Table of Contents >> Show >> Hide
- Why Concrete Pavers Are a Backyard Game-Changer
- Before You Start: Plan the Patio Like a Pro
- Tools and Materials You Will Need
- Step 1: Mark the Layout
- Step 2: Excavate the Area
- Step 3: Compact the Soil
- Step 4: Add and Compact the Gravel Base
- Step 5: Install Edge Restraints
- Step 6: Add and Screed the Bedding Sand
- Step 7: Lay the Concrete Pavers
- Step 8: Fill the Joints
- Step 9: Mist the Surface
- Design Ideas to Make Your Backyard Look Incredible
- Common Mistakes to Avoid
- Maintenance Tips for Long-Lasting Pavers
- Real-World Experience: What You Learn When You Actually Lay Pavers
- Conclusion
Note: This article synthesizes practical paver-installation guidance from reputable U.S. home improvement and hardscape resources, including Lowe’s, The Home Depot, Oregon State University Extension, Belgard, Southern Living, Architectural Digest, and Better Homes & Gardens. Key technical guidance includes planning the patio area, building a compacted base, keeping a proper drainage slope, screeding sand evenly, securing edges, and finishing joints with sand or polymeric sand.
Few backyard upgrades deliver “wait, did we move to a resort?” energy quite like a well-built concrete paver patio. One weekend you have a patch of tired grass and a lonely grill. A few days later, you have an outdoor room ready for string lights, patio chairs, iced tea, and dramatic sunset conversations about absolutely nothing.
Learning how to lay concrete pavers on the ground is not magic, although it may feel like it when your backyard suddenly looks organized, stylish, and suspiciously expensive. The secret is not just placing pavers in a pretty pattern. The real magic happens underneath: excavation, slope, compacted gravel, bedding sand, edge restraints, and joint sand all work together to keep the surface level, attractive, and long-lasting.
This guide walks you through the process in a practical, beginner-friendly way. Whether you want a small backyard sitting area, a garden walkway, a grill zone, or a full patio, concrete pavers can help you create a durable outdoor surface without pouring a permanent concrete slab. Even better, if one paver cracks or stains later, you can usually replace that single piece instead of calling your patio “rustic” and hoping guests believe you.
Why Concrete Pavers Are a Backyard Game-Changer
Concrete pavers are popular because they combine strength, design flexibility, and DIY potential. They come in many shapes, colors, textures, and sizes, making it easy to create everything from a clean modern patio to a cozy cottage-style walkway. Compared with poured concrete, pavers also offer a more modular system. That means repairs are simpler, drainage can be better managed, and the surface can move slightly with soil and weather changes instead of cracking as one solid slab.
For homeowners, concrete pavers are especially attractive because they can define outdoor living spaces. A paver patio can turn a random backyard corner into a dining area. A paver path can guide guests through a garden. A paver pad can give your fire pit a safe, polished-looking home. In other words, pavers do not just cover dirt; they give your backyard a purpose.
Before You Start: Plan the Patio Like a Pro
The first step in any successful paver project is planning. Do not walk outside with a shovel and a dream unless your dream includes redoing the same area twice. Start by deciding where the pavers will go and how the space will be used. A bistro table needs less room than a full outdoor dining set. A walkway should be wide enough for comfortable foot traffic. A grill station should allow space for cooking, serving, and safely stepping around hot surfaces.
Measure the Area
Use a tape measure to calculate the square footage. For a rectangle or square, multiply length by width. For irregular shapes, divide the area into smaller rectangles or squares, calculate each section, then add them together. Buy extra pavers, usually around 5 to 10 percent more than your exact measurement, to allow for cuts, breakage, and the mysterious way one paver always seems to vanish when you need it most.
Choose a Pattern
Common concrete paver patterns include running bond, basket weave, stack bond, herringbone, and random layouts. Running bond is simple and beginner-friendly. Herringbone is strong and visually dynamic, especially for walkways or areas with frequent movement. Large-format pavers create a modern look, while smaller pavers can feel charming and traditional.
Check Drainage and Slope
Drainage is not the glamorous part of patio design, but it is the part that keeps your new backyard masterpiece from becoming a shallow birdbath. The finished paver surface should slope away from the house. A common recommendation is about 1 inch of drop for every 4 feet of distance, which helps move water away from foundations and prevents pooling.
Tools and Materials You Will Need
Having the right tools makes the job smoother and saves you from using a soup spoon as a landscaping instrument. For most concrete paver projects, you will need stakes, string line, tape measure, marking paint, shovel, rake, wheelbarrow, level, hand tamper or plate compactor, rubber mallet, broom, garden hose, straight 2-by-4 board, and safety gear such as gloves, eye protection, and knee pads.
Materials typically include concrete pavers, crushed gravel or paver base, bedding sand, edge restraints, landscape fabric if appropriate for your soil and project, spikes for the edging, and joint sand or polymeric sand. For larger patios, renting a plate compactor is highly recommended. Your arms may be enthusiastic, but compacting a patio base by hand is how weekend projects become family legends.
Step 1: Mark the Layout
Use stakes and string to outline the area. For curved designs, a garden hose or landscape marking paint can help you visualize the shape. Take your time here. The layout determines the final look, and it is much easier to move a string line than to move 400 pounds of gravel after realizing your patio is shaped like a confused pancake.
Check that corners are square if you are building a rectangular patio. Measure diagonally from corner to corner; matching diagonal measurements indicate a square layout. For walkways, stand back and look at the flow. A slight curve can look natural in a garden, while a straight line often works well for modern or formal landscapes.
Step 2: Excavate the Area
Excavation depth depends on the thickness of your pavers, the bedding sand, and the gravel base. For many patios and walkways, homeowners commonly remove enough soil to allow several inches of compacted base, about 1 inch of bedding sand, and the paver thickness. The Home Depot’s paver patio guidance, for example, refers to using about 4 inches of paver base and about 1 inch of paver sand before setting stones. Lowe’s patio guidance describes building a deeper compacted gravel base in layers for strong support.
Remove grass, roots, loose soil, and debris. Dig slightly beyond the final patio edge to allow room for edge restraints. Keep checking depth and slope as you excavate. If the ground has soft spots, dig them out and replace them with compacted base material. A beautiful patio built on unstable soil is like wearing a tuxedo over pajamas: impressive briefly, questionable later.
Step 3: Compact the Soil
Once the area is excavated, compact the soil. This step creates a firm subgrade that supports the paver system. Use a hand tamper for small projects or a plate compactor for larger areas. The soil should feel solid underfoot and should not shift or bounce when walked on.
If your yard has clay-heavy soil or drainage problems, consider consulting a local landscape professional before continuing. Pavers are forgiving, but they are not miracle workers. Proper drainage and a stable foundation are essential for long-term success.
Step 4: Add and Compact the Gravel Base
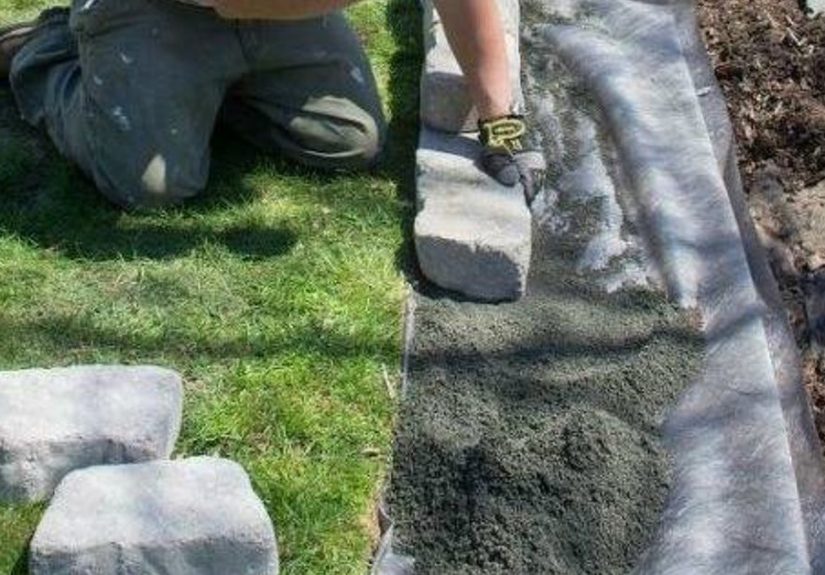
The gravel base is the backbone of your paver patio. Spread crushed stone or paver base evenly over the excavated area. For best results, add it in layers rather than dumping the full depth all at once. Lowe’s recommends adding gravel in 2- to 3-inch layers, moistening it, and compacting each layer while maintaining the slope.
Compaction is crucial. A poorly compacted base can settle over time, creating low spots, uneven pavers, and ankle-twisting surprises. Run the plate compactor over the base in overlapping passes. Lightly misting the gravel can help it settle and compact more effectively, but do not soak it into a mud smoothie.
Step 5: Install Edge Restraints
Edge restraints hold the pavers in place and prevent the patio from spreading outward over time. Without them, your neat paver layout may slowly drift like a committee with no agenda. Install edging along the perimeter according to the manufacturer’s instructions, using spikes to secure it firmly into the base.
For straight patios, rigid edge restraints work well. For curves, flexible edging is easier to shape. Make sure the restraints follow your layout accurately and sit at the correct height so they do not interfere with the finished paver surface.
Step 6: Add and Screed the Bedding Sand
Bedding sand creates a smooth, level layer for the pavers. Spread about 1 inch of sand over the compacted base. A common technique is to place parallel PVC pipes or metal conduit on the base, pour sand between them, and drag a straight 2-by-4 across the pipes to screed the sand evenly. The Home Depot and Lowe’s both describe using pipes or conduit as screed guides for creating a consistent sand layer.
Do not compact the bedding sand before laying pavers unless your specific system calls for it. Avoid walking on the screeded sand. If you must step into the area, use a board to distribute your weight. Once the sand is smooth, remove the pipes and fill the gaps with more sand, carefully leveling those areas.
Step 7: Lay the Concrete Pavers
Start laying pavers from a straight edge, such as the house, a walkway, or a string line. Place each paver gently onto the sand. Do not drag it, because dragging disturbs the bedding layer. Work outward in your chosen pattern, keeping joints consistent.
Use a rubber mallet to tap pavers into place if needed. Check alignment often with a string line. Small errors grow as the pattern expands, and by the time you notice, your patio may be leaning visually toward “abstract art installation.”
If you are installing pavers on a slope, many installation guides recommend working from the lower area upward so the pavers stay tight and aligned. For edges, curves, or obstacles, you may need to cut pavers with a masonry saw, wet saw, or splitter. Always wear eye and hearing protection when cutting concrete pavers.
Step 8: Fill the Joints
Once all pavers are placed, sweep joint sand or polymeric sand across the surface so it fills the spaces between pavers. Polymeric sand contains binders that activate with water, helping lock joints in place and reduce weed growth and erosion. Southern Living notes that polymeric sand can help discourage weeds and insects when used correctly, and The Home Depot recommends removing excess sand before misting to avoid haze on the paver surface.
Use a broom to work the sand into the joints. A plate compactor with a protective pad can help settle the pavers and sand, but check your paver manufacturer’s recommendations first, especially for textured or delicate finishes. After the joints are filled, sweep or blow off all excess sand before adding water. This is important. Polymeric sand left on the surface can harden into a cloudy film, which is not the elegant “aged stone” look anyone asked for.
Step 9: Mist the Surface
Lightly mist the paver surface according to the sand manufacturer’s instructions. The goal is to activate the binder without washing sand out of the joints. Use a gentle spray, not a pressure-washer blast that makes your patio look like it just survived a weather event.
Allow the surface to cure as directed. Keep foot traffic, furniture, pets, and enthusiastic children off the area until the joints have hardened properly. Your patio has waited this long to become fabulous; give it a little quiet time.
Design Ideas to Make Your Backyard Look Incredible
Create a Dining Zone
A rectangular paver patio near the kitchen or back door makes outdoor dining easy. Choose larger concrete pavers for a modern look, then add a table, comfortable chairs, and warm lighting. A border in a contrasting paver color can make the patio look custom-designed.
Build a Fire Pit Area
Concrete pavers can define a cozy fire pit zone. Arrange seating in a circle or square, leaving enough room for safe movement. Check local fire codes and manufacturer instructions before placing a fire pit on or near pavers, especially if using wood-burning models.
Add a Garden Walkway
A paver walkway can connect the patio to a shed, garden bed, gate, or side yard. For a softer look, leave small planting beds along the edges. Ornamental grasses, lavender, creeping thyme, or low-growing perennials can make the path feel intentional and lush.
Mix Pavers With Gravel
For a relaxed backyard style, set large concrete pavers with gravel between or around them. This design works especially well for casual seating areas and garden paths. Just remember that even informal designs still need a stable base and good drainage.
Common Mistakes to Avoid
The most common paver mistake is rushing the base. A patio is only as good as what is underneath it. Skipping compaction, using too little gravel, or failing to maintain slope can lead to settling, puddling, and uneven surfaces.
Another mistake is using too much bedding sand. Sand is for leveling, not for correcting major depth problems. A thick sand layer can shift and create instability. Keep the base accurate, then use the bedding sand as a final smooth layer.
Homeowners also sometimes forget edge restraints. The pavers may look solid at first, but over time, traffic and weather can push them outward. Edge restraints are not optional decoration; they are the quiet security guards of your patio.
Finally, do not overwater polymeric sand. Follow the product instructions carefully. Too little water may fail to activate the binder, while too much water can wash the sand out or create residue.
Maintenance Tips for Long-Lasting Pavers
Concrete pavers are relatively low-maintenance, but they still appreciate basic care. Sweep regularly to remove leaves, dirt, and debris. Rinse with a garden hose when needed. Remove stains promptly, especially grease near grills or food spills near dining areas.
Inspect the joints occasionally. If sand has washed out, refill it. Pull weeds early before they become established. If you use polymeric sand, follow the manufacturer’s guidance for repairs and reapplication. Some homeowners also choose to seal pavers every few years to enhance color and protect against stains, although sealing requirements vary by product, climate, and personal preference.
Real-World Experience: What You Learn When You Actually Lay Pavers
On paper, laying concrete pavers looks beautifully simple: dig, base, sand, pavers, done. In real life, you quickly discover that the ground has opinions. One corner may be packed hard as a driveway, while another behaves like chocolate cake. That is why patience during excavation and compaction matters so much. The best-looking paver patios are usually not created by people who rush; they are created by people who stop, check the level, adjust the base, and keep going.
One practical lesson is to organize materials before the hard work begins. Stack pavers near the project area, but not directly where you need to dig or move wheelbarrows. Keep gravel and sand accessible. Have your tools ready. Nothing breaks momentum faster than realizing the rubber mallet is in the garage, the broom is in the shed, and the tape measure has entered the witness protection program.
Another experience-based tip is to start small if this is your first project. A 6-by-8-foot sitting area teaches nearly all the same skills as a large patio, but with fewer materials and less pressure. Once you understand excavation, base depth, slope, screeding, and joint filling, a larger project feels much more manageable. Confidence is built one paver at a time.
Weather also matters. Avoid starting right before heavy rain, especially after screeding the sand. Rain can disturb the bedding layer and turn your work area into a gritty slip-and-slide. Hot weather can be challenging too, so start early in the morning, drink water, and take breaks. Your patio will not be impressed if you heroically overheat beside a wheelbarrow.
When laying pavers, keep checking your pattern. Step back often and look at the whole surface. It is much easier to correct a slightly crooked row after five pavers than after fifty. If something looks off, fix it immediately. Future you will be grateful, and future guests will never know how close your patio came to becoming a geometry crime scene.
Cutting pavers is another area where experience helps. Measure twice, mark clearly, and cut slowly with proper safety gear. For highly visible edges, place cut pieces neatly and consistently. For less visible areas near planting beds, minor imperfections can often be softened with mulch, border plants, or edging. Landscaping is very forgiving that way; a well-placed fern can hide many sins.
Finally, the finishing touches make a huge difference. Once the pavers are installed, add furniture that fits the scale of the patio. Use outdoor rugs, planters, lanterns, cushions, and string lights to soften the hardscape. Concrete pavers create the structure, but decor creates the mood. A simple paver pad can become a morning coffee spot, a weekend barbecue zone, or the best reading corner in the houseexcept it is outside, so the birds get to judge your book choices.
Conclusion
Laying concrete pavers on the ground is one of the most rewarding backyard upgrades a homeowner can tackle. The finished result can look polished, expensive, and completely custom, but the process is built on simple principles: plan carefully, excavate properly, compact the base, maintain drainage, screed the sand, lay the pavers evenly, secure the edges, and finish the joints correctly.
The biggest takeaway is this: do not underestimate the base. Beautiful pavers get the compliments, but the gravel underneath does the heavy lifting. When you build from the ground up with patience and accuracy, your backyard can become more usable, more attractive, and much more inviting. Add a few chairs, some plants, and a little lighting, and suddenly your outdoor space is not just a yard. It is a destination.





