Table of Contents >> Show >> Hide
- The One Rule That Changed Everything: Make It a Destination
- Step 1: I Picked the Spot Like a Slightly Overdramatic Realtor
- Step 2: I Sketched First, Bought Stuff Later (A Personal Miracle)
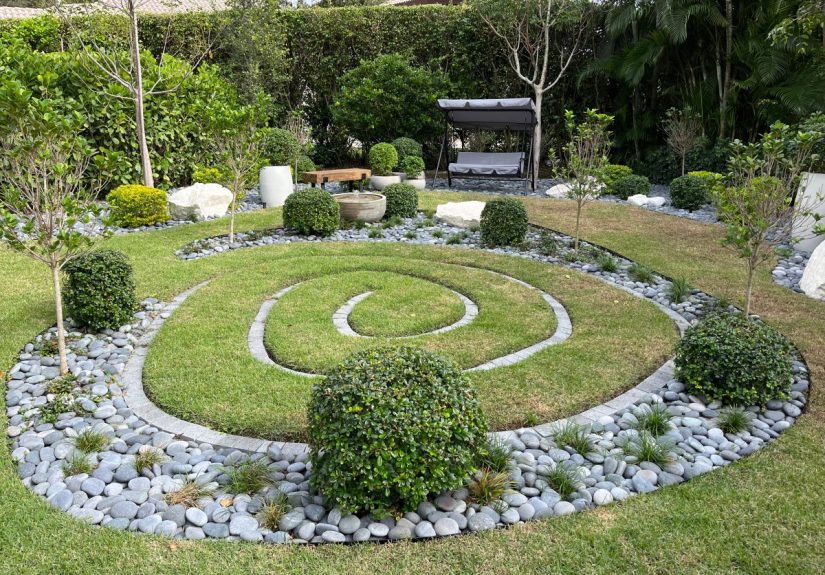
- Step 3: I Built Boundaries That Feel Like a Hug, Not a Wall
- Step 4: I Laid a Path That Forces Me to Slow Down
- Step 5: I Chose One Focal Point (Because My Brain Needs a North Star)
- Step 6: I Added Water Without Starting a Full-Time Pond Hobby
- Step 7: I Planted for the Five Senses (Not Just the Pretty Photos)
- Step 8: I Made It Accessible and Safe (Future-Me Sends a Thank-You Note)
- Step 9: I Turned Maintenance Into a Meditation Instead of a Chore
- If You Have a Small Space, You Can Still Build a Meditation Garden
- The Rituals That Made Me Actually Use the Garden
- Extra: The Part They Don’t Show in the “After” Photo (About of Real-Life Lessons)
- Conclusion
I didn’t set out to build a meditation garden. I set out to build a place where my brain would stop
opening fifteen tabs at oncetwo of them labeled “panic,” one labeled “did I reply to that email,” and one labeled
“what if I secretly hate cilantro.” I wanted a backyard sanctuary that could outcompete my phone, my to-do list,
and (politely) my neighbors’ leaf blower.
What I ended up with is a small-but-mighty mindfulness gardenpart Zen, part sensory playground, part “I swear
I’m only going outside for five minutes” trap. If you’ve ever dreamed of a garden for relaxation that
feels like a retreat, here’s exactly how I designed it, built it, and made it so inviting I now negotiate with
myself before going back inside.
The One Rule That Changed Everything: Make It a Destination
The biggest upgrade I made wasn’t a fancy fountain or imported stones. It was this: I stopped thinking “yard,” and
started thinking destination. A meditation garden works best when it feels like a place you arrive,
not just a patch of outdoors you happen to own.
That meant creating a subtle “threshold” (even if it’s just stepping through an arch of plants), and a clear reason
to slow down. Japanese-inspired design is especially good at thisencouraging you to choose whether your space is for
exploration (strolling) or contemplation (stillness), and designing accordingly.
Step 1: I Picked the Spot Like a Slightly Overdramatic Realtor
I walked my yard at three different times of day like I was touring homes: “Nice light… questionable wind… ah yes,
the neighbor’s dog soundtrack is strong here.” The goal was to find a corner with:
- Calmer sound (or at least the potential to mask noise)
- Comfortable light (morning sun is my personal favorite for meditation)
- A decent view (or at least a view I could improve)
- Enough room to sit without feeling like I’m meditating in a hallway
I picked a spot that already felt slightly “separate,” then committed to making it feel intentionally secluded
not isolated, not gloomy, just gently protected. Think: cozy refuge, not witness protection.
Step 2: I Sketched First, Bought Stuff Later (A Personal Miracle)
I am not naturally a “measure twice, cut once” person. I’m more of a “cut once, then stare into the middle distance”
person. So I forced myself to make a simple plan before buying anything. A good landscape plan starts with a base
drawing of what already exists, followed by a site inventory (sun, shade, drainage, views), then a wish list of
“use areas” (reading nook, walking path, seating, water feature), and only then plant selection.
My no-fancy-software planning process
- Base sketch: property edges, existing structures, and the area I’m actually working on.
- Inventory overlay: sun/shade patterns, noisy zones, good views, bad views, soggy spots.
- Wish list: “I want to sit,” “I want to walk slowly,” “I want privacy,” “I want birds.”
- Zones: meditation seat, sensory planting area, a focal point, a “buffer” edge.
- Phasing: hardscape first (path, edging), then plants, then extras like lighting.
This planning step saved me from the classic mistake of buying plants first and then playing botanical Tetris with
my future.
Step 3: I Built Boundaries That Feel Like a Hug, Not a Wall
Every solid meditation space needs some degree of privacy. Not fortress-level privacy. More like
“my shoulders can drop” privacy. I used a layered approach:
- Outer layer: taller shrubs and a small ornamental tree to soften sightlines
- Middle layer: medium perennials with movement (grasses) to add gentle motion
- Inner layer: low groundcovers to calm the visual “floor” of the garden
I also took a cue from Japanese landscape guidance I love: don’t get “carried away” by a cool object just because
it’s cool. If it doesn’t actually contribute to the scene, it’s clutter with a better résumé. So instead of
sprinkling decor everywhere, I kept the edges clean and let the plants do most of the emotional labor.
Step 4: I Laid a Path That Forces Me to Slow Down
A path is underrated therapy. It gives your body something simple to do while your mind catches up. I made mine
gently curvingenough to feel like a stroll, not so much that I needed a map and a snack break.
Path tips that helped my “I’ll do it later” personality
- Choose a forgiving surface: decomposed granite, mulch, or stepping stones with groundcover.
- Make the path purposeful: it should lead to a seat or a focal point, not nowhere.
- Hide the end a little: letting the path disappear around a curve makes even small spaces feel larger.
This one change made the garden feel like an experience instead of an arrangement of objects.
Step 5: I Chose One Focal Point (Because My Brain Needs a North Star)
In a meditation garden, a focal point is basically a friendly place to rest your attention when your mind tries to
wander off and start a new career as an improv comedian. It can be a statue, a boulder, a lantern, a striking plant,
or wateranything that gently anchors you.
I picked a single sculptural stone and gave it “breathing room” around it. That negative space is part of the
calming effect. The goal is not “more.” The goal is “enough.”
Step 6: I Added Water Without Starting a Full-Time Pond Hobby
Water is the cheat code of calm. It masks street noise, adds movement, and turns a regular corner of the yard into a
restorative space. But I also know myself: if my water feature requires a chemistry degree, it will become a sad
decorative bowl of regret.
My “low-drama water” options
- Bubbling urn or small recirculating fountain: soothing sound, minimal maintenance.
- Birdbath with a dripper: attracts birds and creates gentle motion.
- Simple basin + small pump: the “quiet luxury” of water without a major install.
I placed my fountain close enough to the seating area that I can actually hear itbecause the whole point is to
calm the nervous system, not decorate it from afar.
Step 7: I Planted for the Five Senses (Not Just the Pretty Photos)
The most “sticky” meditation gardens are sensory gardens in disguise. When you give your senses
something gentle to noticefragrance, texture, rustling leaves, seasonal colormindfulness becomes easier. You’re not
forcing presence; you’re being invited into it.
How I designed each sense
Sight: softer structure, fewer visual arguments
I avoided a chaotic rainbow of blooms and leaned into greens, silvers, and a few deliberate pops of color. Form and
texture did the heavy lifting: rounded shrubs, feathery grasses, and one small tree with interesting branching.
Sound: water + “plant-made music”
I intentionally planted a few things that rustle in the breeze (ornamental grasses and small-leaved shrubs) and
positioned the fountain where it could mask neighborhood noise. The garden got noticeably calmer the moment sound
became part of the design.
Smell: fragrance where you can actually reach it
I put herbs and fragrant plants near the path and the seating areaclose enough to brush with a hand. (Pro tip:
fragrance doesn’t travel far if the wind doesn’t cooperate. Put it near your nose.)
Touch: textures that beg to be petted (in a normal way)
I mixed soft foliage, smooth leaves, and feathery grasses. If a plant made me want to touch it, it earned a spot.
Wildlife: the easiest way to feel “not alone”
Birds, butterflies, and pollinators don’t just add beautythey add a sense of living rhythm. I included plants that
support them and kept a clean water source available. Watching wildlife is its own meditation.
Step 8: I Made It Accessible and Safe (Future-Me Sends a Thank-You Note)
I stole ideas from therapeutic garden design because it’s practical genius. Wide, stable paths. Seating in sun and
shade. Comfortable places to pause. A layout that feels secure, not exposed. The goal is a garden you can use on
your best days and your worst days.
- Comfortable seating: one primary spot, plus a secondary perch for variety.
- Easy navigation: no “ankle-breaking decorative gravel surprises.”
- Benign choices: I minimized harsh chemicals and prioritized simple maintenance.
- Clear edges: defined borders help the space feel orderly and supportive.
I also aimed for a “mostly green” spacelots of foliage, fewer hard surfacesbecause restorative gardens often lean
heavily on greenery for a calming effect.
Step 9: I Turned Maintenance Into a Meditation Instead of a Chore
Here’s the plot twist: a meditation garden doesn’t stay peaceful by accident. It stays peaceful because you keep it
from turning into a jungle that whispers, “You have failed.” The key is designing for low maintenance from the
beginning.
My low-maintenance rules
- Choose plants suited to your conditions (the right plant in the right place is basically free therapy).
- Repeat a few plants instead of collecting one of everything like it’s a botanical Pokémon game.
- Use mulch or groundcover so weeds don’t throw a party.
- Do “tiny maintenance” often (five minutes beats one weekend of resentment).
Some days my meditation is literally pulling three weeds and calling it spiritual growth. No one needs to know.
If You Have a Small Space, You Can Still Build a Meditation Garden
You don’t need an acre. You need a feeling. A small Zen garden corner can be:
- A container cluster with fragrance and texture
- A tiny gravel tray you rake like a very calm tiny dragon
- A bench + one focal plant + a screen or tall grasses for privacy
- A simple water bowl with a small bubbler
The design principles scale down beautifully: threshold, enclosure, focal point, sensory plants, and a place to sit.
The Rituals That Made Me Actually Use the Garden
Building it was only half the win. Using it consistently was the real prize. I borrowed a mindfulness idea: make it
daily, make it simple, and anchor it to something you already do.
My three “I can’t talk myself out of this” rituals
- Morning sit: 3 minutes. No timer drama. Just sit, breathe, notice sound and light.
- One-sense scan: choose one sense (sound, smell, touch) and focus on it for 60 seconds.
- Slow lap: walk the path once, deliberately. That’s it. That’s the practice.
Gardening itself became part of it. Watering? Mindfulness. Pruning? Mindfulness. Staring at a leaf like it’s a work
of art? Surprisingly effective.
Extra: The Part They Don’t Show in the “After” Photo (About of Real-Life Lessons)
Let me tell you what happened after I declared the garden “done.” (Spoiler: gardens laugh at the concept of “done.”)
The first week, I sat out there like a proud raccoon who just found an entire pizza. I meditated. I drank tea. I
stared into the middle distance and felt extremely wise. Then, reality showed up wearing muddy boots.
Lesson one: your meditation garden will immediately reveal what stresses you out. For me, it was
visual clutter. A single crooked edging stone bothered me more than it should have. I’d sit down to breathe and my
mind would hiss, “That paver is not aligned.” Instead of fighting it, I treated it like a diagnostic tool: if I keep
noticing something, either fix it or remove it. I straightened the paver. My brain relaxed. A tiny victory for both
of us.
Lesson two: sound matters more than you think. The day my neighbor started a power tool marathon,
my beautiful garden felt like a spa located inside a hardware store. That’s when I truly appreciated the fountain.
I adjusted the flow so the water sound was slightly louder, and I shifted my seating angle away from the noise.
Suddenly the garden felt like my space again. It wasn’t about blocking every sound; it was about giving my nervous
system something gentler to lock onto.
Lesson three: comfort is spiritual. I originally bought a bench that looked great and felt like a
decorative torture device. Five minutes in, my back would file a formal complaint. I replaced it with a seat that
actually supported my body, added a weather-friendly cushion, andthis is the glamorous partmade sure I had a small
surface for tea. The number of times I used the garden doubled. Comfort isn’t an indulgence in a relaxation garden;
it’s the entire point.
Lesson four: plants teach patience, whether you asked or not. I planted some perennials and then
stared at them daily like, “Grow faster, I have inner peace scheduled for Thursday.” It turns out that waiting is
part of the practice. Watching a space fill in slowly made me return to it more often, which made the garden more
meaningful. It became a relationship, not a project.
Lesson five: maintenance is either a fight or a ritual. I tried “ignoring weeds” for a while. The
weeds did not ignore me back. So I switched tactics: I started doing a five-minute tidy after my morning sit. Just a
few weeds, a quick sweep, a rinse of the birdbath. The garden stayed calm, and I stayed out of the weekend spiral of
“why did I do this to myself.”
And the biggest lesson? I didn’t create a perfect place. I created a reliable one. A place that
gently nudges me toward presencethrough sound, texture, shade, and small moments of care. I still have messy days.
I still overthink things. But now I have a spot outside that makes it easier to come back to myself. Also: birds.
Birds help a lot.
Conclusion
A meditation garden isn’t about copying a magazine spread or building a picture-perfect Zen scene. It’s about
designing a space that supports your attention: a clear destination, gentle enclosure, a place to sit, sensory
plantings, and a few calming elements (water is the MVP). Start small, plan intentionally, and let the garden become
a practicenot a performance.




