Table of Contents >> Show >> Hide
- What Is a Sparkle Ball Light, Exactly?
- Why DIYers Love Sparkle Ball Lights
- Materials You’ll Need
- Two Rules That Matter Most Before You Start
- How to Make a DIY Sparkle Ball Light
- Design Ideas for a More Beautiful Sparkle Ball
- Where to Display a DIY Sparkle Ball Light
- Common Mistakes to Avoid
- How Much Does It Cost?
- Why This DIY Still Feels Fresh
- Conclusion
- SEO Tags
Some projects are practical. Some are pretty. And some look like a disco ball and a porch lantern had a very festive baby. That, dear reader, is the magic of a DIY sparkle ball light.
A sparkle ball is a round light made from clear plastic cups and a strand of mini LED lights. It sounds delightfully odd on paper, but once it’s glowing, the effect is pure charm. Each cup catches and bounces the light, creating a twinkly, faceted shine that feels part retro holiday decor, part backyard party mood lighting, and part “Wait, you made that yourself?” bragging rights.
The best part is that this DIY sparkle ball light is not complicated. You do not need a workshop the size of a television set. You do not need to be an electrician. You mostly need patience, a few basic supplies, and a willingness to staple plastic cups into a giant luminous orb like it is the most normal hobby in the world.
Whether you want a glowing decoration for your porch, patio, pergola, holiday setup, or year-round cozy corner, this project delivers big visual impact for a pretty modest effort. Here’s how to make one, style it, and avoid the mistakes that turn “awesome” into “why is this thing shaped like a confused potato?”
What Is a Sparkle Ball Light, Exactly?
A DIY sparkle ball light is a handmade sphere built by joining plastic cups into a globe and threading mini string lights through the cup openings. The cups act like little reflective chambers, which is why the finished ball glows with more sparkle and texture than a plain string of lights ever could.
Think of it as the budget-friendly cousin of a designer pendant and the crafty cousin of a disco ball. It throws soft, playful light, looks great in photographs, and brings instant personality to indoor or outdoor spaces. Because the shape is round and sculptural, it works as both decor and lighting accent.
DIYers love it because it feels clever. You are taking everyday materials and transforming them into something that looks whimsical, custom, and surprisingly polished. In other words, it is peak “I made this with cups from the store and somehow now my porch looks magical.”
Why DIYers Love Sparkle Ball Lights
There are plenty of reasons this project has stuck around in craft and home-decor circles. First, it is affordable compared with many ready-made statement lights. Second, it is highly customizable. You can go classic with warm white lights, colorful with multicolor LEDs, icy with cool white, or dramatic with a themed palette for parties and holidays.
It is also flexible in how you use it. A sparkle ball can hang from a tree branch, glow from a shepherd’s hook, sit in a planter, cluster in a corner of a patio, or become a cheerful holiday focal point on the porch. One light ball is cute. A group of three looks intentional, artsy, and just a little bit smug in the best way.
And unlike some DIY decor projects that look great online but tragic in real life, this one tends to be forgiving. Minor imperfections disappear once the lights are on. The glow does a lot of heavy lifting. Frankly, sparkle is a generous editor.
Materials You’ll Need
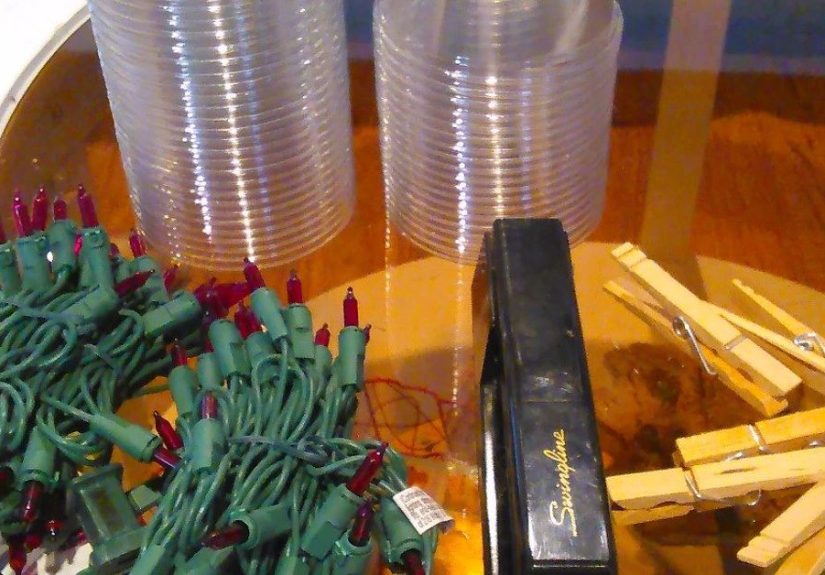
- 50 clear plastic cups for one standard sparkle ball
- One strand of mini LED string lights
- A stapler and staples, or another cup-joining method
- A drill, soldering tool, or heated tool to make holes in the cup bottoms
- Binder clips or clothespins to hold sections in place while assembling
- Zip ties or hanging hardware if you plan to suspend the ball
- An outdoor-rated extension cord if the sparkle ball will be used outside
- Weatherproof plug protection for outdoor setups
Clear cups usually create the brightest, cleanest sparkle. Frosted cups soften the effect a bit. Red cups? Funny for a cookout, less ideal for elegant glow. Unless your design vision is “tailgate chic,” stick with clear.
Two Rules That Matter Most Before You Start
Use LED mini lights, not old-school hot bulbs
This is the big one. A sparkle ball is made of plastic cups, and plastic has a famously poor relationship with heat. Modern LED string lights are the smart choice because they run cooler, are more energy efficient, and are generally better suited to decorative DIY lighting. They also come in more color options and often last longer, which is nice when you do not want to rebuild your glowing orb every season.
Match the light string to the location
If your sparkle ball will live outdoors, use outdoor-rated lights and outdoor-rated extension cords. Plug the setup into a GFCI-protected outlet, keep connections protected from moisture, and never use damaged cords or frayed strands. This is still decor, not a science experiment in avoidable regret.
How to Make a DIY Sparkle Ball Light
- Prep the cups. Make a hole in the bottom of each cup. The hole should be large enough for a mini LED bulb or small section of the light strand to fit through securely. Keep the hole centered so the light ball assembles more evenly.
- Build the first ring. Start by stapling cups together side by side to form a ring. Some makers build in smaller clustered sections first, then connect them. Either way, the goal is a curved shape that begins forming part of the sphere.
- Create the upper half. Continue attaching rows of cups until you have a rounded bowl shape. Use clips to hold cups in place before stapling if the plastic gets slippery or the alignment starts acting dramatic.
- Repeat for the second half. Make another matching half. This is where symmetry matters most. A little wobble is fine. A lopsided moon rock is less ideal.
- Test-fit the lights. Before closing the ball, thread the LED strand through the holes so each cup gets illuminated. Work methodically to avoid tangles. Start near the plug end and snake the strand around the structure instead of forcing it.
- Leave an exit path for the cord. One section should allow the cord to come out cleanly without pinching or bending sharply. You want the finished ball to look neat, not like it swallowed a cable in a panic.
- Join the halves. Staple or secure the two halves together once the lights are in place. Double-check that the cups sit snugly and the globe feels stable.
- Light it up and adjust. Plug it in and step back. Shift any cups that block the glow unevenly, tuck loose wire sections, and make sure the ball hangs or sits the way you want.
The shape does not have to be mathematically perfect. In fact, part of the handmade charm is that it feels a little organic. Once illuminated, your eye notices the shimmer first and the geometry second.
Design Ideas for a More Beautiful Sparkle Ball
Go classic with warm white
Warm white LED lights make the sparkle ball feel cozy, vintage-inspired, and easy to blend into almost any decor style. This version works beautifully on porches, patios, and covered entryways.
Use color for personality
Multicolor lights turn the sparkle ball playful and nostalgic. Red and green feel holiday-ready. Soft pastels work for spring parties. Blue and white can feel icy and wintery. Amber and orange make it feel like fall got dressed up for dinner.
Cluster different sizes
A single sparkle ball is fun, but a small grouping creates a stronger visual statement. Hang three at varying heights over a seating area, or arrange them in different corners of a porch for a layered glow.
Mix it with other lighting
Sparkle balls work especially well with other ambient lighting. Pair them with patio string lights, lanterns, candles, or soft overhead fixtures. Layered lighting creates depth and makes the setup feel intentional rather than random.
Where to Display a DIY Sparkle Ball Light
This project is more versatile than people expect. Try a sparkle ball in these spaces:
- Hanging from a porch ceiling for instant curb appeal
- Suspended from a pergola or patio beam for party-ready glow
- Nestled in a large planter for a sculptural look
- Grouped in a backyard seating area as accent lighting
- Used as playful holiday decor along a front walkway
- Hung indoors in a craft room, sunroom, or teen bedroom
Outdoors, it helps to think about shape and sight lines. A sparkle ball looks best where it has room to be noticed. Give it a little breathing room instead of hiding it in a visually busy spot where it has to compete with ten other decorations and a confused inflatable snowman.
Common Mistakes to Avoid
The first mistake is using the wrong lights. Skip older hot-running strands and choose LEDs. The second is ignoring electrical safety outdoors. Always use products rated for the environment, protect plugs from moisture, and inspect cords before use.
Another common mistake is rushing the shape. If the cup rows are wildly uneven, the ball can end up looking dented. Take a little extra time during assembly, especially when forming the two halves. Small adjustments early save a lot of muttering later.
Finally, do not hang a heavy outdoor setup with flimsy hardware. Use secure hooks, support lines, or sturdy hanging points. For longer spans or grouped displays, extra support can keep everything looking crisp instead of saggy.
How Much Does It Cost?
One reason this project remains so popular is that it usually costs less than buying a decorative statement light. If you already have a stapler, clips, and a drill, the main expense is the cups and the LED light strand. That makes the sparkle ball a great high-impact, low-drama decor project for holidays, parties, or year-round ambiance.
Why This DIY Still Feels Fresh
Trends come and go, but sparkle balls keep hanging around because they do two things well: they create atmosphere and they tell a story. Store-bought decor can be beautiful, but a handmade light ball has personality. It says somebody had an idea, gathered some simple materials, and made a glowing sculpture just because the world could use more twinkle.
It also lands in a sweet spot between crafty and stylish. Done well, it feels festive without being cheesy, playful without looking childish, and affordable without looking cheap. That is a pretty nice trick for a bunch of plastic cups.
Conclusion
A DIY sparkle ball light is one of those wonderfully weird home projects that looks far more impressive than its material list suggests. With clear cups, LED string lights, and a little patience, you can make a glowing orb that brings warmth, whimsy, and a surprising amount of charm to your home. It works for the holidays, but it does not have to stay there. On a porch, patio, pergola, or cozy indoor corner, a sparkle ball light adds instant mood and handmade personality. In a world full of forgettable decor, this project sparkles on purpose.
Extra: Real-Life Experiences With a DIY Sparkle Ball Light
The funniest thing about making your first sparkle ball is how skeptical you are at the beginning. You set out a stack of plastic cups, a light strand, and a stapler, and it absolutely does not look like the makings of something elegant. It looks like you are preparing for a very low-budget science fair. Then the shape starts coming together. One row becomes two, the sphere starts to curve, and suddenly the project begins to make sense in the most satisfying way.
Many people discover that the best moment is not even the final hanging. It is the first test plug-in. Before that moment, the sparkle ball is just a plastic object with ambition. After that moment, it comes alive. The cups catch the light in dozens of tiny angles, and even a simple warm white strand looks richer and more textured than expected. The glow is soft but dramatic, cheerful without being harsh, and oddly comforting in the way only ambient lighting can be.
There is also a surprising emotional payoff to this project. A sparkle ball often becomes the decoration people ask about first. Guests notice it on the porch. Neighbors slow down to look. Family members say, “You made that?” with the kind of suspicion that is secretly a compliment. It has a handmade quality that invites conversation, and because it is a little quirky, people tend to remember it.
Another real-world joy is how adaptable it feels over time. One year, you might use warm white lights for a classic holiday look. The next year, you swap in colorful LEDs and suddenly it feels playful and retro. For a summer gathering, the same sparkle ball can move to the patio and look perfectly at home with planters, string lights, and outdoor dinnerware. It does not have to be locked into one season or one style. That flexibility makes the project feel worth the effort.
Of course, the experience is not all cinematic glowing magic. There is usually one mildly annoying phase where the cord tangles, a cup shifts out of line, or a staple decides to become an enemy of progress. That is normal. Sparkle balls reward patience more than speed. The people who enjoy the process most are usually the ones who lean into the weirdness of it. They accept that for one afternoon, their great artistic mission is to wrestle cups into a sphere and pretend this is a perfectly reasonable life choice.
Once finished, though, the project tends to earn its place. A sparkle ball gives off more than light. It creates mood. It softens a corner of the yard, makes a porch feel welcoming, and turns an ordinary evening into something a little more festive. Even when it is not the main light source, it changes the atmosphere around it. That is why so many DIYers end up making more than one. The first sparkle ball feels like an experiment. The second feels like a decorating strategy. By the third, you have accepted your fate and become the person with glowing cup orbs on the patio. Honestly, there are worse destinies.




