Table of Contents >> Show >> Hide
- 1. Painted Stripe and Color-Block Ornaments
- 2. Velvet-Wrapped Ornaments
- 3. Faux Frost and Crystal Ornaments
- 4. Honeycomb Paper Ball Ornaments
- 5. Felt Characters and Whimsical Critters
- 6. Photo Ornaments That Tell Your Family Story
- 7. Glass Photo Globes and Clear Baubles
- 8. Wood Slice Ornaments from Tree Trunks
- 9. Rustic DIY Wood Photo Ornaments
- 10. Family Tree Ornaments
- 11. Personalized Name Ornaments
- 12. Yearly Milestone Ornaments
- 13. Glitter Swirl Ornaments
- 14. Pressed Botanical and Eucalyptus Ornaments
- 15. Ribbon-Wrapped and Bow-Topped Ornaments
- 16. Ornament Clusters for Big Visual Impact
- 17. Paper Chain and Paper Accent Ornaments
- 18. Kids’ Handprint and Keepsake Ornaments
- 19. Upcycled and Thrifted Ornament Makeovers
- 20. Company or Brand Color Ornaments
- 21. Monochrome Statement Ornaments
- 22. Heirloom-Inspired Ornaments
- 23. Themed Ornament Sets (But Make Them Personal)
- 24. Minimalist Ornaments with Intentional Negative Space
- 25. Custom Printed Photo and Text Ornaments
- How to Pull All 25 Ornament Ideas into One Custom Tree
- Real-Life Tips and Experiences for Decorating Custom Ornaments
- Start with One “Anchor” Idea
- Batch Your Ornament Projects
- Use Trends as Inspiration, Not Strict Rules
- Plan for Sentimentality
- Label the Back of Your Ornaments
- Make Space for Kids’ Creativity
- Use Ornament Decorating as a Tradition
- Think About Storage While You Craft
- Balance Perfection and Play
- Let Your Tree Evolve Over Time
If you’ve ever stared at a box of plain baubles and thought, “You deserve better,” this guide is for you. Custom Christmas ornaments are one of the easiest ways to turn a basic tree into a personal storybook of your life, your style, and your favorite glitter. From trendy velvet and paper designs to sentimental photo keepsakes, we’ll walk through 25 creative ways to decorate ornaments so your Christmas tree looks completely customwithout needing Santa’s workshop budget.
Recent Christmas decor trends lean heavily into personalization, mixed textures, and handmade charm. Think velvet finishes, honeycomb paper ornaments, photo baubles, and natural elements like eucalyptus, pinecones, and wood slices that give your tree character and warmth. With these ideas, you can mix store-bought basics with DIY ornament upgrades to create a tree that feels curated, meaningful, and totally “you.”
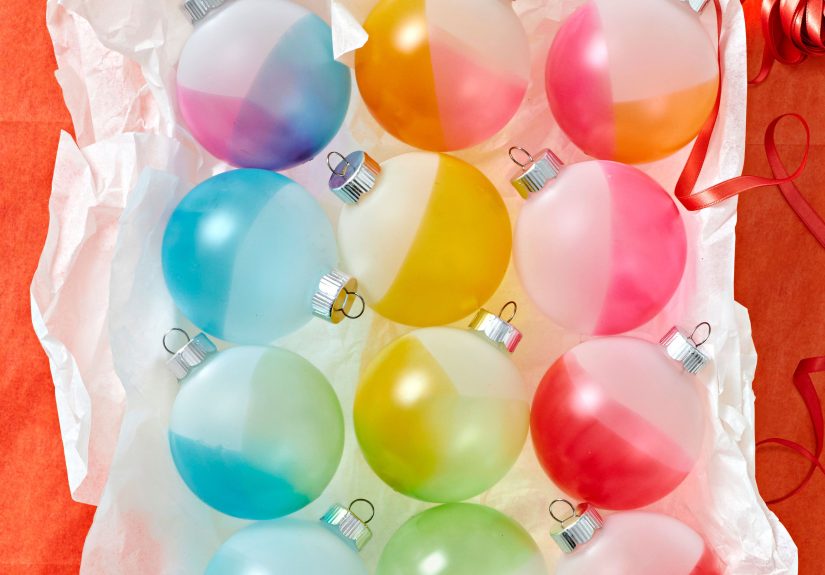
1. Painted Stripe and Color-Block Ornaments
Plain glass or plastic balls are basically blank canvases. Use painter’s tape or masking tape to create stripes, blocks, or geometric patterns, then brush on acrylic paint. While the paint is still tacky, sprinkle a bit of glitter along a stripe for a subtle shimmer. This simple technique was highlighted in classic ornament upgrade guides and still feels modern because you can customize the palette to match your decormoody jewel tones, Scandi neutrals, or candy-colored brights.
2. Velvet-Wrapped Ornaments
Velvet is one of the biggest ornament trends thanks to its soft, matte finish and luxe feel. Wrap existing baubles in strips of velvet ribbon, securing the ends with hot glue at the top and bottom. You can leave them smooth for a minimal look or crisscross ribbons like a wrapped gift. Mix these with metallic ornaments to add depth and texture to your tree.
3. Faux Frost and Crystal Ornaments
That frosty, “left outside in a snowstorm” look isn’t just for branches. Faux-frost techniques using a Borax solution can coat pinecones and small ornaments in delicate crystals. Dip small plastic balls or mini figurines, let the crystals form, and then hang them as icy accents. Just keep these out of reach of kids and pets and treat them as decorative only.
4. Honeycomb Paper Ball Ornaments
Honeycomb ornaments bring a fresh, modern twist to the tree. Lightweight paper honeycomb balls can be purchased flat, then opened, fanned out, and clipped together. They’re trendy, affordable, and available in everything from muted pastels to bold jewel tones. Hang them alongside traditional round ornaments to add sculptural interest.
5. Felt Characters and Whimsical Critters
Felt ornamentsespecially ones shaped like cute animals, food, or mini scenesare big right now. You can buy kits or cut your own felt shapes and glue or stitch them together. Add tiny scarves, hats, or glasses to give each character a personality. These are perfect if you’re decorating a kid-friendly or “storybook” tree.
6. Photo Ornaments That Tell Your Family Story
Photo ornaments turn your tree into a “memory tree,” a trend many families love because every branch holds a story. Use tiny frames, clear fillable ornaments, or wood slices with decoupaged photos. Include wedding pictures, baby photos, travel memories, and portraits of loved ones who’ve passed away for a meaningful, sentimental display.
7. Glass Photo Globes and Clear Baubles
Clear glass or plastic ornaments are ideal for showcasing mini scenes and photos. Slide a curled photo inside a clear ball, add faux snow or glitter, and you’ve basically made a tiny snow globe for your tree. You can also tuck in handwritten notes or kids’ drawings for an even more personal touch.
8. Wood Slice Ornaments from Tree Trunks
Want an ornament with history built in? Slice a disc from last year’s tree trunk before discarding it, sand it, and drill a small hole for a ribbon. Add a photo, paint a simple design, or write the year and a short memory. Over time you’ll have a timeline of Christmases hanging right on your branches.
9. Rustic DIY Wood Photo Ornaments
Wood slice photo ornaments are a favorite DIY gift and look great on a farmhouse, cabin, or rustic tree. Print photos on regular paper, attach them to the wood with decoupage medium, and seal on top. The natural bark edge makes every ornament unique and gives your tree that cozy, handmade vibe.
10. Family Tree Ornaments
Take the “family tree” concept literally. Create one ornament that contains a mini family tree graphic or names on painted branches, or make a series of ornaments where each bauble represents one family member. This idea shows up often in handmade ornament tutorials and is a sweet heirloom in the making.
11. Personalized Name Ornaments
Names instantly make ornaments feel custom. Use letter stickers, painted calligraphy, or vinyl cutouts to add family names, pet names, or nicknames to plain baubles. Articles on personalized ornaments suggest mixing script fonts with bold block lettering for a polished look. These are great stocking stuffers and can double as place cards at holiday dinners.
12. Yearly Milestone Ornaments
Create a new ornament each year that highlights a big moment: a new house, a new baby, a graduation, or even “The Year We Finally Figured Out Sourdough.” Use paint pens to write the year and a short caption. Over time, your “custom tree” becomes a visual timeline of your lifea concept echoed in memory-tree inspiration guides.
13. Glitter Swirl Ornaments
Glitter inside ornaments is easier (and less messy) than it looks. Pour a bit of floor finish or craft glue into a clear plastic ornament, swirl it around, drain the excess, then add glitter and swirl again. Parents and bloggers who’ve made these with kids recommend letting little helpers handle the swirling while adults manage the pouring. The result: smooth, sparkly ornaments that look store-bought but are totally DIY.
14. Pressed Botanical and Eucalyptus Ornaments
Natural greenery is trending on celebrity trees, especially the use of eucalyptus and berry stems for a modern, calm vibe. To echo this on ornaments, press small leaves or flowers between clear acrylic discs or glass frames. Hang them alongside simple baubles in whites and greens for a chic, spa-like tree aesthetic.
15. Ribbon-Wrapped and Bow-Topped Ornaments
Channel that glamorous, Vanna-White-style tree with wide satin or velvet ribbons cascading around your ornaments. Instead of just tying bows on branches, attach mini bows directly to the tops of your ornament caps or wrap ribbons around the center. The mix of shimmer and softness instantly elevates inexpensive baubles.
16. Ornament Clusters for Big Visual Impact
One of the smartest tricks for a full, designer-style tree is ornament clustering. Group three to five ornaments together with floral wire or pipe cleaners and hang them as a single piece. Mix matte, gloss, and glitter finishes in slightly different sizes for a look that mimics berries or blooms. It fills gaps fast and looks expensive with very little extra effort.
17. Paper Chain and Paper Accent Ornaments
Paper chains are having a major comeback as nostalgic, budget-friendly decor. Use coordinating scrapbook paper to make chains for the tree, then cut matching paper into shapes (stars, hearts, tiny houses) and hang them as ornaments. Because it’s just paper, you can test out bold color comboslike citrus brights or retro reds and pinkswithout committing to pricey decor.
18. Kids’ Handprint and Keepsake Ornaments
Salt dough, air-dry clay, or simple painted handprints on flat ornaments are classic for a reason. They capture a moment in time (and those tiny hands grow fast). Many DIY ornament roundups recommend stamping a handprint, then writing the child’s name and year around the edge for a sweet keepsake.
19. Upcycled and Thrifted Ornament Makeovers
Grab a bag of mismatched thrift-store ornaments and treat them as a makeover challenge. Spray-paint them all one color familylike matte white, champagne gold, or deep forest greenthen add details with paint pens, stencils, or decoupage. DIYers who focus on repurposing emphasize that a consistent color palette can unify wildly different shapes and styles.
20. Company or Brand Color Ornaments
If your tree is going in an office or storefront, match your ornaments to the brand colors for a cohesive professional look. Decor trend guides suggest using glass baubles in corporate shades and even adding simple logos via decals or transfers. This is also fun at home if your “brand” is just your favorite sports team or school colors.
21. Monochrome Statement Ornaments
On the opposite side of the eclectic trend, a monochrome tree with custom accents can look incredibly chic. Choose one colorlike blush, midnight blue, or emeraldand decorate ornaments with variations in texture instead of color: glossy, matte, glitter, velvet, and metallic finishes. Add small personalized details (initials, years, symbols) in a contrasting metallic so your tree still feels custom, not generic.
22. Heirloom-Inspired Ornaments
Recreate the look of heirloom glass ornaments by layering translucent paints, metallic leaf, and fine glitter. Many ornament trend roundups talk about the appeal of pieces that feel “collected over time,” even if you made them last Tuesday. Choose traditional shapesfinials, teardrops, bellsand finish them in rich jewel tones with subtle gold accents.
23. Themed Ornament Sets (But Make Them Personal)
Instead of buying a boxed “theme,” design your own. Maybe this year is “Travel,” with ornaments featuring maps, luggage tags, and tiny landmarks you’ve visited. Or “Cozy Cabin,” with flannel patterns, mini skis, and faux-fur trims. Decor experts agree that the most successful trees blend a loose theme with personal stories, not rigid rules.
24. Minimalist Ornaments with Intentional Negative Space
Minimal doesn’t equal boring. Inspired by celebrity trees that favor fewer ornaments with more intention, you can decorate with a smaller number of carefully chosen pieces and leave space between them. Choose simple spheres in two or three colors, add subtle personalization (like initials or dates), and let the shape of the tree and the glow of the lights do the rest.
25. Custom Printed Photo and Text Ornaments
Finally, if DIY isn’t your thingor you’re short on timecustom printing services will do the heavy lifting. Upload photos, add names, and select materials like glass, metal, or wood to create ready-to-hang personalized ornaments. Mix these with your handmade pieces for a perfectly balanced, custom Christmas tree.
How to Pull All 25 Ornament Ideas into One Custom Tree
You don’t need to use every idea (unless you really want a maximalist “ornament explosion” moment). Instead, pick a few that support your overall plan:
- Choose a base palette: 2–3 core colors plus one metallic.
- Add personal layers: Photo ornaments, name ornaments, and yearly milestones.
- Mix in textures: Velvet, paper, glitter, wood, and glass for a rich, layered look.
- Balance busy and calm: Pair detailed ornaments with simple, solid-color filler balls.
- Finish with clusters and ribbons: Ornament clusters and flowing ribbons help everything feel intentional and cohesive.
In the end, the best custom Christmas tree isn’t the most “perfect”it’s the most “you.” Whether your ornaments are hand-painted masterpieces, slightly lopsided kid crafts, or glossy photo keepsakes, they all tell the story of your holidays. That’s what makes the tree magical.
Real-Life Tips and Experiences for Decorating Custom Ornaments
Once you start designing custom ornaments, you’ll discover that the creative process is half the fun. Here are some experience-based tips and little lessons that make the journey smoother (and a lot less stickylooking at you, glitter).
Start with One “Anchor” Idea
It’s tempting to try every technique at once, but the most successful trees usually begin with one anchor concept. Maybe you decide, “This year is a photo-memory tree” or “I’m going full rustic with wood and greenery.” Once you choose that anchor, the rest of your ornament designs become easier to edit. You can still play with paint, glitter, and ribbons, but you’ll choose colors and styles that support your main idea instead of competing with it.
Batch Your Ornament Projects
Making custom ornaments one at a time can feel overwhelming. Instead, batch them like a holiday production line. Do a “paint night” where you prime all your baubles. On another night, add lettering or glitter. Save ribbons and ornament clustering for the final decorating session. This approach also makes it easier to involve family memberskids can help with swirling glitter inside ornaments or sticking on stickers while adults handle hot glue and delicate materials.
Use Trends as Inspiration, Not Strict Rules
Velvet ornaments, honeycomb paper, and botanical details may be trending now, but your tree doesn’t have to look like a catalog spread to feel stylish. Use trends as a starting point: maybe you try a few velvet-wrapped baubles or tuck in paper honeycomb shapes among your existing ornaments. If a trend doesn’t feel like you (hello, all-black tree), skip it and lean into what makes you happy. Custom ornaments are about expression, not pressure.
Plan for Sentimentality
Many families eventually end up with a “memory tree” almost by accidentsouvenir ornaments from trips, baby’s first Christmas, kids’ handprints, and memorial pieces for loved ones. Building this intentionally is even more rewarding. Every year, choose at least one new ornament that represents something meaningful: a big achievement, a funny family story, or a new tradition. Over the years, unwrapping those ornaments becomes the emotional highlight of decorating day.
Label the Back of Your Ornaments
When you’re in the middle of crafting, it’s easy to assume you’ll always remember which year you made a particular ornament. Spoiler: you probably won’t. Get in the habit of writing the year and a quick note on the back or bottom of homemade ornamentsespecially photo ones. Something as simple as “2025 – first year in the new house” can turn a cute bauble into a cherished keepsake in the future.
Make Space for Kids’ Creativity
If you have kids in the house, it can be tempting to “correct” their crafts so the tree looks more coordinated. Try this compromise instead: give them a batch of ornaments that are entirely theirs to design, plus a section of the tree (or even a smaller “kids’ tree”) where they can hang their creations proudly. Then you can keep the rest of the tree aligned to your color scheme while still celebrating their creativity.
Use Ornament Decorating as a Tradition
Instead of rushing to get everything done in one weekend, treat ornament decorating as its own tradition. Host a yearly ornament-making night with friends or family. Set out supplies for a few simple projectslike glitter swirl ornaments, name ornaments, and wood slice photo ornamentsand let everyone craft their own. People will start to look forward to “ornament night” almost as much as the holiday itself.
Think About Storage While You Craft
Future-you will be very grateful if present-you thinks about storage. Delicate or dimensional ornaments like honeycomb balls, ribbon-heavy designs, and faux-frosted pieces need a bit more padding. Save smaller shipping boxes, egg cartons, or drink carriers to tuck them into. Label containers by theme (“photo ornaments,” “velvet and ribbon,” “kids’ crafts”) so setting up next year’s tree is more like shopping your own curated collection.
Balance Perfection and Play
The biggest advantage of custom ornaments is that they don’t have to be perfect. A slightly crooked name, a smudged handprint, or a paint line that wandered a little are part of the charm. When you look back, those “imperfections” will remind you of the laughter, the mess, and the memories you made while decorating. Strive for beautiful, surebut leave room for playfulness.
Let Your Tree Evolve Over Time
Finally, remember that your custom Christmas tree is a long-term project, not a one-season sprint. You don’t need to create an entire museum of personalized ornaments in one year. Add a few new styles each season, retire pieces that no longer feel like you, and let your tree evolve along with your life. Before long, decorating it won’t just be about hanging pretty thingsit’ll be about revisiting the story of your family, one ornament at a time.
When you look at your finished tree, packed with photo keepsakes, hand-painted baubles, glittery experiments, and sentimental milestones, you’ll see more than decorations. You’ll see the holidays you’ve lived, the people you love, and the creativity you brought to a simple evergreen. That’s the real magic of a custom Christmas tree.





