Table of Contents >> Show >> Hide
- Why Old Car Stereos Are Worth Hacking
- The Ancient Protocol Behind the Trick
- How the Microcontroller Pulls Off the Disguise
- Sound Quality: Better Than an FM Transmitter
- Reverse Engineering Without the Drama
- What Makes This Hack So Clever?
- Practical Benefits for Car Owners
- Limitations and Things to Watch For
- Why Makers Still Love Old Protocols
- Specific Example: The Volvo HU-Series AUX Hack
- Is This Better Than Buying an Adapter?
- Experience Notes: What It Feels Like to Build One
- Conclusion
Some technology gets old gracefully. Vinyl records become “warm.” Mechanical keyboards become “tactile.” Old car stereos, however, usually become one thing: stubborn. They sit in the dashboard like tiny plastic gatekeepers, perfectly willing to play a CD from 2004 but deeply suspicious of your modern phone, Bluetooth receiver, or music player. That is where the fun begins.
Tricking an ancient protocol to play tunes is the kind of project that makes electronics hobbyists grin. It is part car audio upgrade, part reverse engineering puzzle, and part negotiation with a head unit that refuses to admit the compact disc era has left the building. The classic example is a Volvo HU-series stereo that lacks a simple auxiliary input but includes an old CD changer port on the back. Instead of replacing the entire factory radio, makers discovered a smarter route: convince the stereo that a CD changer is connected, then feed audio through the existing left and right input pins.
The result is delightfully nerdy. A small microcontroller, often an Arduino Nano or similar board, pretends to be the missing CD changer. It answers the stereo’s startup handshake, speaks just enough of the old protocol to unlock the “CD-CHGR” source, and lets a modern audio source play through the original system. It is not magic, although it may feel like it the first time the speakers wake up and play music from a phone through a dashboard designed for shiny plastic discs.
Why Old Car Stereos Are Worth Hacking
At first glance, replacing the head unit seems easier. Buy a modern receiver, add Bluetooth, maybe get a touchscreen large enough to distract a small airport. Done. But factory stereos have advantages that aftermarket units often fail to respect. They fit the dashboard perfectly, match the interior lighting, connect cleanly to steering wheel controls, and may integrate with amplifiers, antennas, navigation modules, or vehicle settings.
That is especially true in cars from the early 2000s. Many manufacturers were transitioning from simple analog radios to more integrated infotainment systems. The head unit was no longer just a radio; it was part of the car’s personality. Removing it could mean losing factory controls, display functions, premium amplifier support, or the clean original look. For owners who care about originality, swapping in a glowing blue aftermarket receiver can feel like putting running shoes on a tuxedo.
The better solution is often to keep the factory stereo and add the one feature it should have had all along: an auxiliary input. The hack is elegant because it uses hardware the stereo already understands. If the radio can accept audio from a CD changer, then it already has audio input lines. The only obstacle is convincing the head unit that the changer exists.
The Ancient Protocol Behind the Trick
In the Volvo HU-series example, the key player is an old communication system commonly associated with the CD changer interface. The head unit expects a connected accessory to respond during initialization. If nothing answers, the stereo simply hides the CD changer option from the source menu. That behavior makes sense from a user-interface perspective. Nobody wants a “CD changer” button that leads to silence, confusion, and mild dashboard-related disappointment.
The protocol acts like a tiny conversation between the stereo and the external device. The head unit asks, in its own electrical language, “Are you there?” The real CD changer would respond with timing, data, and status messages. A microcontroller can imitate that response. It does not need to spin discs, read tracks, or shuffle anything. It only has to say the right things at the right time so the stereo unlocks the input.
The 8-Pin DIN Connector
The physical doorway is often an 8-pin DIN connector. DIN connectors have been used for audio, data, power, keyboards, MIDI, and plenty of other low-voltage electronics. In older car audio systems, a DIN connector could carry multiple signals at once: audio left, audio right, ground, power, clock, and data. This is why the port is so useful. It is not merely a hole in the back of the stereo; it is a small bundle of opportunities wearing a round metal jacket.
For the hack, the audio path and the control path are separate but related. The stereo needs protocol communication before it will select the CD changer source. Once the source is enabled, the actual music can travel as analog audio through the left and right pins. This separation is what makes the project practical. The microcontroller handles the “identity fraud” portion, while the music player handles the music.
Why a Simple Wire Is Not Enough
A common beginner assumption is that adding AUX input means finding the audio pins, soldering a cable, and celebrating with a playlist. Sometimes that works, especially if the head unit already has an accessible source mode. But many factory stereos mute or ignore the input until a valid accessory is detected. In those systems, audio wiring alone is like bringing snacks to a party you were not invited to. The snacks may be excellent, but the door is still locked.
That is why the protocol matters. The stereo does not merely need sound; it needs confidence. It needs to believe a CD changer is present, initialized, and ready. Once the microcontroller creates that illusion, the audio pins become useful.
How the Microcontroller Pulls Off the Disguise
An Arduino Nano-style board is a natural fit for this kind of project. It is small, affordable, easy to program, and comfortable with digital input/output. More importantly, it can react quickly enough to imitate the timing expected by the stereo. In a typical setup, the board connects to the relevant clock and data lines on the CD changer port, listens for the head unit’s initialization pattern, and sends responses that match the expected accessory behavior.
The microcontroller does not need to be powerful. It is not decoding MP3 files or streaming high-resolution audio. Its job is more like playing a role in a very strict school play. When the stereo says its line, the Arduino says the next line. Miss the timing, and the stereo walks offstage. Get it right, and the CD changer source appears as though nothing suspicious has happened.
Timing Is Everything
Old accessory protocols are often simple in concept but picky in practice. They may use a clock line, a bidirectional data line, defined pulse widths, startup delays, and repeated initialization checks. If the response comes too early, too late, or with the wrong electrical level, the head unit may ignore it. That is why successful projects usually begin with research, logic analysis, and careful reading of existing code.
A logic analyzer is one of the most useful tools for this work. It captures digital signals so the builder can see the timing between pulses, measure clock behavior, and compare real accessory traffic with the microcontroller’s imitation. Without that visibility, debugging becomes a guessing game, and guessing games are how hobbyists end up staring at dashboards at midnight whispering, “Why do you hate me?”
Sound Quality: Better Than an FM Transmitter
One reason this hack remains attractive is sound quality. Many old-school solutions, such as cassette adapters or FM transmitters, work but have drawbacks. Cassette adapters depend on aging tape mechanisms. FM transmitters can pick up interference, especially in crowded radio markets. A direct analog AUX input usually sounds cleaner because the signal travels into the stereo without being converted into a weak radio broadcast first.
The final quality still depends on the audio source, cable routing, grounding, and the stereo’s internal circuitry. A poorly grounded cable can introduce alternator whine. A cheap adapter can add hiss. A phone volume set too high can distort the input, while one set too low can make the listener crank the stereo and amplify noise. The sweet spot is a clean, shielded connection with sensible output levels.
Bluetooth Can Join the Party
Although the original concept often uses a 3.5 mm auxiliary cable, Bluetooth can be added by connecting a small Bluetooth audio receiver to the AUX input. This keeps the factory radio while adding wireless convenience. Some advanced versions even map stereo buttons to playback commands, allowing next-track or previous-track control through the original head unit. That takes the project from “nice AUX input” to “factory-looking modern upgrade.”
However, the more features you add, the more careful the design must become. Bluetooth modules need clean power. Car electrical systems are noisy environments with voltage spikes, ground differences, and plenty of electromagnetic grumpiness. Good filtering, fusing, and secure installation matter.
Reverse Engineering Without the Drama
The phrase “reverse engineering” can sound like something performed in a secret basement by people wearing black hoodies. In this project, it is more practical than mysterious. The process usually starts by identifying the connector, finding pinouts, checking voltage levels, and understanding the communication pattern. Then the builder writes or adapts code that produces the expected responses.
Good reverse engineering is patient. You do not randomly connect pins and hope the stereo becomes friendly. You document each signal, confirm grounds, measure voltages, and avoid shorting unknown lines. The best makers are not reckless; they are curious with a multimeter.
Common Project Stages
Most CD changer emulator projects follow a similar path. First, the builder confirms that the factory radio has a compatible changer input. Next, they research the connector pinout and protocol. Then they prototype the microcontroller circuit outside the dashboard, often on a breadboard or temporary wiring harness. After the software successfully unlocks the CD changer mode, they test audio input. Finally, they package the circuit safely so it will not rattle behind the dash like a tiny electronic maraca.
The packaging step is more important than beginners think. A car vibrates, heats up, cools down, and occasionally hits potholes that feel personal. Loose jumper wires are fine for a desk test but not for a permanent vehicle installation. A finished project should use proper connectors, strain relief, insulation, and a secure enclosure.
What Makes This Hack So Clever?
The cleverness is not just that it adds music. Plenty of products can do that. The cleverness is that it respects the original system. Instead of fighting the stereo, the project speaks its language. It does not bypass the head unit; it persuades it. That is a very different engineering mindset.
This approach also highlights a broader truth about electronics: many devices contain hidden capabilities locked behind assumptions. The stereo already has audio inputs. The microcontroller does not create them. It simply unlocks access by satisfying the old protocol’s expectations. In other words, the hack is not brute force. It is social engineering for machines.
Practical Benefits for Car Owners
For owners of older vehicles, a CD changer emulator AUX hack can deliver several benefits. It preserves the factory appearance, keeps the stock amplifier path, costs less than many full stereo replacements, and avoids cutting the dashboard. It can also be reversible if built with an adapter harness rather than permanent modifications.
There is also a satisfaction factor that cannot be purchased in a plastic blister pack. When the project works, the builder has not merely installed a feature. They have understood a system, learned its behavior, and convinced it to do something useful years after the manufacturer moved on. That feeling is worth at least three extra garage high-fives.
Limitations and Things to Watch For
This hack is not universal. Different manufacturers used different CD changer protocols. Volvo MELBUS-style communication is not the same as Ford ACP, Alpine M-Bus, Pioneer IP-Bus, or other proprietary systems. Even within one brand, model years and head unit variants can change the wiring or behavior. A guide for one vehicle should not be blindly applied to another.
Safety also matters. Vehicle electronics are not toys, and incorrect wiring can damage the stereo, blow fuses, or create unreliable behavior. Anyone attempting this kind of project should disconnect power when wiring, confirm pinouts from multiple sources, use proper fusing where needed, and avoid modifications that interfere with driving, airbags, safety systems, or visibility. Music is great; electrical smoke is a terrible genre.
There is also the distraction issue. Any audio upgrade should make driving simpler, not more distracting. Controls should be easy to use, cables should be secured, and playlists should be chosen before driving. The goal is to enjoy music, not conduct a tiny DJ set at 55 mph.
Why Makers Still Love Old Protocols
Old protocols are charming because they are understandable. Modern infotainment systems can involve encrypted buses, integrated touchscreens, app ecosystems, and software locks. Older systems often rely on simpler signals that a hobbyist can observe and imitate. They are not always documented, but they are approachable with the right tools and patience.
That makes projects like this a perfect learning bridge. You get a taste of embedded programming, serial communication, timing analysis, analog audio, vehicle wiring, and practical troubleshooting. Unlike a purely theoretical exercise, the reward is immediate and musical. When the hack works, the speakers prove it.
Specific Example: The Volvo HU-Series AUX Hack
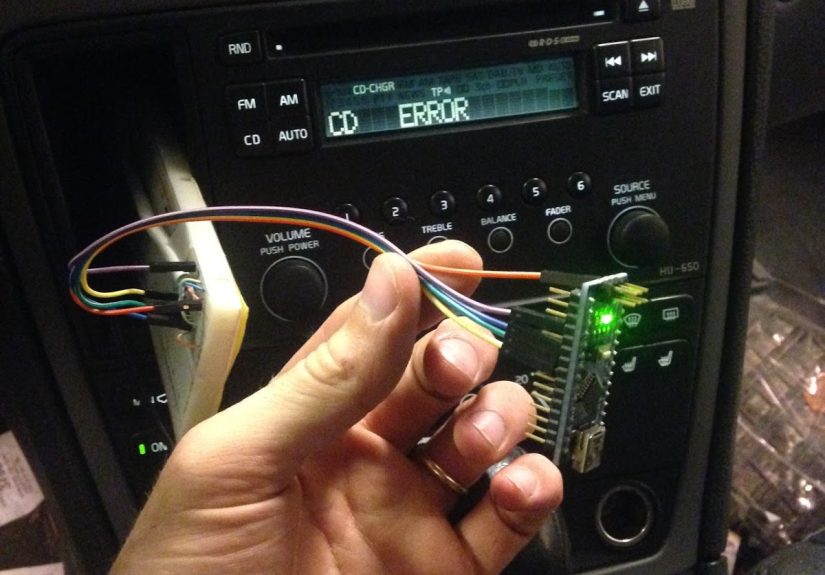
The well-known Volvo HU-series project centers on a factory head unit, such as the HU-650 in a 2007 Volvo V70. The stereo includes an 8-pin DIN connection intended for a trunk-mounted CD changer. Without the changer connected, the radio does not offer the CD changer as a selectable source. The workaround is to use a small microcontroller to emulate the changer’s presence through the accessory protocol.
Once the initialization succeeds, the stereo enables the changer source. The builder then routes left and right analog audio into the corresponding pins on the DIN connector. A phone, music player, or Bluetooth receiver can provide the signal. The dashboard remains original, but the audio options become far more modern.
This same idea appears across other car audio communities. Ford enthusiasts have used CD changer emulation through Ford’s accessory communication systems. Other makers have explored similar concepts for Alpine, Pioneer, Toyota, BMW, and various factory radios. The names and details change, but the core pattern remains the same: imitate the old accessory, unlock the input, play modern audio.
Is This Better Than Buying an Adapter?
For most people, a commercial adapter is easier. It is designed to plug in, work quickly, and avoid the debugging adventure. For makers, however, the DIY version offers something better than convenience: understanding. It can also be cheaper, customizable, and deeply satisfying.
The choice depends on the goal. If the goal is simply to play music tomorrow morning, buy a quality adapter. If the goal is to learn how an old stereo thinks, build the emulator. One path saves time. The other creates a story.
Experience Notes: What It Feels Like to Build One
The first experience related to tricking an ancient protocol to play tunes is usually not triumph. It is confusion. You remove the stereo, look at the connector, and realize the back of a factory head unit has all the warmth of a locked bank vault. There are pins, labels, mystery voltages, and just enough forum knowledge to make you brave but not enough to make you relaxed.
The next stage is research. This is where the project becomes oddly addictive. You find references to CD changer ports, old accessory buses, pinouts, timing diagrams, and code snippets written years ago by someone who was clearly fighting the same dashboard beast. The moment you realize the stereo is not ignoring AUX because it lacks audio input, but because it wants a protocol handshake, the whole project changes. It becomes less like wiring and more like learning a password.
Prototyping can be both exciting and ridiculous. A tiny Arduino sits on the workbench with wires running into a connector like spaghetti trying to become an engineer. The first upload rarely works perfectly. Maybe the head unit does not detect the changer. Maybe it detects it once, then forgets it after the ignition cycles. Maybe the audio plays but only on one channel because the ground reference is wrong. Each failure teaches something. The stereo is not being rude; it is giving feedback in the only language it knows: silence.
When the CD changer source finally appears on the display, it feels like winning an argument with history. The radio thinks a changer is connected. There is no changer. There is only a microcontroller politely lying with perfect timing. Then the first song comes through the speakers, and suddenly the old dashboard feels upgraded without losing its character. That moment is why people build these projects instead of buying the simplest adapter online.
The best lesson from the experience is that old technology often has more life left than we assume. A 2000s factory stereo may not know what a streaming app is, but it understands audio. It understands accessories. It understands the rules it was built with. If you learn those rules, you can extend the device instead of discarding it. That is good engineering and, frankly, good manners.
Another practical lesson is to build for the car, not just for the desk. A circuit that works beautifully on a bench can fail in a dashboard if wires are loose, power is noisy, or the enclosure is flimsy. The finished installation should be boring in the best possible way: no rattles, no exposed conductors, no mystery resets, no sudden audio blasts, and no controls that require taking attention away from the road.
In the end, tricking an ancient protocol to play tunes is not only about adding AUX input. It is about the joy of compatibility across eras. A phone from today, a stereo from yesterday, and a microcontroller in the middle form a tiny diplomatic mission. The phone brings the music. The stereo brings the speakers. The microcontroller brings the fake mustache and says, “Good evening, I am definitely a CD changer.” Somehow, beautifully, everyone believes it.
Conclusion
Tricking an ancient protocol to play tunes is a perfect example of practical creativity. It turns an outdated CD changer interface into a modern music pathway without ruining the original dashboard. By using a microcontroller to emulate the expected accessory handshake, makers can unlock hidden audio inputs, preserve factory design, and learn valuable lessons about embedded systems, serial communication, analog audio, and patient troubleshooting.
The project also reminds us that “old” does not always mean useless. Sometimes old hardware is simply waiting for someone to speak its language. In this case, that language may involve an 8-pin DIN connector, a clock line, a data line, and a tiny board pretending to be a device from the CD era. It is clever, useful, and just nerdy enough to make the first successful song feel like a standing ovation from the dashboard.
Note: This article is for educational and editorial use. Vehicle audio modifications should be researched carefully and verified by someone experienced with automotive electronics before installation.




