Table of Contents >> Show >> Hide
- What “Automatic Filament Changer” Actually Means (Because It’s Not One Thing)
- The Five Enemies of Reliable Switching
- Design Reality Checks Before You Print a Single Bracket
- Firmware and Slicer: Where “Simple” Becomes a Choreography
- Case Studies: What Popular Approaches Teach (Even If You’re Building DIY)
- The Hidden Costs: Waste, Time, and the “Purge Tax”
- A Practical Troubleshooting Playbook (So You Don’t Debug by Vibes)
- Conclusion: The “Automatic” Part Is Earned
- From the Workbench: of Hard-Learned Lessons (That Builders Keep Re-Learning)
Automatic filament changing sounds like the kind of futuristic luxury we were promised along with jetpacks and robot butlers. “My 3D printer will seamlessly switch colors and materials,” you say, casually sipping coffee while a perfect multi-color Benchy appears. And sometimes… that actually happens. Other times, your printer makes a noise that can only be described as regret, spits half-chewed filament onto the floor, and asks you (emotionally) to reconsider your life choices.
This article is for anyone who’s stared at an automatic filament changer projectwhether it’s a runout reloader, a multi-color feeder, a splicer, or a full tool-changerand thought: “How hard can it be?” (Answer: hard in exactly the ways you didn’t think to worry about.) Let’s walk through what these systems really do, where they fail, and how builders improve reliability without turning their workshop into a shrine to PTFE tubing.
What “Automatic Filament Changer” Actually Means (Because It’s Not One Thing)
People use the phrase 3D printer filament changer to describe several different machines with very different failure modes. Before you design brackets, print gears, or buy your tenth sensor “just in case,” it helps to know which category you’re building.
1) Runout reloaders (the “keep printing when the spool ends” kind)
These systems are designed to feed from a backup spool when the primary spool runs out. They’re often marketed as “automatic refill” devices. Conceptually, it’s simple: detect end-of-filament, grab the new one, continue. In reality, the challenge is preventing false switches and ensuring the new filament joins the path cleanly without creating a traffic jam of two filaments trying to occupy the same tube.
2) Multi-color/multi-material feeders (the “single nozzle, many spools” kind)
This is the popular “one hotend, multiple filaments” approach. The machine unloads filament A, loads filament B, purges the nozzle, and continues printing. It’s powerfuland famously sensitive to friction, filament tip shape, tube routing, and the laws of physics you forgot existed.
3) Splicers (the “tape multiple filaments into one long filament” kind)
Splicers create a single continuous strand by cutting and fusing filament segments, then feeding that “custom rainbow” into your printer like it’s normal filament. Your printer sees one filament; the splicer handles the changes. The hard part shifts to splice consistency, accurate length prediction, and managing the buffer of fused filament.
4) Tool changers / hotend swaps (the “no purge tower apocalypse” kind)
Instead of pulling filament in and out of one nozzle, these systems swap toolheads (or hotends). The big win: less purging and fewer “color boogers.” The tradeoff: higher mechanical complexity, alignment demands, and usually more cost. Still, many builders look at purge waste from filament-swapping systems and decide tool changing is the saner long-term path.
The Five Enemies of Reliable Switching
No matter which route you take, the same villains show uplike a superhero movie, except the hero is you, covered in filament dust, whispering “why” to a tiny set screw.
Enemy #1: Friction you can’t see
Filament systems fail for boring reasons. A slightly tight PTFE bend. A coupler with a tiny internal lip. A tube end cut at an angle that snags tips. A path that looks fine until a spool is nearly empty and the filament starts pulling at a worse angle. The key lesson: every extra millimeter of resistance multiplies your failure rate, especially during fast unload/retract sequences.
Enemy #2: Filament is not a uniform “material,” it’s a mood
PLA can be brittle after humidity exposure. PETG can string and leave blobby tips. TPU can stretch, buckle, and generally behave like it’s auditioning for a slapstick comedy. Fiber-filled filaments add drag and chew up tight paths. Multi-material setups magnify these differences because your system must handle the worst filament automatically, at speed, every time.
Enemy #3: Sensors lie (or tell the truth at the worst possible time)
Runout sensors, encoder wheels, mechanical switches, optical sensorseach has strengths, and each has moments where it becomes a drama queen. False triggers can cause mid-print unloads, phantom runouts, or “helpful” reload attempts when nothing is actually wrong. Sensors also interact with tube routing and buffers in ways that can look like software bugs but are really mechanical timing issues.
Enemy #4: Retraction physics and spool inertia
When a system retracts filament quickly, the spool has to unwind smoothly. Light spools, sticky spool holders, and poor rewind tension can cause slack loops, tangles, and internal jams. Many failures blamed on “the feeder” are actually caused by spool managementthe least exciting part of the build, and therefore the part everyone ignores until 2 a.m.
Enemy #5: Purge waste and heat-related ugliness
Every filament swap in a single-nozzle system requires purging old material out of the melt zone. That means waste: purge towers, purge blocks, “poop chutes,” infill purging, and extra time. Worse: when you switch between different polymers, under-purging can create weak layers or messy color contamination. Over-purging makes you feel like you’re printing a second model made entirely of sadness.
Design Reality Checks Before You Print a Single Bracket
Start by drawing the filament path like it’s plumbing
Map every segment: spool → guide → feeder → buffer → tube → extruder → hotend. Mark where friction can increase: couplers, tight bends, Y-junctions, sharp tube entries. If you can’t explain how filament moves during every state (load, print, retract, switch, error recovery), your first prototype will explain it for youwith noise.
Buffers are not optionalthey’re shock absorbers
Buffers decouple the feeder’s push/pull from the spool’s inertia. Without a buffer, retraction can yank on the spool, and spool drag can fight loading. With a buffer, the system can create and consume slack in a controlled way. The challenge is designing a buffer that doesn’t add its own friction, doesn’t kink filament, and doesn’t confuse sensors.
Mounting and geometry matter more than you want them to
Many “it works on my bench” changers fail the moment they’re mounted to an actual printer because the angles change. Tube routing that’s fine horizontally might become a kink when the toolhead moves to the far corner. A runout reloader that’s stable when spools sit still might misbehave when the printer’s motion vibrates a lightweight spool holder. Your design needs to tolerate real-world movement, not just idealized CAD.
Firmware and Slicer: Where “Simple” Becomes a Choreography
The swap script: unload, cut/park, load, confirm, purge, resume
An automatic filament swap is essentially a tiny play with several acts. If any actor misses their cue, the show ends with a jam. Reliable systems tend to include:
- Controlled unload with temperature-aware retraction (too cold = snapped filament; too hot = stringy tip).
- Tip shaping (or at least tip tolerance) so the filament can re-enter tubes and gears cleanly.
- Verification steps using sensors or extrusion confirmation, not just “trust me, it loaded.”
- Purge management tailored to material pairs, not one-size-fits-all.
Calibration is the difference between “cool demo” and “daily driver”
Whether you’re tuning purge volumes, splice lengths, retract distances, or sensor thresholds, calibration is the product. The hardware is just the instrument. If your project plan does not include time for repeated calibration prints and boring tests (like 100 load/unload cycles), your printer will schedule that time for youduring your most important print.
Failure handling must be designed, not wished for
The most underrated feature in a filament changer is how gracefully it fails. Smart systems:
- Retry with adjusted speeds (slower load, shorter retract) instead of repeating the same mistake loudly.
- Pause safely and keep the nozzle from cooking one spot on the print.
- Give you a clear “where it failed” state so you can recover without disassembling half the machine.
Case Studies: What Popular Approaches Teach (Even If You’re Building DIY)
Feeder-and-buffer systems: small friction, big consequences
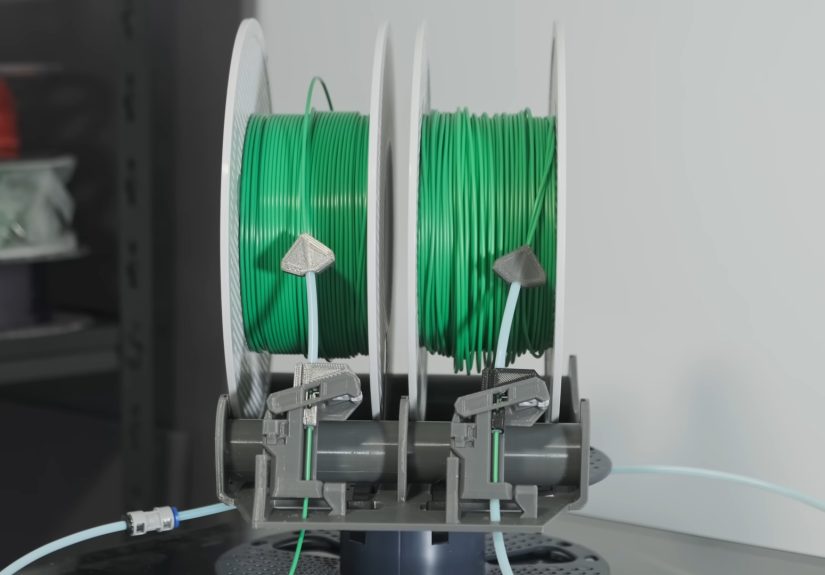
Commercial multi-filament units highlight the same lesson DIY builders learn: the filament path has to be ridiculously smooth. Many real-world issues come down to tube routing, couplers, spool drag, and the interaction between fast retraction and slow spool rewind. If your design can tolerate a mediocre spool holder, it’s probably a good design.
MMU-style designs: idlers, alignment, and tip quality
Multi-material units that rely on an idler or selector mechanism tend to be sensitive to tension and alignment. Too tight and you grind filament. Too loose and you slip. Add in stringy tips from certain materials, and suddenly your system becomes a tip-shape inspector that fails anyone not dressed appropriately.
Splicers: the buffer becomes your “secret second machine”
Splicers move complexity upstream: your printer gets “normal filament,” while the splicer handles color changes. But this introduces a different calibration burden: accurate length prediction, consistent splices, and a reliable buffer so the printer’s pull doesn’t fight the splicer’s output. Splicers can be brilliant for multi-color printing on printers that otherwise can’t do itif you respect the tuning process.
Drybox-modular DIY builds: convenience meets real-world integration
Community-designed modular changers often combine dry storage and feeder modules. The upside is excellent filament handling and humidity control. The downside is integration: power, communication, mounting, and ensuring that the combined path (module → changer → printer) doesn’t add enough resistance to ruin everything. Modular is greatuntil you realize each module adds two more places for filament to snag.
The Hidden Costs: Waste, Time, and the “Purge Tax”
Multi-color printing with a single nozzle is often a negotiation with purge waste. The more often you switch colors, the more time and material you spend purging. Realistic strategies to reduce waste include:
- Designing models for fewer swaps (group colors by layer, reduce tiny color islands).
- Using purge-to-infill when acceptable (not for show surfaces or structural-critical parts).
- Right-sizing purge volumes by material pair (PLA-to-PLA needs less than PETG-to-PLA, generally).
- Exploring tool-changing or hotend-swapping if you want frequent swaps without a plastic landfill.
If you’re building an automatic filament changer, plan for the purge tax early. It affects your design goals: a system that “works” but doubles print time might not feel like a win after the novelty wears off.
A Practical Troubleshooting Playbook (So You Don’t Debug by Vibes)
When something fails, resist the urge to replace three parts at once. A calmer approach saves timeand spares your printer from becoming a “Ship of Theseus” made of upgrade kits.
Step 1: Isolate the path
Test loading through each segment separately. Spool-to-feeder. Feeder-to-buffer. Buffer-to-extruder. If you can’t push filament smoothly by hand through a section, your motors will suffer too.
Step 2: Slow down and watch the failure
Most changers work at slow speed and fail at production speed. That’s a clue. Run load/unload cycles slower, observe where filament buckles, where slack forms, or where it catches.
Step 3: Mark the filament
Use a marker to put a line on filament at a known point, then track how far it travels during load/unload. This reveals whether your system is under-feeding, over-retracting, or slipping.
Step 4: Treat the spool like a component, not a passive object
Make sure spools roll smoothly, don’t wobble, and don’t have crossed windings. Add a simple filament guide or better spool holder before you redesign the entire changer.
Step 5: Tame the tip
If your filament ends come out stringy, bulbous, or chewed, you’ll see frequent reload failures. Tip quality improves with better unload temperature control, consistent retract behavior, and smooth paths that don’t shave filament.
Conclusion: The “Automatic” Part Is Earned
Building an automatic filament changer is less like assembling a gadget and more like training a system. You’re balancing friction, geometry, sensors, firmware timing, spool behavior, and purge strategyall while asking plastic spaghetti to behave like precision wire. The good news is that once you build in smooth filament paths, sane buffering, reliable detection, and graceful failure handling, these projects can genuinely level up your printing. The bad news is you will learn these lessons in the most educational way possible: repeatedly.
From the Workbench: of Hard-Learned Lessons (That Builders Keep Re-Learning)
If you read enough build logs and community writeups, a pattern emerges: the first prototype is almost always a confidence booster. It changes filament once or twice, everyone claps, and you start naming the machine like it’s a pet. Then the “real print” beginsmulti-hour, lots of swaps, tiny color detailsand your changer discovers new ways to fail that feel oddly personal.
One common experience is the false victory: the changer loads filament perfectly during tests, but fails during actual printing. Why? Because printing adds heat, ooze, motion, vibration, and repeated cycles. A tube that’s “fine” becomes warm and slightly softer. A path that was smooth becomes contaminated with filament dust. A spool that was full and heavy becomes light, starts bouncing, and suddenly the retraction routine pulls faster than the spool can rewind. The result can be slack loops, tangles, or filament that retracts into the feeder at a weird angle and catches on a coupler edge.
Another classic is the mystery jam that disappears the moment you open the enclosure. You pause the print, everything looks normal, and you feel like you’re being haunted by a tiny gremlin with an engineering degree. In many cases, this is friction stacking: a slightly tight bend plus a slightly rough coupler plus a slightly swollen filament (humidity, heat, or just brand variation) pushes the system past its tolerance. The fix is rarely dramatic. It’s trimming tube length, increasing bend radius, cleaning a tube end, or reducing load speed by a small amount. It’s frustrating because the solution doesn’t feel heroicbut it works.
Builders also report that the buffer is both hero and troublemaker. It stabilizes tension, but it can introduce its own failure modes: filament can kink, stack oddly, or interact with sensors in ways that cause phantom runout behavior. Many people end up iterating buffer geometry more than the changer itself. And yes, it’s annoying to discover your “supporting accessory” is actually the main character.
Then there’s the purge lesson: you can absolutely get gorgeous multi-color results, but the waste can be shocking on swap-heavy models. This pushes many builders toward smarter model design (fewer swaps), better purge tuning (per material pair), and eventually considering tool-changing approaches when the purge tax becomes too high. A lot of people start with “I want four colors,” and end with “I want two colors and my dignity.”
The most valuable long-term lesson, though, is workflow: successful builders stop treating failures as random and start treating them as data. They log which slot failed, what filament brand, what humidity conditions, where in the print, and what the filament tip looked like. Over time, reliability comes from small, boring improvements: smoother paths, better spool handling, slower critical moves, clearer sensor logic, and designs that fail safely instead of catastrophically. That’s the real “automatic” partearned through iteration, patience, and a willingness to fix the unglamorous stuff first.