Table of Contents >> Show >> Hide
- What Is Rub ’n Buff, Exactly?
- Why Rub ’n Buff Works So Well on Ornaments
- How to Make Rub ’n Buff Ornaments
- Best Rub ’n Buff Color Ideas for Ornaments
- Creative Rub ’n Buff Ornament Ideas
- Common Mistakes to Avoid
- Are Rub ’n Buff Ornaments Worth It?
- What the Experience of Making Rub ’n Buff Ornaments Is Really Like
- Conclusion
If your ornament collection currently looks like it survived three breakups, one attic heat wave, and a suspicious glitter incident, Rub ’n Buff might be your holiday hero. This little tube of metallic wax has developed a loyal following for one simple reason: it makes humble decor look far more expensive than it has any right to. In plain English, it is the craft equivalent of putting on a velvet blazer and suddenly feeling qualified to host a very dramatic Christmas dinner.
Rub ’n Buff ornaments are especially appealing because they sit at the sweet spot between easy DIY and high-end holiday style. You do not need a workshop. You do not need professional art training. You do not need to become the kind of person who casually says “patina” six times before lunch. You just need a few ornaments, a light hand, and a willingness to buff something until it looks delightfully old-world.
That mix of thrift, nostalgia, and handmade character is exactly why this look works so well right now. Vintage-inspired holiday decorating keeps showing up in American home style because people want ornaments that feel collected, personal, and a little storied instead of straight-from-the-big-box-store identical. Rub ’n Buff helps create that effect fast. It can warm up plain ornaments, revive faded thrift finds, soften bright finishes, and add a metallic glow that feels richer than basic paint.
What Is Rub ’n Buff, Exactly?
Rub ’n Buff is a wax-based metallic finish made to add luster and depth to surfaces. Unlike regular craft paint, it is not meant to behave like a thick, flat coating. It is more like a finishing touch that sits somewhere between makeup, polish, and decorative magic. It is known for its metallic richness, and because it is applied in thin layers, it often looks more dimensional than ordinary paint.
That difference matters when you are working on ornaments. Ornaments are small objects, and small objects can get ugly in a hurry when they are overpainted. Thick coats swallow texture. Heavy glitter turns charming into chaotic. Rub ’n Buff, on the other hand, lets you highlight raised details, create worn edges, or give an all-over sheen without making the ornament look dipped in pancake batter.
Another reason crafters love it is coverage. A tiny amount goes a long way, which makes it a smart choice for ornament projects. You can transform a whole batch without going through a mountain of product. That is good for your budget and even better for your sanity, because no one wants to panic-buy six more tubes on December 18.
Why Rub ’n Buff Works So Well on Ornaments
1. It creates a vintage look without requiring actual vintage prices
True antique ornaments and mercury-glass styles can be gorgeous, but they can also be expensive, fragile, and not always easy to find in matching sets. Rub ’n Buff gives everyday ornaments a similar old-world mood. Golds look warmer. Silvers look softer. Darker shades add age and depth. Suddenly a plain ball ornament has “estate sale charm” instead of “drugstore aisle energy.”
2. It flatters texture
Embossed ornaments, carved wood shapes, metal stars, ceramic bells, and decorative caps all benefit from metallic wax because it catches detail beautifully. This is where the product really earns its reputation. Raised patterns, grooves, and edges become more visible once the metallic finish is lightly rubbed over them. If your ornament already has texture, Rub ’n Buff is basically handing it a microphone.
3. It suits both full makeovers and subtle accents
You can coat an ornament completely, or just hit the high points. You can buff the cap and leave the body matte. You can rub metallic wax over painted texture for an aged finish. You can even use painter’s tape for stripes or color blocking. The product plays well with both “I made twelve matching heirloom-looking ornaments” and “I just wanted this one weird thrift-store swan to stop looking sad.”
4. It fits current holiday decorating trends
Handmade, secondhand, and heritage-inspired decor continues to resonate because it feels more personal than disposable seasonal shopping. Rub ’n Buff ornaments fit beautifully into that direction. They can feel old-fashioned, romantic, elegant, rustic, moody, or glam depending on the base color and metallic shade you choose.
How to Make Rub ’n Buff Ornaments
The basic process is wonderfully straightforward, but the best results come from treating it like a finish, not wall paint.
Start with the right ornament base
Good candidates include glass ornaments, ceramic ornaments, wood ornaments, metal pieces, and many already-painted ornaments that need a glow-up. Thrifted ornaments are especially fun because you can update odd colors and dated finishes instead of buying everything new. If the ornament has grease, dust, or residue, clean it first and let it dry fully. A clean surface matters more than many people think.
Prep matters more than people expect
If the surface feels very slick, a light scuff can help the finish grip better. You do not need to sand like you are refinishing a farmhouse table. Think gentle, not aggressive. The goal is simply to give the finish a better chance to cling. If sanding is not practical, a compatible primer can help on some surfaces. This is one of those unglamorous steps that saves you from future irritation and muttering.
Use less product than your instincts suggest
The classic beginner mistake is squeezing out enough product to finish a bronze statue. Resist the urge. Use a tiny amount on a gloved finger, soft cloth, cotton swab, or brush. Then build slowly. Thin layers give you control, keep details visible, and create a more believable metallic finish. Too much product can smear, look muddy, and flatten the ornament’s character.
Apply in layers
If you want full coverage, work in light coats rather than one heavy pass. If you want an antique effect, dab or brush the wax only onto edges, ridges, and selected areas. For vintage-style ornaments, this partial coverage often looks better than full metallic coating because it mimics wear and patina rather than brand-new shine.
Buff for the final luster
This is the part that makes people understand the product’s name. Once the finish begins to set, gently buff with a soft cloth. More buffing generally means more shine. If you want a muted old-gold or dusty silver look, stop earlier. If you want a richer gleam, keep going. In other words, you are in charge of whether the ornament whispers elegance or loudly demands a spotlight.
Let it dry before hanging or storing
Even if the surface seems dry quickly, giving the ornaments extra time before hanging, stacking, or boxing them up is wise. Optional sealant can help extend the finish, especially if the ornaments will be handled a lot, but test first because sealers can slightly change sheen or color. For outdoor or moisture-prone use, extra caution is smart. This finish is better suited to decorative indoor life than weather combat.
Best Rub ’n Buff Color Ideas for Ornaments
Antique Gold
This is the crowd-pleaser. Antique Gold gives ornaments warmth without the brassy shout of some brighter metallics. It looks beautiful on cream, forest green, burgundy, navy, dusty blue, and matte black. If your holiday style is traditional, European-inspired, or slightly grandmillennial, Antique Gold is probably your friend.
European Gold
European Gold usually reads a little cooler and softer. It works especially well if you want elegance without too much yellow. Pair it with blush, linen, soft white, sage, or weathered gray for a refined, quietly expensive look.
Silver Leaf or Pewter
These shades are fantastic when you want wintery depth rather than warmth. Silver Leaf leans brighter and cleaner, while Pewter brings a moodier, aged feel. Both can elevate dark ornaments, especially charcoal, midnight blue, deep green, and frosted white.
Spanish Copper or Autumn Gold
If your holiday decor includes cinnamon tones, brown velvet ribbons, dried oranges, or wood beads, coppery shades are a strong choice. They feel cozy, collected, and a little unexpected. They also work beautifully for late-fall-to-Christmas transitions, which is useful if you prefer your decor with less peppermint and more candlelit library.
Creative Rub ’n Buff Ornament Ideas
Mercury-glass inspired makeover
Older silver ornaments can be refreshed with gold or copper Rub ’n Buff to create a mixed-metal vintage effect. This technique works especially well when the original finish already has age or mottling. Instead of hiding imperfections, you lean into them. Suddenly “old” becomes “curated.”
Matte base plus metallic highlights
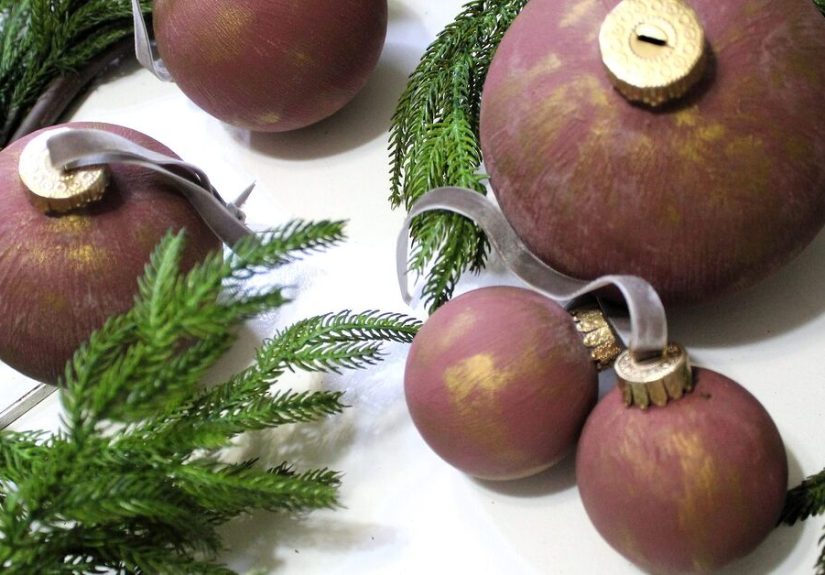
Paint the ornament in a chalky or muted base color first, let it dry completely, and then add Rub ’n Buff on raised areas or around the edges. This creates depth and makes the ornament feel layered rather than flat. The combination is especially pretty on embossed ornaments and molded details.
Brush-and-dab texture
For a softer, painterly finish, use a brush to dab the wax in irregular patterns. This breaks up the metallic surface and keeps everything from looking too perfect. Ironically, less perfection often looks more expensive in holiday decor. A little unevenness suggests age, handwork, and personality.
Taped designs
If you want cleaner lines, use painter’s tape to create sections, stripes, or geometric patterns. Metallic bands on matte ornaments can look surprisingly upscale. It is simple, modern, and does not require the steady hand of a surgeon.
Cap and hardware upgrade
Sometimes the ornament body is fine, but the cap looks cheap. Fixing only the cap and top hardware with metallic wax can instantly elevate the entire ornament. This is one of the fastest holiday upgrades on the planet and deserves much more appreciation.
Coordinated mixed-metal collection
Instead of making every ornament identical, choose two or three metallic tones and repeat them across your tree. This creates cohesion without monotony. A collection of gold, pewter, and copper ornaments often looks more collected over time, which is exactly the illusion many decorators want.
Common Mistakes to Avoid
Using too much product: Rub ’n Buff is not shy. Even a little can cover a lot. Start tiny.
Skipping prep on slick surfaces: Clean first, lightly scuff when needed, and do not expect miracles from a dusty ornament pulled straight out of storage.
Rushing the buffing stage: Buff too soon or too hard and you may smear the finish. Let it set slightly, then polish gently.
Ignoring test patches: Try the finish on the back or bottom first, especially if the ornament is glossy, fragile, or already painted.
Assuming every sealer behaves the same: Test before sealing the whole batch. Shine can shift.
Forgetting ventilation and heat awareness: Craft comfortably, use airflow, and keep the product away from direct heat. Holiday sparkle should not come with avoidable drama.
Are Rub ’n Buff Ornaments Worth It?
Absolutely, especially if you enjoy decor that looks layered, collected, and more expensive than it was. Rub ’n Buff ornaments solve several holiday decorating problems at once. They help you reuse what you already own, upgrade thrifted finds, create a vintage look without luxury-store pricing, and customize your tree so it actually looks like yours.
They are also flexible. You can go maximalist and turn your tree into a gilded masterpiece, or stay subtle and just add metallic accents to a few sentimental pieces. The finish works with traditional Christmas decor, old-world European styles, cottage holiday looks, moody winter palettes, and modern neutral themes. That kind of range is rare for a humble tube of wax.
Most of all, Rub ’n Buff ornaments feel personal. They do not look mass-produced. They look handled, considered, edited, and made with intention. And during a season that can sometimes feel like an endless conveyor belt of shopping and shipping notices, that handmade quality is part of the appeal.
What the Experience of Making Rub ’n Buff Ornaments Is Really Like
Making Rub ’n Buff ornaments is one of those craft experiences that starts with cautious curiosity and ends with you side-eyeing half the decor in your house, wondering what else could use “just a little metallic improvement.” The process tends to be surprisingly satisfying because the transformation happens fast. Unlike some projects that require eight drying cycles, two existential crises, and a dedicated spreadsheet, this one rewards you early.
The first experience most people notice is how dramatic the change can be from the smallest amount of product. You touch a dull ornament with a tiny bit of wax, buff lightly, and suddenly it looks far more refined. That quick payoff makes the project feel fun instead of tedious. It also creates a dangerous but understandable confidence. One minute you are upgrading a thrift-store ornament. Ten minutes later, you are inspecting candlesticks, frames, and random decorative birds with suspicious ambition.
There is also a very particular pleasure in working with older ornaments. A faded finish, a scratched spot, or a slightly dated color scheme can turn into an advantage rather than a flaw. The piece already has character, and Rub ’n Buff enhances it instead of erasing it. That makes the project feel less like generic crafting and more like editing a story. You are not just adding shine. You are deciding what kind of history the ornament seems to carry.
Of course, the experience is not perfectly glamorous. Your fingers will absolutely try to become metallic if you skip gloves. You will probably underestimate how little product you need at least once. At some point you may hold an ornament up to the light and think, “I have ruined it,” only to buff it thirty seconds later and realize it looks fantastic. That emotional roller coaster is part of the charm. Rub ’n Buff ornaments often look awkward in the middle and lovely at the end.
Another common experience is discovering how personal the finish can be. Some people prefer a soft, worn patina that looks quietly antique. Others love a fuller metallic finish that catches tree lights from across the room. Some want every ornament coordinated; others want a collected mix that feels inherited over decades. Rub ’n Buff supports all of those approaches. It does not force a single aesthetic. It gives you a tool and lets your taste do the talking.
Perhaps the most rewarding part is what happens after the ornaments go on the tree. They tend to look more layered and more intentional than standard store-bought pieces because they literally are. Guests notice them. You notice them. And because you had a hand in the finish, they often feel more meaningful than something tossed into a cart during a holiday sale. Even a simple ball ornament can feel special once it has been cleaned up, buffed out, and given a little personality.
In that sense, the experience of making Rub ’n Buff ornaments is not really about the wax alone. It is about rescue, reinvention, and that deeply satisfying moment when something ordinary becomes beautiful because you took the time to see its potential. Also, yes, it is about the thrill of saying, “I made those,” in a tone that casually suggests you might now own a holiday styling empire.
Conclusion
Rub ’n Buff ornaments are proof that holiday decorating does not have to be expensive to feel elevated. With a small amount of metallic wax, a few basic supplies, and a little patience, you can turn plain, dated, or thrifted ornaments into pieces that look warm, storied, and beautifully custom. Whether your style leans antique gold elegance, frosty silver restraint, or mixed-metal holiday drama, this technique gives you room to create a tree that feels collected instead of copied. And frankly, that is a lot of power for one tiny tube.




