Table of Contents >> Show >> Hide
- What Makes Ribbon Candy Different From Regular Hard Candy?
- Old-Fashioned Ribbon Candy Ingredients
- Equipment You Should Not Skip
- How to Make Old-Fashioned Ribbon Candy
- Why Corn Syrup Is In the Recipe
- Best Tips for Success
- Troubleshooting Your Homemade Ribbon Candy
- Flavor Ideas for Ribbon Candy
- Serving and Gifting Ideas
- The Experience of Making Old-Fashioned Ribbon Candy at Home
- Conclusion
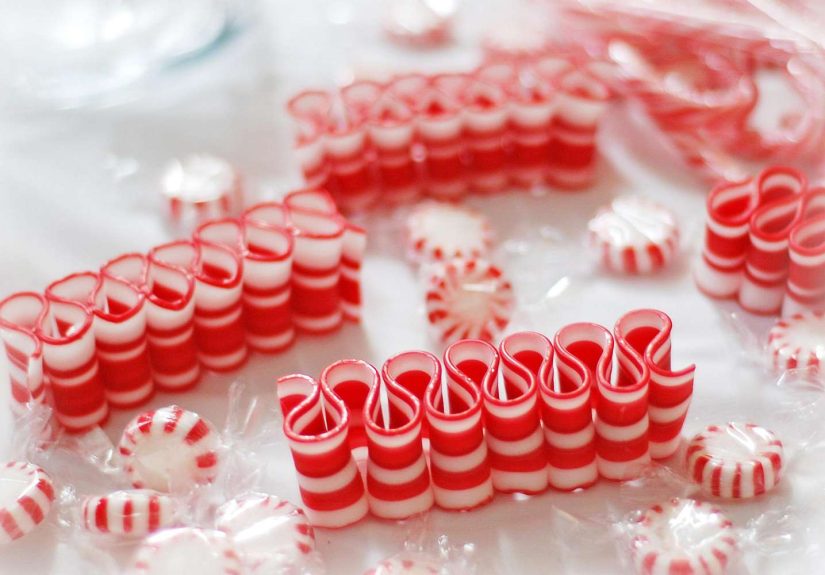
There are holiday sweets, and then there is old-fashioned ribbon candythe glamorous, slightly dramatic, definitely fragile confection that looks like it belongs in a Victorian candy shop window next to a tin of peppermint sticks and a grandma with elite cookie opinions. It is glossy, striped, delicate, and just fussy enough to make you feel like a kitchen magician when it works.
This guide walks you through a true homemade ribbon candy recipe with practical tips, plain-English troubleshooting, and a little moral support for the moment when molten sugar starts acting like it has a personality. Ribbon candy is not hard because the ingredient list is complicated. It is hard because sugar is an overachiever. Get the temperature right, move with confidence, and you can turn a simple syrup into a nostalgic vintage Christmas candy that looks far more expensive than it is.
If you have never made pulled sugar candy before, take a deep breath. This recipe is very doable for patient home cooks, especially if you set up your pans, tools, and colors before the syrup hits temperature. Think of it as part recipe, part craft project, part tiny Olympic event for your candy thermometer.
What Makes Ribbon Candy Different From Regular Hard Candy?
Most classic hard candy recipes are cooked all the way to the hard-crack stage, then poured, molded, or broken into shards. Ribbon candy is a little different. Instead of cooking the syrup to a fully brittle stage before shaping, the candy is often cooked slightly lower so it stays pliable long enough to be pulled, twisted, stretched, and curled into those signature ribbons.
That is why homemade ribbon candy feels half confection, half performance art. You are not just making candy. You are timing color, heat, texture, and movement. The reward is worth it: crisp edges, a satiny sheen, and that classic striped look that screams old-school holiday charm.
Old-Fashioned Ribbon Candy Ingredients
For the candy
- 3 cups granulated sugar
- 1 cup light corn syrup
- 1/4 cup water
- 1/2 teaspoon peppermint extract
- Red food coloring, as needed
- Green food coloring, as needed
- Neutral oil or nonstick spray, for pans and tools
Optional but very helpful
- Heat-safe gloves
- Bench scraper or metal spatula
- Oiled kitchen shears
- Powdered sugar for lightly dusting finished pieces if your kitchen is humid
Equipment You Should Not Skip
If there is one thing this old-fashioned ribbon candy recipe does not want you to wing, it is temperature. A reliable candy thermometer matters. So does a warm oven, which helps keep portions of candy pliable while you shape the rest. Before you begin, lightly oil four baking sheets or large heat-safe trays, and preheat your oven to 200°F. You are not baking the candy. You are basically giving it a little backstage waiting room.
You will also want a marble slab, silicone mat on a heat-safe surface, or a sturdy cutting board that can handle hot sugar. And because molten sugar is roughly as forgiving as a tax audit, keep kids, pets, loose sleeves, and unnecessary chaos away from the stove.
How to Make Old-Fashioned Ribbon Candy
Step 1: Prep everything before the sugar starts cooking
Grease four baking sheets or trays. Set out your food coloring, extract, spatula, bench scraper, and scissors. Preheat the oven to 200°F. Once sugar syrup reaches the right stage, things move quickly, and this is not the moment to start rummaging through a drawer while saying, “I know I had scissors somewhere.”
Step 2: Make the syrup
In a large heavy saucepan, combine the sugar, corn syrup, and water. Cook over medium heat, stirring just until the sugar dissolves completely. Once the mixture comes to a boil and the sugar is dissolved, stop stirring. Let the syrup cook until it reaches 285°F.
That lower finishing temperature is what makes this peppermint ribbon candy workable. If you cooked this batch like a standard lollipop base to full hard crack, it would become too brittle too quickly for pulling and shaping.
Step 3: Add flavor
Take the pan off the heat and stir in the peppermint extract. Work carefully and avoid leaning directly over the pot. Hot sugar syrup plus aromatic extract equals an impressive burst of steam you do not want greeting your face like an overeager holiday relative.
Step 4: Divide and color the candy
Pour one-third of the syrup onto a prepared tray and place it in the warm oven to stay soft. Pour another third onto a second tray, add green coloring, and place that tray in the oven too. Add red coloring to the remaining syrup and pour it onto your heat-safe work surface.
This method gives you the classic red, white, and green look associated with vintage Christmas candy. If you prefer, you can make two-color ribbons instead, which is a little easier for first-timers.
Step 5: Pull the first color
Let the red candy sit just until it develops a thin skin and is cool enough to handle with gloves, but still very warm. Use an oiled bench scraper to fold and move it around as it cools. Then start pulling: stretch the candy into a rope, fold it back on itself, twist lightly, and pull again.
After repeated pulling, the candy will turn lighter, more opaque, and satiny. That shine is one of ribbon candy’s defining features. Once it is pliable but no longer lava-coded, shape it into a log about 2 inches thick and return it to a prepared tray in the warm oven.
Step 6: Repeat with the white and green portions
Pull the plain candy until it becomes pearly and opaque, then form it into a log. Repeat with the green portion. Keep the finished logs warm in the oven while you work. The goal is to hold each section at that magical point where it is flexible enough to stretch but not so soft that it droops like a sad scarf.
Step 7: Form the ribbon candy
Cut a 5-inch piece from each log and place the three pieces side by side with the white in the center. Gently press them together, then pull the combined rope into a thinner strip about 1 inch high. Twist lightly as needed so the stripes stay visible and pretty.
Using oiled kitchen shears, cut the strip into 6- to 8-inch lengths. Immediately curl each piece into a ribbon shape while it is still warm. Let the candies harden completely at room temperature.
Step 8: Store correctly
Once set, wrap the candies individually in cellophane or store them in layers between wax paper in an airtight container. Ribbon candy is beautiful, but it has a long and slightly dramatic history of turning sticky when humidity shows up uninvited.
Why Corn Syrup Is In the Recipe
Some people see corn syrup in a candy recipe and immediately try to negotiate with the ingredient list. In this case, it earns its spot. In classic sugar work, a small amount of corn syrup helps reduce crystallization so the finished candy stays smooth instead of grainy. It also makes the syrup more cooperative while cooking, which is what you want when your dessert already requires the focus of a tiny aerospace launch.
Could you experiment without it? Sure. But for a reliable old-fashioned ribbon candy recipe, keeping the corn syrup is the smart move.
Best Tips for Success
1. Check your thermometer first
If your thermometer runs hot or cold, your candy will too. Test it in boiling water before you begin so you can adjust your final target temperature if necessary.
2. Do not make candy on a swampy day
Humidity is the sworn enemy of crisp candy. If the weather is sticky, your candy may stay soft, absorb moisture, or become tacky later. Air conditioning or a dehumidifier can help.
3. Stir only at the beginning
Stir while dissolving the sugar, then stop. Continued stirring after the syrup starts boiling can encourage crystallization and leave you with a grainy batch instead of glossy ribbon candy.
4. Oil your tools lightly
A little oil on trays, spatulas, gloves, and scissors helps the candy release and shape more cleanly. Too much oil, though, can make the surface greasy and harder to handle.
5. Work in small sections
Trying to shape the whole batch at once is a great way to invent new candy-related stress. Keep portions warm and manageable, and form ribbons a few pieces at a time.
Troubleshooting Your Homemade Ribbon Candy
The candy is sticky
Usually this means one of three things: the syrup did not cook hot enough, the kitchen was humid, or the finished candy was not stored airtight. A light dusting of powdered sugar can help a little, but proper storage is the real fix.
The candy turned grainy
Graininess often starts with sugar crystals on the sides of the pot or too much stirring after boiling begins. Next time, dissolve the sugar fully at the start, stop stirring once it boils, and brush down crystals with a wet pastry brush if needed.
The candy hardened before I could shape it
That is exactly why the warm oven trick is so useful. If a piece becomes too stiff, place it back in the oven for a few minutes until it softens slightly. You want pliable, not melted.
The stripes look messy
Welcome to the club. The first batch is usually more “abstract holiday art” than “museum-quality peppermint perfection.” It still tastes great. With practice, your pulls will get thinner, neater, and more evenly striped.
Flavor Ideas for Ribbon Candy
Peppermint is the classic choice, but this holiday candy recipe is surprisingly flexible. Try cinnamon for a bold old-school candy-shop flavor, lemon and orange for a citrus version, or cherry and vanilla for something that feels delightfully retro. If you use strong candy oils or concentrated flavorings, go carefully. A little goes a long way, and no one wants ribbon candy that tastes like mouthwash with ambitions.
You can also change the colors for different occasions. Red and white make a candy-cane vibe, pastel shades work for spring, and amber-striped ribbons can feel wonderfully old-fashioned in an almost caramel-shop sort of way.
Serving and Gifting Ideas
Ribbon candy is perfect for holiday tins, dessert boards, edible gifts, and cookie exchange tables that need one flashy overachiever. Pile it into a glass jar, tuck a few pieces into cellophane bags, or use it as a decorative finish on a dessert tray. Just do not stack it naked in a humid kitchen and expect it to remain flawless. Ribbon candy is delicious, but it does believe in boundaries.
The Experience of Making Old-Fashioned Ribbon Candy at Home
Making old-fashioned ribbon candy is one of those kitchen experiences that feels bigger than the ingredient list. On paper, it is just sugar, corn syrup, water, flavoring, and color. In real life, it becomes an event. The room warms up. The thermometer suddenly becomes the most important object in the house. You start speaking in short, decisive phrases like a contestant on a baking show. “Tray ready?” “Scissors ready?” “Why is the green portion judging me?”
For many people, ribbon candy carries a built-in sense of nostalgia. Even if you did not grow up making it, you probably saw it somewhere: in a grandmother’s candy dish, a holiday market, a decorated bakery case, or a tin that looked too fancy for everyday snacking. It is one of those sweets that instantly suggests Christmas music, cold weather, and relatives arguing about whether the tree lights should be white or “fun.”
The first attempt usually comes with a learning curve. The candy may cool too fast. The ribbons may look more like festive lightning bolts than elegant loops. One stripe may be thick while another disappears completely. That is normal. Ribbon candy is not the kind of recipe that rewards perfectionism on round one. It rewards preparation, calm hands, and a willingness to laugh when one piece looks less like ribbon and more like a peppermint eel.
But that is also what makes it memorable. Unlike drop cookies or brownies, ribbon candy demands your full attention. You cannot casually scroll your phone while shaping it. You are in it. You are stretching, twisting, cutting, curling, and hoping the tray in the oven is staying just warm enough. It turns the kitchen into a workshop, and that hands-on process is a big part of the appeal.
There is also something satisfying about how quickly the transformation happens. A glossy, transparent syrup turns into a satiny rope. A rope becomes a striped band. A striped band becomes a curled piece of candy that looks like it came from a specialty shop with very expensive wallpaper. Few homemade sweets feel that theatrical.
And then there is the moment when the batch finally cools. The ribbons harden. The colors brighten. The shapes hold. You realize you made a candy that most people only ever buy, and suddenly even the awkward pieces look charming. In fact, those oddball shapes often become everyone’s favorite because they prove the candy was made by hand, not stamped out by a machine.
That homemade quality is what keeps people coming back to recipes like this. Ribbon candy is not just about sugar; it is about tradition, patience, and the little stories attached to holiday cooking. It is the kind of treat that invites conversation. Someone always asks how you made it. Someone else says they have not seen it in years. Someone inevitably bites too enthusiastically and discovers that ribbon candy still shatters like it means business.
So yes, making ribbon candy can be finicky. It can be a little messy. It can absolutely test your timing. But it also delivers the kind of kitchen memory that lasts much longer than the candy itself. And that, honestly, is part of why an old-fashioned ribbon candy recipe still matters. It is not just dessert. It is edible holiday theater.
Conclusion
If you want a candy that feels classic, looks spectacular, and tastes like holiday nostalgia with a crisp peppermint snap, this old-fashioned ribbon candy recipe is worth the effort. It requires attention, but not mystery. Prep well, trust the thermometer, keep portions warm, and do not let a slightly wonky first batch discourage you. Even imperfect ribbon candy has charm. It is homemade, dramatic, and unmistakably festivebasically the dessert version of showing up to a party in velvet.




