Table of Contents >> Show >> Hide
- Why Octopus Magnets Are Such a Fun DIY Project
- Materials I Used for My Octopus Magnets
- Choosing the Right Magnet
- Designing the Octopus Shape
- Color Ideas for Octopus Magnets
- How I Made the Octopus Magnets Step by Step
- Common Mistakes and How to Avoid Them
- Creative Variations to Try
- Why Handmade Magnets Make Great Gifts
- My Personal Experience Making Octopus Magnets
- Final Thoughts
There are craft projects that begin with a noble purpose, like organizing your home, making a thoughtful handmade gift, or proving to yourself that you can use a glue gun without creating a small crime scene. Then there are craft projects that begin because you look at a blank refrigerator and think, “You know what this appliance needs? Tentacles.” That, dear reader, is how I made some octopus magnets.
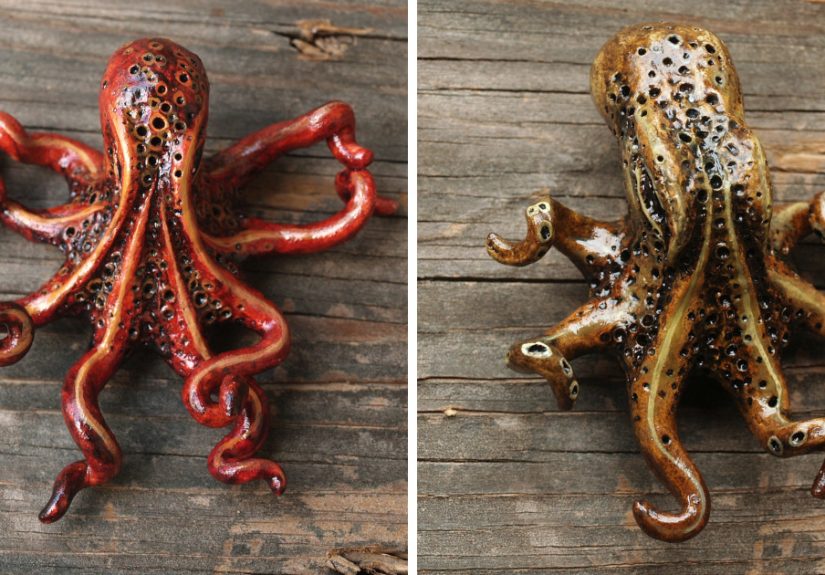
Octopus magnets are exactly what they sound like: small handmade octopus-themed decorations with magnets attached to the back, ready to cling to a refrigerator, locker, filing cabinet, magnetic board, or any other metal surface that looks emotionally prepared for sea life. They are charming, surprisingly easy to personalize, and weirdly satisfying to make. A tiny octopus has personality before it even has eyes. Add little suckers, a swirly tentacle, and a mildly judgmental expression, and suddenly your fridge looks like it has hired an underwater receptionist.
This guide blends real crafting practices with a little marine-inspired design logic. Octopuses are famous for their eight arms, soft bodies, color-changing skin, clever behavior, and dramatic talent for looking like they know more than everyone in the room. Those traits make them perfect for DIY fridge magnets because every magnet can be cute, spooky, elegant, cartoonish, realistic, or “I accidentally made a sea pancake, but I love him.”
Why Octopus Magnets Are Such a Fun DIY Project
The best crafts are small enough to finish, creative enough to feel personal, and forgiving enough that a mistake can be renamed as “texture.” Octopus magnets check every box. They do not require a giant studio, expensive tools, or the patience of a museum restorer. You can make them from polymer clay, air-dry clay, resin, felt, shrink plastic, painted wood shapes, or even recycled bottle caps with sculpted details on top.
Octopuses also give you a lot of design freedom. A heart magnet must look like a heart. A star magnet must look like a star. But an octopus? It can have curled arms, sleepy eyes, tiny glasses, a sailor hat, glitter freckles, a bow tie, or the mysterious expression of someone who just solved a puzzle box and refuses to explain how. Because real octopuses can shift color and texture, even unusual color choices feel believable. Purple, coral, teal, sandy beige, pumpkin orange, pearl white, midnight bluesomehow they all work.
Materials I Used for My Octopus Magnets
For my octopus magnets, I used oven-bake polymer clay because it holds detail well, stays workable until baked, and creates a durable finished piece when handled correctly. Air-dry clay can also work, especially for beginners or classroom-style crafts, but it is more porous and usually benefits from sealing after it dries. Polymer clay is excellent for small sculpted magnets because it allows smooth curves, tiny suckers, and expressive faces without needing advanced sculpting skills.
Basic Supplies
- Oven-bake polymer clay in octopus-friendly colors
- Small round ceramic or neodymium magnets
- Strong craft adhesive, super glue, or two-part epoxy
- Acrylic paint for details
- Clear acrylic sealer or varnish, if needed
- Toothpicks, dotting tools, or clay sculpting tools
- Parchment paper, ceramic tile, or a safe work surface
- A baking tray used only for crafts
- Fine brush or paint marker for eyes and accents
A quick safety note: small strong magnets should be kept away from young children and pets. Loose high-powered magnets can be dangerous if swallowed. For a decorative craft like this, the magnet should be securely attached, and finished pieces should not be treated like toys. Cute does not automatically mean chewable, no matter what your dog believes.
Choosing the Right Magnet
The magnet is the quiet hero of this project. Nobody compliments the magnet when the octopus is hanging proudly on the fridge, but if the magnet is weak, the octopus slowly slides downward like it has given up on life. For lightweight clay pieces, small ceramic disc magnets are often enough. For heavier pieces, stronger magnets may be needed, but they must be handled carefully and attached very securely.
Flat-backed magnets are easiest to use. A round disc magnet fits nicely behind a small clay octopus body, while a strip or sheet magnet may work better for a flatter design. Before gluing anything, test the magnet on your refrigerator or magnetic board. Some stainless-steel appliances are not strongly magnetic, which is deeply rude but common enough to check before you make an army of sea creatures.
Designing the Octopus Shape
The simplest octopus magnet starts with a rounded head and eight arms arranged like a soft little starburst. Since the magnet needs to sit flat, I recommend designing the back of the octopus as a flat surface. Think of it as a sculpture with one practical side. The front gets personality; the back gets engineering.
Start by rolling a ball of clay for the head. Press it gently against your work surface to flatten the back. Then create eight small clay coils for arms. They do not need to be identical. In fact, slightly uneven arms look more natural and more adorable. Curl a few arms inward, let one wave upward, and tuck another under the body. Suddenly the octopus looks like it has plans.
Adding Tentacle Details
The suckers are where the magic happens. You can make them with tiny dots of lighter clay, small indentations from a toothpick, or painted circles after baking. If you want a realistic look, use a repeating pattern of small circles along the underside of each arm. If you want a cartoon style, add fewer, larger suckers so the design stays clean and readable.
Texture also helps. Real octopuses can change the appearance of their skin, and a handmade version looks more lively with subtle surface detail. A toothbrush, crumpled foil, or the tip of a clay tool can create a lightly bumpy texture. Just do not overdo it unless your goal is “octopus that has been through a waffle iron.”
Color Ideas for Octopus Magnets
One of the best parts of making octopus magnets is choosing colors. A soft coral octopus feels beachy and cheerful. A deep purple octopus looks magical. A blue-green octopus gives coastal mermaid energy. A red-orange octopus looks bold and classic. A white or pale gray octopus can feel elegant, especially with gold accents or pearly shimmer.
You can also blend colors by kneading two shades of clay together only partially. This creates marbling, which looks especially good on sea creatures. A swirl of turquoise and navy can mimic ocean water, while pink and orange create a sunset reef effect. If you prefer painting after baking, use a neutral clay base and add acrylic paint in thin layers.
How I Made the Octopus Magnets Step by Step
Step 1: Prepare the Work Area
I covered my table with parchment paper and kept a damp cloth nearby for wiping dust and fingerprints. Polymer clay picks up lint like it has a personal vendetta against clean surfaces, so a tidy workspace matters. I also separated tools used for clay from anything used for food. Craft tools and kitchen tools should not live a double life.
Step 2: Condition the Clay
Conditioning means kneading the clay until it becomes soft, smooth, and flexible. This prevents cracking and makes shaping easier. I rolled the clay between my palms, folded it, rolled it again, and repeated until it stopped acting like a stubborn eraser. If clay becomes too soft, let it rest for a few minutes or place it somewhere cool before continuing.
Step 3: Shape the Head and Body
I rolled a medium ball for the head, then pressed the back gently against the table so it would sit flat after baking. For a cuter look, I made the head slightly oversized compared to the arms. This gives the magnet a cartoon charm and leaves room for big eyes, tiny eyebrows, or the expression of a sea creature who has seen your grocery list and has concerns.
Step 4: Create the Arms
Next, I rolled eight small coils. I tapered each coil slightly at the end and arranged them under the head. The trick is to press the arms firmly enough that they bond with the body but not so hard that everything turns into a clay puddle. I curled the tips with a toothpick and varied the positions so the octopus looked lively instead of like a symmetrical ceiling fan.
Step 5: Add Suckers and Face Details
For the suckers, I used tiny dots of pale clay and pressed them gently onto the arms. This takes patience, but the result is worth it. If you are short on time, you can paint the suckers after baking instead. For the face, I added two small black clay dots for eyes and a tiny curved mouth. One octopus got a surprised expression. Another looked smug. I do not know what it was smug about, but I respected its confidence.
Step 6: Bake the Clay Correctly
Polymer clay should be baked according to the package instructions because different brands and formulas can vary. Many common oven-bake clays cure around 275°F, often based on thickness, but the package is the final boss here. I placed the pieces on parchment paper over a baking tray and checked that no arms were sticking up too high or leaning into danger. After baking, I let the pieces cool completely before touching them.
Step 7: Paint and Seal
Once cooled, I added tiny painted highlights: white dots in the eyes, soft blush on the cheeks, and a few darker spots across the head. Acrylic paint works well for small details. Sealer is optional for some polymer clay pieces, but it can protect painted areas and add a finished look. Matte sealer keeps the octopus soft and modern, while gloss makes it look fresh from the tide pool. Use thin coats and allow each coat to dry fully.
Step 8: Attach the Magnets
The magnet should be attached only after the clay is baked and cooled. I lightly roughed up the back of the clay and the surface of the magnet so the glue had more grip. Then I used a strong adhesive, pressed the magnet in place, and let it cure undisturbed. This is the hardest part because the finished octopus is sitting there, adorable and unemployed, and you want to put it on the fridge immediately. Resist. Let the glue do its job.
Common Mistakes and How to Avoid Them
The first mistake is making the octopus too heavy. A thick clay magnet may look impressive, but it needs a stronger magnet and more reliable glue. Keep the design small, flat-backed, and lightweight. The second mistake is attaching the magnet before baking. Most magnets and adhesives are not meant to be baked, so attach them afterward.
The third mistake is rushing the paint or sealer. If the paint is not dry before sealing, it can smear. If the sealer goes on too thick, it may dry unevenly or feel tacky. Thin coats are boring but powerful. Crafting often rewards the person who waits, which is unfortunate for those of us who consider patience a limited-edition personality trait.
Creative Variations to Try
Once you make one octopus magnet, ideas start multiplying. You can make a whole family of ocean magnets: octopus, squid, jellyfish, crab, starfish, shell, and tiny seaweed. You can make seasonal octopuses, too. A Halloween octopus with a witch hat. A Christmas octopus holding a candy cane. A Valentine octopus hugging a heart. A graduation octopus wearing a cap and looking like it has eight student loans.
You can also make themed sets. A “coffee octopus” could hold a tiny mug in one arm. A “book lover octopus” could wrap its arms around a miniature book. A “kitchen octopus” could hold a spoon, a tomato, and a look of culinary panic. These details make handmade magnets feel giftable rather than random.
Why Handmade Magnets Make Great Gifts
Handmade magnets are small, affordable, useful, and easy to personalize. They do not require knowing someone’s clothing size, wall color, or complicated taste in home decor. A magnet can hold a photo, a recipe, a reminder, a child’s drawing, or the electric bill you keep pretending is not real. When the magnet is shaped like a tiny octopus, even boring paperwork gets a little personality.
Octopus magnets are especially good for ocean lovers, teachers, marine biology fans, kids’ rooms, beach house decor, office boards, and anyone who appreciates cute weird things. They can also be sold at craft fairs or included as small add-ons in handmade shops. Since each one can be slightly different, imperfections become part of the charm.
My Personal Experience Making Octopus Magnets
Making these octopus magnets taught me that small crafts have a funny way of revealing your personality. I started with a neat plan: make six octopuses, keep them similar, use matching colors, attach magnets, done. Very professional. Very organized. Very “person who owns labeled storage bins.” Within twenty minutes, I had one cheerful coral octopus, one dramatic purple octopus, one tiny blue octopus that looked permanently startled, and one mystery blob I kept insisting was “abstract marine life.”
The biggest surprise was how expressive the faces became. A pair of eyes placed slightly higher made one octopus look innocent. Eyes closer together made another look suspicious, as if it had just discovered I used the last of the snacks. A tiny curved mouth changed the whole mood. I realized that handmade crafts are less about perfect symmetry and more about character. The octopus with the uneven arms became my favorite because it looked like it was waving hello and also trying to escape a meeting.
The suckers were the most time-consuming part. I tried making each one from tiny clay dots, and for a while I felt like a person training for an extremely specific Olympic event. Roll dot, place dot, press dot, repeat until questioning life choices. But once the arms had those little details, the magnets looked much more finished. The texture gave them depth and made the whole project feel intentional rather than “I rolled clay during a thunderstorm.”
I also learned that color blending is dangerously addictive. I mixed teal with a little white and navy, planning to make one marbled octopus. Then I made another. Then I started wondering whether every object in my home needed a marbled ocean makeover. The blended clay created a soft underwater look that paint alone could not quite match. It made each magnet unique without requiring complicated technique.
Attaching the magnets required the most discipline. I wanted to test them immediately, but glue needs time to cure. The first one I rushed slipped slightly, and the magnet dried off-center. It still worked, but the octopus leaned on the fridge like it had just heard disappointing news. After that, I placed the remaining pieces face down, added glue carefully, pressed the magnets flat, and left them alone. The next day, they held beautifully.
Seeing the finished octopus magnets on the refrigerator was weirdly delightful. They made the kitchen feel more playful without being cluttered. One held up a grocery list. Another guarded a takeout menu. The smallest one held a photo and looked extremely proud of its assignment. That is the charm of handmade decor: it turns ordinary spaces into places with tiny stories.
If I made them again, I would create a full ocean set with different expressions and maybe label each octopus with a personality. “Captain Cling.” “Professor Wiggles.” “Madame Ink.” “The Refrigerator Kraken.” I would also make a few flatter designs for stronger holding power and easier packaging if giving them as gifts. Still, the slightly chunky handmade ones have a cozy charm that machine-made magnets cannot copy.
The project reminded me that crafts do not have to be huge to be satisfying. Sometimes you do not need to repaint a room, build furniture, or reorganize your entire life. Sometimes you just need to make a tiny octopus, glue a magnet to its back, and let it hold your grocery list like a noble sea guardian. That feels like progress to me.
Final Thoughts
I made some octopus magnets, and honestly, I recommend the experience. They are fun to sculpt, easy to customize, and practical enough to justify making “just one more” until your refrigerator becomes a small aquarium with paperwork. Whether you use polymer clay, air-dry clay, resin, or painted wood, the key is to keep the design lightweight, attach the magnet securely, and let your octopus have a little personality.
This project is perfect for beginners, ocean lovers, handmade gift makers, and anyone who enjoys crafts with a sense of humor. A tiny octopus magnet may not change the world, but it can make your kitchen more cheerful, your notes harder to lose, and your fridge look like it has excellent taste in marine life.
Note: This article is an original, web-ready piece based on real craft methods, magnet safety guidance, polymer clay best practices, and factual inspiration from octopus biology.