Table of Contents >> Show >> Hide
- Why the Dune Sandworm Is a Crochet Dream Project
- Planning Your Crochet Sandworm: Design Before You Dive
- Materials That Make It Look “Desert Real”
- Stitch Strategies That Mimic Sandworm Segments
- Building the Body: A Practical, No-Drama Construction Plan
- Color Palette: How to Get That Dune Vibe Without Overthinking It
- Finishing Touches That Make It Look Professional
- A Quick Reality Check: “Inspired By” Crafting, Fan Art, and Selling
- Troubleshooting: When Your Sandworm Looks Like Something Else
- My Crochet Sandworm Journal: What I Learned (and Laughed About) Along the Way
- Conclusion
The first time I watched a sandworm rise out of the dunes in the Dune movies, my brain did what every craft brain does:
“I could make that… out of yarn.” Not a screen-accurate, VFX-level behemoth (my living room is not an IMAX),
but a cuddly, dramatic, coilable desert monster that looks like it could burst through a blanket, demand spice, and then politely
accept a lint roller.
If you’ve ever wanted to turn cinematic awe into something you can actually holdthis is your sign. In this guide, I’ll break down
how to design, crochet, and finish a sandworm-inspired project that feels unmistakably Dune without requiring a film crew,
a “Worm Unit,” or a ton of dust. (I will, however, recommend stitch markers and snacks.)
Why the Dune Sandworm Is a Crochet Dream Project
From a maker’s point of view, sandworms are basically a masterclass in repeatable texture. Their bodies are built from
rhythmic segmentationrings, ridges, and plates that translate beautifully into crochet techniques like back-loop rows, post stitches,
and surface detailing. Even better: a crochet sandworm doesn’t have to be “perfectly realistic” to be instantly recognizable.
If it’s long, ringed, and a little intimidating in the cutest way possible, you’re already in the ballpark.
The movies also help, because they give you a clear visual language to borrow: desert neutrals, warm shadows, gritty texture, and that
iconic circular mouth shape. You can lean into the vibe (weathered, sandy, ancient) or go full fan-art (neon worm, pastel worm,
“I came here to vibe and devour spice” worm).
Planning Your Crochet Sandworm: Design Before You Dive
Before you touch yarn, decide what kind of sandworm you’re making. This avoids the classic crafting phenomenon of
“I started a project and now it’s… an abstract tube with dreams.”
Pick your sandworm style
- Amigurumi-style plush: Soft, stuffed, and friendlygreat for gifts and shelves.
- Poseable desk worm: A lightly stuffed or weighted piece that can coil around plants, monitors, or books.
- Statement decor: A longer worm (2–5 feet) that drapes over a couch like it owns the place (because it does).
- Mini worm keychain: Tiny, quick, and dangerously addictive to make in batches.
Decide on size and proportions
A simple starting point is a worm that’s about 18–24 inches long with a slightly wider head and a tapering tail.
If you want drama, go longer. If you want portability, go shorter. If you want to lose track of time and emerge three days later with a
six-foot yarn serpent, I respect your journey.
Materials That Make It Look “Desert Real”
Your materials do most of the heavy lifting for the sandworm aesthetic. The right yarn + tight stitches = instant “Arrakis energy.”
Yarn
- Worsted (medium/#4): Easiest to control, great stitch definition, perfect for textured segments.
- Bulky (#5) or super bulky (#6): Faster results and a chunkier worm, but gaps can appear if tension is loose.
- Textured yarn (sparingly): A fuzzy strand can read as “sand” but can hide your stitchesuse it as an accent, not a trap.
Hook
Choose a hook that creates a dense fabric. For amigurumi-style work, crocheters often go down a hook size or two from
what the yarn label suggests, so the stuffing doesn’t show through. A dense fabric also helps the worm look more sculpted and less like
a snorkel from a cartoon.
Stuffing and structure
- Polyfill: Standard plush stuffing for a soft worm.
- Weighted pellets (optional): Add a bit in the belly so it coils and stays put on a shelf.
- Pipe cleaners or craft wire (optional): For poseability (wrap securely so it doesn’t poke out).
Eyes and mouth details
Many sandworm designs skip eyes entirely (which honestly increases the intimidation factor). If you’re adding eyes for a cute plush,
embroidered eyes are a safe, charming option. If you use plastic safety eyes, place them before closing the body and make sure they’re
attached correctlyonce they’re locked in, they’re not meant to move.
Stitch Strategies That Mimic Sandworm Segments
Sandworms read as sandworms because of their ringed, armored texture. You can build that texture in layers, from “simple but effective”
to “I have become stitch; destroyer of free time.”
Option 1: The easy segmented look (beginner-friendly)
- Single crochet in the round for the body (classic amigurumi base).
- Every few rounds, work a full round in back loop only to create a subtle ridge.
- Repeat that rhythm (e.g., 3 normal rounds, 1 back-loop round) for consistent “rings.”
Option 2: Deep ridges (intermediate)
- Use front post stitches on ridge rounds to build raised “plates.”
- Add surface crochet lines to emphasize segment edges.
- Use a second yarn color slightly darker or lighter for shadowed definition.
Option 3: Cinematic texture (advanced)
Combine multiple textures: ridges, bobbles, and selective surface lines. The goal is controlled chaoslike wind-carved dunes, but in yarn.
If your worm starts looking like a crocheted pineapple, scale back. (Unless you’re making “Dune: Tropical Edition,” in which case, carry on.)
Building the Body: A Practical, No-Drama Construction Plan
Here’s a straightforward approach that works for most sandworm styles:
1) Head and mouth area
Start with a slightly wider front section. You can increase quickly to create a “powerful” head, then maintain a steady circumference for
most of the body. For the mouth, you have two popular looks:
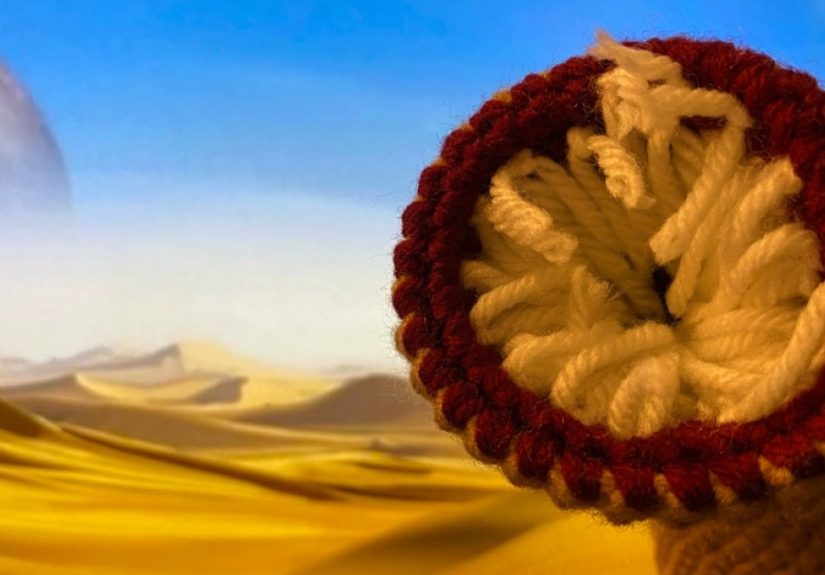
- Graphic circular mouth: A felt or crocheted circle with stitched “rings.”
- 3D mouth opening: A shallow opening with layered inner rings, keeping it stylized (cute-scary, not gross).
2) The long middle
This is where your segment pattern shines. Choose a repeat rhythm and stick to it. If you want a more “movie-inspired” look,
keep segments closer near the head and slightly wider apart toward the mid-body, like the worm is wearing armor that changes scale.
3) The tail taper
Gradually decrease over multiple rounds so the tail looks natural, not like it got clipped by your stitch marker. Finish with a tight close
so it stays neat.
Color Palette: How to Get That Dune Vibe Without Overthinking It
The simplest route is to stay in desert neutrals: sand, tan, camel, cinnamon, brown, and charcoal accents. But you can also play with:
- Ombre shading: Darker belly, lighter back, or vice versa.
- Weathering: Dry-brush a tiny amount of fabric-safe paint (optional) for “sand-dusted” edges.
- Spice-inspired accents: Warm orange or rust details around the mouth rings.
Pro tip: if your yarn color looks “too clean,” add a second strand in a slightly different neutral for a subtle marled effect.
It instantly reads more organic.
Finishing Touches That Make It Look Professional
Weaving in ends like you mean it
A sandworm is basically a long runway for ends to pop out and embarrass you. Weave ends back and forth through multiple stitches, then
trim close. If your worm will be handled often, weave extra securely.
Shaping and stuffing
Stuff gradually and evenly. For a plush worm, firm stuffing helps it look sculpted. For a poseable worm, lighter stuffing lets it bend and coil.
If you’re adding wire, keep it centered and padded so it never touches the outside fabric.
Make it “sandworm cinematic” with posing
Display matters. Coil it around a plant pot. Let it “peek” from behind books. Wrap it around a lamp like it’s the landlord now.
A little staging turns your crochet into a mini scene.
A Quick Reality Check: “Inspired By” Crafting, Fan Art, and Selling
Making fan-inspired crafts for personal use is common in fandom spaces, but selling items based on copyrighted films and characters can
get legally complicated fast. In the U.S., copyright law and trademark rules may apply, and “fair use” is a case-by-case analysis
(not a magic phrase you can put in an online listing like a protective spell).
If you plan to sell, consider safer routes:
- Create a generic “desert worm” pattern without using protected names, logos, or direct movie imagery.
- Focus on original design choices (unique textures, colors, story framing) that stand on their own.
- When in doubt, consult a qualified professional for guidanceespecially if you’re building a business.
Troubleshooting: When Your Sandworm Looks Like Something Else
“My stitches have gaps and the stuffing shows.”
Use a smaller hook, tighten tension, and consider yarn-under single crochet for a denser fabric. Also stuff graduallyoverstuffing can
force gaps open.
“It’s curling weirdly.”
Curling is often uneven tension. Try consistent stitch counts and check that your increases/decreases are spaced evenly. If you want
it to curl, you can also strategically add weight to the bottom.
“The segments aren’t obvious.”
Increase contrast: add deeper ridges (back-loop rounds more often), use surface crochet lines, or lightly shade between segments with a
second neutral yarn.
My Crochet Sandworm Journal: What I Learned (and Laughed About) Along the Way
I didn’t start with a masterpiece. I started with a lumpy tube that looked like it was auditioning to be a pool noodle. But that’s the
fun part of crafting something inspired by a big, dramatic movie: you get to translate “cinematic spectacle” into “cozy chaos” one stitch
at a time. Here are the real-world lessons I learned while crocheting my sandworm, in case you want to skip some of the trial-and-error
(or at least fail in a more entertaining direction).
1) Texture beats perfection. My early version had slightly uneven segments, and I kept trying to “fix” them. Then I realized:
real dunes aren’t symmetrical, and neither is a mythical desert creature. Once I leaned into textureadding consistent ridge rounds and
a little surface stitchingthe worm suddenly looked intentional. Crochet has a funny way of forgiving you when you commit.
2) The head needs attitude. If the front isn’t wider, it reads like “cute snake.” The moment I increased the head circumference
and added a bold mouth ring, the whole piece upgraded from “tube” to “legend.” Even a stylized mouth circle, stitched with concentric rings,
gave it that unmistakable sandworm presence.
3) Your hook size is your special effect. I tried a hook that was too large for my yarn, and the fabric got airygreat for a
summer shawl, terrible for a worm that’s supposed to feel dense and powerful. Going down a hook size made the stitches tight, the ridges
sharper, and the finished worm sturdier. It was the craft equivalent of switching from standard definition to 4K.
4) Neutrals aren’t boring; they’re cinematic. I thought I wanted a dramatic color. Then I tried a warm sand tone with a slightly
darker strand for marling, and it looked instantly “desert.” The subtle color variation made it feel textured even before I added extra stitches.
It also photographed better, which matters if you’re sharing online.
5) Long projects need mini milestones. Crocheting a long worm is basically a commitment ceremony. To stay motivated, I treated each
segment set like a checkpoint: “Finish five ridge cycles, then you may have coffee.” It kept the project fun instead of turning into a yarn marathon
fueled by stubbornness and questionable snacks.
6) Stuffing is a personality dial. Firm stuffing made my worm look bold and sculptedlike it was about to burst through the couch cushions.
Lighter stuffing made it drape and coil, which felt more like a decorative creature lurking around my bookshelf. I ended up mixing both:
firmer in the head for structure, softer in the middle for poseability.
7) Photos reveal what your eyes ignore. I stared at my worm for hours thinking, “Looks fine.” Then I took a quick photo and saw the truth:
my ridges were getting wider on one side because my tension drifted when I watched intense scenes. (Apparently my stitches react to drama.)
A few small adjustments fixed the silhouette.
8) The funniest part is naming it. I tried to be serious. I failed. The worm ended up with a nickname that sounded like a desert
rock band and a pet. That’s the charm of fan-inspired crafting: you can honor the epic source material while also making something that feels
personal, cozy, and a little ridiculousin the best way.
9) People recognize it faster than you think. Even without hyper-real details, friends immediately went, “Is that a Dune worm?”
That’s when I knew the project worked. You don’t need perfect accuracy; you need the right visual cues: rings, scale, mouth, and mood.
10) Making one will make you want to make another. The first worm teaches you the blueprint. The second worm is where you get playful:
bigger ridges, better shaping, maybe a tiny “mini worm” companion, maybe a spice-colored accent, maybe a whole shelf display that whispers,
“Yes, I crochet. Yes, I’m dramatic about it.”
If you’re on the fence, here’s my honest encouragement: start small. Make a mini worm first, practice your segment rhythm, and then scale up.
Because once you realize you can crochet something inspired by a huge cinematic creatureand make it adorableyou might never look at yarn the
same way again.
Conclusion
Crocheting sandworms inspired by the Dune movies is a perfect mash-up of fandom and fiber art: it’s bold, textural, customizable, and
surprisingly achievable once you break it into steps. Start with a strong silhouette, build segmentation with a simple repeat, and finish with
details that sell the “desert legend” vibe. Whether your worm ends up cute, terrifying, or “cuddly menace,” the real win is that you made something
cinematic with nothing but yarn, patience, and a refusal to let your stitch marker bully you.




