Table of Contents >> Show >> Hide
- Quick Reality Check: What You’re Replacing (Router vs. Modem vs. Gateway)
- Before You Swap: 10 Minutes of Prep That Saves 2 Hours of Regret
- Step-by-Step: How to Replace Your Router with a New One
- Step 1: Pick a good setup spot (for now)
- Step 2: Take a quick “cable map” photo
- Step 3: Power down in the right order
- Step 4: Disconnect the old router and connect the new router
- Step 5: Power up in the right order (this matters more than people think)
- Step 6: Connect to the new router for setup
- Step 7: Run Quick Setup (Internet connection type)
- Step 8: Set your Wi-Fi name and password (the “make life easy” moment)
- Step 9: Secure the router admin access (because default passwords are basically a welcome mat)
- Step 10: Restore “special” settings (only if you actually use them)
- Step 11: Test like a professional (without wearing a lanyard)
- Special Scenarios (Read This If Your Setup Is “Not Normal”)
- Troubleshooting: When the Lights Look Fine but the Internet Is Not
- After the Swap: Quick Home Network Security Checklist
- What to Do with the Old Router (Don’t Just Toss It in a Drawer of Doom)
- Conclusion: A Router Swap Is Mostly About Order, Not Bravery
- Real-World Experiences: What Usually Happens When People Replace a Router (So You Can Avoid the Weird Stuff)
Replacing a Wi-Fi router sounds like a tech chore that requires three engineering degrees, a soldering iron, and the patience of a saint.
In reality, it’s mostly unplugging things in the correct order and resisting the urge to “fix” settings that were never broken.
This guide walks you through a smooth, low-drama router swapwhether you’re upgrading for faster speeds, better coverage, fewer dropouts,
or because your old router has started making that sad blinking-light face that says, “I tried.”
Quick Reality Check: What You’re Replacing (Router vs. Modem vs. Gateway)
Before you start yanking cables like you’re defusing a movie bomb, identify what you actually have:
- Modem + Router (two separate boxes): Most common for cable internet. The modem connects to your ISP; the router creates your Wi-Fi network.
- Gateway (one combo box): A single device that acts as both modem and router (often provided by an ISP).
- Fiber ONT + Router: Fiber often uses an ONT (Optical Network Terminal) instead of a cable modem, then your router plugs into it.
- DSL modem/router situation: Some DSL setups require PPPoE login credentials (a username/password from your ISP).
The steps below work for most homes. Where things differ (gateway, fiber, DSL), you’ll see special notes so you don’t accidentally build a “double router sandwich.”
Before You Swap: 10 Minutes of Prep That Saves 2 Hours of Regret
1) Grab the essentials
- Your new router (and any mesh satellites/points if it’s a mesh system)
- Power adapter(s) (use the one that came with the new router)
- At least one Ethernet cable (preferably two)
- A phone or laptop for setup
- Your ISP info if needed (PPPoE username/password, static IP details)
2) Decide: Keep the same Wi-Fi name (SSID) and password, or start fresh?
If you keep the same SSID and Wi-Fi password as your old router, most devices will reconnect automaticallyphones, TVs, cameras, smart plugs, and that one printer that only works on Tuesdays.
Starting fresh is fine too, but expect to reconnect everything manually.
3) Screenshot your old “special” settings (optional, but smart)
If you ever did any of the following, take a few screenshots or notes from your old router’s admin page/app:
- Port forwarding (gaming consoles, remote desktop, security cameras)
- DHCP reservations (devices that always get the same local IP)
- Custom DNS (family filtering, faster DNS, etc.)
- Guest network name/password
- Parental controls or schedules
Don’t worry if you’ve never touched those settings. Most people haven’tand their internet still works. (Wild, I know.)
Step-by-Step: How to Replace Your Router with a New One
Step 1: Pick a good setup spot (for now)
For the initial setup, put the new router near your modem/ONT so cabling is easy. After everything works, you can move it to a better location
ideally a central, open spot (not inside a cabinet, behind a TV, or directly under a pile of “important” mail).
Step 2: Take a quick “cable map” photo
Snap a picture of how your old router is connected. You’re not admitting defeatyou’re creating documentation like a responsible adult.
Step 3: Power down in the right order
- Turn off or disconnect devices that are actively using the internet (optional, but it reduces chaos).
- Unplug power from the old router.
- Unplug power from the modem/ONT or gateway. If your modem has a battery backup, remove the battery too (if applicable).
- Wait at least 60–120 seconds. (This helps your ISP equipment and modem fully reset and “forget” old connections.)
Step 4: Disconnect the old router and connect the new router
Now do the physical swap:
- Unplug the Ethernet cable that goes from your modem/ONT/gateway to the old router.
- Plug that Ethernet cable into the WAN/Internet port on your new router (often labeled “Internet” or color-coded).
- If you have a wired device or a network switch, plug it into a LAN port on the new router (not WAN).
Step 5: Power up in the right order (this matters more than people think)
- Plug in and power on the modem/ONT first.
- Wait until the modem/ONT lights indicate it’s online/stable (this may take a few minutes).
- Plug in and power on the new router.
- Wait another couple of minutes for the router to boot and negotiate an internet connection.
Why this order? Your modem/ONT needs to establish the ISP connection first, then your router can request an IP address and start routing traffic.
Doing it backward often leads to the dreaded “Wi-Fi works but there’s no internet” situation.
Step 6: Connect to the new router for setup
Most new routers offer setup via an app, a web page, or both.
You’ll typically connect by:
- Joining the router’s default Wi-Fi network (printed on the router label), or
- Connecting your laptop to the router via Ethernet, then opening the setup page.
Step 7: Run Quick Setup (Internet connection type)
During setup, the router will ask how it should connect to the internet. Common options:
- Automatic/DHCP (most cable and many fiber setups): The router gets an IP automatically.
- PPPoE (common with some DSL/fiber providers): You enter an ISP-provided username/password.
- Static IP: You enter IP, gateway, subnet mask, and DNS details (usually business plans or special setups).
If you don’t know, try Automatic/DHCP first. If it fails, your ISP may require PPPoE credentials or a specific configuration.
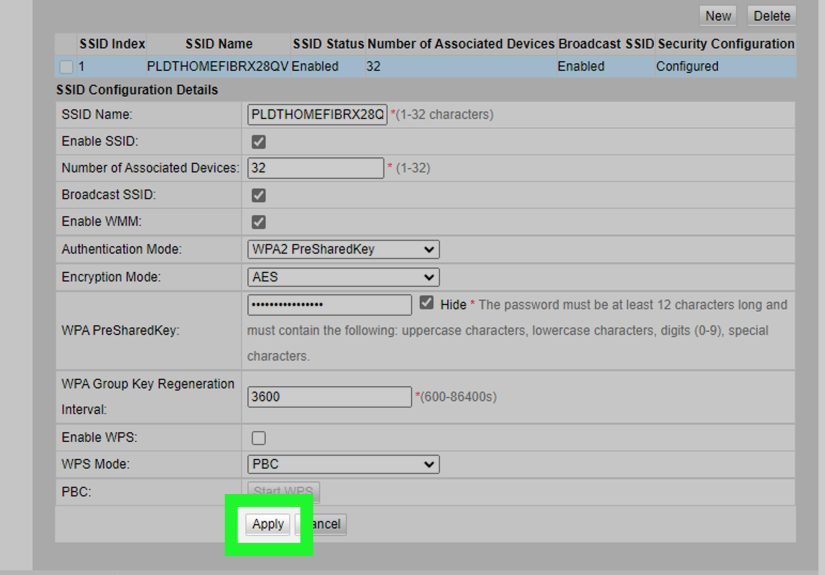
Step 8: Set your Wi-Fi name and password (the “make life easy” moment)
Here’s the most underrated trick in router replacement:
- If you want devices to reconnect automatically, set the new router’s SSID and Wi-Fi password to match the old router.
- If your old router used outdated security (like WPA/WEP), upgrade to WPA3 (or WPA2-AES if WPA3 isn’t available).
Pro tip: If you have lots of smart-home gadgets, keeping the same SSID/password can turn “reconnect 37 devices” into “watch them quietly come back to life.”
Step 9: Secure the router admin access (because default passwords are basically a welcome mat)
During or right after setup:
- Change the router admin password (not the Wi-Fi passworddifferent thing).
- Disable remote management unless you truly need it.
- Disable WPS if it’s on (convenient, but often not worth the risk).
- Turn on automatic firmware updates if your router supports themor at least check for updates now.
Step 10: Restore “special” settings (only if you actually use them)
If you took screenshots earlier, now’s when you re-enter them:
- Port forwards: Example: forwarding ports for a game console, a Plex server, or a camera DVR.
- DHCP reservations: Example: keeping your printer at the same local IP so your laptop stops pretending it’s a stranger every week.
- Custom DNS: Example: using a family-safe DNS provider or a performance-focused DNS.
- Guest network: Great for visitors and IoT devices that don’t need to see your computers.
Step 11: Test like a professional (without wearing a lanyard)
- Check internet on a phone (Wi-Fi) and a laptop (Wi-Fi).
- If possible, test a wired connection too (Ethernet is your “truth serum” for speed and stability).
- Run a speed test near the router, then in your usual problem spots.
- Open a few real-world apps: video streaming, a video call test, or your work VPN.
Special Scenarios (Read This If Your Setup Is “Not Normal”)
If you have an ISP gateway (modem/router combo)
If you’re plugging your new router into an ISP gateway, you may run into double NAT (translation: two routers both trying to be “the boss”).
Options:
- Best: Put the gateway into bridge mode (or IP Passthrough, depending on ISP) so your new router does the routing.
- Alternative: Put your new router into Access Point (AP) mode so the gateway remains the router.
If you’re not sure which to choose: bridge mode is typically the “use your own router fully” approach; AP mode is simpler but leaves routing features on the ISP device.
If you have fiber (ONT)
Many fiber setups are straightforward: ONT → router WAN port. Some providers require PPPoE credentials or VLAN tagging.
If Automatic/DHCP doesn’t work, check your ISP support page or contact them for the required connection type.
If you have DSL
DSL often uses PPPoE. If your new router asks for a username/password and you’ve never seen that before, your ISP can provide it.
Troubleshooting: When the Lights Look Fine but the Internet Is Not
Problem: “Wi-Fi connects, but there’s no internet”
- Power cycle correctly: modem/ONT off → wait → modem/ONT on (wait fully online) → router on.
- Check the cable: modem/ONT must go to the router’s WAN/Internet port, not a LAN port.
- Check router status: does the WAN show an IP address? If it’s 0.0.0.0 or blank, the router isn’t getting an address from the ISP.
- Try “Release/Renew” WAN: many routers have a button for this in the Internet/WAN settings.
- MAC address hiccup: some ISPs/modems can be picky and may “remember” the previous router. A full modem power cycle often fixes it.
- Last resort: call ISP support and tell them you replaced your router (they may have to refresh/provision the connection in rare cases).
Problem: “Internet works, but it’s slower than expected”
- Test speed on Ethernet first. If wired is fast but Wi-Fi is slow, the issue is Wi-Fi (placement, interference, band selection).
- Move the router higher and more central (yes, it matters).
- Use 5 GHz (or 6 GHz if available) for speed; use 2.4 GHz for range and stubborn smart devices.
- Update router firmware.
- If your router has QoS, use it carefullygreat when tuned, annoying when misconfigured.
Problem: “Some devices won’t reconnect”
- If you reused SSID/password, reboot the device (or “Forget Network” and rejoin).
- If you enabled WPA3-only and an older device can’t connect, switch to WPA2/WPA3 mixed mode (or WPA2-AES) temporarily.
- For smart-home devices: try splitting 2.4 GHz and 5 GHz into separate SSIDs if pairing fails.
After the Swap: Quick Home Network Security Checklist
A router replacement is the perfect moment to make your network harder to mess with:
- Change admin credentials (unique password, not reused anywhere else).
- Use WPA3 (or WPA2-AES if WPA3 isn’t supported by some devices).
- Disable WPS and unnecessary remote access features.
- Update firmware and enable auto-updates if available.
- Create a guest network for visitorsand consider putting IoT gadgets there if they only need internet access.
- Review connected devices in your router dashboard to spot anything you don’t recognize.
What to Do with the Old Router (Don’t Just Toss It in a Drawer of Doom)
- Factory reset it (removes saved passwords and settings).
- Recycle or donate if it’s still usefulor e-waste recycle if it’s ancient.
- If you want, repurpose it as an access point (only if it supports AP mode and isn’t too old to be secure).
Conclusion: A Router Swap Is Mostly About Order, Not Bravery
Replacing your router is less about technical wizardry and more about doing the basics correctly:
unplug in the right order, connect modem/ONT to the WAN port, power up modem first, then router, and lock down security once you’re online.
Keep your SSID and password if you want the easiest transition, and don’t forget firmware updatestoday’s “optional” update is tomorrow’s “why is my network haunted?”
Real-World Experiences: What Usually Happens When People Replace a Router (So You Can Avoid the Weird Stuff)
I’ve seen router swaps go beautifullylike a pit crew changing tires in five minutesand I’ve seen them devolve into a living-room floor covered in cables
while someone whispers, “Why are there two networks named NETGEAR_84 and NETGEAR_84-5G and why do both hate me?”
The difference is almost always the same handful of real-world details that no quick-start sheet explains.
The most common “gotcha” is the power-up order. People plug in the new router, see Wi-Fi appear, and assume the internet should be instant.
But many modems and ONTs need a minute to re-establish the upstream connection. If the router boots first, it asks for an IP address before the modem is ready,
then sits there like a dog waiting by an empty food bowl. In practice, the fix is boring but effective: turn everything off, wait, power modem/ONT first, then router.
It’s the networking equivalent of “did you try turning it off and on again?” exceptannoyinglyit works.
Another repeat offender: the wrong port. The WAN/Internet port and LAN ports look similar, and in the heat of battle, people plug modem → LAN.
The router will still broadcast Wi-Fi, your phone will connect, and you’ll get that false confidence that everything is fine… until you open a browser and nothing loads.
If your Wi-Fi says “Connected” but apps behave like you’re on a desert island, check the WAN port first.
The biggest time-saver I’ve watched in action is reusing the old Wi-Fi name (SSID) and password. Folks with smart homesthermostats, doorbells, plugs, speakers,
robot vacuums with opinionscan spend an entire evening re-pairing devices if they change network credentials. When they keep the same SSID/password, most devices quietly reconnect
as if nothing happened. The only times this backfires are when the old router used outdated security settings, or when the new router is set to WPA3-only and an older gadget can’t keep up.
In those cases, switching to WPA2-AES or a mixed WPA2/WPA3 mode usually gets everything back online without sacrificing your entire weekend.
Then there’s the “I upgraded my router and now my game console says NAT Type: Sad” moment. This often happens when the ISP gateway is still routing and your new router is also routing,
creating double NAT. Real-world symptom: streaming works, browsing works, but online games, VPNs, or remote access get flaky. The cure is to choose one device to be the router:
either put the ISP gateway into bridge/IP passthrough mode, or set your new router to AP mode. Once you do that, the internet stops acting like it’s being routed through two overly enthusiastic traffic cops.
Finally, a practical tip that feels almost too simple: after you finish setup, check your router dashboard for unknown connected devices and change the admin password right away.
People are great at choosing a Wi-Fi password and then forgetting the router’s admin login still says “admin/admin” (or a default printed on the label). That’s like installing a new front door
and leaving the key under the mat with a sticky note that says “KEY.” A router swap is the perfect moment to tighten things up while everything is already rebooting anyway.