Table of Contents >> Show >> Hide
- Before You Start: The 60-Second “Don’t Make It Worse” Checklist
- What NOT to Do When a Key Snaps in a Lock
- How to Remove a Broken Key from a Lock: 11 Snapped Key Hacks
- Hack #1: Lubricate + Tweezers (Best for: key fragment sticking out)
- Hack #2: The “Real Tool” Move (Best for: flush breaks)
- Hack #3: A Thin Jigsaw/Hacksaw Blade (Best for: flush or slightly recessed keys)
- Hack #4: Paperclip or Bobby Pin Hook (Best for: shallow fragments)
- Hack #5: Precision Pick (But Not “Lock Picking”) (Best for: visible grooves)
- Hack #6: Gravity + Gentle Taps (Best for: loose fragments)
- Hack #7: The “Other Key Push” (Best for: cylinders you can access from the other side)
- Hack #8: Remove the Cylinder and Push from the Back (Best for: stubborn fragments, door access available)
- Hack #9: The Super Glue Trick (Last Resort) (Best for: flush fragments you can touch)
- Hack #10: Hot Glue Stick “Mold” Pull (Last Resort, Too) (Best for: shallow fragments)
- Hack #11: The Locksmith Shortcut (Best for: deep breaks, pricey locks, or “I’m over this” moments)
- Troubleshooting: Why Keys Snap (So You Don’t Repeat This Episode)
- FAQs: Broken Key Removal, Fast Answers
- “Been There” Experiences: Real-World Scenarios and What Usually Works (Extra Notes)
- The “Apartment Deadbolt That Only Turns If You Shoulder the Door” Situation
- The “Mailbox Lock That Hasn’t Been Loved Since 2009” Situation
- The “Car Door Key Snapped While It Was Cold and Everyone Is Waiting” Situation
- The “Someone Tried Glue First and Now We Live Here” Situation
- The “Everything Worked… Until the Next Week” Situation
- Sources Consulted (No Links)
You’re having a normal day. You stroll up to the door, insert your key, and give it a confident little twistlike you’ve done a thousand times.
Then snap. The key breaks, half of it stays in the lock, and your plans for the next five minutes are replaced by a new hobby:
tiny metal archaeology.
The good news: in many cases, you can remove a broken key from a lock with simple tools and a little patience.
The better news: you don’t need to sacrifice your doorknob to the locksmith gods (most of the time).
Below are 11 snapped key hacksplus practical tips on what to try first, what to avoid, and when it’s smarter to call a pro.
Before You Start: The 60-Second “Don’t Make It Worse” Checklist
1) Confirm the lock is yours (or you have permission)
These methods are intended for locks you own or are authorized to work onyour home, your apartment (with permission),
your mailbox, your padlock, etc. If it’s not your lock, don’t touch it. That’s not a “life hack.” That’s a “court date.”
2) Stop twisting and stop pushing
Twisting a snapped key fragment can wedge it deeper into the pins. Pushing it in makes removal harder. Your goal is to
extract, not compact.
3) Get the door stable and the lock accessible
If it’s a door lock, open the door (if you can) so you’re not fighting against pressure from a misaligned latch.
If you’re locked out, keep the door steadydon’t jiggle the handle like it’s a game show buzzer.
4) Pick a safe lubricant
A dry lubricant (like graphite powder or a PTFE/Teflon-style lock lube) is usually preferred for locks because it won’t
stay wet and attract grime. If you only have a general-purpose spray on hand, use it sparingly and plan to clean/lube properly later.
5) If you’re a teen: recruit an adult for blades, drills, or glue
The hacks below include sharp tools and adhesives. If you’re under 18, it’s smart to have an adult helpespecially for
anything involving cutting, drilling, or glue near your eyes/skin.
What NOT to Do When a Key Snaps in a Lock
- Don’t jam a screwdriver inside the keyway and pry wildlythis can damage pins and the cylinder.
- Don’t hammer the lock face like you’re forging a sword. Gentle taps can help; rage taps do not.
- Don’t flood the lock with thick oils that can trap dust and gum up the mechanism over time.
- Don’t use glue as your first choice. Glue is the “break glass in case of emergency” method, not the warm-up act.
How to Remove a Broken Key from a Lock: 11 Snapped Key Hacks
Hack #1: Lubricate + Tweezers (Best for: key fragment sticking out)
What you need: dry lubricant, tweezers or needle-nose pliers, good lighting.
- Spray or puff a small amount of dry lubricant into the keyway.
- Grip the exposed key piece as close to the lock face as possible.
- Pull straight out with gentle wigglesno twisting.
Why it works: lubricant reduces friction, and a straight pull prevents the fragment from snagging on pins.
Watch out: if your tool is too thick, it can push the fragment deeper instead of grabbing it.
Hack #2: The “Real Tool” Move (Best for: flush breaks)
What you need: a broken key extractor tool (often sold as a small hook-like set), lubricant.
- Lubricate the keyway lightly.
- Insert the extractor along the side of the key fragment (usually teeth-side), aiming to catch a groove.
- Once it bites, pull outward slowly while keeping the tool aligned with the keyway.
Why it works: extractors are designed to grab the key’s grooves without chewing up the lock.
Pro tip: if you own a home, a small extractor kit is one of those “future-you will be smug” purchases.
Hack #3: A Thin Jigsaw/Hacksaw Blade (Best for: flush or slightly recessed keys)
What you need: a thin metal-cutting jigsaw blade or hacksaw blade segment, lubricant, gloves.
- Use a thin blade with fine teeth (metal-cutting type). The thinner, the better.
- Lubricate the lock lightly.
- Slide the blade into the keyway with the teeth facing the key fragment.
- Angle gently so the teeth catch a notch or groove, then pull outward slowly.
Why it works: the teeth can snag the key’s ridges like a DIY extractor.
Watch out: don’t force the bladeif it binds, pull it out and try a slightly different angle.
Hack #4: Paperclip or Bobby Pin Hook (Best for: shallow fragments)
What you need: a paperclip or bobby pin, pliers (optional), lubricant.
- Straighten the clip/pin and bend a tiny hook at the end (think: fishhook, but less dramatic).
- Lubricate the keyway.
- Slide the hook along the side of the fragment and try to catch the key’s groove.
- Pull out slowly and steadily.
Why it works: if the piece isn’t deep, a small hook can grab the ridges.
Watch out: flimsy wire can bend and slippatience beats brute force.
Hack #5: Precision Pick (But Not “Lock Picking”) (Best for: visible grooves)
What you need: a small safety pin, dental pick, or thin scribe tool; lubricant.
- Lubricate lightly.
- Use the tip to catch a groove in the key fragment.
- Pull outward with tiny, controlled movements.
Why it works: better control than a floppy paperclip.
Watch out: don’t stab downward into the lockyour target is the key fragment, not the pins.
Hack #6: Gravity + Gentle Taps (Best for: loose fragments)
What you need: lubricant, a small tool handle (or knuckle), and a calm personality.
- If possible, orient the lock so the keyway faces downward (for door locks, this may be limited).
- Lubricate lightly.
- Tap around the lock face gently to help the fragment shift outward.
- Try tweezers again immediately after tapping.
Why it works: tiny vibrations can unstick a fragment that’s lightly wedged.
Watch out: “gentle” means gentleno hammer auditions.
Hack #7: The “Other Key Push” (Best for: cylinders you can access from the other side)
What you need: a spare key (or a thin straight tool), access to the opposite side of the cylinder.
- If the lock cylinder is accessible from the inside side and the keyway goes through, insert a spare key from the other side.
- Apply steady pressure to nudge the broken piece outward.
- Grab the fragment with tweezers as soon as it protrudes.
Why it works: you’re pushing the fragment in the direction it wants to leave.
Watch out: this doesn’t apply to all locks, and you should never force it.
Hack #8: Remove the Cylinder and Push from the Back (Best for: stubborn fragments, door access available)
What you need: screwdriver, a clean workspace, patience.
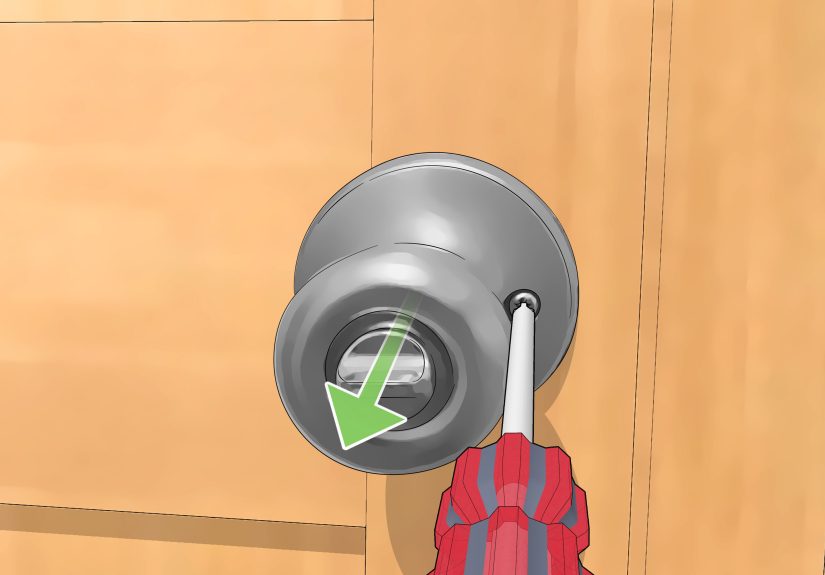
- If you can access the interior side of the door, you can often remove the lock/knob assembly with basic screws.
- Once the cylinder is out, you may be able to push the fragment out from the back with a thin tool aligned to the keyway.
- Reassemble carefully and test the lock.
Why it works: it removes the “tight doorway” problem and gives you a straight shot.
Watch out: if the lock is complex, high-security, or you’re unsure, stop and call a locksmith.
Hack #9: The Super Glue Trick (Last Resort) (Best for: flush fragments you can touch)
What you need: a toothpick/matchstick, a tiny amount of super glue, steady hands.
- Put a tiny amount of glue on the tipless than you think you need.
- Touch the glued tip to the broken key fragment and hold still until it bonds.
- Pull straight out slowly.
Why it works: it can bond to the fragment when nothing else can grab it.
Watch out: glue can permanently foul a lock if it spreads. If you’re not confident, skip this one.
Hack #10: Hot Glue Stick “Mold” Pull (Last Resort, Too) (Best for: shallow fragments)
What you need: hot glue stick (or hot glue), careful handling, time to cool.
- Warm the end of a glue stick (or apply a small blob of hot glue) and press it gently to the exposed fragment.
- Hold it in place until it cools and firms up.
- Pull outward steadily.
Why it works: it can “grip” the fragment without a metal hook.
Watch out: hot glue and locks are a risky friendshipuse minimal glue and don’t press it deep.
Hack #11: The Locksmith Shortcut (Best for: deep breaks, pricey locks, or “I’m over this” moments)
Sometimes the smartest hack is knowing when to stop. Call a locksmith if:
- The key is broken deep inside and nothing can catch it.
- The lock is high-security, antique, or part of an expensive handle/trim set.
- You tried glue and it didn’t work (or it made things worse).
- This is a car ignition or modern vehicle lock (sensitive parts + higher stakes).
Why it works: pros have purpose-built extraction tools and experienceand they can often save the lock.
Troubleshooting: Why Keys Snap (So You Don’t Repeat This Episode)
Keys usually break because of a combo platter of problems: worn metal, a sticky cylinder, misalignment, cold weather,
or forcing the key when it doesn’t turn smoothly. If your key looks bent, cracked, or worn down, get a fresh copy made
before it fails in the lock at the worst possible time (which is always “five minutes before something important”).
Quick prevention wins
- Replace worn keys (especially older copies made from older copies).
- Use a dry lock lubricant occasionally if the cylinder feels gritty or stiff.
- Fix door alignment issues if the deadbolt only turns when you lift/push the door.
- Don’t hang a heavy keychain on the key while it’s in the lock (extra torque adds up over time).
FAQs: Broken Key Removal, Fast Answers
Can I still use the lock after the key breaks?
Sometimes. But if the fragment is lodged near the pins, turning the cylinder may jam it further. Extract first whenever possible.
Should I use WD-style lubricant to get the broken key out?
If it’s all you have, a tiny amount may help in the moment. But for routine lock care, a dry lubricant (graphite/PTFE) is usually the better long-term choice.
What if the key broke while turning and the lock is “half turned”?
The cylinder position can matter. If the lock is mid-rotation, gently returning it toward the key’s normal insertion/removal position can reduce pin pressure.
If you can’t do it easily, don’t force itthis is a good moment for a locksmith.
What’s the best DIY method if the key is flush with the lock?
A proper broken key extractor is usually best. If you don’t have one, a thin metal-cutting jigsaw/hacksaw blade can sometimes work as a substitute.
“Been There” Experiences: Real-World Scenarios and What Usually Works (Extra Notes)
Broken key situations tend to repeat the same storylinedifferent cast, same plot twist. Here are a few common real-life scenarios
people run into, and the approaches that most often solve them without turning your afternoon into a hardware-store scavenger hunt.
The “Apartment Deadbolt That Only Turns If You Shoulder the Door” Situation
This one is incredibly common: the deadbolt is slightly misaligned with the strike plate, so every time you lock or unlock the door,
you’re accidentally using the key as a tiny pry bar. Eventually, the key loses that argument.
In these cases, the broken piece is often under pressure from the bolt. If you can open the door (or relieve pressure by gently pushing/pulling the door),
the fragment becomes noticeably easier to pull out. The winning combo is usually a small puff of dry lubricant and a steady tweezer pull.
After the key is out, people often discover the real fix was adjusting the strike plate or tightening a loose knob/handlebecause the lock wasn’t “bad,”
it was just being bullied by a door that didn’t line up.
The “Mailbox Lock That Hasn’t Been Loved Since 2009” Situation
Mailbox locks and padlocks live outdoors, collect grit, and get ignored until they misbehave. When keys snap here, the fragment can be shallow
but stubborn because dirt and corrosion add friction. Gentle tapping sometimes helps, but the biggest difference-maker is a lock-safe dry lubricant
and a hook-style tool that can grab a groove. People often have the most success with an actual broken-key extractor, but a carefully bent paperclip can work
if the fragment isn’t deep. If the lock is cheap and the cylinder is badly corroded, replacement is often faster than heroicsespecially when the “savings”
is mostly you losing daylight and patience.
The “Car Door Key Snapped While It Was Cold and Everyone Is Waiting” Situation
Car locks add stress because you’re outside, it’s inconvenient, and you’re thinking about being late (which makes your hands do unhelpful things).
When a key breaks during a turn, the cylinder may be slightly rotated, and that can pinch the fragment. The best outcomes usually come from pausing,
stabilizing the cylinder (without forcing it), adding a small amount of appropriate lubricant, and using a thin tool to catch the fragment’s grooves.
If the piece is deep, people frequently end up calling roadside assistance or a locksmithnot because the problem is impossible, but because modern car locks
and ignition systems can be more delicate and more expensive to damage. The “experience lesson” here is simple: if you feel yourself escalating from
“careful” to “creative,” that’s your cue to bring in a pro.
The “Someone Tried Glue First and Now We Live Here” Situation
Glue methods sometimes work, but when they fail, they fail loudly. The most common glue mistake is using too much and pushing it into the keyway,
which can bond to internal parts or create a gummy mess that traps dirt. When this happens, people often end up replacing the cylinder.
The experience-based takeaway: try mechanical extraction first (tweezers, extractor tool, thin blade). Only consider glue when you can clearly touch
the fragment and you can keep the glue controlled. If you can’t confidently do “controlled,” skip it.
The “Everything Worked… Until the Next Week” Situation
Even when you successfully remove the fragment, the original problem may still be there: a worn key, a sticky cylinder, door misalignment,
or a lock that needs cleaning. People who avoid repeat episodes usually do two small follow-ups: they get a fresh key cut from a good original
(not from the broken one), and they address whatever made the lock hard to turn in the first place (a quick lubrication, a strike plate adjustment,
or replacing a tired cylinder). The best experience is the one you don’t have to repeat.
Sources Consulted (No Links)
This article was researched by synthesizing guidance and common recommendations from reputable U.S.-based home improvement, locksmith,
and consumer DIY resources, including: Angi, BobVila, Family Handyman, The Home Depot, Lowe’s, This Old House, The Spruce, HowStuffWorks,
Instructables, ACME Locksmith, Elmer’s Lock & Safe, and additional locksmith educational articles.