Table of Contents >> Show >> Hide
- What Lawn Stripes Really Are (Spoiler: It’s a Light Trick)
- Tools That Make Striping Easy (and Tools That Make It Extra)
- Prep Like a Groundskeeper (So Your Stripes Don’t Look Like a QR Code)
- Step-by-Step: Basic Straight Stripes (The Foundation of All Fancy Patterns)
- Level Up Patterns: Checkerboards, Diamonds, and That “Ballpark” Look
- Pro Groundskeeper Tricks for Darker Darks and Brighter Brights
- DIY Striping Roller: Cheap, Effective, and Surprisingly Fun
- Common Striping Mistakes (and How to Fix Them)
- FAQ: Quick Answers That Save You a Saturday
- Real-World Experiences: What It’s Actually Like Learning to Stripe a Lawn (Plus Fixes for the “Oops” Moments)
You know that moment when you drive past a baseball field and think, “Wow, that grass looks expensive”?
Good news: you don’t need a stadium budget (or a secret handshake) to get that clean, striped lawn look.
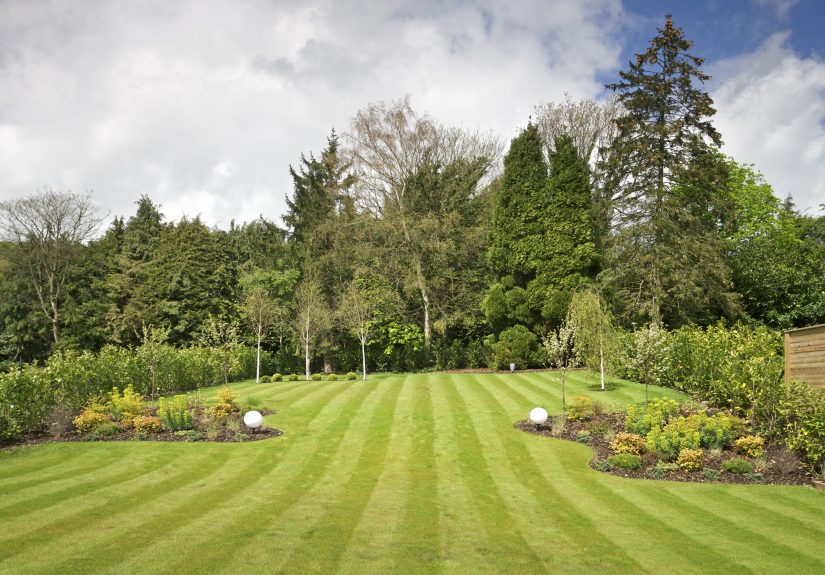
Lawn striping is mostly about bending grass blades on purposenot painting them, not cutting them into different heights,
and definitely not whispering motivational speeches to each blade (though, hey, whatever works for you).
In this guide, you’ll learn the science behind lawn stripes, the gear that actually matters, the exact mowing patterns
pros use, and the small technique tweaks that turn “meh lines” into “whoa, did you hire a groundskeeper?” lines.
Then, at the end, you’ll get an extra-long “real-life” experience section packed with practical lessons and
what-to-do-when-it-goes-sideways tips.
What Lawn Stripes Really Are (Spoiler: It’s a Light Trick)
Lawn stripes happen because grass blades get pushed and bent in a direction. When blades bend toward you,
you mostly see darker tips and shadows. When they bend away from you, more of the blade surface reflects light,
so it looks brighter. Same grass, same heightdifferent reflection. That’s the whole magic.
Why some lawns stripe better than others
- Grass type matters: Many cool-season grasses (like tall fescue and Kentucky bluegrass) tend to stripe well because blades bend and “lay over” more readily.
- Healthy, dense turf matters: Thick grass gives you a more uniform reflective surface, which makes the contrast pop.
- Mowing height matters: Slightly taller grass usually bends more easily, producing stronger stripes.
Tools That Make Striping Easy (and Tools That Make It Extra)
1) A mower that leaves a “roller” effect
Pro groundskeepers often use mowers with rollersespecially reel mowersbecause the roller naturally presses the grass down
in consistent lines. At home, you can get a similar result with:
- A mower with a rear roller (some walk-behind models have them built in).
- A striping kit (a weighted roller or flap attachment that mounts behind the mower).
- A DIY roller (yes, you can build one safely if you’re carefulmore on that below).
2) Sharp blades (because ragged cuts look fuzzy)
Sharp mower blades produce a cleaner cut and a smoother-looking finish. Dull blades tear grass, which can leave a frayed,
uneven look that ruins the “crisp carpet” vibe. If your stripes look hazy, your blade may be auditioning for retirement.
3) Optional but helpful: a “straight-line system”
Stadium stripes look straight because pros follow references. At home, you can use:
- A driveway edge, sidewalk, or fence line
- A distant landmark (tree, mailbox, neighbor’s “I love flamingos” yard statue)
- A string line for the first pass if you want laser-straight results
Prep Like a Groundskeeper (So Your Stripes Don’t Look Like a QR Code)
Clear and dry wins
- Remove obstacles: toys, branches, sprinkler heads that stick up, and anything else your mower will bump.
- Mow when the grass is dry: Wet grass clumps, smears, and can spread diseaseplus it can make your mower slip and drift.
Set your height for striping success
If you want dramatic stripes, mowing a bit higher often helps because longer blades bend more visibly. You don’t need to
turn your lawn into a prairiejust avoid mowing super short if striping is the goal.
Follow the “don’t scalp it” rule
A good mowing rhythm improves both lawn health and stripe quality. A common guideline is to avoid removing too much leaf
blade at once. When you mow frequently and take less off each time, the turf stays denserand dense turf stripes better.
Step-by-Step: Basic Straight Stripes (The Foundation of All Fancy Patterns)
Step 1: Mow a clean perimeter
Start by mowing around the outside edges of your lawn (one or two laps). This gives you turning space so you don’t chew up
the ends of your stripes with clumsy pivots.
Step 2: Pick your “north star”
Choose a point in the distance and drive the mower toward it. Don’t stare at the mower wheelsyour line will wobble like
you’re signing your name on a roller coaster.
Step 3: Make your first stripe
Mow a straight pass across the lawn. At the end, either:
- Do a gentle turn on the perimeter strip, or
- Lift/adjust the deck slightly while turning (if your mower allows) to avoid gouging.
Step 4: Come back right next to it
Turn around and mow back in the opposite direction, keeping the mower wheel slightly overlapping your previous pass.
Each pass bends the grass the opposite waycreating the light/dark contrast.
Step 5: Keep speed and overlap consistent
Consistency is what makes stripes look pro. If one pass is fast and the next is slow, your roller pressure changes and the
stripe intensity can look uneven.
Level Up Patterns: Checkerboards, Diamonds, and That “Ballpark” Look
Checkerboard (the classic “I definitely know what I’m doing” pattern)
- Mow straight stripes across the lawn (north–south).
- Then mow straight stripes perpendicular to the first set (east–west).
- Instant “sports field energy,” minus the scoreboard.
Diamonds (checkerboard’s fancy cousin)
- Stripe the lawn diagonally from corner to corner.
- On the next mow, stripe diagonally the other direction to cross the first set.
- Keep your diagonals anchored to corners for symmetry.
Diagonal stripes (simple, sharp, and hides minor imperfections)
If your lawn isn’t perfectly flat, diagonal patterns can disguise slight unevenness better than long straight runs
aligned with the house.
Waves and circles (advanced, but doable)
These look amazing, but they require smooth steering and a mower that tracks predictably. Start with a gentle S-curve.
If it looks weird, don’t paniccall it “modern turf art” and keep going.
Pro Groundskeeper Tricks for Darker Darks and Brighter Brights
Double-cut for extra contrast
Pros often mow the same direction twice (especially on high-visibility turf). Your first pass cuts; your second pass
reinforces the bend. This can make stripes look more definedjust don’t do it every single time if it compacts your paths.
Stripe when the lawn is growing well
A well-fed, actively growing lawn is denser and more uniform. Dense turf reflects light more evenly, so the pattern looks
cleaner. (Translation: stripes love a healthy lawn.)
Change your pattern to protect the turf
Groundskeepers rotate patterns to avoid “grain,” ruts, and wear lines. If you mow the same track every time, the turf can
start leaning permanently and the soil can compact. Alternating your direction (and patterns) keeps grass upright and healthier.
Avoid mowing in extreme heat or drought stress
When the lawn is stressed (hot, dry, or both), aggressive mowing can damage turf. If you must mow during a hot stretch,
aim for cooler parts of the day and keep your mowing height conservative.
DIY Striping Roller: Cheap, Effective, and Surprisingly Fun
You can create a striping effect by dragging a weighted roller behind your mowermany DIY builds use PVC pipe with end caps
filled with sand or gravel. The goal is a smooth cylinder that presses grass down evenly without swinging wildly.
DIY safety checklist
- Use secure attachment points (bolts/eyelets rated for the load).
- Make sure the roller can’t contact the blade area or interfere with controls.
- Keep the roller stabletoo much side-to-side swing creates wavy, accidental “abstract stripes.”
- If your mower maker offers a compatible striping kit, that’s usually the safest plug-and-play option.
Common Striping Mistakes (and How to Fix Them)
Mistake: Stripes look faint
- Raise mowing height slightly so blades bend more.
- Add a roller/striping kit (or increase roller weight carefully).
- Mow when grass is dry and upright.
Mistake: Lines are wobbly
- Use a distant landmark for each pass.
- Slow down a touchspeed amplifies steering errors.
- Mow a perimeter first so your turns don’t distort stripe ends.
Mistake: Ends are torn up
- Turn on the perimeter strip, not on your stripe ends.
- Make three-point turns instead of pivoting hard.
- If possible, momentarily reduce blade engagement while turning (mower-dependent).
Mistake: Lawn looks stressed after chasing stripes
- Stop “extra passes” for a week and rotate directions.
- Check mowing heighttoo short plus frequent striping is a turf bully.
- Sharpen blades and mow more frequently to remove less each time.
FAQ: Quick Answers That Save You a Saturday
Do stripes harm your lawn?
Striping itself is just bending grass, but repeatedly mowing the same lines can compact soil and create wear paths.
Rotate patterns regularly to keep turf healthier.
What mower makes the best stripes?
Mowers with rollers (often reel mowers or roller-equipped walk-behinds) typically produce the most consistent striping.
But a rotary mower can also stripe well with a striping kit or roller attachment.
Can warm-season grass get stripes?
Yes, but the effect may be subtler depending on grass stiffness and mowing height. Healthy density and a roller help a lot.
Real-World Experiences: What It’s Actually Like Learning to Stripe a Lawn (Plus Fixes for the “Oops” Moments)
The first time most people try lawn striping, the expectation is “instant ballpark.” The reality is usually closer to
“I made lines, but they look like they were drawn by a squirrel with a tiny steering wheel.” That’s normal.
Striping is a skill, and like any skill, it looks dramatically better after a few repsespecially once you start noticing
the small habits that cause crooked passes, faded contrast, and torn-up turns.
One of the most common early lessons is that your eyes lie when you focus too close. If you watch the front wheels
or the mower deck, your brain over-corrects constantly, and your stripe wanders. People who “suddenly get good” almost always
switched to aiming at a distant pointlike the corner of a fence, a tree trunk, or a specific window frame on the house.
Once you commit to a far target, your hands relax, your steering smooths out, and your stripe straightens like it got promoted.
Another real-life surprise: turns are where stripes go to die. If the ends of your lawn look scuffed or chaotic,
it’s rarely because you can’t stripeit’s because you’re turning too sharply on the grass you just perfected. The fix is boring
but powerful: mow a perimeter first and treat it like a “turn lane.” When you turn on that outer ring (instead of on your stripe ends),
the stripes look cleaner, and you stop creating those messy half-moon scars that scream “rookie.”
People also learn quickly that striping is easier when the lawn is cooperating. When the grass is short, sparse, or stressed,
it doesn’t bend as dramatically, and your stripes look faint no matter how hard you try. That’s why lawns that are mowed a bit higher
(within what’s appropriate for the grass type), watered appropriately, and cut with sharp blades tend to stripe better. It’s not about
“forcing” the patternit’s about setting conditions where the blades naturally lay over and reflect light evenly.
Then there’s the DIY roller experience, which often goes through predictable stages:
Stage 1: “I am a genius for building this.” Stage 2: “Why is it swinging like a wrecking ball?”
Stage 3: “Oh, I need better attachment points.” If your DIY roller swings, it can create accidental curves and inconsistent
pressure. Many successful DIY setups keep the roller centered with short, stable connections and enough clearance so it doesn’t bump the mower
in turns. If you’re improving a DIY build, focus on stability firstweight second.
A fun “aha” moment happens when you mow stripes and then walk to a different viewing angle. The pattern can look stronger or weaker depending on
where you stand, because striping is literally a light-and-angle illusion. Homeowners sometimes think their stripes “disappeared,” when really
they just changed their viewpointor the sun shifted. That’s also why lawns often look best from the street: the viewing angle is consistent and
the light reflection is more dramatic.
Finally, there’s the long-term experience: the best-looking striped lawns usually belong to people who rotate patterns.
They’ll do straight stripes one week, diagonals the next, checkerboard occasionally, and then give the turf a break from heavy “double-cut”
sessions. This keeps the lawn from developing ruts and keeps the grass from leaning permanently in one direction. Ironically, switching patterns
not only protects the lawnit also makes your yard look more intentional, like you have a seasonal “design plan” instead of a single trick.
Bottom line: if your first striped mow looks only “pretty good,” you’re doing great. The difference between a beginner stripe and a
groundskeeper stripe is mostly (1) consistent height and sharp blades, (2) a roller effect, (3) straight-line targeting, and (4) clean turns.
Nail those, and your lawn will start getting compliments that feel suspiciously like applause.