Table of Contents >> Show >> Hide
- Before You Touch Anything: Important Safety Rules
- Why Power Seats Get Stuck
- Tools That May Help
- Option 1: Restore Power by Checking the Fuse or Circuit Breaker
- Option 2: Inspect the Switch and Side Trim
- Option 3: Clear the Seat Tracks and Gently Assist the Seat
- Option 4: Use the Manual Drive Point or Turn the Seat Mechanism by Hand
- Option 5: Apply Temporary Power Directly to the Seat Motor
- Option 6: Loosen or Remove the Seat for Access
- Helpful Tips for Moving a Stuck Power Seat Without Breaking It
- When You Should Call a Mechanic
- Real-World Experiences: What Usually Happens With Stuck Power Seats
- Conclusion
A power seat is one of those little luxuries you barely noticeuntil it gets stuck in the exact position designed by a chiropractor’s evil twin. Maybe the driver’s seat is jammed too close to the steering wheel. Maybe it is reclined like a beach chair. Maybe you dropped a coin in the track and your car has decided that, no, today we do not adjust anything.
The good news: a stuck power seat does not always mean the seat is ruined. In many cases, the problem is a blown fuse, weak connection, dirty switch, jammed track, tired motor, or damaged drive cable. The less-good news: most power seats are not built with a simple manual lever like old-school seats. They use electric motors, gears, threaded rods, cables, and switches, which means “just shove it backward” is usually a terrible plan unless your hobby is buying replacement seat tracks.
This guide explains how to manually move a power seat using six practical options, when each method makes sense, and when it is smarter to stop and call a mechanic. The goal is not to turn your driveway into a dealership service bay. The goal is to help you move the seat safely enough to drive, access mounting bolts, clean the track, or diagnose the real issue without turning a small problem into a very expensive sculpture.
Before You Touch Anything: Important Safety Rules
Modern front seats are more than cushions on rails. Many include wiring for power motors, seat heaters, lumbar support, occupancy sensors, memory modules, side airbags, and seat belt pretensioners. That means safety comes first.
Before working under or around a power seat, turn the vehicle off, remove the key or keep the key fob away from the car, and avoid touching yellow airbag connectors. If you plan to unplug seat wiring or loosen seat bolts, disconnect the negative battery cable first and wait several minutes before handling connectors. This helps reduce the risk of short circuits and accidental warning-light problems.
Never force the seat violently. If the track is jammed, forcing it can bend the rails, strip gears, snap a drive cable, or damage the motor. Also, never replace a blown fuse with a higher-amp fuse. That is not a repair; that is an invitation for the electrical system to start auditioning for a smoke machine.
Why Power Seats Get Stuck
A power seat usually stops moving for one of five reasons: no electrical power, a bad switch, a loose or corroded connector, a failed motor, or a mechanical blockage in the track. The symptoms often tell you where to begin.
If the Seat Is Completely Dead
If nothing worksnot forward, backward, up, down, recline, or lumbarthe first suspects are the fuse, circuit breaker, ground connection, main power connector, or seat control module. A completely dead seat is often an electrical issue rather than a broken motor, because it is unlikely for every seat motor to fail at the same time.
If Only One Direction Fails
If the seat moves backward but not forward, or reclines but will not come upright, the problem may be the switch contact, one motor, a stripped gear, or one side of the seat track binding. Partial movement is helpful because it means at least some power is reaching the seat.
If You Hear Clicking, Grinding, or Humming
Noise usually means the switch is sending power, but the seat cannot move properly. The motor may be struggling, the gear may be worn, the drive cable may be slipping, or something may be stuck in the rail. Coins, pens, hair clips, crumbs, small toys, and mystery parking-lot gravel all love seat tracks. Apparently, the area under a car seat is where random objects go to retire.
Tools That May Help
You may not need every tool listed here, but these are commonly useful when trying to move a stuck power seat:
- Owner’s manual or fuse diagram
- Flashlight or headlamp
- Needle-nose pliers
- Trim removal tool
- Socket set and ratchet
- Screwdrivers
- Multimeter or test light
- Electrical contact cleaner
- Small brush or vacuum
- Fused jumper wires, only for experienced users
If you are not comfortable with electrical testing, stop at visual inspection, fuse checks, and track cleaning. A professional technician can test the motor and wiring without accidentally angering the airbag system.
Option 1: Restore Power by Checking the Fuse or Circuit Breaker
This is the easiest option, and it should usually be your first move. Many vehicles have a fuse labeled “SEAT,” “PWR SEAT,” “DRIVER SEAT,” “PASS SEAT,” or something similar. Some vehicles use a circuit breaker instead of a regular blade fuse.
Find the fuse location in the owner’s manual or on the fuse box cover. Power seat fuses may be in the interior fuse panel, engine compartment fuse box, or both. Remove the correct fuse and inspect it. If the metal strip inside is broken, replace it with a fuse of the exact same amperage.
After replacing the fuse, try moving the seat in short bursts. Do not hold the switch down for a long time. If the seat moves, greatmove it to a safe driving position and investigate why the fuse blew. If the new fuse blows immediately, there may be a short circuit, jammed motor, damaged harness, or overloaded track. Stop replacing fuses and have the circuit diagnosed.
This option is best when the seat is completely dead, especially if other seat functions also stopped working. It is not a true “manual” movement method, but it is often the fastest way to get a stuck power seat moving again without taking anything apart.
Option 2: Inspect the Switch and Side Trim
The power seat switch is the part you press, push, or tilt when adjusting the seat. It sends power and ground to the correct motor depending on the direction you choose. Over time, switch contacts can wear, buttons can break, trim panels can loosen, and spilled drinks can make the switch sticky enough to qualify as dessert.
Look closely at the switch. Does it feel loose? Does one direction feel softer than the others? Is the outer plastic knob missing or cracked? Sometimes the inner switch still works, but the plastic cover no longer reaches it correctly.
If the trim panel is loose, carefully remove it with a trim tool. Avoid yanking because the switch wiring harness may still be attached. Once you can see the connector, check that it is fully seated. Look for corrosion, bent pins, broken wires, or signs of moisture. A small amount of electrical contact cleaner may help dirty connectors, but do not soak the area.
If the switch works only when pressed at a certain angle, the switch may be failing. In that case, you may be able to temporarily move the seat by carefully operating the remaining functional direction or by reseating the switch connector. A replacement switch is often less expensive than replacing the entire seat assembly.
Option 3: Clear the Seat Tracks and Gently Assist the Seat
If the motor makes noise but the seat refuses to move, inspect the tracks. Slide a flashlight along both rails and look for objects wedged in the mechanism. Even a small coin can jam a track if it lands in the wrong place. The seat may also bind if one rail moves and the other does not.
Remove visible debris with pliers, a vacuum, or a small brush. Do not put your fingers deep into the mechanism while someone else is pressing the switch. That is how a simple repair becomes a dramatic story nobody wants.
Once the track is clean, press the seat switch in short pulses while gently shifting your body weight forward or backward. The key word is gently. You are not trying to bench-press the seat into obedience. You are helping the motor overcome a small bind. If the seat starts moving, continue in short bursts until it reaches a useful position.
This option works best when the seat moves slightly, clicks, hums, or binds only in one area of the track. If the seat is crooked, twisted, or moving on one side only, stop. A drive cable, gear, or rail may be damaged.
Option 4: Use the Manual Drive Point or Turn the Seat Mechanism by Hand
Some power seat assemblies have a way to turn the drive mechanism manually. This may be a square shaft, hex-shaped drive point, exposed cable end, worm gear, or motor socket. Not every vehicle has one, and many owner’s manuals do not describe it because it is more of a service procedure than a daily-use feature.
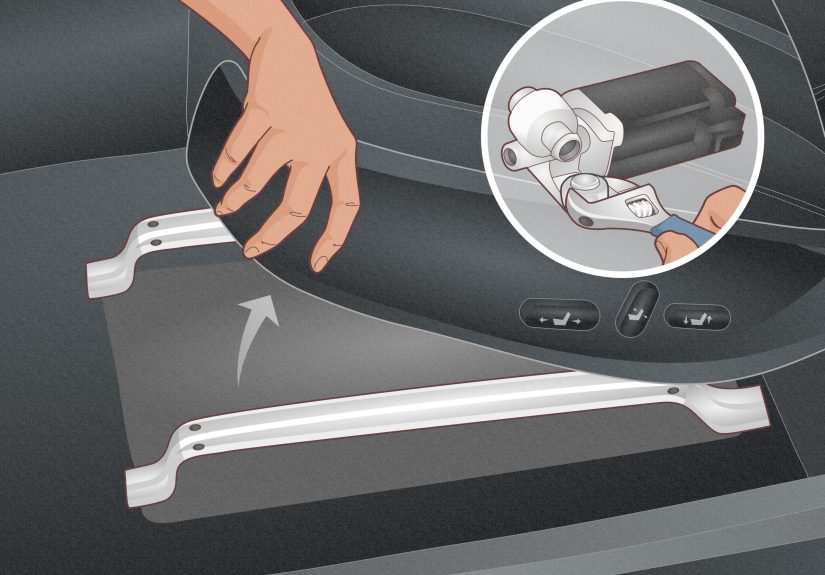
To look for it, move the floor mat out of the way and inspect under the front of the seat with a flashlight. You may see small motors attached to flexible cables or threaded rods. The forward/backward motor usually connects to the seat rails. The height and recline motors are mounted differently depending on the vehicle.
If you can access a drive cable or manual drive point, you may be able to turn it slowly with the correct socket, bit, wrench, or flexible extension. Turn only a little at a time and keep both rails even. If the seat begins to twist, stop and reverse slightly. Uneven movement can damage the track.
A low-speed drill can sometimes be used with the right bit, but this is not a race. Use low speed, light pressure, and stop often. High speed can strip gears or overheat parts. If you are unsure which part you are turning, do not guess. Guessing under a car seat is how tiny problems put on a tuxedo and become luxury repair bills.
Option 5: Apply Temporary Power Directly to the Seat Motor
This option is for experienced DIYers or technicians. If the switch or control circuit has failed but the motor is still good, direct power may move the seat enough to access bolts or reach a safe driving position. The basic idea is that a power seat motor moves one direction when power and ground are applied one way, and moves the opposite direction when polarity is reversed.
However, this method can cause damage if done carelessly. Do not probe yellow airbag connectors. Do not jump random wires. Do not use unfused wires. Do not let positive and negative leads touch. If your vehicle has memory seats, seat modules, or complex wiring, direct-power testing can be more complicated.
The safest approach is to identify the specific two-wire connector for the motor that controls the direction you need. Use a wiring diagram when possible. Apply power only briefly through a fused jumper. If the motor moves, stop once the seat reaches a useful position. If the fuse in your jumper blows, the motor does not move, or the wires heat up, stop immediately.
This method is useful when the switch is bad, the seat needs to move so bolts can be accessed, or the vehicle has a temporary circuit issue. If that sentence made your palms sweat, let a mechanic do it. There is no shame in not wanting to play electrical chess with a seat full of sensors.
Option 6: Loosen or Remove the Seat for Access
If the seat is stuck and you cannot access the motor, connector, or track, you may need to loosen the seat from the floor. Most front seats are secured by four main bolts or nuts: two front and two rear. The problem, of course, is that a stuck seat may block the exact bolts you need to reach. Very funny, car. Very funny.
If you can access the bolts, disconnect the negative battery cable before unplugging seat wiring. Remove the bolts carefully and keep track of their locations. Some manufacturers specify replacing certain seat bolts after removal, so check service information for your vehicle.
Once the seat is loose, tilt it carefully rather than yanking it out. Seats can be heavy, awkward, and still connected to wiring underneath. With better access, you can inspect the harness, test the motor, clear the track, or manually turn the drive mechanism.
Do not drive with a loose seat. A seat that is not properly bolted down is unsafe. After repairs, tighten the mounting bolts to the correct specification. If the airbag warning light comes on after unplugging or moving the seat, have the system scanned and repaired. Do not ignore it.
Helpful Tips for Moving a Stuck Power Seat Without Breaking It
Use Short Bursts Instead of Holding the Switch
Holding the switch down for a long time can overheat a struggling motor or blow a fuse. Short pulses are safer and give you time to listen for changes.
Listen Before You Diagnose
Silence often points toward power, fuse, switch, or wiring problems. Clicking or humming usually suggests the motor is trying but the track or gear is stuck. Grinding may mean worn gears or a slipping cable.
Check Under the Seat After Cleaning the Car
Floor mats, vacuum hoses, coins, pens, and charging cables can get pushed into seat tracks. After cleaning your car, slide the seat through its full range to make sure nothing got trapped.
Do Not Lubricate Everything in Sight
A tiny amount of appropriate lubricant on dry rails may help, but spraying random grease all over motors, carpet, wiring, and sensors is not maintenance. It is automotive salad dressing. Use only products safe for seat tracks and avoid electrical connectors.
Keep the Seat Square
If one side moves and the other does not, the seat can twist. Stop immediately. A twisted track is harder to repair than a stuck one.
When You Should Call a Mechanic
Call a professional if the seat is stuck in a dangerous driving position, the airbag light is on, the fuse keeps blowing, wires are melted, the seat moves unevenly, or you smell burning. Also call a mechanic if the vehicle has memory seats, advanced safety sensors, or complicated modules you are not comfortable testing.
A technician can check the fuse, relay, switch, connector, motor, control module, and track. They can also move the seat safely to access bolts and replace the failed part. Sometimes the actual repair is simple, but getting to the part is the tricky bit.
Real-World Experiences: What Usually Happens With Stuck Power Seats
In real life, stuck power seats rarely fail in a neat, movie-script way. They usually give little warnings first. A driver may notice the seat moving slower than usual, especially when sliding backward. Someone else may hear a faint click under the cushion. Another person may realize the recline works, the height works, the lumbar works, but forward and backward movement has left the group chat.
One common experience is the “one direction only” failure. For example, a seat moves backward but refuses to move forward. This often points toward a worn switch contact, a motor circuit issue, or a track that binds under load. The driver may be tempted to keep pressing the switch harder, as if the button can be emotionally persuaded. Sadly, buttons do not respond to motivational speeches. A better move is to stop, listen, and check whether the motor is making noise.
Another familiar situation happens after something rolls under the seat. A coin, pen cap, phone cable, or small toy gets lodged in the track. The motor still works, but the seat jams. The owner may hear a clicking sound or see the seat move a fraction of an inch. Cleaning the rail and gently helping the seat while using short switch pulses can sometimes fix it. This is the best-case scenario because the repair costs exactly zero dollars, unless you count the emotional damage of discovering fossilized French fries under the seat.
Older vehicles often develop slower seat movement before total failure. That slow movement can come from tired motors, dry tracks, worn drive cables, or weak electrical connections. If the seat has been dragging for months, the final failure is not really sudden; it just finally stopped negotiating. In these cases, manual movement may help temporarily, but the long-term fix usually involves diagnosing the motor, cable, or track.
There is also the “dead after cleaning” problem. Someone details the interior, moves the seat all the way forward or backward, vacuums aggressively, and afterward the seat quits. Sometimes a connector under the seat was bumped loose. Sometimes moisture reached the switch. Sometimes debris was pushed into the rail. The lesson is simple: after cleaning, test all seat functions before you put the tools away and proudly announce victory.
Drivers who try direct power often do it because they need access to hidden rear bolts. This can work, but it is not the first method beginners should try. The safer experience is usually this: check the fuse, inspect the switch, clean the track, look for loose connectors, then move to advanced testing only if needed. Power seats are convenient, but they are also wired into a crowded neighborhood of safety systems. Treat them with patience, not brute force.
The most useful lesson from real-world repairs is that a stuck power seat is usually a symptom, not the whole problem. Moving it manually solves the immediate headache, but it does not always fix the cause. Once the seat is in a safe position, take time to find out why it got stuck. Your future selfthe one not folded against the steering wheel like a human tacowill appreciate it.
Conclusion
Learning how to manually move a power seat is mostly about patience, diagnosis, and knowing when to stop. Start with the simple checks: fuse, switch, connector, and track debris. If the motor still has life, gentle assistance or manual turning may move the seat enough to regain comfort or access repair points. More advanced methods, such as applying temporary power to the motor or removing the seat, should be handled carefully because modern seats often include airbags, sensors, and safety wiring.
The big rule is simple: do not force it. A stuck seat may be annoying, but a bent track, stripped gear, blown module, or airbag warning light is much worse. Move slowly, test carefully, and call a professional when the problem moves beyond basic inspection. Your seat should support your back, not become the main villain in your afternoon.




