Table of Contents >> Show >> Hide
- Why a Pegboard Shelf Is Such a Smart DIY Upgrade
- Before You Start: Know What Kind of Pegboard You Have
- Tools and Materials
- Best Wood for a Simple Pegboard Shelf
- How Wide Should the Shelf Be?
- How To Make a Simple Pegboard Shelf: Step-by-Step
- What Can You Put on a Pegboard Shelf?
- Common Mistakes to Avoid
- Simple Styling Ideas for a Better-Looking Pegboard Shelf
- When to Upgrade the Design
- Real-World Experience: What I Learned From Making a Simple Pegboard Shelf
- Conclusion
If your wall is wearing a pegboard but still somehow looks like it has commitment issues, a simple pegboard shelf can fix that fast. Hooks are great for scissors, tape measures, and tools that already have holes in them. But for jars, paint bottles, plants, folded towels, craft bins, or that one glue bottle that always rolls away like it is late for a meeting, you need a shelf.
The good news: this is one of the easiest beginner DIY projects you can make. You do not need a fancy shop, a garage full of serious-person tools, or a dramatic soundtrack. You just need a small board, a few basic supplies, and a pegboard that is mounted correctly. In this guide, you will learn how to make a simple pegboard shelf, how to size it, how to keep it level, what mistakes to avoid, and how to make it look good enough that people assume you are “very handy” and not just “good at following directions.”
Why a Pegboard Shelf Is Such a Smart DIY Upgrade
A pegboard shelf turns empty vertical space into useful storage without making a room feel bulky. That is the magic trick. Unlike a full cabinet, a pegboard shelf stays light, flexible, and easy to move around. If your needs change, you can usually remove the shelf, shift the hooks, and try a new arrangement in minutes.
This kind of shelf works especially well in garages, laundry rooms, craft corners, kitchens, home offices, entryways, and bathrooms. It is ideal for lightweight to medium-weight items that do not hang neatly from hooks. Think spice jars, mugs, hand tools, twine, seed packets, skincare products, notebooks, or a tiny potted plant that makes your workspace look like you have your life together.
Another big advantage is cost. A simple pegboard shelf can be made with scrap wood or an inexpensive pine board. You are not building custom cabinetry here. You are building a practical little ledge that punches above its weight.
Before You Start: Know What Kind of Pegboard You Have
Not all pegboards behave the same way, and that matters when you add a shelf. Traditional hardboard pegboard is common and budget-friendly. Metal and plastic pegboard systems are often sturdier, more moisture-resistant, and sometimes easier to install because some models already have built-in spacing behind the panel.
If you are working with a classic hardboard pegboard, make sure it has enough space between the board and the wall so the hooks can insert properly. That spacing usually comes from furring strips behind the board. If the pegboard is mounted flat against the wall, your hooks will not seat correctly, and your shelf will become a short-lived lesson in gravity.
You should also check the condition of the board. If it looks swollen, warped, cracked, or loose, do not trust it with anything heavier than a sticky note. A shelf is only as secure as the pegboard supporting it.
Tools and Materials
For the simplest version of this project, gather the following:
- 1 pine board or similar wood board
- Saw or pre-cut board from the store
- Measuring tape
- Pencil
- Drill
- Drill bit sized to your pegboard hooks
- Sandpaper
- Two short straight pegboard hooks or shelf support hooks
- Wood glue (optional)
- Paint, stain, or clear coat (optional)
- Level
If you are installing a new pegboard first, you may also need the pegboard panel, furring strips, screws, wall anchors, and a stud finder. But if you already have a mounted pegboard, you can skip the wall-installation drama and move straight to the shelf.
Best Wood for a Simple Pegboard Shelf
Pine is usually the easiest choice for beginners because it is inexpensive, widely available, and simple to cut and sand. A 1×4 board is a classic pick for a shallow shelf. It gives you enough depth for many small items without turning the shelf into a forehead hazard.
If you want a more polished look, you can use poplar, plywood, or a pre-finished shelf board. In a damp room such as a laundry area or bathroom, add a protective finish so the wood holds up better over time. This is not the glamorous part of the job, but neither is replacing a shelf that puffed up like a sponge with ambition.
How Wide Should the Shelf Be?
A short shelf is the easiest place to start. A beginner-friendly version is around 10 inches wide, which is enough room for jars, tape, small tools, or decor without putting too much stress on the hooks. You can certainly go wider, but the wider you go, the more important balance becomes.
As a general rule, keep your first shelf shallow and modest. This is a pegboard shelf, not a floating fireplace mantel. Pegboards are fantastic organizers, but they still have weight limits. Always match your shelf size to the board, the hooks, and the items you plan to store.
How To Make a Simple Pegboard Shelf: Step-by-Step
Step 1: Measure and Cut the Board
Measure the width you want for your shelf. A simple 10-inch cut is a great starting point, especially for a first project. Mark the board clearly with a pencil, then cut it using a hand saw, circular saw, or miter saw. If you are buying materials from a home improvement store, many stores can cut the board for you. That is legal, and frankly, delightful.
After cutting, sand the cut edges and corners. Even a quick pass with medium-grit sandpaper makes the shelf look cleaner and feel safer. No one wants a storage solution that doubles as a splinter dispenser.
Step 2: Mark the Hook Locations
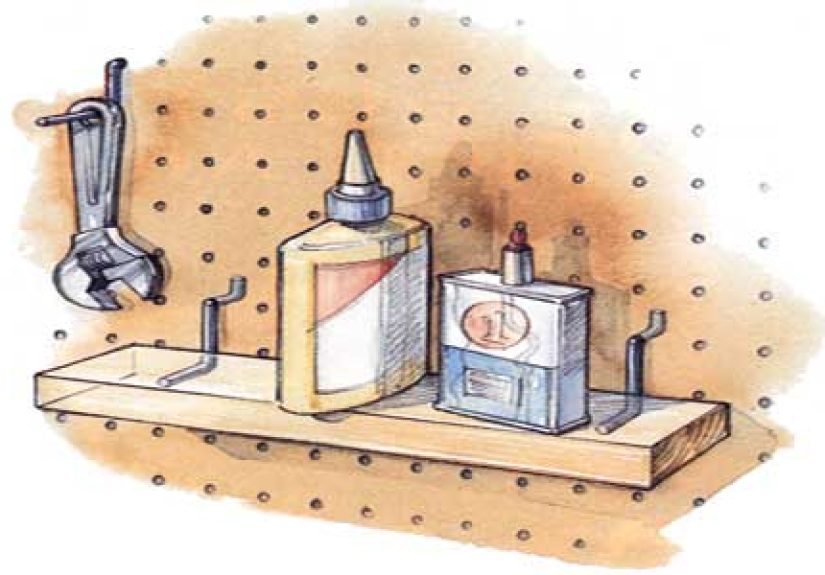
Place the board so the back edge is facing you. Mark a point about 1 inch in from each end along the back edge. These marks are where the support hooks will fit into the wood. The goal is to keep the shelf balanced and supported at both sides.
If your shelf is wider than 10 inches, double-check that the marks line up with the pegboard spacing you plan to use. A quick test fit against the board before drilling can save you from creative new vocabulary later.
Step 3: Drill the Holes
Using a drill bit sized for your hook shafts, drill holes at the marks. For a simple design, the holes should be deep enough to hold the hooks securely without drilling through the front face. Go slowly and keep the drill level. Crooked holes can make the shelf tilt, wobble, or look like it gave up halfway through the project.
Clean out any sawdust from the holes and test the fit with your hooks. They should feel snug but not impossible to insert.
Step 4: Finish the Wood
This step is optional, but it makes a big difference. Paint the shelf to match the pegboard, stain it for a warmer wood look, or seal it with a clear finish if you like the natural grain. Let it dry fully before installation.
A painted shelf can turn a purely practical organizer into a design feature. Black on black looks sharp in a workshop. White on white feels clean in a laundry room. Natural wood against a colored pegboard adds warmth and contrast. Basically, you can go “modern utility” or “organized cottage-core.” The shelf does not judge.
Step 5: Insert the Hooks Into the Shelf
Slide the straight pegboard hooks into the drilled holes. If the fit is a little loose, a small amount of wood glue can help keep the hooks in place. Do not go overboard. You want support, not a permanent emotional attachment.
Make sure both hooks sit evenly so the shelf will rest level when mounted.
Step 6: Mount the Shelf on the Pegboard
Line up the hooks with two matching holes on the pegboard and insert them firmly. Press gently downward so the shelf seats securely. Use a small level on top of the board to confirm that it sits straight.
If the shelf leans forward, check whether the hooks are fully inserted, whether the drilled holes are even, and whether the pegboard itself is mounted correctly. Sometimes the shelf is innocent and the wall is the real chaos agent.
What Can You Put on a Pegboard Shelf?
The best items for a simple pegboard shelf are small, useful, and not overly heavy. Good options include jars of screws, tape rolls, seed packets in containers, office supplies, spice tins, mugs, folded washcloths, skincare products, mini speakers, or decorative objects.
Try to keep heavier items close to the pegboard rather than near the front edge of the shelf. That reduces leverage and helps the shelf stay more stable. A little weight management goes a long way here.
Common Mistakes to Avoid
Making the Shelf Too Deep
A deep shelf looks exciting until it becomes awkward, unstable, and weirdly good at catching your sleeve. Keep it practical.
Ignoring Weight Limits
Even if the shelf feels solid at first, overloading the pegboard can lead to sagging, damaged holes, or failed hooks. Always check the pegboard system’s recommended limit and err on the cautious side.
Skipping the Finish in Damp Areas
If your shelf lives in a bathroom, laundry room, mudroom, or humid garage, unfinished wood can absorb moisture and age badly. A quick protective coat is worth it.
Using a Weakly Mounted Pegboard
If the pegboard is not securely mounted with proper support, no shelf design will save it. Fix the installation first, then accessorize.
Simple Styling Ideas for a Better-Looking Pegboard Shelf
Function matters, but looks matter too, especially if your pegboard is in a visible room. Pair the shelf with matching hooks, baskets, or containers for a cleaner appearance. Group similar items together. Leave a little breathing room so the wall does not look like a storage closet that had a panic attack.
You can also create zones. Put your shelf above tool hooks in the garage, above a desk organizer in the office, or next to baskets in the laundry room. A shelf feels more intentional when it is part of a system instead of a lonely plank trying its best.
When to Upgrade the Design
Once you make one simple shelf, it is very easy to start thinking like a pegboard tyrant. Suddenly you want a second shelf, then a wider one, then a matching set, then labeled bins, then a tiny hanging plant because now you are “curating a wall.” This is normal.
Upgrade when you need more storage, when your pegboard system can safely support it, or when you want adjustable shelves with dowels, brackets, or custom supports. But for a first build, simple wins. A small shelf that works is far better than an elaborate shelf that becomes a cautionary tale.
Real-World Experience: What I Learned From Making a Simple Pegboard Shelf
The first time I made a simple pegboard shelf, I assumed it would be a ten-minute project. In theory, that was true. In practice, it became a very educational half hour featuring one crooked drill hole, one shelf that leaned like it had heard bad news, and one moment where I stared at the pegboard as if it had personally betrayed me.
The biggest lesson was that tiny measurements matter more than you think. On paper, marking an inch in from each side sounded easy. In real life, if one mark is slightly off, the shelf can sit unevenly, and even a small tilt becomes obvious the second you place anything round on top. I learned to measure twice, test the spacing against the pegboard before drilling, and stop pretending I could eyeball it like a cowboy in a home improvement commercial.
I also learned that shelf depth changes everything. My first instinct was to make the shelf deeper because more shelf equals more storage, right? Technically, yes. Structurally, not always. A deeper shelf encourages you to place heavier items farther from the wall, which creates more forward pull. When I switched to a shallower board, the whole thing felt sturdier and looked cleaner too. That was the moment I understood why simple pegboard shelves work best when they stay modest.
Another surprise was how much sanding improved the final result. I nearly skipped it because sanding always feels like the vegetable course of DIY: good for you, rarely exciting. But once I softened the edges and corners, the shelf looked intentional instead of “freshly cut in a hurry.” It also felt better in the hand, which matters in a small everyday object you touch all the time.
Finishing the wood made a bigger difference than I expected too. I tried one unfinished shelf in a utility area and one sealed shelf in a slightly humid laundry room. The sealed version held up better, stayed cleaner, and just looked more finished. That experience convinced me that even a quick clear coat is worth the extra effort, especially when the shelf lives somewhere steamy, splashy, or generally chaotic.
The most useful lesson, though, was about restraint. Pegboard shelves invite overconfidence. The minute one works, you start thinking it can hold paint cans, speakers, a stack of books, and perhaps your hopes for the future. It cannot. Once I started using pegboard shelves for the right kind of items, smaller containers, light supplies, and things I reach for often, they became far more useful. Instead of fighting the system, I worked with it.
Now, whenever I make a pegboard shelf, I focus on three things: accurate drilling, sensible size, and realistic weight. That formula has never failed me. The shelf goes up faster, looks better, and actually stays useful instead of becoming a tiny wooden reminder that confidence should never outrun physics.
Conclusion
If you want a beginner-friendly project that is affordable, practical, and surprisingly satisfying, a simple pegboard shelf is hard to beat. It adds storage without bulk, makes use of vertical space, and can be customized to fit almost any room. Start with a short board, drill carefully, keep the load light, and finish the wood if the shelf will live in a humid area.
Most important, do not overcomplicate it. The beauty of a pegboard shelf is that it solves a real problem with minimal fuss. That little board can hold tools, supplies, decor, or daily essentials, and it does it without asking for a giant budget or a weekend-long build. In the world of DIY, that is what we call a very good deal.




