Table of Contents >> Show >> Hide
- Quick Answer
- What Is a Lodestone in Minecraft?
- Materials You Need
- How to Make Chiseled Stone Bricks
- Step-by-Step: How to Make a Lodestone in Minecraft
- How to Make a Compass
- How to Use a Lodestone in Minecraft
- Important Lodestone Rules to Know
- Best Uses for a Lodestone
- Common Mistakes Players Make
- Was the Recipe Different in Older Minecraft Versions?
- Should You Craft a Lodestone or Find One?
- Final Thoughts
- Player Experiences and Real-World Gameplay Lessons
If Minecraft has ever sent you wandering into the Nether, spinning in circles, muttering, “I swear my portal was right here,” then congratulations: you are exactly the kind of player who needs a lodestone. This block is one of the game’s most useful navigation tools, and unlike many “super helpful” Minecraft items, it does not require a spreadsheet, three villagers, and a minor emotional breakdown to understand.
A lodestone lets you bind a compass to a specific location so it points somewhere useful instead of stubbornly pointing to world spawn. That means you can mark a base, a Nether portal, a mining camp, or your favorite suspiciously overbuilt chicken farm and actually find it again later. Even better, the recipe is much easier in current versions of Minecraft than it used to be.
In this guide, you will learn exactly how to make a lodestone in Minecraft, what materials you need, how to craft the matching compass, how to use both items together, and why this humble block can save your bacon when the world starts looking like a copy-pasted maze of netherrack and bad decisions.
Quick Answer
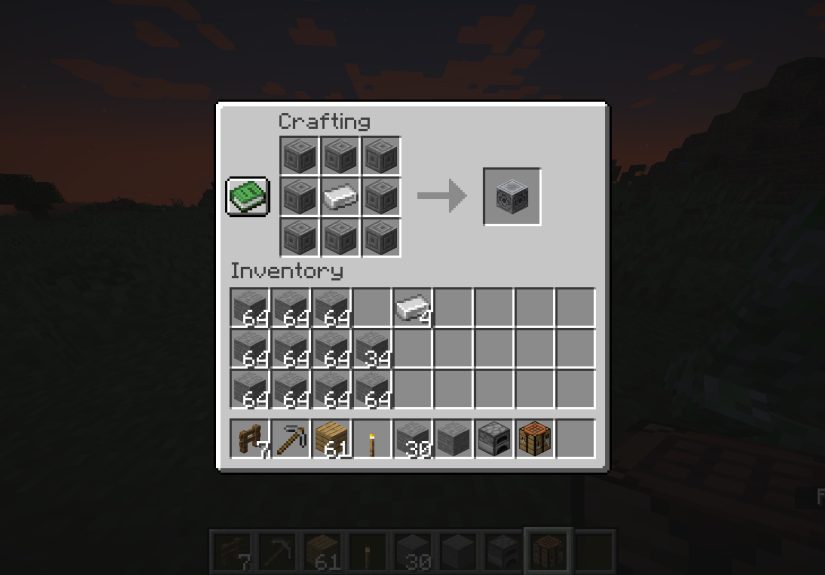
To make a lodestone in current Minecraft versions, place 1 iron ingot in the center of a crafting table and surround it with 8 chiseled stone bricks. Then place the lodestone in the world and use a compass on it to create a lodestone compass that points back to that block.
What Is a Lodestone in Minecraft?
A lodestone is a special block that changes where a compass points. Normally, a compass points to the world spawn. That is useful if your base happens to be at world spawn. If it is not, the compass is basically a very confident liar.
Once you use a compass on a lodestone, that compass becomes tied to the block. From then on, it points to the lodestone instead of spawn. This is especially valuable in the Nether and the End, where ordinary compasses are famously about as reliable as a weather forecast made by a creeper.
If you love exploration, long-distance travel, or building bases far from your starting area, a lodestone is less of a luxury and more of a “why didn’t I do this sooner?” upgrade.
Materials You Need
Lodestone Recipe
- 1 Iron Ingot
- 8 Chiseled Stone Bricks
Compass Recipe
- 4 Iron Ingots
- 1 Redstone Dust
So if you are starting from scratch and want a working lodestone compass setup, gather enough iron for both the lodestone and the compass. The block itself is now much cheaper than it used to be, which is great news for players who would rather not dive into netherite production just to stop getting lost.
How to Make Chiseled Stone Bricks
The ingredient that confuses many players is not the iron ingot. It is the chiseled stone bricks. They sound fancy, but they are not hard to get.
There are two easy ways to make them:
Method 1: Use a Stonecutter
If you have a stonecutter, this is the easiest route. Put regular stone into the stonecutter and convert it directly into chiseled stone bricks. This skips several crafting steps and feels wonderfully efficient, which is not something most Minecraft crafting chains can honestly say.
Method 2: Craft Them Manually
If you do not have a stonecutter, start with stone, turn it into stone bricks, then make stone brick slabs, and finally convert those slabs into chiseled stone bricks. It works fine, but it is a little like taking three buses to visit your neighbor across the street.
For most players, the stonecutter method is the clear winner.
Step-by-Step: How to Make a Lodestone in Minecraft
Step 1: Open Your Crafting Table
You need the full 3×3 crafting grid, so your personal inventory crafting space will not cut it. Place and open a crafting table.
Step 2: Place the Iron Ingot in the Center
Put 1 iron ingot in the exact center slot of the crafting grid.
Step 3: Surround It With Chiseled Stone Bricks
Fill all eight surrounding slots with chiseled stone bricks. When arranged correctly, the lodestone will appear in the result box.
Step 4: Move the Lodestone to Your Inventory
Click the finished block and move it into your inventory. Nice work. You are now one step closer to becoming the rare Minecraft player who actually knows where they are going.
How to Make a Compass
If you do not already have a compass, craft one next. Open the crafting table and place 1 redstone dust in the center. Put 4 iron ingots above, below, left, and right of the redstone dust. That creates a compass.
On its own, the compass points to world spawn. Once linked to a lodestone, it becomes much more useful.
How to Use a Lodestone in Minecraft
Place the Lodestone
Set the lodestone down wherever you want to mark. Good places include your main base, a Nether portal room, a faraway village, a trial base, or the entrance to a giant cave system you definitely believe you can navigate from memory. You cannot.
Use the Compass on the Block
Hold the compass and use it on the placed lodestone. The compass becomes a lodestone compass and starts pointing to that exact block. You will know it linked properly because it gets a shimmering enchanted-style visual effect.
Follow the Needle
From that point on, the compass points to the lodestone as long as the lodestone still exists and you are in the same dimension as the block.
Important Lodestone Rules to Know
A lodestone compass is powerful, but it has a few rules. Ignore them, and the game will happily make you look silly.
Rule 1: Dimension Matters
If your lodestone is in the Nether and you carry the linked compass into the Overworld, the compass will not guide you correctly. Likewise, a lodestone in the Overworld will not help you while you are in the End. The block and the compass need to be in the same dimension.
Rule 2: Breaking the Lodestone Breaks the Plan
If the lodestone is destroyed, the linked compass no longer works properly. Translation: do not casually redecorate your base and break the one block your navigation system depends on.
Rule 3: One Compass Per Destination Is Smart
You can have multiple lodestones and multiple compasses. In fact, that is the best way to use them. One for your home base. One for your Nether hub. One for your woodland mansion expedition. One for the secret bunker you pretend is “just temporary storage.”
Rule 4: Rename Your Compasses
If you are using several lodestone compasses, rename them in an anvil. “Home,” “Portal,” and “Mega Mine” are much more helpful than carrying three identical shiny compasses and hoping your future self is a genius.
Best Uses for a Lodestone
1. Mark Your Nether Portal
This is the classic use, and for good reason. The Nether is great for fast travel and terrible for orientation. A lodestone near your portal can save you from long, sweaty walks through lava-lit misery.
2. Track a Remote Base
Built a mountain cabin, jungle temple hideout, or ocean cliff fortress far from spawn? A lodestone gives you a clean way to navigate back without relying only on coordinates.
3. Organize Large Survival Worlds
In older survival worlds, players often end up with multiple farms, villages, mines, and transportation hubs spread across thousands of blocks. Lodestones help turn chaos into a real network.
4. Make Exploration Safer
Going on a long expedition becomes less stressful when you know you can head back to camp without guessing. That is especially true after gathering valuable loot, because suddenly every cliff looks steeper and every skeleton feels deeply personal.
5. Use It in the End
Because lodestones can give compasses a useful target in dimensions where ordinary compasses are unreliable, they are great for marking important locations beyond the Overworld. If you are exploring long-distance structures, that can be a huge quality-of-life improvement.
Common Mistakes Players Make
Using an Outdated Recipe
If a guide tells you that you need netherite to make a lodestone, it is probably written for an older version. In current versions, iron is the key ingredient. This change made lodestones much more practical for everyday survival play.
Forgetting to Craft the Compass
The lodestone block alone does not magically guide you. You need a compass to connect to it. No compass, no navigation miracle.
Expecting It to Point to Your Bed
A regular compass points to world spawn, not your bed or your favorite chest room. That is exactly why lodestones are so useful: they let you choose a meaningful destination.
Breaking the Block After Linking
Yes, you can move your lodestone with a pickaxe. No, your compass will not appreciate casual demolition if you do not plan the move properly.
Not Making Extras
If you are making one lodestone, consider making two or three compasses. Once you see how handy they are, you will want a full set.
Was the Recipe Different in Older Minecraft Versions?
Yes. In older versions, especially around the Nether Update era, a lodestone required 1 netherite ingot and 8 chiseled stone bricks. That made it a late-game item for many players, since netherite meant finding ancient debris, smelting it into scraps, and combining the scraps with gold.
In newer versions, Mojang changed the recipe to use iron instead. That is a major improvement for survival players because it moves the lodestone from “cool but expensive” to “actually practical.”
So if your game is current, enjoy the discount. If you are playing an older version, do not be alarmed if the iron recipe does not work. Your world is not cursed. It is just behind the times.
Should You Craft a Lodestone or Find One?
You can do either. Lodestones may appear as loot in certain generated structures, and older guides also mention finding them in bastion remnants. But for most players, crafting one is the simplest and most reliable route because the current recipe is so affordable.
That is the real beauty of the modern lodestone recipe: it removes the drama. No rare late-game ingredient, no huge detour, no “maybe I will just keep using coordinates forever.” You can craft the block, place it, and immediately start navigating more intelligently.
Final Thoughts
If you have ever been lost in Minecraft, then a lodestone is for you. And if you have never been lost in Minecraft, then either you are a navigation wizard or you have not explored enough yet. Either way, this block deserves a spot in your survival toolkit.
In current Minecraft versions, making a lodestone is refreshingly simple: one iron ingot, eight chiseled stone bricks, and a compass to link it all together. Once set up, it becomes one of the cleanest ways to mark important locations and travel with confidence, especially in difficult dimensions.
It is not the flashiest block in the game. It will not explode, summon lightning, or make your house prettier. But it will get you home, and honestly, that is a beautiful thing.
Player Experiences and Real-World Gameplay Lessons
The funniest thing about lodestones is that most players do not appreciate them until they are already hopelessly lost. Nobody wakes up in a fresh survival world and says, “Today I shall invest in advanced navigation infrastructure.” No, what usually happens is much messier. A player heads into the Nether for “just a quick quartz run,” takes three wrong turns, panics after hearing ghasts, and suddenly starts treating every red tunnel like it might be the right one. That is when the lodestone goes from optional block to personal hero.
One of the most common experiences in Minecraft is building a beautiful base far from spawn and then realizing a regular compass does not care. It still points to the original world spawn like an overly loyal GPS that refuses to update its address book. Players who craft a lodestone for the first time often describe the same feeling: relief. For the first time, the compass is pointing somewhere that actually matters. It is a small change, but it makes a big world feel organized.
Another classic experience happens in multiplayer survival servers. Someone says, “My house is easy to find, just head past the spruce forest, turn left at the weird hill, cross the river, and keep going until you see a farm that looks like a tax mistake.” That might sound charming, but it is a terrible navigation system. Lodestones make shared worlds cleaner. Players can keep a compass for the shopping district, one for the Nether hub, and another for their base. Suddenly the server feels less like chaos and more like a place with actual infrastructure.
The Nether is where lodestones really earn their reputation. Veteran players often place one near every major portal because terrain there is repetitive, dangerous, and weirdly good at making people overconfident. A straight tunnel can branch once, then twice, then eight times, and before long every direction looks correct in that very suspicious Minecraft way. A lodestone compass removes the guesswork. Instead of relying on memory, you just follow the needle and keep your lava-related regrets to a minimum.
Even builders get surprising value from lodestones. Large creative-style survival worlds often include distant mines, resource outposts, map art zones, mob farms, and scenic cabins. After enough expansion, remembering everything becomes unrealistic. Players who start using lodestones usually end up making more than one, because once navigation becomes easy, it is hard to go back to “I think the melon farm is somewhere east-ish.”
That is probably the best way to describe the lodestone experience: it turns Minecraft travel from vague improvisation into confident movement. It does not remove adventure. It just removes the annoying part where adventure turns into wandering, wandering turns into panic, and panic turns into accidentally living in the basalt deltas for forty-five minutes.




