Table of Contents >> Show >> Hide
- Why a Cabinet Makes the Perfect DIY Play Kitchen
- Choose the Right Cabinet Before You Start
- Tools and Materials You’ll Likely Need
- Step 1: Clean the Cabinet Like It Owes You Money
- Step 2: Repair, Sand, and Prep for Paint
- Step 3: Paint the Cabinet
- Step 4: Create the Sink
- Step 5: Add a Stovetop and Oven Details
- Step 6: Build Up the Back and Sides
- Step 7: Make It Safe for Real-World Play
- Easy Design Ideas That Make It Look Extra Special
- Common Mistakes to Avoid
- Real-Life Experience: What Building One Actually Feels Like
- Final Thoughts
- SEO Tags
If you have an old cabinet collecting dust in the garage, congratulations: you are already halfway to becoming the coolest toy-maker on the block. A homemade play kitchen from a cabinet is one of those DIY projects that feels wildly impressive but is actually very doable, even if your carpentry experience begins and ends with assembling one suspiciously wobbly bookshelf.
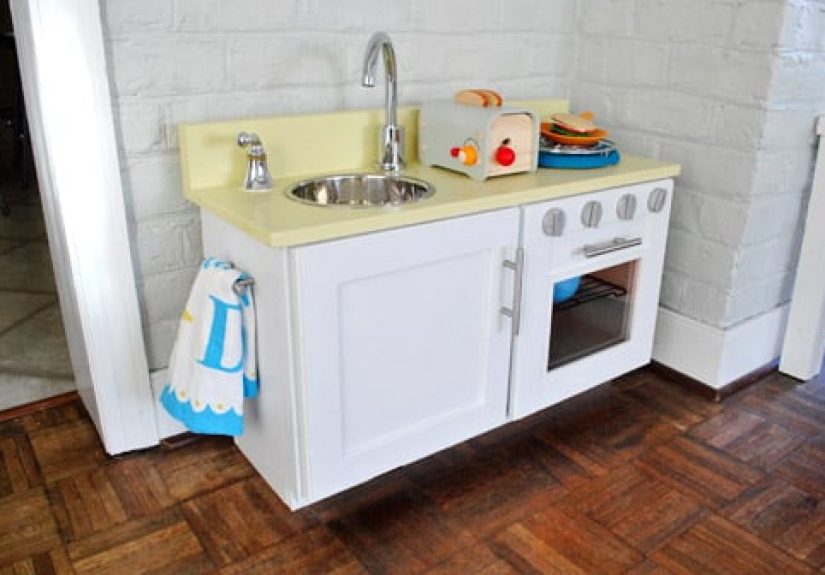
The beauty of this project is that it combines upcycling, creativity, and practical storage in one adorable package. Instead of buying a bulky toy kitchen that may not match your home, you can transform a cabinet into a custom pretend-cooking station with a sink, stove, oven, shelves, hooks, and all the tiny “chef energy” your child can handle. Better yet, you can size it to your space, paint it to match your style, and make it sturdy enough to survive years of pretend soup, imaginary pancakes, and very serious tea parties.
In this guide, you’ll learn how to make a homemade play kitchen from a cabinet step by step, what materials work best, which safety details matter most, and how to add the little finishing touches that make the whole thing look far more expensive than it actually was. Let’s turn that forgotten cabinet into a pint-size culinary headquarters.
Why a Cabinet Makes the Perfect DIY Play Kitchen
A cabinet is practically begging for a second life as a toy kitchen. It already gives you the basic structure, storage, and height you need. The doors can become an oven or pantry. The top surface can become a stovetop and prep area. Interior shelves can hold toy dishes, felt food, miniature pots, and that one plastic carrot that always ends up under the couch.
Using a cabinet also saves time. Instead of building a frame from scratch, you start with a solid base and focus on the fun details: paint, hardware, faux burners, a sink bowl, a faucet, a backsplash, and cute little hooks for spatulas that will somehow become more organized than your real kitchen tools.
It is also a budget-friendly option. Many people find suitable cabinets at thrift stores, yard sales, Habitat ReStore locations, or in their own basement. A simple cabinet makeover can cost far less than a new wooden play kitchen, especially if you reuse paint, knobs, bowls, and scrap wood you already have.
Choose the Right Cabinet Before You Start
Not every cabinet is a star candidate. The best cabinet for this project is sturdy, not too deep, and sized appropriately for your child. A base cabinet, nightstand, side table with storage, or small media cabinet can all work beautifully.
Look for these features:
- Solid construction: Avoid anything that rocks, leans, or feels flimsy.
- Kid-friendly height: Around counter height for toddlers and preschoolers usually works best.
- Flat top surface: This makes it easier to create burners and prep space.
- Storage inside: Shelves or open space help keep play food and accessories contained.
- Safe edges: Sharp corners can be sanded, but heavily damaged pieces are more trouble than they are worth.
If you are using an older cabinet, pause before sanding or stripping it. Cabinets or furniture made before 1978 may contain lead-based paint. If you do not know the history of the piece, treat it cautiously, use lead-safe practices, or skip that cabinet and choose a newer one. This is one DIY shortcut you absolutely do not want to take.
Tools and Materials You’ll Likely Need
You can keep this build simple or go full tiny-chef luxury. Here is a practical middle-ground list that works for most DIY play kitchen projects.
Basic tools:
- Drill or screwdriver
- Jigsaw or hole saw if cutting for a sink
- Sander or sanding block
- Paintbrushes and small roller
- Measuring tape
- Pencil
- Painter’s tape
Common materials:
- Cabinet or small furniture piece
- Cleaner or degreaser
- Wood filler for dents and holes
- Primer
- Cabinet or furniture paint
- Small bowl or metal mixing bowl for the sink
- Knobs or handles for stove controls
- Hooks for utensils
- Plywood or scrap wood for backsplash or shelf additions
- Peel-and-stick tile, contact paper, or paint for decoration
- Wall anchor kit
If the cabinet is laminate rather than wood, use a bonding primer made for slick surfaces. If you are painting indoors, choose a low-VOC or no-VOC product when possible and make sure the area is well ventilated. Your future self, your lungs, and everyone in the house will appreciate the effort.
Step 1: Clean the Cabinet Like It Owes You Money
Before you paint or cut anything, clean the cabinet thoroughly. Old cabinets collect grease, dust, wax, and mystery grime with the determination of a toddler hoarding stickers. Paint will not adhere well to dirty surfaces, so this step matters more than it looks.
Remove the doors, hardware, shelves, and drawers if possible. Label the pieces so you can put everything back in the right place later. Then wash all surfaces with a degreasing cleaner, let them dry completely, and inspect for dents, chipped corners, or unused hardware holes.
Step 2: Repair, Sand, and Prep for Paint
Fill dents or holes with wood filler and let it dry. Once dry, sand the repaired areas smooth. Then lightly sand the rest of the cabinet to help the primer grip. You do not need to sand it into another dimension; just scuff the surface enough to improve adhesion.
Wipe away all dust with a tack cloth or slightly damp microfiber cloth. Dust left behind will turn your beautiful finish into a weird crunchy texture, which is not the design statement we are aiming for.
Prep tips that make a big difference:
- Remove hardware before painting for a cleaner finish.
- Use painter’s tape on any areas you do not want painted.
- Prime first, especially if the cabinet is dark, glossy, or laminate.
- Let each coat dry fully before sanding lightly and recoating.
Step 3: Paint the Cabinet
This is where the transformation starts to feel magical. Choose a color palette that suits your space and your child’s style. White is classic and bright. Soft green, pale blue, blush, and warm gray all work beautifully. For a more playful look, try two-tone colors, such as a white cabinet with a mint backsplash or natural wood accents with black “appliances.”
Use thin, even coats of primer and paint rather than one thick gloppy coat that dries with drips. A small foam roller can help create a smoother finish on flat areas, while a brush works well for corners and trim. Semi-gloss or satin finishes are often the sweet spot because they are durable and easier to wipe clean.
If you want the play kitchen to look polished, paint the doors separately and let everything cure well before reassembly. Rushing the drying process is how fingerprints become permanent decor.
Step 4: Create the Sink
A toy sink is one of the features that instantly makes the cabinet look like a real play kitchen. The simplest version uses a lightweight bowl dropped into a cut opening in the countertop.
Place the bowl upside down on the top surface and trace around it, leaving a small lip so it does not fall through. Cut the opening carefully with a jigsaw. Sand the edges smooth. Drop the bowl into place. Stainless steel bowls are popular because they look realistic, but plastic works too and is lighter for very small children.
For the faucet, you have options. You can install a simple hook-style faucet from leftover plumbing parts, use a wooden dowel and curved piece for a faux faucet, or repurpose a real faucet if it is decorative and safely secured. No running water is necessary unless you are especially ambitious and have apparently decided sleep is optional.
Step 5: Add a Stovetop and Oven Details
Now for the fun part: fake appliances. On the countertop, paint or apply vinyl circles to represent burners. Black paint works well, and silver rings or small dots can make them look more realistic. For stove knobs, attach cabinet knobs, wooden wheels, or large furniture pulls to the front panel.
If you want them to turn, install them with bolts and washers. If not, glue or screw them in place securely. Either option looks charming, but spinning knobs earn serious points with tiny chefs.
The cabinet doors can become an oven. Add a handle, draw a faux window with paint, acrylic, or chalkboard vinyl, and suddenly the whole thing looks delightfully bakery-ready. A drawer can become a pretend microwave or warming drawer. Open shelves can hold plates, cups, or baskets of toy ingredients.
Step 6: Build Up the Back and Sides
If the cabinet is short or plain, add a backsplash or back panel using plywood, beadboard, or even a sturdy board cut to size. This creates vertical space for details that make the play kitchen feel complete.
Great add-ons for the backsplash area:
- Small hooks for utensils
- A shelf for toy spices
- A towel bar
- A chalkboard menu panel
- Peel-and-stick tile for a backsplash effect
- Mini art, pretend recipe cards, or a printable “open/closed” sign
This is also where you can sneak in a little style. If you love farmhouse charm, add cup pulls and white paint. If you prefer modern looks, use black hardware and a simple subway-style backsplash. If your child loves color, lean in. A play kitchen should be joyful, not shy.
Step 7: Make It Safe for Real-World Play
A homemade play kitchen should be cute, but safety is the real MVP. Once the build is finished, check everything carefully before handing it over to your child.
Important safety checks:
- Anchor the cabinet to the wall so it cannot tip if climbed on or pulled.
- Sand any rough edges or sharp corners.
- Make sure knobs, hooks, bowls, and hardware are tightly attached.
- Avoid pinch points on doors or use soft-close hinges if possible.
- Do not use glass, breakable tile, or loose decorative pieces.
- Allow paint and finishes to cure fully before use.
Also think about the accessories you place inside the kitchen. Avoid anything small enough to be a choking hazard for younger children. Wooden food sets, soft felt foods, and larger pretend cookware are usually good choices.
Easy Design Ideas That Make It Look Extra Special
You do not need a giant budget to make your homemade play kitchen look designer-worthy. In fact, the details usually matter more than the build itself.
Try one or two of these upgrades:
- Add peel-and-stick wallpaper or contact paper inside the cabinet.
- Use a tension rod and fabric curtain for a sink skirt.
- Label baskets for toy food, dishes, and utensils.
- Install puck lights or battery-operated tap lights.
- Use a thrifted backsplash tile sample board as decor.
- Hang a mini clock, framed menu, or tiny grocery list.
The best DIY play kitchens look a little bit realistic and a little bit whimsical. That balance is what makes them so charming. You are not building a restaurant inspection nightmare. You are building a stage for imagination.
Common Mistakes to Avoid
Even a simple project can go sideways if you skip the boring-but-important parts. Here are the mistakes most likely to derail your cabinet play kitchen makeover:
- Skipping prep: Dirty, glossy cabinets do not hold paint well.
- Using the wrong primer: Laminate and slick finishes need bonding primer.
- Rushing dry time: Sticky paint ruins an otherwise great project.
- Ignoring scale: A cabinet that is too tall or too deep is awkward for children.
- Overdecorating: Too many small pieces can become cluttered or unsafe.
- Forgetting the anchor: The kitchen must be secured to the wall.
Real-Life Experience: What Building One Actually Feels Like
The funniest thing about making a homemade play kitchen from a cabinet is that you usually begin with enormous confidence and a terrible plan. It starts innocently enough. You spot an old cabinet and think, “This will be easy.” Then you carry it inside, stare at it for twenty minutes, and realize you are about to become emotionally invested in miniature burners.
One of the most common experiences people have with this project is discovering that the cabinet itself decides the final design. Maybe you planned on a sleek modern kitchen, but the cabinet has curved doors and vintage legs, so suddenly you are making a tiny cottage bakery. Or maybe you intended to keep it simple, but then you find the perfect little brass hooks and now your child’s pretend spatulas are better organized than your real ones. This project has a way of escalating charmingly.
Another very real experience is learning that prep work matters far more than the dramatic before-and-after photos suggest. The glamorous part is the paint color and cute accessories. The not-so-glamorous part is cleaning old grime, sanding edges, filling holes, and waiting for things to dry. But that unglamorous work is exactly why the finished kitchen feels solid and polished instead of flimsy and rushed. Almost everyone who loves the final result admits the same thing: the prep was annoying, but worth it.
Parents also tend to underestimate how much children love the realistic details. It is rarely the big painted surface that gets the most attention. It is the turning knobs, the little sink, the towel hook, the shelf with tiny cups, the oven door handle. Those small features are what draw kids in. A child does not look at the project and think, “Excellent use of cabinet primer.” They think, “I can make pretend mac and cheese in here immediately.” That is the win.
There is also a sweet emotional side to this project that people do not always expect. A homemade play kitchen often becomes more than a toy. It turns into a daily-use corner for storytelling, role play, “cooking” beside a parent in the real kitchen, and practicing independence. Children serve invisible soup. They make birthday cakes for stuffed animals. They “wash” dishes with great seriousness. It becomes a stage for creativity, language, and imitation. In many homes, it quietly turns into one of the most-used play items simply because it invites open-ended play rather than one fixed activity.
And yes, there are usually a few DIY mishaps along the way. A sink hole gets cut slightly off-center. A paint color looks wildly different on the cabinet than it did on the sample card. A knob goes on crooked, then gets fixed, then somehow looks crooked again because your brain has entered the DIY twilight zone. This is normal. The good news is that homemade charm covers a multitude of tiny imperfections. In fact, those little quirks often make the finished piece feel warmer and more personal.
Many DIYers also say the project changes the way they see old furniture. Once you have turned a cabinet into a play kitchen, you never look at curbside furniture the same way again. Suddenly every nightstand is a mini workshop, every bookshelf is a doll wardrobe, and every side table is one coat of paint away from a second career.
If there is one consistent takeaway from the experience, it is this: children do not need perfection. They need something thoughtful, safe, and inviting. The best homemade play kitchens are not necessarily the fanciest ones. They are the ones built with care, sized for real play, anchored properly, and filled with enough personality to spark imagination. So if your lines are not laser-straight or your faux burners are a little wonky, breathe easy. Your child is not judging your symmetry. They are too busy running a five-star pancake restaurant out of the former cabinet you rescued from oblivion.
Final Thoughts
Learning how to make a homemade play kitchen from a cabinet is one of the most satisfying DIY projects for parents, grandparents, and crafty humans in general. It saves money, gives old furniture a new purpose, and creates a play space that feels custom, practical, and full of personality.
The key is to keep the process simple: choose a sturdy cabinet, prep it well, paint it carefully, add realistic features, and never skip safety details. Once it is finished, you will have more than a toy. You will have a handmade little world where imagination can run wild, cookies can be baked without calories, and every stuffed animal in the house can finally enjoy a proper dinner service.
Not bad for an old cabinet.





