Table of Contents >> Show >> Hide
- What Is a Kokedama Ball?
- Best Plants for a DIY Kokedama Ball
- Materials and Tools You’ll Need
- How to Make a DIY Kokedama Ball
- Kokedama Care Guide: How to Keep It Alive (and Good-Looking)
- Common Kokedama Problems and Fixes
- Creative Ways to Display Your Kokedama
- Final Thoughts
- Real-World DIY Kokedama Experiences (What Beginners Usually Learn)
If a houseplant and a tiny art installation had a baby, it would be a kokedama. This Japanese moss-ball planting style turns ordinary potted plants into floating, tabletop, or shelf-ready living decor. It looks fancy enough for a design magazine, but it is surprisingly beginner-friendly (and delightfully messy) to make at home.
In this guide, you’ll learn exactly how to make a DIY kokedama ball, which plants work best, what soil mix to use, how to water it without drowning it, and how to keep your moss ball looking fresh instead of like a sad green meatball. We’ll also cover real-world troubleshooting, display ideas, and common beginner mistakesbecause yes, almost everyone makes at least one on their first try.
What Is a Kokedama Ball?
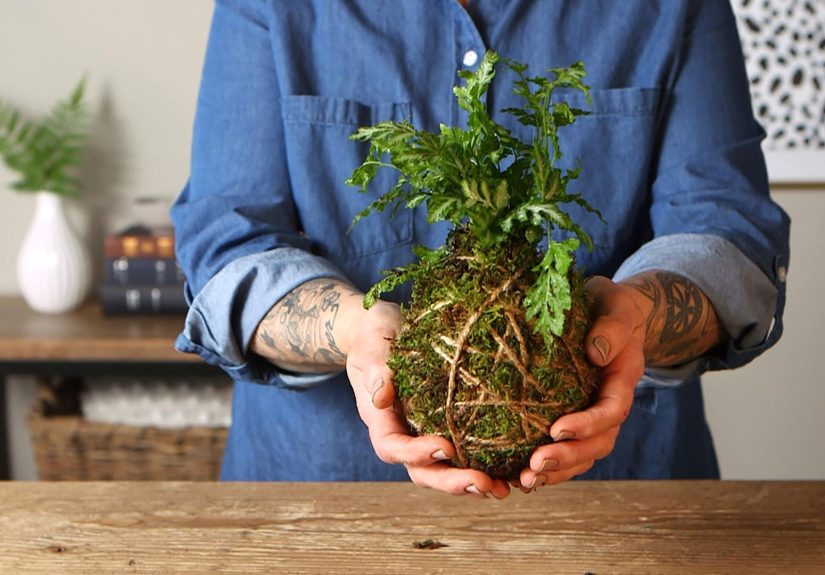
Kokedama is a Japanese gardening technique where a plant’s roots are wrapped in a ball of soil and then covered in moss. The word literally translates to “moss ball,” and it’s often described as a cousin (or stylish rebel cousin) of bonsai. Instead of planting in a pot, the moss-covered root ball becomes the container.
A DIY kokedama ball can be displayed in several ways:
- Hanging from twine or fishing line
- Resting on a shallow dish or decorative plate
- Grouped with other kokedama for a centerpiece
- Placed in a clear bowl for a more modern look
The appeal is obvious: it’s sculptural, minimalist, and a great way to show off a favorite houseplant without another pot joining the cabinet of ceramic “I swear I’ll use these someday.”
Best Plants for a DIY Kokedama Ball
Choosing the right plant is half the battle. The best kokedama plants are usually small, slower-growing, and tolerant of consistent moisture. Think “easygoing roommate,” not “high-maintenance diva.”
Beginner-Friendly Kokedama Plants
- Pothos
- Philodendron (small varieties)
- Spider plant
- Dracaena (compact types)
- Peace lily
- Ferns (maidenhair, bird’s nest, rabbit’s foot, asparagus fern)
- Peperomia
- English ivy (if you can give it good light and airflow)
Plants to Avoid (At Least for Your First One)
- Large fast-growing plants (they outgrow the ball quickly)
- Most cacti and many succulents (traditional kokedama stays too moist)
- Plants that need very airy roots or highly specific media
- Anything dramatic that faints if you look at it wrong
Can you make succulent kokedama? Yes, some people do. But it usually requires a drier, sandier mix and more careful watering. For your first project, a pothos or fern is the smoother ride.
Materials and Tools You’ll Need
There are several legitimate ways to build a kokedama, from traditional clay-heavy mixes to beginner-friendly potting soil blends. Below is a practical list that works for most home DIYers.
Core Materials
- 1 small plant (usually in a 4-inch nursery pot)
- Peat moss (or a moisture-retentive component)
- Bonsai soil, clay-based soil, or regular potting mix (depending on recipe)
- Sphagnum moss or sheet moss (for wrapping roots and/or outer layer)
- Sheet moss or preserved moss for the outer wrap
- Water
- Twine, waxed thread, monofilament fishing line, or similar binding material
Helpful Tools
- 2 bowls or buckets (one for soaking moss, one for mixing soil)
- Scissors
- Spray bottle (optional, but very useful)
- Colander or dish rack (for draining after watering)
- Gloves (optional, unless you dislike dirt under your nails)
- Work surface protection (tarp, tray, newspaper, or a “craft chaos zone”)
Soil Mix Options for Kokedama
There isn’t just one correct recipe. Different guides use different blends depending on how traditional or beginner-friendly they want the project to be. Here are the most common approaches:
- Beginner classic: A peat moss + bonsai soil mix (many DIY guides use a 7:3 ratio of peat moss to bonsai soil by volume).
- Traditional-inspired mix: Clay-based/bonsai soil plus peat moss (some tutorials recommend a higher clay content for better adhesion).
- Accessible alternative: Potting mix with peat and perlite (easier to find, works well for many houseplants).
- Optional binder: Some makers add bentonite clay to help the ball hold together.
The goal is simple: a moist, moldable ball that stays together when pressed. Not soup. Not dust. Somewhere between cookie dough and a snowball that went to art school.
How to Make a DIY Kokedama Ball
Here’s the step-by-step method that combines traditional technique with beginner practicality.
Step 1: Soak the Moss
Place your sphagnum moss and/or sheet moss in a bowl of water and let it soak until fully saturated. This usually takes about 10 to 15 minutes. If you’re using preserved or dried moss, soaking makes it flexible and much easier to wrap.
Once soaked, gently squeeze out excess water so it’s damp, not dripping like a wet dish sponge.
Step 2: Prep the Plant
Remove the plant from its nursery pot. Gently shake or brush away some of the old soil around the roots. You do not need to scrub the roots bare like you’re prepping them for surgery; just remove enough to help the roots fit neatly into the new soil ball.
If the plant is root-bound, loosen the roots a little with your fingers so they can spread into the kokedama mix.
Step 3: Mix the Soil for the Ball
In a separate bowl, combine your chosen soil ingredients. Add water graduallysmall amounts at a timewhile mixing with your hands. Keep pressing and mixing until the soil holds together firmly when squeezed.
A good test: form a ball about the size of a grapefruit (or an orange for smaller plants). If it cracks and crumbles, add a little more water. If it slumps like pudding, add more dry mix.
Step 4: Form the Soil Ball Around the Roots
There are two common ways to do this:
- Split-ball method: Make a full ball, split it in half, place the roots inside, then press the halves back together.
- Build-around-roots method: Pack moist soil directly around the root ball and shape it into a sphere.
Either way, press firmly so the ball becomes compact and smooth. It should feel secure, not fragile.
Step 5: Wrap the Root Ball in Moss
Lay sheet moss flat (green side outward if applicable), place the soil ball in the center, and wrap the moss around it so the soil is fully covered. Trim excess moss with scissors if needed.
If using loose moss, pack and smooth it around the ball before securing with string. Don’t panic if it looks awkward at first. Most kokedama go through an “ugly potato” phase before becoming elegant.
Step 6: Secure with Twine, Thread, or Fishing Line
Wrap string around the moss ball in multiple directions, crossing over itself to hold the moss snugly in place. Start with a long tail so you can tie off securely at the end.
If you want to hang the kokedama, leave extra line and create a loop or a three-point hanger. Clear fishing line gives a floating effect, while twine gives a more rustic look.
Tip: Natural twine looks charming, but some materials wear out faster in consistently moist conditions. If longevity matters, waxed thread or fishing line is often a sturdier choice.
Step 7: Water the Finished Kokedama
Once assembled, soak the kokedama in room-temperature water until fully saturated. This generally takes about 5 to 15 minutes depending on the size of the ball and the materials used.
After soaking, place it in a colander or dish rack and let it drain thoroughly until it stops dripping. Then it’s ready to display.
Kokedama Care Guide: How to Keep It Alive (and Good-Looking)
Watering Kokedama the Right Way
The most reliable way to tell when your DIY kokedama ball needs water is by weight. Pick it up after watering so you know what “fully soaked” feels like. When it feels noticeably lighter, it’s time to soak again.
General watering method:
- Submerge the moss ball in room-temperature water for about 5–10 minutes (sometimes up to 15 minutes for larger balls).
- Let it drain completely in a colander or dish rack.
- Return it to its display spot only when dripping stops.
How often? It depends on plant type, humidity, airflow, season, and light. Some may need water twice a week; others much less often. There is no universal schedule, which is annoying but true.
Light Needs
Most kokedama-friendly houseplants prefer bright indirect light to medium light. Direct sun can dry the moss too quickly and may scorch leaves (especially ferns and other shade-loving plants).
Match the placement to the plantnot just to your interior design goals. Your pothos does not care that the shelf looks incredible at golden hour if it’s being roasted.
Humidity and Airflow
Kokedama can dry out faster in homes with forced-air heat or very dry climates. If the moss is crisping up constantly, consider:
- Light misting between soakings (for the moss surface)
- Moving it to a more humid room (like a bathroom with bright indirect light)
- Using a humidifier nearby
At the same time, don’t trap it in stale, soggy conditions. Good airflow helps prevent mold.
Fertilizer
Kokedama usually need less feeding than plants in larger containers. A diluted water-soluble fertilizer used occasionally during the growing season is a common approach. Some gardeners fertilize lightly only a few times a year; others use very dilute feed more regularly. When in doubt, underfeed rather than overfeed.
Pruning and Repotting
Kokedama is often a temporary display style, not a forever home. Over time, roots may grow through the moss or the plant may outgrow the ball. When that happens, you can:
- Trim roots lightly and refresh the moss wrap
- Rebuild a slightly larger kokedama (once or occasionally)
- Move the plant back into a pot and make a new kokedama with a smaller plant
Common Kokedama Problems and Fixes
Problem: The Ball Falls Apart
Usually caused by a soil mix that is too dry, too loose, or not compacted enough. Add a little water, repack firmly, and rewrap with moss and line.
Problem: Mold on the Moss
This can happen if the ball stays wet too long or airflow is poor. Let it dry a bit more between soakings, improve ventilation, and gently clean the affected area. Minor mold issues are common and often manageable.
Problem: Brown Leaf Tips
Often a sign of dryness, low humidity, or inconsistent watering. Check the weight of the ball more often and consider boosting humidity.
Problem: Yellow Leaves
Often points to overwatering, poor drainage, or a plant mismatch (for example, using a plant that hates consistently moist conditions). Let the ball dry more between soakings and reassess your plant choice.
Problem: Moss Looks Tired or Brown
Moss can fade over time, especially in low humidity or harsh light. You can refresh the outer layer by rewrapping with new moss. Think of it as a spa day, not a failure.
Creative Ways to Display Your Kokedama
- Single statement piece: Hang one in a corner with filtered light.
- Cluster display: Group several at different heights for a floating garden effect.
- Tabletop style: Set on a ceramic dish, wood saucer, or shallow bowl.
- Bathroom greenery: Great for humidity-loving plants if there is enough indirect light.
- Seasonal swap: Rotate plant varieties or refresh moss wraps for a new look.
A pro tip for indoor styling: put a tray or dish under tabletop kokedama, even if you drained it well. Your furniture will appreciate the respect.
Final Thoughts
Learning how to make a DIY kokedama ball is one of those rare projects that feels both crafty and genuinely calming. It’s part gardening, part sculpture, part “why is there moss in my coffee,” and completely worth trying.
Start with one easy plant, keep your soil mix moldable, soak by weight instead of by rigid schedule, and don’t stress if your first kokedama isn’t gallery-perfect. The charm of kokedama is that it’s handmade, a little wild, and very much alive.
Once you make one, there’s a good chance you’ll make three more and start looking at every small plant in your house like, “You know what would really spice up your life? Becoming a moss orb.”
Real-World DIY Kokedama Experiences (What Beginners Usually Learn)
One of the most common experiences people have with their first kokedama is underestimating how much the project depends on feel rather than exact measurements. You can read five tutorials, follow every ratio, and still end up adjusting the mix because your peat moss is drier, your potting mix is chunkier, or your plant’s roots are larger than expected. That is completely normal. In practice, making a kokedama is a little like cooking pancakes: the recipe helps, but your hands tell you when the texture is right.
Another very common beginner moment is the “this looks terrible” phase. The soil ball may crack, the moss may slide, and the string may make the whole thing look like a parcel from a very confused florist. Then, after a few more wraps and a trim, it suddenly looks intentional. Most people are surprised by how quickly the shape improves once they stop babying it and start wrapping firmly in multiple directions.
Watering is usually the next learning curve. Many first-time makers want a strict scheduleevery Tuesday and Saturday, done. But kokedama doesn’t really care about your calendar. Homes with heating, AC, dry winter air, or bright windows can dry a moss ball much faster than expected. On the other hand, a shaded humid room may keep it moist for much longer. People who do well with kokedama tend to learn the “lift test” early: pick it up, feel the weight, compare it to how it felt after soaking, and water based on that.
Plant choice also shapes the whole experience. Beginners who start with pothos, spider plants, or sturdy ferns often feel like plant geniuses (deserved). Beginners who start with a fussy plant often assume they are bad at kokedama, when really they just chose a plant with narrower care needs. That is why experienced growers keep repeating the same advice: pick an easy plant first, then get experimental later.
Another real-world lesson is that kokedama is beautiful but not maintenance-free. The moss can brown. Roots may poke through. The string can loosen over time. None of that means the project failed. In fact, many people end up enjoying the maintenance because it feels more hands-on than standard houseplant care. Refreshing the moss wrap, trimming a few roots, or retying the line can become part of the ritual.
Finally, people often discover that kokedama changes how they think about displaying plants. Instead of asking, “Which pot matches this shelf?” they start thinking about height, texture, negative space, and light in a more artistic way. A simple pothos becomes a hanging focal point. A fern becomes a little living sculpture. And that’s really the magic of a DIY kokedama ball: it turns plant care into design, and design into something alive.





