Table of Contents >> Show >> Hide
- What “Frosting an Exterior Window” Actually Means
- Choose the Right Method
- Tools and Materials Checklist
- Step-by-Step: How to Frost an Exterior Window With Film
- Step 1: Measure precisely
- Step 2: Prep the glass like your reputation depends on it
- Step 3: Cut film on a clean flat surface
- Step 4: Wet the glass (yes, generously)
- Step 5: Remove liner and wet the adhesive side
- Step 6: Apply from top to bottom
- Step 7: Squeegee in overlapping passes
- Step 8: Trim edges cleanly
- Step 9: Final squeegee and edge check
- Step 10: Cure time
- Alternative: Frosted Spray Paint (Fast, Decorative, but Less Forgiving)
- Alternative: Etching Cream (Permanent and Crisp)
- Exterior-Specific Challenges (and How to Beat Them)
- Common Mistakes and Smart Fixes
- Cost and Time Expectations
- Final Thoughts
- Extended Experience Section: Practical Lessons From Real DIY Scenarios (Approx. )
You want privacy. You still want sunlight. And you definitely do not want your front window looking like a middle-school science fair gone wrong.
Good news: frosting an exterior window is one of those DIY projects that can look premium without requiring a contractor, a crane, or a dramatic soundtrack.
This guide walks you through the smartest way to frost an exterior window based on real-world methods used by homeowners, installers, and product manufacturers.
You’ll learn when to use frosted film, when spray frosting makes sense, when etching is worth it, and how to avoid the classic “bubble city” finish.
We’ll also cover weather, safety, durability, cleaning, and common mistakesbecause nothing says “fun weekend” like redoing the same window twice.
What “Frosting an Exterior Window” Actually Means
Before you buy anything, decide where the frosting goes:
1) Frosting the interior face of an exterior window
This is the most common route. The window itself is exterior-facing, but the film or coating is applied to the inside glass surface. Why? Better durability, easier installation, and fewer weather-related failures.
Many decorative frosted sprays are explicitly designed for interior-side application.
2) Frosting the outside face of the glass
This is a specialized project. Outdoor exposure means UV, rain, expansion and contraction, and dirt buildup. If you truly need an outside-mounted solution,
use products specifically rated for exterior use (often professionally installed architectural films).
Bottom line: if your goal is privacy for a street-facing bathroom, entry sidelight, laundry room, or garage door panel, apply frosting on the interior face unless your product documentation says otherwise.
Choose the Right Method
Method A: Frosted Window Film (Best for most homeowners)
- Best for: clean look, easy updates, low mess, good DIY control.
- Permanence: removable to semi-permanent (depends on static cling vs adhesive).
- Look: uniform, modern, “etched-glass vibe” without etching.
- Skill level: beginner to intermediate.
Method B: Frosted Glass Spray
- Best for: fast coverage, curves, decorative stencils.
- Permanence: semi-permanent to permanent depending on product line.
- Look: soft diffusion, slightly artisanal.
- Skill level: intermediate (even coats matter).
Method C: Etching Cream
- Best for: permanent frosting, custom patterns, durable finish.
- Permanence: permanent.
- Look: true etched effect.
- Skill level: intermediate to advanced (chemical handling required).
Method D: Professional Exterior-Grade Architectural Film
- Best for: true outside-glass applications or combined privacy + solar control.
- Permanence: long-term with warranty (when professionally installed).
- Look: consistent, commercial-quality finish.
- Skill level: usually pro-only for best results.
Tools and Materials Checklist
For a film-based project (recommended):
- Frosted privacy film (adhesive or static cling)
- Spray bottle with application solution
- Microfiber or low-lint cloth
- Squeegee or hard card
- Utility knife with fresh blades
- Measuring tape and straightedge
- Painter’s tape
For spray frosting:
- Frosted glass spray
- Masking paper/plastic + tape
- Respirator or mask recommended by product instructions
- Gloves and eye protection
For etching cream:
- Etching cream + stencil material
- Protective gloves and eyewear
- Brush/applicator
- Running water access for rinsing
Step-by-Step: How to Frost an Exterior Window With Film
If you only follow one method in this article, follow this one. It gives the best balance of privacy, finish quality, and reversibility.
Step 1: Measure precisely
Measure only the glass area (not trim). For many film installs, cutting the sheet slightly oversized first makes alignment easier.
You’ll do final trimming after application.
Step 2: Prep the glass like your reputation depends on it
Dust, lint, and tiny debris are the #1 reason for bumps and bubbles. Clean thoroughly and wipe dry with a low-lint cloth.
If the window is near a kitchen, remove grease residue completely before applying film.
Step 3: Cut film on a clean flat surface
Keep the liner side up while trimming. Use long, controlled cuts. New blade only. Dull blades tear film and your patience at the same time.
Step 4: Wet the glass (yes, generously)
Mist the glass with installation solution. A wet surface lets you reposition the film and push out air/water more effectively.
Dry installs are for people who enjoy chaos.
Step 5: Remove liner and wet the adhesive side
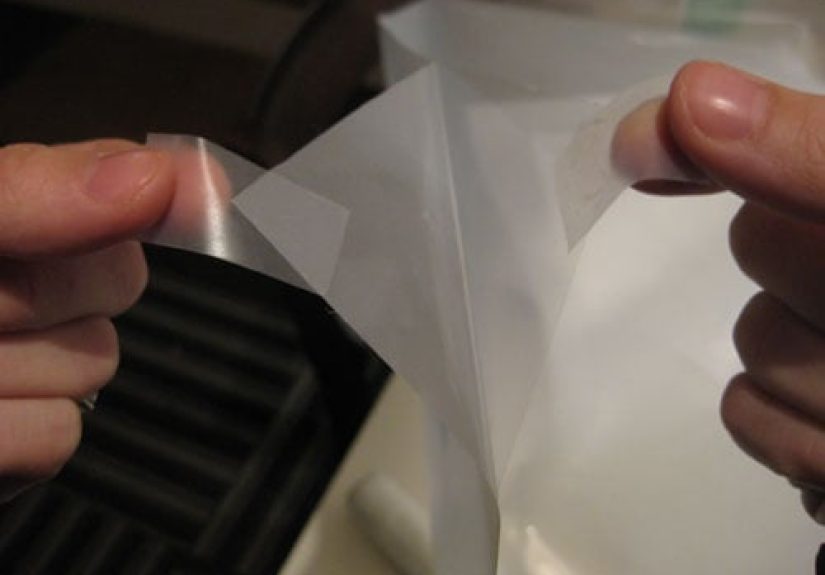
Use the tape-peel trick if the liner is stubborn. Keep fingerprints off the adhesive side by wetting your hands and the film surface as you go.
Step 6: Apply from top to bottom
Start at the top edge, align, then lay the film downward. Smooth with your hands first; don’t chase perfection yet.
Step 7: Squeegee in overlapping passes
Work center-outward to push water and bubbles toward the edges. Keep the film surface wet so the squeegee glides rather than drags.
Step 8: Trim edges cleanly
Run your blade along the glass edge using light pressure. Clean cuts are what make DIY look professional.
Step 9: Final squeegee and edge check
Re-wet and squeegee again. Press corners firmly. If edges lift later, rework with a wrapped plastic card and light pressure.
Step 10: Cure time
The film may look slightly hazy while moisture evaporates. That is normal. Let it cure fully before judging the final finish.
Resist the urge to poke every tiny bubble with a pinyou’ll often do more harm than good.
Alternative: Frosted Spray Paint (Fast, Decorative, but Less Forgiving)
Frosted sprays can look excellent on sidelights, pantry glass, and small exterior-facing windowswhen used exactly as labeled.
Most mainstream frosted sprays are intended for interior-side use on windows.
How to do it right
- Mask everything: frame, trim, nearby wall, hardware.
- Ventilate aggressively if working indoors.
- Apply several light coats instead of one heavy coat.
- Keep your can distance and pass speed consistent.
- Let each coat flash/dry before adding opacity.
Pro tip: If you want a premium look, do one light base coat, then a subtle cross-pass. This reduces striping and “wet lane” marks.
Alternative: Etching Cream (Permanent and Crisp)
If you want a truly permanent frosted effect, etching cream is the long-game choice. It chemically textures the glass itself.
It can be applied to full coverage or stencil designs.
Key reminders
- Wear gloves and eye protection.
- Work in a ventilated, controlled area.
- Mask surrounding glass and trim carefully.
- Follow temperature and dwell-time instructions precisely.
- Rinse thoroughly and safely.
Etching gives beautiful resultsbut treat it as a chemical process, not a craft shortcut.
Exterior-Specific Challenges (and How to Beat Them)
Sun and heat load
West- and south-facing windows get the roughest conditions. If heat and glare are major issues, pair privacy goals with film specs designed for solar control, not just appearance.
Weather durability
For true outside-glass installs, choose products explicitly rated for exterior exposure. If a film is not weather-rated, it can fail early at the edges.
Moisture zones
Bathrooms, shower windows, and pool-adjacent glass need moisture-aware product selection. Not every decorative film is built for wet environments.
Ladder safety
If your window requires elevation, stability matters more than speed. Use proper ladder technique and maintain three-point control while climbing.
One rushed step can turn a weekend DIY into a very expensive story.
Common Mistakes and Smart Fixes
“My film has bubbles”
Cause: dry glass, weak squeegee pressure, or trapped debris.
Fix: re-wet surface, squeegee center to edge in overlapping strokes, and address edge curl early.
“My finish looks streaky”
Cause: heavy spray coats or inconsistent pass speed.
Fix: sand nothing, strip if needed, and reapply lighter coats with controlled overlap.
“Privacy is great by day, not at night”
One-way reflective films can lose privacy when indoor lights are brighter than outside. Frosted films provide consistent day/night obscuring.
“Can I clean it immediately?”
Not ideal. Let film cure first. Early cleaning can disturb edges and trap lint.
Cost and Time Expectations
- DIY frosted film: usually the best value for whole-window privacy, often finished in 1–3 hours per typical window.
- Spray frosting: low upfront cost, fast setup, but finish quality depends heavily on technique.
- Etching cream: moderate material cost, high permanence, best for detail work.
- Pro exterior-grade film: highest upfront cost, strongest durability/warranty path for true exterior installations.
If your window is oversized, high up, unusually shaped, or directly exposed to harsh weather, professional installation often pays for itself in appearance and lifespan.
Final Thoughts
The best way to frost an exterior window is usually simple: install quality frosted film on the interior face of the exterior window.
You get privacy, natural light, cleaner installation, and easier maintenance.
If you need full permanence, etching is your power move.
If you need outside-mounted performance, use true exterior-rated film and consider a pro.
Whatever method you choose, remember the golden rule of glass projects: prep like a perfectionist, apply like a surgeon, and don’t rush cure time.
Your window will thank you by looking expensive.
Extended Experience Section: Practical Lessons From Real DIY Scenarios (Approx. )
One of the most useful patterns in real projects is this: homeowners usually start by thinking they need full blackout privacy, then realize they actually want
soft privacy with natural light. That shift changes everything. In a street-facing bathroom, for example, a homeowner often reaches for dark reflective film first.
It sounds logical“If it’s dark, no one can see in.” But in many homes, that can make the space feel smaller. A frosted film usually solves the actual problem better:
it diffuses sunlight, obscures details, and keeps the room bright. The result feels more spa and less cave.
Another common scenario is the front-door sidelight. This one is emotional, not just technical. People love the natural light near the entry, but they do not love feeling
like they’re in a fishbowl every time someone walks up the path. The best outcomes here come from two decisions: choosing a pattern density that matches privacy needs,
and trimming edges with precision. Even a high-quality film looks cheap if edge cuts are jagged. In side-by-side comparisons, the “professional-looking” install is almost always
the one where the installer took extra time on prep and blade work, not the one with the most expensive film.
A third case appears in west-facing patio doors. Homeowners begin with aesthetics (“I want frosted”), then discover comfort issues (heat, glare, UV fade).
In those rooms, decorative frosting alone may not solve afternoon discomfort. The better strategy is to define priorities in order:
first thermal comfort and glare control, then privacy level, then decorative style. This avoids the “looks great, still blazing hot” outcome.
It is also where product labels matter mostespecially for films that claim multipurpose performance.
Weather and moisture also teach quick lessons. In humid bathrooms and shower-adjacent windows, not all films behave the same over time.
The projects that hold up tend to use products rated for the environment and avoid rushed installation on damp glass. In practice, moisture discipline is simple:
dry surfaces completely, install carefully, and let cure time do its job before aggressive cleaning. Homeowners who skip this usually report edge lift, hazing panic, or bubbling.
Homeowners who wait it out usually report, “It looked cloudy at first, then cleared and stayed put.”
Then there is the ladder factor. A lot of window projects feel “easy” until the glass is above shoulder height or outside over landscaping.
The most successful DIYers treat access as part of the project plan, not an afterthought. They stage tools, avoid overreaching, and break the job into two calm passes
rather than one rushed marathon. The project quality improves immediately because safer body position means steadier hands.
The final practical lesson is surprisingly human: test pieces save relationships. Whether it is choosing opacity, spray density, or stencil scale,
a small test on spare glass (or an inconspicuous pane) prevents expensive do-overs and opinion clashes. Frosting feels permanent once it is on your best window.
Testing turns guesswork into confidence, and confidence turns DIY into craftsmanship.