Table of Contents >> Show >> Hide
- Why Pinocchio Is a Great Character to Draw
- What You Need Before You Start
- How to Draw Pinocchio in 6 Steps
- Tips to Make Your Pinocchio Look Better Fast
- Common Mistakes When Drawing Pinocchio
- Easy Practice Ideas After Your First Sketch
- Extra Drawing Experience: What I Learned From Sketching Pinocchio Again and Again
- Final Thoughts
If you have ever wanted to draw a character who looks equal parts adorable, mischievous, and one fib away from a nose-related engineering problem, Pinocchio is a fantastic place to start. He is one of those classic characters who looks detailed at first glance, but once you break him into simple shapes, he becomes surprisingly manageable. That is the secret sauce of a good Pinocchio drawing tutorial: stop trying to draw “all of Pinocchio” at once, and start building him piece by piece.
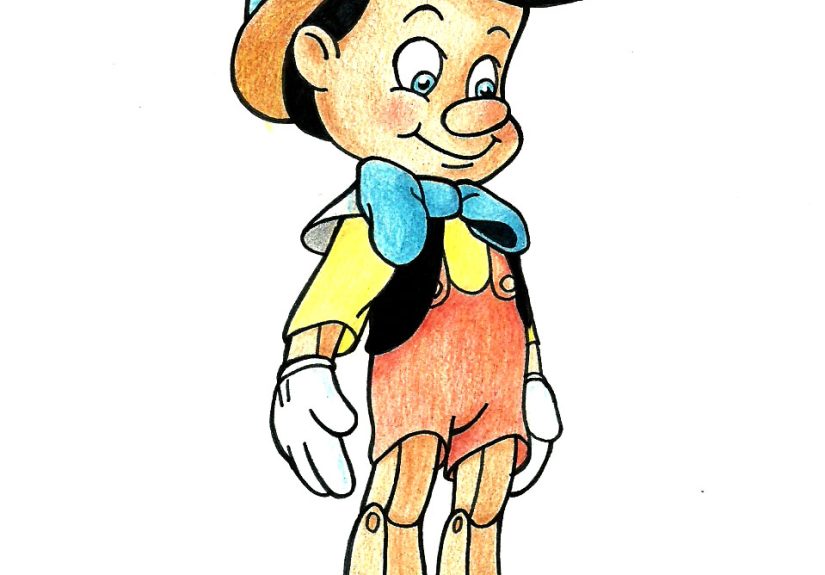
In this guide, you will learn how to draw Pinocchio in 6 steps using easy shapes, clean proportions, and recognizable character details. We will focus on the classic look most people picture right away: the jaunty hat with a feather, rounded cheeks, expressive eyes, bow tie, short pants, and those wonderfully puppet-like limbs. Whether you are a beginner, a parent drawing with a kid, or someone who just enjoys sketching cartoon characters during meetings that definitely could have been emails, this step-by-step method will help.
Why Pinocchio Is a Great Character to Draw
Pinocchio works beautifully for beginners because his design is readable. His face is built from soft curves, his clothes are bold and simple, and his silhouette is memorable even before you add color. That means you do not need advanced anatomy skills to make him look recognizable. Better yet, he teaches several useful drawing habits at once: building a head with guidelines, using shape-based construction, exaggerating features for personality, and keeping a character balanced from head to toe.
He is also a fun exercise in contrast. His face feels warm and human, but his body still hints at a wooden puppet. That mix makes the drawing feel alive. You are not sketching a generic cartoon boy. You are drawing a character with innocence, energy, and just enough theatrical flair to make your pencil feel important.
What You Need Before You Start
- A pencil for the sketch
- An eraser for cleanup and second chances
- Plain drawing paper
- A black pen or marker if you want crisp final lines
- Colored pencils, crayons, or markers for finishing touches
Before you start, lightly mark the center of your page. Pinocchio has a head-heavy design, so give yourself enough room below for the torso, shorts, legs, and shoes. Nothing is more humbling than drawing a perfect face and then realizing his legs have to end at the knees because the paper ran out.
How to Draw Pinocchio in 6 Steps
Step 1: Map the Head, Center Line, and Basic Pose
Start with a medium oval for the head. Add a vertical line down the middle and a horizontal line across the lower half of the oval to guide the face. These light guide marks help place the eyes, nose, and mouth without turning the whole thing into a guessing game.
Next, sketch a simple neck and a short torso underneath the head. Use basic shapes: a small rectangle or rounded box for the upper body, then a wider shape for the shorts. Add straight stick lines for the arms and legs so you can decide on the pose early. A slight bend in one knee or one arm can make Pinocchio feel much more lively than a stiff toy-soldier stance.
Keep the lines loose and faint here. This stage is about construction, not perfection. Think of it as building the skeleton of the drawing. Nobody frames the scaffolding, but without it, the whole thing gets weird fast.
Step 2: Build the Face and Add the Signature Nose
Now shape the lower face. Pinocchio usually looks best with rounded cheeks, a soft jaw, and a smaller chin rather than a sharp angular face. Draw his ears on each side of the head, roughly aligned with the eye area.
Then draw the nose. This is the part everyone waits for, and yes, it matters. Keep it long enough to be unmistakably Pinocchio, but not so long that it looks like he could pole-vault with it. A narrow, slightly rounded shape works best. Attach it naturally to the center of the face so it feels integrated, not pasted on like a wooden traffic cone.
Add large eyes along the horizontal guide. Leave enough space between them so the nose can sit comfortably. Sketch arched brows for a friendly expression, then add a small smiling mouth below the nose. If you want a cheerful classic look, lift the corners of the mouth slightly and give him open, bright eyes. A little curve in the cheeks can help sell that upbeat expression.
Step 3: Draw the Hair, Hat, and Feather
Pinocchio’s hair gives the top of the head its personality, so avoid making it too flat. Add soft, chunky locks over the forehead and around the sides of the face. The hair should feel tidy but lively, not helmet-like. A few curved clumps are better than dozens of tiny strands.
Now place the hat. Draw it sitting at a jaunty angle on top of the head. The brim can curve gently, and the crown should rise with a little bounce. Then add the feather. The feather is one of those details that quietly does a lot of work. Without it, the drawing can still be cute, but with it, the character instantly reads as Pinocchio.
At this point, step back and check the silhouette. Even if the details disappeared, would the head still look like Pinocchio? You want the answer to be yes. Big eyes, long nose, playful hat, feather, rounded cheeks. That combination is doing the heavy lifting.
Step 4: Sketch the Bow Tie, Torso, Sleeves, and Shorts
Under the chin, draw a crisp collar and a bow tie. Pinocchio’s outfit is part of his charm, so let these shapes be clean and readable. The bow tie does not need a million folds. Two rounded triangles and a center knot are enough.
Shape the shirt and sleeves around your torso guide. Keep them simple and slightly puffy. Then refine the shorts. They should feel a little oversized and playful, not sleek or modern. Pinocchio is not dressing for a streetwear campaign. He is wearing classic storybook clothes, and that old-fashioned styling is part of what makes him instantly recognizable.
Add suspenders or straps if you want a more polished look, and define the waistline clearly. Use curved lines wherever possible so the outfit feels friendly and animated instead of stiff. This is especially important for a cartoon character. Curves suggest motion and warmth; too many hard straight lines can make the drawing look frozen.
Step 5: Add the Arms, Gloves, Legs, and Shoes
Now build out the limbs over your guide lines. Keep the arms and legs slim and simple, but make sure the joints feel puppet-like rather than fully realistic. You can hint at that wooden construction with rounded connection points at the elbows and knees, or by keeping the limbs slightly tube-shaped.
Draw gloved hands if you want the classic animated feel. Simple mitten-like glove shapes work well for beginners. On the lower half, add narrow legs and sturdy shoes. Slightly oversized shoes help balance the design because Pinocchio has a visually larger head and upper body.
Watch the proportions here. If the legs are too short, he may look squashed. If they are too long, he starts drifting away from the familiar Pinocchio look. A good rule is to keep the body compact and let the clothing shapes help create the character instead of stretching the anatomy.
Step 6: Clean Up, Ink the Drawing, and Add Color
Erase extra guide lines and redraw your final contours with confidence. This is where your sketch starts looking intentional. Strengthen the clean outer lines, especially around the face, hat, feather, bow tie, and shoes. Those areas define the character most clearly.
If you are coloring, use warm skin tones for the face, dark hair, and a bright outfit palette. The classic color approach often includes a yellow hat, blue bow tie, red or warm-toned shorts, and brown or neutral shoes. You can also add a little pink to the cheeks to make him look more lively and youthful.
Want extra polish? Add soft shading under the hat brim, beneath the nose, under the bow tie, and around the shoes. Keep it subtle. This is a cartoon drawing, not a dramatic oil painting where the puppet has seen things.
Tips to Make Your Pinocchio Look Better Fast
Use Simple Shapes First
Most drawing frustration comes from rushing into details too early. Start with circles, ovals, boxes, and lines. When the structure works, the details suddenly behave much better.
Keep the Expression Friendly
Pinocchio usually reads best with a hopeful, curious, or slightly cheeky expression. If the brows angle too sharply or the mouth gets too thin, he may start looking grumpy instead of charming.
Let the Nose Be Distinct, Not Ridiculous
Yes, the nose is iconic. No, it does not need to be the length of a canoe paddle. Keep it balanced with the face.
Think About the Silhouette
Strong characters are recognizable in outline. Hat, feather, rounded cheeks, long nose, bow tie, short pants, simple shoes. Nail those, and you are already winning.
Common Mistakes When Drawing Pinocchio
- Making the head too small for the body
- Drawing the nose too thick or too straight
- Forgetting the bow tie and feather, which are major identity clues
- Using too many scratchy lines instead of committing to clean curves
- Making the outfit look too modern and losing the storybook feel
- Ignoring balance, so the character looks like he may tip over
If your first attempt feels off, do not panic. Cartoon character drawing is often about adjustment, not instant brilliance. Move the eyes slightly. Shorten the nose a bit. Widen the hat brim. A few tiny edits can rescue the whole drawing.
Easy Practice Ideas After Your First Sketch
Once you finish your first version, try drawing Pinocchio again in different ways. This is where your skills start leveling up.
- Draw a head-only portrait to focus on expression
- Try a full-body pose with one hand raised
- Draw him looking surprised, happy, or nervous
- Practice only the hat, feather, and face from three angles
- Create a “lying scene” version with a slightly longer nose for fun
Repeating the character is not boring. It is exactly how your hand learns the design. The second Pinocchio is usually better than the first, and the third one starts acting like you actually know what you are doing. Convenient, right?
Extra Drawing Experience: What I Learned From Sketching Pinocchio Again and Again
One of the most useful things about drawing Pinocchio is that he teaches patience without feeling like homework. The first time I tried sketching him, I made the classic beginner mistake of chasing details too early. I was so excited about the hat, the feather, and the famous nose that I skipped the construction stage and jumped straight into the decorative stuff. The result looked less like Pinocchio and more like a confused scarecrow auditioning for community theater. That was humbling, but it was also helpful.
Once I slowed down and started with the head oval, facial guide lines, and a simple body framework, the drawing improved almost immediately. That experience reinforced a lesson artists hear all the time but sometimes ignore: simple shapes are not “baby steps.” They are the real foundation. When the basic structure is right, the charm shows up much more easily.
Another thing I noticed is how much emotion lives in tiny changes. Tilt the eyebrows a little higher and Pinocchio looks innocent. Round the cheeks more and he feels younger. Make the smile slightly crooked and suddenly he looks mischievous, as if he is about to swear he did not eat the last cookie while crumbs are still on his face. That is what makes character drawing so fun. You are not just copying a costume. You are choosing a personality.
I also learned that drawing Pinocchio is great practice for controlling exaggeration. If you underplay the features, he turns into a generic cartoon boy in an old-timey outfit. If you overdo everything, he becomes a parody of himself. The sweet spot is somewhere in the middle. The nose should be long, but elegant. The hat should be playful, but not gigantic. The shoes should be sturdy, but not clownish. Finding that balance is a surprisingly good lesson in design judgment.
Coloring teaches another skill: restraint. It is tempting to throw bright colors everywhere because Pinocchio is a lively character, but too many loud choices can make the drawing feel chaotic. I found that keeping one or two areas bold, like the hat or bow tie, and letting the rest stay balanced makes the final piece much stronger. A little blush in the cheeks and a few small shadows often do more than fifty extra color decisions.
Most of all, drawing Pinocchio reminded me that recognizable characters depend on clarity. Clean lines, readable shapes, and a strong silhouette matter more than perfect realism. That is encouraging for beginners because it means you do not need to be a master painter to make something appealing. You just need to observe carefully, simplify smartly, and keep practicing. And yes, maybe accept that your first attempt will have one suspiciously giant ear. That is part of the artistic journey too.
Final Thoughts
If you want to learn how to draw Pinocchio in a way that feels fun instead of frustrating, the trick is to build the character from the inside out. Start with simple shapes. Place the face carefully. Add the iconic features that make him instantly recognizable. Then clean everything up with confident lines and a cheerful palette. In six manageable steps, you can go from blank page to a character that feels lively, classic, and full of storybook charm.
So grab your pencil, keep your sketch loose, and remember: if the first version looks a little wonky, that does not mean you failed. It just means your drawing is still in the “once upon a time” stage.




