Table of Contents >> Show >> Hide
You finally did it: you rescued a second Wii from a closet, a garage sale, or that one friend who “definitely still uses it” (they don’t).
Now you want your old progressyour 100% Galaxy file, your lovingly curated Miis, your “I swear I was one race away from unlocking that thing” saveon the new console.
Good news: for many Wii games, you can transfer save data using an SD card right from the Wii Menu.
The less-good news: some games block copying (on purpose), and the Wii is famously picky about where it wants saves to live.
This guide walks you through an official, no-funny-business method to copy or move save files from one Wii to another in 14 clear steps,
plus troubleshooting and real-world “here’s what usually goes wrong” stories at the end so you can avoid the classic mistakes
(like hitting Move when you meant Copy… we’ve all seen that movie).
Before You Start: A Quick Reality Check
What you can transfer
- Most standard Wii game saves using the Wii’s built-in Data Management tools.
- Some Virtual Console save data (the save files), depending on the title and how it stores data.
- Miis by storing them to a Wii Remote and bringing them to the other Wii.
What you usually cannot transfer this way
-
Some game saves that are marked as non-copyable. On the Wii Menu, these saves appear grayed out or the Copy/Move buttons are disabled.
This is common for games that used online features or console-tied identifiers. -
Wii Shop Channel downloads (WiiWare/Virtual Console titles) to a different Wii via SD card.
You can store them on an SD card, but they’re tied to the original console and won’t run on another Wii just because the files are on the card. - Anything that requires bypassing copy protection. This article sticks to legitimate, built-in options.
What you need
- An SD card that your Wii can read reliably (older Wiis are happiest with standard SD, and updated systems can use SDHC up to a point).
- Both consoles powered and working (you need access to the Wii Menu on the source Wii to export saves).
- Enough free blocks on the destination Wii’s internal memory (saves must be installed to internal memory to be used).
How the Wii Save Transfer Actually Works
The Wii doesn’t play most save files directly from the SD card. Think of the SD card as a moving truck, not an apartment.
You copy (or move) the save to the SD card, then copy it onto the destination Wii’s internal memory. Once installed, the game loads it from internal storage.
Also: the Wii is very literal. There’s no “Copy & Replace” button. If a save already exists on the destination Wii for the same game,
you may have to delete that existing save first before the Wii will let you copy the incoming one.
How to Copy Save Files to Another Wii: 14 Steps
-
Step 1: Identify which saves you want to transfer.
On your source Wii, write down the games you care about (or take a quick phone photo of the save list).
This helps you notice missing or “locked” saves earlybefore you’ve done three trips between consoles like you’re delivering pizza. -
Step 2: Confirm your SD card is compatible and reliable.
If your Wii is updated to a later System Menu, it supports standard SD and SDHC up to a certain capacity.
If you have multiple cards lying around, choose the simplest, most compatible option (and avoid ultra-huge cards that older hardware struggles to read). -
Step 3: Make sure the destination Wii has enough free blocks.
Go to Wii Options (the round button in the bottom-left) → Data Management.
If you’re low on space, move nonessential saves to SD (for storage) or delete things you no longer need.
Saves must be installed to internal memory to work, so free space matters. -
Step 4: Insert the SD card into the source Wii.
Put the SD card in the SD slot at the front of the console.
If the Wii asks to format or shows errors, stop and try a different cardsave transfers are not the moment for “let’s see what happens.” -
Step 5: Open the Wii’s Data Management screen.
From the Wii Menu, click Wii Options → Wii Settings (if needed) → back out to Data Management.
On most menus it’s: Wii Options → Data Management. -
Step 6: Go to Save Data for Wii.
Choose Save Data, then select the Wii tab (this is where standard Wii game saves live).
You should now see a grid/list of saves stored on the console. -
Step 7: Select a save file and choose Copy (preferred) or Move (use carefully).
Pick a save you want to transfer. If Copy is available, use itthis keeps the original safe on the source Wii.
If only Move is available, read the confirmation carefully: Move transfers the save to SD and removes it from the Wii.
If you’re not 100% sure, back out and start with a different save so you can practice safely. -
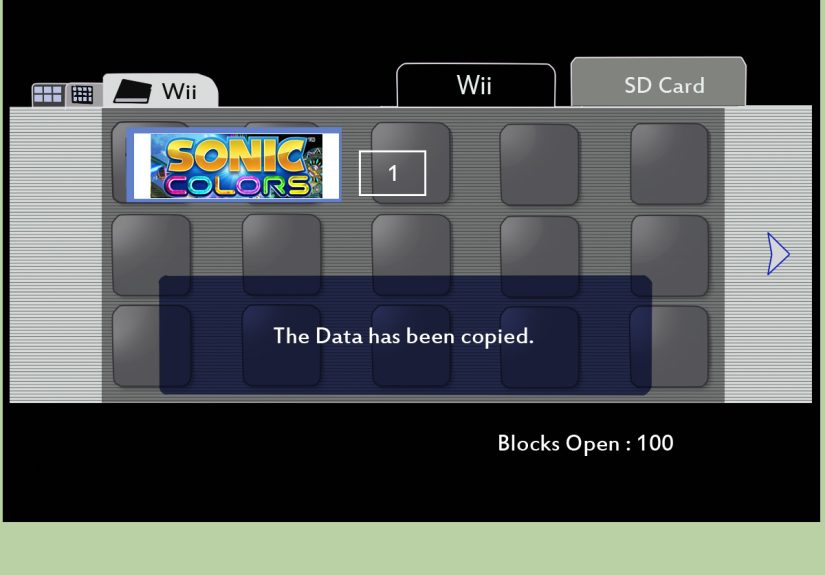
Step 8: Confirm the copy to the SD card.
When prompted, confirm Yes to copy. Repeat for each save you want to transfer.
If a save is grayed out or the system says it cannot be copied, that’s the game’s restrictionnot you doing something wrong. -
Step 9: Optionalbut smartdouble-check the SD Card tab.
Still in Save Data, switch to the SD Card tab to confirm your saves are now visible there.
Seeing the files listed is a nice confidence boost before you move to the next console. -
Step 10: Eject the SD card and move to the destination Wii.
Power down if you want to be extra cautious, then remove the SD card and insert it into the destination Wii’s SD slot.
(Yes, the Wii is old. Treat it gently. It has feelings.) -
Step 11: Open Data Management on the destination Wii.
From the Wii Menu: Wii Options → Data Management → Save Data → Wii.
You’re heading to the same neighborhood, just a different house. -
Step 12: Switch to the SD Card tab and select the incoming save.
In the Save Data screen, choose the SD Card tab to view the saves stored on your SD card.
Select the save you want, then choose Copy to copy it onto the destination Wii’s internal memory. -
Step 13: If the destination Wii already has a save for that game, delete it first (if needed).
If the Wii refuses to copy because a save exists, go back to the Wii tab (internal saves), select the existing save,
and delete itonly if you’re sure you don’t need what’s on the destination Wii.
Then return to the SD tab and copy again. -
Step 14: Verify the transfer by launching the gameand transfer Miis if you want them, too.
Start the game and confirm your save loads correctly. If it does, congrats: you just time-traveled your progress.
For Miis, open the Mii Channel on the source Wii, store Miis to a Wii Remote, then plug that Wii Remote into the destination Wii
and import them through the Mii Channel there.
Troubleshooting: When the Wii Says “No”
The Copy button is grayed out (or I get “This file cannot be copied/moved”)
This usually means the game developer blocked transfers for that save. It’s common with titles that used online features or console-tied identifiers.
If the Wii Menu won’t copy it, there isn’t an official workaround. Your best “legit” options are:
- Check the game’s own menus for a built-in transfer/export option (rare, but some games support special migration tools).
- Accept that you’ll need to restart on the new console for that specific game save.
- Keep the old Wii for that one game (the sentimental “save museum” approach).
I copied saves to SD, but the game doesn’t see them
That’s normal if the save is still on the SD card. Most Wii games expect saves to be installed in internal memory.
Go back to Data Management on the destination Wii and copy the save from the SD tab into the Wii tab (internal storage).
“Not enough blocks” on the destination Wii
The Wii has limited internal memory. If you’re out of space, move other saves to SD for storage,
delete unneeded data, and try again. Remember: the save has to land in internal memory to actually function.
My Wii Shop Channel downloads won’t work on the new Wii
This is expected. Downloaded channels/titles are tied to the original console and can’t be played on a different Wii just by moving files to SD.
Save files are different: saves can usually be used on another console unless that specific game blocks transfers.
FAQ: Fast Answers for Common “Wait, What?” Moments
Can I just put the SD card into my computer and copy files around?
You can back up the SD card contents for safekeeping, sure. But to install Wii saves onto a Wii,
you typically still need to use the Wii’s Data Management interface to copy the save onto internal memory.
The Wii expects data in its own format and installs it through the menu system.
Can I keep saves on the SD card permanently to save space?
You can store saves on SD, but most games won’t load them from SD during play.
The SD card is excellent for storage and transfer; internal memory is where saves usually need to live to be used.
How do I transfer Miis again?
The simple method is Wii Remote storage:
in the Mii Channel, choose the Wii Remote icon and drag Miis into open slots on the Wii Remote.
On the destination Wii, open the Mii Channel and bring them back from the Wii Remote storage screen.
Real-World Experiences: What Usually Happens (and How to Win Anyway)
Let’s talk about the part guides don’t always say out loud: transferring Wii saves is easy right up until it suddenly isn’t,
and then it becomes a mini-adventure starring you, a tiny SD card, and a console that communicates exclusively through polite warnings.
Here are common situations Wii owners run intoand how to handle them without losing your mind (or your Saturday).
1) The “I accidentally hit Move” panic
This is the #1 heart-stopper. You meant to Copy, but your thumb chose chaos and you hit Move.
If you used Move, the save is now on the SD card, and it was removed from the Wii. The key is: don’t do anything rash.
Take the SD card to the destination Wii and copy it into internal memory right away. Once it’s installed, you’re safe.
If you’re still using the old Wii, you can even copy it back later (again, assuming the game allows it).
Moral: when in doubt, choose Copy first, then celebrate with a snack.
2) The “Why is this save grayed out?” mystery
You’ll see a save sitting there like a smug little rectangle, refusing to be selected. Often these are games with online-era protections
or special identification data. The most frustrating part is the randomness: one game transfers fine, the next one acts like you’re trying
to steal the crown jewels. When that happens, remind yourself: it’s not personal, it’s policy.
Your practical play is to transfer what you can, then list the holdouts and decide whether they’re worth keeping the old Wii around for.
(Many people keep a “primary Wii” for stubborn saves and a “living room Wii” for everything else. Yes, it’s extra. Also yes, it works.)
3) The “There’s no Copy & Replace?” surprise
Modern systems spoil us with overwrite prompts. The Wii is old-school: if a save already exists on the destination Wii, it often won’t politely ask,
“Would you like to replace it?” It just refuses. So you end up in this awkward standoff where your SD card has the correct save,
but the destination Wii is like, “I already have a save, thanks.” The fix is usually deleting the destination save first.
This is also where people accidentally delete the wrong thingso slow down, check the icon and title, and maybe don’t do this part at 2 a.m.
4) The “I transferred it… but the game doesn’t load it” confusion
This one is sneaky because it feels like the transfer failed. In many cases, what really happened is that the save is still only on the SD card,
and the game is looking in internal memory. The Wii Menu lets you store saves on SD, but most games want them installed internally to load.
The solution is boring (copy it from SD to Wii internal memory) but effective.
Once you do that and launch the game, you get that satisfying moment where your old progress appearslike a time capsule that actually worked.
5) The “Mii migration is weirdly charming” moment
Moving Miis is one of the most delightfully low-tech things Nintendo ever did: drag your tiny people into the Wii Remote like you’re packing them
into a little cartoon bus, then take the bus to the other console. It feels like you’re smuggling a neighborhood across town.
Just remember that Wii Remote storage has limited slots, so if you’ve built an entire Mii civilization, you may need a couple of trips
(or multiple Wii Remotes). Also, if a Wii Remote asks to format for Mii storage, read the prompts carefully.
Bottom line: transferring Wii saves is usually straightforward when you stick to the Wii Menu’s built-in tools.
You’ll transfer the majority of your saves in minutes, and the few that don’t cooperate are typically blocked for reasons outside your control.
Approach it like a checklist, keep Copy/Move straight, and you’ll be back to playing instead of spelunking through menus.
Conclusion
Copying save files to another Wii is one of those “classic Nintendo” processes: simple, specific, and a little quirky.
With a compatible SD card and the Wii’s Data Management menu, you can move many saves safely in a repeatable way.
The keys are (1) use Copy whenever possible, (2) install saves to internal memory on the destination Wii,
(3) expect a few titles to be non-transferable, and (4) verify by launching each game after you transfer.
Do that, and your progress comes with youno magic spells required, just menu clicks and mild patience.





