Table of Contents >> Show >> Hide
- Why a Patterned Ceiling Works So Well in a Dining Room
- Pick Your Decorative Pattern Style
- Prep Like You Mean It (Because Ceilings Hold Grudges)
- Plan the Pattern: The Layout That Makes It Look Expensive
- Tools and Materials You’ll Actually Use
- How to Stencil a Decorative Pattern on Your Dining Room Ceiling
- Step 1: Set Up the Room
- Step 2: Mark Your Starting Point
- Step 3: Attach the Stencil Securely
- Step 4: Load the Roller Lightly (Seriously, Lightly)
- Step 5: Apply Paint in Thin Layers
- Step 6: Reposition Using Registration Marks
- Step 7: Keep the Pattern True as You Move Outward
- Step 8: Handle Edges and Corners Without Panic
- Step 9: Optional UpgradeAdd Depth or Metallic Highlights
- How to Paint a Tape Pattern (Stripes or a Grid) on a Ceiling
- Wallpapered Ceiling: A Quick Reality Check (and How to Make It Easier)
- Common Mistakes (and How to Avoid Them)
- Design Tips: Make the Ceiling Feel Like It Belongs
- Maintenance and Touch-Ups
- Real-Life Experiences: What I Learned Doing a Decorative Pattern on My Dining Room Ceiling
- Conclusion
There are two types of ceilings: the ones people forget exist… and the ones that make guests look up mid-bite and say,
“Waitwhat is that?” If you’ve ever heard designers call the ceiling the “fifth wall,” this is why. A decorative pattern
overhead can turn a regular dining room into a room with personalitywithout needing a full renovation, a second mortgage,
or a dramatic montage soundtrack (though you’re welcome to supply one).
In this guide, we’ll walk through how to plan, prep, and execute a patterned ceilingespecially with paint and stencils,
since they deliver the biggest “wow” for the least “why does my neck hate me?” We’ll cover layout math that actually makes
sense, tools that save your sanity, paint choices that won’t betray you in daylight, and the small tricks that separate
“handcrafted charm” from “I sneezed mid-stripe.”
Why a Patterned Ceiling Works So Well in a Dining Room
Dining rooms are made for focus: a central table, a light fixture, and people gathered in one zone. A ceiling pattern
reinforces that “center of attention” feeling and can do at least one of these jobs:
- Defines the dining area (especially in open layouts) by giving the room a clear visual boundary.
- Adds drama without clutterbecause the decoration isn’t competing with your art, shelves, or sideboard.
- Balances tall walls by bringing the eye upward and making the room feel intentional and finished.
- Camouflages minor imperfections (depending on sheen and pattern) better than a single flat color.
Pick Your Decorative Pattern Style
Before you buy paint or start naming your ladder like it’s a coworker, decide what kind of ceiling pattern you want.
Here are the most popular optionsranked from “most paint-based” to “most install-based.”
Option A: All-Over Stencil Pattern
This is the classic: a repeating motif across the ceilingthink trellis, geometric tile, damask, or a modern arch pattern.
It’s ideal if you want the ceiling to feel like wallpaper, but you’d rather wield a roller than wrestle seams overhead.
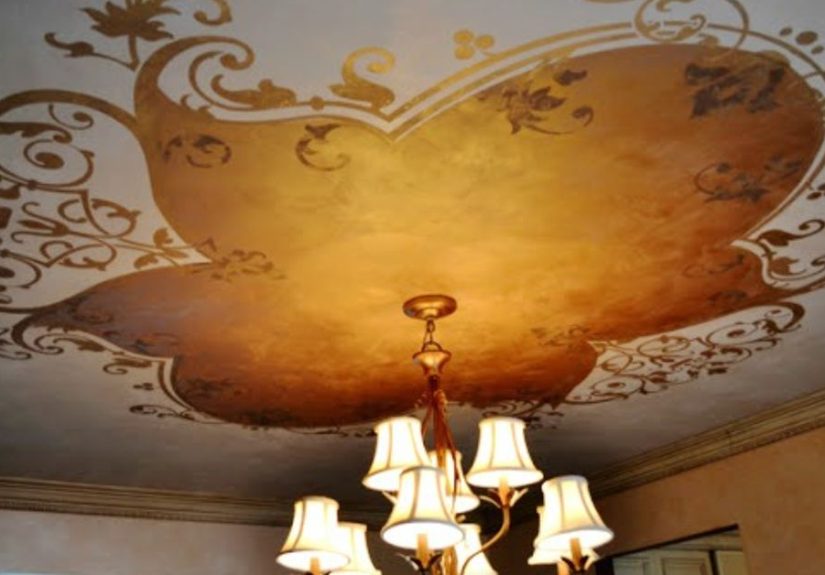
Option B: Center Medallion or “Spotlight” Pattern
A large stencil medallion around the chandelier (or centered over the table) gives you maximum impact with less work.
It’s a smart choice if your ceiling is textured, your room is large, or you want a bold focal point without repeating
a motif 74 times.
Option C: Taped Geometrics (Stripes, Grids, Harlequin, Sunbursts)
Painter’s tape patterns can look crisp and modernespecially stripes or a subtle grid. This option rewards patience
and careful measurement. It also rewards you with the ability to say, “Yes, I did this with tape,” which is a satisfying
sentence to say out loud.
Option D: Wallpapered Ceiling
Wallpaper on ceilings is having a moment, and it can be stunningespecially in dining rooms where you want a “designed”
look. It’s also the most physically awkward option, because you’re aligning large sheets over your head like an upside-down
gift wrap challenge.
Option E: Architectural Pattern (Panels, Beams, Tiles)
Coffers, beadboard, faux beams, or decorative tiles create literal dimension. These can be incredible, but they’re
a bigger project (and usually more tools, more time, and more vocabulary words like “furring strips”).
Prep Like You Mean It (Because Ceilings Hold Grudges)
Ceiling work punishes shortcuts. Not because the ceiling is crueljust because it’s directly under the light source,
and overhead lighting is the world’s harshest critic.
1) Inspect the Surface
- Smooth ceiling: Great for stencils and sharp tape lines.
- Light texture: Still possible, but stencil edges may soften. Choose a busier pattern.
- Heavy texture: Consider a medallion, broader shapes, or wallpaper designed to disguise texture.
2) Clean and Patch
Dust, cooking residue, and mystery ceiling grime can affect adhesion. A quick clean and spot-sanding makes a bigger
difference than you’d think. Patch cracks, nail pops, or dents, then sand smooth where needed.
3) Prime (Especially if You’re Changing Color or Adding Pattern)
Primer evens absorption so your pattern looks consistent. If you’re painting over stains or water marks, use a stain-blocking
primer so those spots don’t reappear like a jump scare later.
4) Choose Paint Sheen Strategically
Ceiling paint is often flat because it hides surface flaws. Matte can offer a tiny bump in washability while still keeping
glare low. Satin or higher sheen can look glamorous, but it will spotlight every seam and patch like it’s auditioning for
a reality show called Ceiling Imperfections: The Reunion.
Plan the Pattern: The Layout That Makes It Look Expensive
Most “professional-looking” ceilings aren’t magicalthey’re planned. Your two goals are symmetry and
repeat consistency.
Find the Center (Even If Your Light Fixture Isn’t)
Measure the ceiling length and width, mark the midpoints, and snap a chalk line both directions to find the true center.
If your chandelier is off-center (it happens), you can choose whether to center the pattern on the room or on the fixture.
In dining rooms, centering on the table or light often looks most intentional.
Do a Quick “Scale Test”
Pattern size matters. A tiny pattern on a big ceiling can look busy; a huge motif in a small room can feel like it’s
hovering. Tape up paper squares to represent the stencil repeat (for example, 18″, 24″, or 30″) and step back.
A Simple Repeat Example (So You Don’t Drift)
Let’s say your dining room ceiling is 12′ x 14′ (144″ x 168″) and your stencil repeat is 24″.
You’ll get roughly 6 repeats across (144 ÷ 24 = 6) and 7 repeats along (168 ÷ 24 = 7). That’s clean.
If your math gives you awkward remainders, plan to split the difference so the “partial” pattern hits both sides evenly.
Tools and Materials You’ll Actually Use
- Drop cloths (the real kindgravity is not your friend)
- Painter’s tape (low-tack is helpful for delicate paint)
- Stencil and optional stencil adhesive (repositionable)
- Small dense foam roller and tray liners
- Stencil brush (for tight details or touch-ups)
- Extension pole (your shoulders will thank you)
- Step ladder or platform ladder
- Chalk line and/or laser level
- Pencil + soft eraser
- Primer + ceiling paint + accent paint colors
How to Stencil a Decorative Pattern on Your Dining Room Ceiling
This is the most reliable route to a patterned ceiling that looks custom. The keys are alignment and
paint controlnot speed. (Speed is how ceilings get… “abstract.”)
Step 1: Set Up the Room
- Move the table out if possible; if not, cover it completely.
- Remove or cover the chandelier (turn off power if you’re removing it).
- Use bright work lights from multiple angles to catch flaws early.
- Wear eye protectionoverhead paint has a personal vendetta.
Step 2: Mark Your Starting Point
For an all-over pattern, start at the center and work outward. This helps the design stay symmetrical and reduces the chance
you end up with a weird sliver of pattern hugging one wall like it’s afraid of the corners.
Step 3: Attach the Stencil Securely
Use painter’s tape at multiple edges, or a repositionable stencil adhesive on the back. The stencil should lay as flat as
possible. Any lifted edge is a little invitation for paint to sneak underneath.
Step 4: Load the Roller Lightly (Seriously, Lightly)
The number one cause of stencil bleed is too much paint. Load a small foam roller, then roll off the excess onto paper towels
or cardboard until it feels almost “dry.” You can always add another pass; you can’t un-bleed a crisp line without touch-up work.
Step 5: Apply Paint in Thin Layers
- Roll or pounce straight downdon’t push paint sideways into edges.
- Use a stencil brush for corners or delicate details.
- If you need a second coat, let the first coat set briefly so you don’t smear.
Step 6: Reposition Using Registration Marks
Many stencils include small built-in markers to help align repeats. Use them. Mark light pencil guide points if needed
(faint marks erase more easily than “I eyeballed it” does).
Step 7: Keep the Pattern True as You Move Outward
Work in a grid-like path: center → next repeat → next repeat, checking alignment every few placements. If you drift early,
the drift multiplieslike compound interest, but less fun.
Step 8: Handle Edges and Corners Without Panic
At the perimeter, you have choices:
- Fade it: End the pattern cleanly and let the border be a quiet frame.
- Partial stencil: Use a cut section of the stencil to tuck the pattern near the molding.
- Add a border: A simple band (painted or stenciled) can make edges look intentional.
Step 9: Optional UpgradeAdd Depth or Metallic Highlights
A second color, subtle glaze, or metallic accent can make the ceiling look high-end. Keep it simple: one base color and one
highlight color often looks more sophisticated than a full rainbow overhead.
How to Paint a Tape Pattern (Stripes or a Grid) on a Ceiling
If you love crisp geometry, tape patterns are gorgeous. They also demand careful layout and clean tape technique.
Step 1: Decide Your Pattern and Direction
- Stripes: Classic, especially when aligned with the long dimension of the room.
- Grid: Subtle structure that feels architectural.
- Harlequin: More dramatic; best in rooms with simpler walls.
Step 2: Use a Laser Level or Chalk Line for Layout
A laser level helps keep lines consistent across the roomespecially useful if your ceiling isn’t perfectly square (many aren’t).
Mark your lines lightly in pencil before taping.
Step 3: Tape Carefully and Seal the Edges
Press tape down firmly with a putty knife or plastic card. For extra crisp lines, paint a thin coat of the base color
along the tape edge first (this seals tiny gaps), then apply the stripe color. When you pull the tape, you get a sharper line.
Step 4: Paint, Then Pull Tape at the Right Time
Pull tape back on itself at a low angle while paint is still slightly wet (not dripping-wet, not fully cured). This helps avoid
tearing the paint film. Touch up small flaws with a fine brushbecause even “perfect” DIY ceilings deserve a little grace.
Wallpapered Ceiling: A Quick Reality Check (and How to Make It Easier)
Wallpaper ceilings can look incredibleespecially in dining rooms where you want drama. If you go this route:
- Pick a pattern that complements your wall color and light fixture.
- Prep and prime so the adhesive bonds evenly.
- Work with a helper for alignment and support.
- Start with smaller rooms first if you’ve never wallpapered overhead.
Common Mistakes (and How to Avoid Them)
Too Much Paint = Bleed City
Whether stenciling or taping, heavy paint loads are the enemy. Build coverage slowly. Thin layers look cleaner and dry more evenly.
Skipping Layout = “Why Is It Crooked?”
Ceilings magnify misalignment because your eye reads the whole surface at once. Spend extra time on the first few repeats or lines.
That prep time pays you back in fewer touch-ups and fewer emotional speeches to the ladder.
Choosing a Shiny Finish on a Bumpy Ceiling
Higher sheen reflects light and makes every flaw more visible. If your ceiling isn’t perfectly smooth, keep sheen low and rely on
contrast or pattern for drama instead of gloss.
Not Considering Lighting
Dining rooms often have a central fixture plus daylight from windows. Test your colors under both. A pattern that looks subtle at
noon can look bold at nightand vice versa.
Design Tips: Make the Ceiling Feel Like It Belongs
- Echo one color below: Pull a ceiling color into napkins, artwork, or a rug for cohesion.
- Keep walls calmer if the ceiling is busy: Let the ceiling be the star, not one of twelve divas.
- Use trim as a frame: Crisp crown molding (painted cleanly) makes the ceiling look intentional.
- Match the vibe to the room: Formal dining room? Try damask or a medallion. Casual? Go geometric or playful.
Maintenance and Touch-Ups
The good news: ceilings don’t get touched much. The bad news: when they do, it’s usually a chair bump, a chandelier swap,
or a dramatic “we tried to hang a balloon arch” incident. Save a small labeled jar of your pattern colors. For stencils,
keep the stencil (or at least a corner section) for future repairs.
Real-Life Experiences: What I Learned Doing a Decorative Pattern on My Dining Room Ceiling
Let me tell you something nobody puts on the pretty inspiration photos: a patterned ceiling is basically a DIY yoga class you
didn’t sign up for. The first day I started, I felt confidentalmost suspiciously confident. I had my stencil, my paint, my plan,
and the kind of optimism usually reserved for people who think they can assemble furniture “without the instructions.”
My first lesson was immediate: ceilings are not walls. On a wall, you can step back every five minutes, admire your progress,
and pretend you’re on a home makeover show. On a ceiling, you step back and realize you’ve been staring straight up for so long
you can now describe every tiny flaw in your drywall finish with the accuracy of a museum curator. I had to adjust my work rhythm:
short sessions, frequent breaks, and a real commitment to the extension pole. If you’re planning this project, an extension pole
isn’t optionalit’s your new best friend, your shoulder-saver, and the reason you’ll still be able to lift a fork at dinner later.
The second lesson was paint control. I knew “lightly loaded roller” was the rule, but I didn’t fully respect it until I saw
the first hint of stencil bleed. It wasn’t catastrophic, but it was enough to make me whisper, “Oh no,” like I’d just watched
a slow-motion spill happening. After that, I treated paint like hot sauce: you can always add more, but you can’t un-pour it.
I started rolling off extra paint until the roller felt almost dry, and I built color in thin layers. The result was cleaner,
and the whole project looked more intentionalless “accidental Rorschach test,” more “custom ceiling detail.”
Third lesson: alignment is everything, and drift is sneaky. At first, each repeat looked fine. Then I realized that if you’re off
by even a tiny amount, your pattern slowly migrates across the ceiling like it’s trying to escape. The fix was simple but not
glamorous: I added faint pencil guide marks and checked alignment constantly. It felt slow, but it saved me from bigger problems
later. If you’re stenciling, take extra time on the first row or twobecause that row becomes the “truth” everything else follows.
Fourth lesson: corners and edges are where perfection goes to negotiate. I originally thought I could make every edge repeat
flawlessly, but real ceilings have realitiesmolding, tiny dips, and corners that are rarely perfectly square. Once I accepted
that, I chose an approach that looked intentional: I let the pattern end neatly near the molding and did careful touch-ups where
needed. Ironically, when you stop fighting the edges and start designing them, the whole ceiling looks more professional.
And finally: the payoff is real. The moment I finished, turned on the chandelier, and saw the pattern glow softly overhead,
the room felt upgraded in a way that paint alone rarely achieves. It didn’t just look “decorated”it looked designed. Guests
noticed. I noticed. Even I started sitting at the table a little longer, just to enjoy the effect. If you’re on the fence about
doing a decorative ceiling pattern, my experience is this: plan more than you think you need to, use less paint than you think
you should, and give yourself permission to make it charming rather than clinically perfect. Because the best part of a dining room
isn’t flawless linesit’s the fact that people gather there. A ceiling pattern is just the room’s way of dressing up for company.
Conclusion
A decorative dining room ceiling pattern is one of the most satisfying upgrades you can DIY: it’s high-impact, surprisingly
customizable, and (once it’s done) it makes the whole room feel finished. Whether you choose an all-over stencil, a dramatic
medallion, crisp tape stripes, or a wallpapered “fifth wall,” the secret is the same: prep carefully, plan your layout, and
work in controlled, repeatable steps. Your neck may complain, but your dining room will look like it got a glow-up from above.