Table of Contents >> Show >> Hide
- Why This DIY Light Fixture Idea Works So Well
- Choose the Right Hanging Plant Basket First
- Three Smart Ways to Make a Basket Chandelier
- Materials You May Need
- Safety Rules You Really Should Not Ignore
- Step-by-Step: How to Make a DIY Chandelier From a Hanging Plant Basket
- Best Places to Use a Basket Chandelier
- Common Mistakes to Avoid
- Design Tips to Make It Look Custom, Not Crafty
- The Real Experience of Making a DIY Chandelier From a Hanging Plant Basket
- Final Thoughts
- SEO Tags
Some people see a hanging plant basket and think, “Nice tomatoes.” Other people see a hanging plant basket and think, “That could absolutely become a chandelier.” This article is for the second groupthe gloriously overconfident, budget-minded, style-hungry crowd who look at basic home goods and hear a tiny voice whisper, make it prettier.
A DIY chandelier from a hanging plant basket works because it hits the sweet spot between affordable, creative, and surprisingly chic. You get the airy shape of a statement light fixture without the usual designer price tag. Done well, it can feel boho, farmhouse, coastal, vintage, glam, or “I swear I found this in a boutique and definitely did not make it while wearing old sweatpants.” Better yet, the project can be adapted for homeowners, renters, hardwired pendants, plug-in pendants, or purely decorative faux fixtures.
The trick is knowing which version you’re making. Are you building a decorative shade around an existing fixture? Converting a basket into a true pendant light? Or faking the whole thing with battery-powered lights for a rental-friendly glow-up? Once you know that, the rest of the project gets a lot less intimidating and a lot more fun.
Why This DIY Light Fixture Idea Works So Well
The best basket chandelier ideas all have one thing in common: texture. A hanging plant basket already has a sculptural frame, whether it’s wire, wicker, seagrass, rattan, or metal. That open structure lets light pass through, which means the fixture feels light and airy instead of bulky and cave-like. It also makes minor imperfections easier to hidewhich is wonderful news for the rest of us who do not own the hands of a Swiss watchmaker.
Another reason this project works is flexibility. A wire planter basket can become a crystal-inspired chandelier cover. A woven basket can become a pendant shade. A metal basket can be wrapped in macramé cord for a boho look. A lightweight basket with a puck light can fake a high-end pendant without touching your wiring. In other words, this isn’t one project. It’s a whole family of slightly chaotic, highly photogenic projects.
Choose the Right Hanging Plant Basket First
Best Basket Types
If you want the classic “DIY chandelier from a hanging plant basket” look, start with one of these:
- Wire planter basket: Great for crystal garland, beads, faux greenery, or airy farmhouse styling.
- Woven basket: Ideal for a basket pendant light with warm, natural texture.
- Metal hanging basket: Perfect for macramé wrapping, painted finishes, or modern-industrial looks.
- Open-weave natural fiber basket: Excellent for boho or coastal lighting because it filters light softly.
What to Avoid
Skip anything too heavy, too dense, or too flammable-looking. A basket that feels like a kettlebell is not the charming thrift find you hoped forit’s a future argument with your ceiling box. Avoid solid containers that trap heat, baskets that sit too close to the bulb, and anything so deep that the light source disappears into a wicker cave. Pretty is good. Pretty and practical is better.
Size Matters More Than People Think
Before you buy, measure your existing fixture or the space where the chandelier will hang. A tiny basket on a big ceiling can look apologetic. An oversized basket in a low room can feel like it’s actively trying to join you for dinner. The goal is balance: large enough to make a statement, open enough to breathe, and proportionate enough that no one has to duck.
Three Smart Ways to Make a Basket Chandelier
1. The Decorative Basket Cover
This is the easiest route and the one most people should start with. You keep your existing light fixture and add a transformed hanging plant basket as a decorative outer layer. Think of it as costume jewelry for a boring ceiling light. This version is especially useful if you already have a flush-mount or semi-flush fixture and just want it to stop looking like it came free with the house.
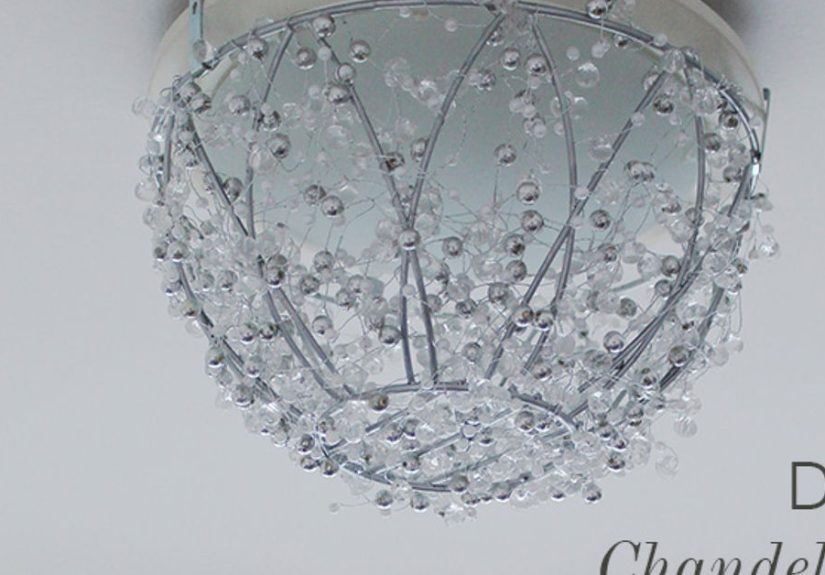
A wire planter basket works beautifully here. Remove the hanging chains and liner, clean the frame, and paint it if needed. Then wrap it in crystal garland, bead strands, twine, faux pearls, wood beads, or even strips of fabric. Once the basket is fully dressed up, attach it to the existing fixture using lightweight clips or hooks that keep the basket secure without crowding the bulb. The result can look surprisingly glam for a project that began life in the garden aisle.
2. The True Basket Pendant Light
This version turns a basket into an actual pendant shade. It’s the most polished look and the closest to something you’d spot in a boutique lighting shop with an unreasonable markup and a salesperson who says things like “organic silhouette.” You’ll use a lightweight basket, create or widen a center hole, feed a pendant cord or pendant kit through it, and secure the basket so the bulb hangs well below the material.
This style is fantastic over a breakfast nook, reading corner, kitchen sink, entry table, or bedside area. It also gives you the biggest visual payoff because the basket becomes the star, not just the supporting actress. If your basket already has a center opening, congratulations: the DIY gods are smiling upon you.
3. The Renter-Friendly Faux Chandelier
No wiring? No problem. This version uses battery-powered puck lights, fairy lights, or remote bulbs inside a lightweight basket or hanging basket structure. It won’t function exactly like a hardwired chandelier, but it can look shockingly good in photos and in person, especially in reading nooks, bedrooms, patios, and little corners begging for personality.
This is also the least stressful version. No electrical work, no rewiring, and no standing on a ladder while questioning every life choice that brought you to this moment. You can hang the basket from hooks, hide cords if needed, and experiment with staggered heights for a grouped installation. For renters or commitment-phobes, this is the MVP.
Materials You May Need
- Hanging plant basket or lightweight woven basket
- Spray paint, if you want to change the finish
- Crystal garland, wood beads, twine, macramé cord, or decorative wire
- Lightweight clips, hooks, or hardware for attachment
- Pendant light kit, plug-in pendant, or hardwired pendant kit
- Battery puck lights or fairy lights for a no-wire version
- Drill, shears, or snips for creating a centered opening
- Wire cutters, screwdriver, and voltage tester if you’re installing a real fixture
- Cord covers or cable concealers if you’re using plug-in lighting
- LED bulb in the correct wattage for your fixture
Safety Rules You Really Should Not Ignore
Let’s pause the fun for the important part: a basket chandelier is cute, but electricity is not whimsical. If you are replacing or modifying a real ceiling fixture, turn off the breaker and verify the power is off before touching anything. Not “I flipped a switch and hope for the best.” Actually off.
Next, your fixture must be supported by the electrical box and building structurenot by the wires themselves. If the box is loose, damaged, outdated, or not suitable for the new fixture weight, fix that first. A heavy basket project may need a support-rated box or brace. This is not the place for optimism and zip ties.
Use the manufacturer-recommended bulb type and wattage, and whenever possible choose LED bulbs. They run cooler, which is exactly what you want when using basket, fiber, cord, or decorative trim around a light. Keep plenty of clearance between the bulb and the basket material. If anything touches the bulb or crowds the socket, redesign the project. Your chandelier should be dramatic, not flammable.
And if you’re styling something outdoors, use a fixture rated for the location. Indoor lights do not magically become porch-safe just because the weather seems nice today. Covered spaces may need damp-rated fixtures, while exposed areas need wet-rated ones.
Step-by-Step: How to Make a DIY Chandelier From a Hanging Plant Basket
Step 1: Strip the Basket Down
Remove chains, liners, coco coir inserts, soil debris, mystery dust, and anything else reminding the basket of its former life as a plant holder. Wash it, dry it well, and inspect the structure. Make sure the frame is sturdy and symmetrical. A basket with a charming “handmade wobble” can be endearing on a shelf; on a ceiling, it just looks crooked.
Step 2: Plan the Final Look
Decide whether you want glam, rustic, boho, coastal, minimalist, or dramatic. This step matters because it determines everything that follows. Crystal garland gives you sparkle. Wood beads add warmth. Macramé creates softness. Black paint pushes the basket modern. Metallic paint can make a basic planter basket look more chandelier-like in about one afternoon.
Step 3: Paint or Wrap the Basket
If the existing finish is not doing you any favors, spray paint it first and let it cure fully. Then start wrapping or weaving in your decorative material. With crystal garland or fine wire, perfection is not required. In fact, a slightly random weave often looks richer and more organic than an overly fussy pattern. Fill obvious gaps, soften harsh lines, and step back often to make sure the basket still looks balanced from all sides.
Step 4: Test the Light Source
Dry-fit the basket around the existing fixture or thread the pendant cord through the center opening if you’re making a pendant. Check the bulb location carefully. The basket should frame the bulb, not hug it like a long-lost relative. You want visible clearance, good ventilation, and a clean view from below.
Step 5: Attach the Basket Securely
For a decorative cover, attach three evenly spaced clips or hooks to the top rim so the basket hangs level. For a true pendant, secure the basket through the center opening using the pendant hardware or shade ring system that came with the kit. For a renter-friendly version, use hooks and lightweight hanging hardware appropriate for the ceiling surface and the actual weight of the fixture.
Step 6: Add the Bulb and Final Styling
Use an LED bulb in the correct wattage and shape. An Edison-style bulb can look fantastic in open basket pendants, while a frosted LED can soften the glow if you’re going for cozy rather than theatrical. Then style the bottom view. This is the angle everyone forgets until they sit down and realize the chandelier looks amazing from the side and mildly confusing from underneath.
Step 7: Turn It On and Edit Ruthlessly
Once the light is on, look for weird shadows, hot spots, visible hardware, crooked lines, or sections that need more decorative material. Great DIY lighting almost always gets one round of editing after installation. This is normal. It’s not failure. It’s just your chandelier asking for a little final styling before its close-up.
Best Places to Use a Basket Chandelier
- Bedroom: Creates softness and texture without feeling too formal.
- Guest room: Makes a basic room feel intentionally styled.
- Breakfast nook: Adds charm without needing a huge budget.
- Entryway: Delivers instant personality the second someone walks in.
- Laundry room: A wildly underrated place for fun lighting.
- Covered patio: Only if the fixture and setup are rated appropriately for the location.
Common Mistakes to Avoid
- Using a basket that is too heavy for the fixture or support box
- Letting the basket sit too close to the bulb
- Ignoring whether the box is securely attached to the structure
- Choosing the wrong bulb wattage
- Using an indoor fixture outside
- Making the opening off-center so the pendant hangs crooked
- Overdecorating the basket until the light can barely escape
Design Tips to Make It Look Custom, Not Crafty
Use one strong texture and one supporting detail. For example, pair a natural basket with a matte black cord kit, or a wire planter basket with crystal garland and a single metallic finish. Too many competing details can make the piece look confused. Also, repeat the basket’s color or finish somewhere else in the roomhardware, picture frames, side tables, curtain rodsso the chandelier feels intentional.
If the room still feels flat, layer your lighting. A basket chandelier is wonderful ambient lighting, but it looks even better when the room also has a lamp, a wall sconce, or another softer source of light. That layered approach gives the space depth and makes the chandelier feel like part of a thoughtful lighting plan instead of a lone heroic object doing all the work.
The Real Experience of Making a DIY Chandelier From a Hanging Plant Basket
Here’s the part no one tells you when you start a project like this: the experience is half practical craft, half low-stakes emotional roller coaster. First comes the thrill of possibility. You spot the basket and immediately imagine it suspended over a table, casting a warm, patterned glow like something from a boutique hotel. Then comes the second stage, which is standing in the aisle holding the basket at eye level while trying to picture whether it looks “elevated” or just “garden center, but indoors.”
Once you bring it home, the project becomes strangely personal. You start making tiny design decisions that feel way more important than they should. Silver spray paint or matte black? Wood beads or crystals? Do you want this chandelier to whisper “coastal calm” or announce “thrifted genius with excellent taste”? You may tell yourself it’s just a weekend DIY, but somewhere between the first coat of paint and the first test fit, it becomes a full-blown creative mission.
There’s also a very specific satisfaction that comes from turning an ordinary object into something unexpectedly elegant. A hanging plant basket is not glamorous. It begins life holding petunias and potting mix. But once it’s cleaned up, reimagined, and suspended from the ceiling, it suddenly has main character energy. That transformation is the whole magic of DIY décor. You’re not just saving moneyyou’re training your eye to see potential where most people see utility.
The funniest part is usually the middle, when the project looks questionable. This is the stage where the basket is half wrapped, one clip is crooked, decorative strands are tangled, and the whole thing resembles a prop from an ambitious school play. Every good DIY has an ugly middle. Respect it. Push through it. The reveal almost always comes later, usually after one last adjustment you didn’t know you needed.
And then there’s the final moment: you turn on the light. Maybe the shadows are prettier than expected. Maybe the texture glows. Maybe the room suddenly feels warmer, softer, and more finished. That’s when the project stops being a craft and starts becoming part of your home. People notice it. They ask where you bought it. You get to enjoy the deeply satisfying experience of saying, “Actually, I made it from a hanging plant basket,” which is the DIY equivalent of casually dropping that you bake your own bread.
More than anything, this kind of project teaches confidence. Not fake confidencethe useful kind. The kind that says you can look at a room, identify what’s missing, and create a solution with imagination instead of a giant budget. It reminds you that great interiors are often built from clever ideas, patience, and a willingness to experiment. Sometimes the best statement lighting doesn’t come from a showroom. Sometimes it comes from the garden section, a little creativity, and the decision to trust your instincts.
Final Thoughts
A DIY chandelier from a hanging plant basket is one of those rare decorating projects that feels equal parts smart, stylish, and genuinely fun. It can be glamorous or rustic, simple or dramatic, renter-friendly or fully installed. The secret is choosing the right basket, respecting safety, and treating the project like a design decisionnot just a craft experiment.
If you want a low-cost way to upgrade a room with character, texture, and a little bragging rights, this is a project worth trying. Just remember: lightweight materials, secure support, LED bulbs, and enough clearance so your chandelier remains unforgettable for the right reasons.





