Table of Contents >> Show >> Hide
- What Is a Hypertufa Garden Trough?
- Why Make a Hypertufa Trough Instead of Buying a Planter?
- Best Hypertufa Recipe for Beginners
- Materials and Tools You Will Need
- Choosing the Right Mold
- How To Make a Hypertufa Garden Trough Step by Step
- Best Soil Mix for a Hypertufa Trough
- What To Plant in a Hypertufa Garden Trough
- Design Ideas for a Beautiful Hypertufa Trough
- Common Mistakes To Avoid
- How To Care for a Hypertufa Garden Trough
- Real-World Experience: Lessons From Making Hypertufa Troughs
- Conclusion
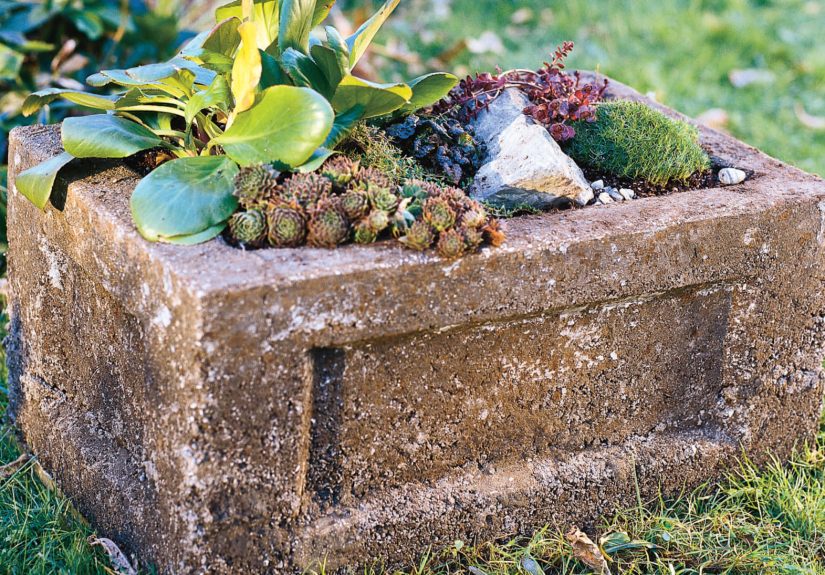
A hypertufa garden trough looks like something rescued from an old English estate, possibly by a gardener wearing muddy boots and saying things like “splendid drainage.” The good news: you do not need an estate, a stone quarry, or a heroic upper-body workout to make one. Hypertufa is a lightweight, porous, stone-like material made from Portland cement, organic fiber such as peat moss or coconut coir, and an airy aggregate like perlite or vermiculite. Once cured, it becomes a rustic container that is perfect for succulents, alpine plants, herbs, miniature conifers, mossy accents, and small rock-garden scenes.
This guide walks you through how to make a hypertufa garden trough from scratch, including the best recipe, tools, mold setup, curing process, planting tips, common mistakes, and hard-earned experience from the kind of DIY project that makes your gloves look like they lost a wrestling match with a sidewalk.
What Is a Hypertufa Garden Trough?
A hypertufa trough is a handmade planter designed to imitate natural tufa stone. Traditional stone troughs were once used as livestock watering containers, but gardeners loved them because they aged beautifully, drained well, and created ideal homes for small plants. Unfortunately, real stone troughs are heavy, expensive, and not exactly easy to casually bring home in the trunk of a sedan.
Hypertufa solves that problem. It gives you the rough, weathered look of stone without the full weight of concrete or quarried rock. Because it is porous, it allows air and moisture movement around plant roots. That makes it especially useful for plants that hate soggy soil, including sedums, sempervivums, alpine dianthus, dwarf thyme, hens-and-chicks, saxifrages, and many compact herbs.
Why Make a Hypertufa Trough Instead of Buying a Planter?
Store-bought planters are easy, but hypertufa troughs have personality. No two look exactly alike, which is part of the charm. One may turn out smooth and elegant; another may look like it was discovered beside an ancient monastery. Both are winners.
A homemade hypertufa garden trough offers several advantages:
- Lightweight stone look: It resembles aged rock but is easier to move than solid concrete or stone.
- Excellent drainage: The porous material helps prevent waterlogged roots.
- Custom size and shape: You can make a long trough, round bowl, square planter, shallow alpine tray, or quirky freeform container.
- Budget-friendly: The ingredients are inexpensive and widely available at garden centers and home improvement stores.
- Creative freedom: You control the texture, thickness, color tone, drainage holes, and final planting style.
Best Hypertufa Recipe for Beginners
There are many hypertufa recipes, but a reliable beginner-friendly mix uses equal parts by volume of Portland cement, sifted peat moss or coconut coir, and perlite. Some gardeners prefer a slightly richer organic and aggregate mix, such as 1 part cement, 1.5 parts peat or coir, and 1.5 parts perlite. Both work well. For a first trough, the equal-parts recipe is simple, forgiving, and easy to remember.
Basic Hypertufa Mix
- 1 part Portland cement
- 1 part peat moss or coconut coir
- 1 part perlite or vermiculite
- Water, added slowly until the mixture holds its shape
For a medium trough about 24 inches long, 12 inches wide, and 10 inches deep, start with a small bucketful of each dry ingredient. It is better to mix a little extra than to run out halfway through building the wall. Running out of hypertufa mix at the corner stage is the DIY equivalent of running out of frosting on the front of a birthday cake.
Materials and Tools You Will Need
Before mixing, gather everything. Hypertufa waits for no one, and once your gloves are coated in cement paste, you will not want to go hunting for a missing plastic sheet.
Materials
- Portland cement, not pre-mixed concrete or mortar
- Peat moss or coconut coir
- Perlite or vermiculite
- Clean water
- Plastic sheeting or trash bags
- Cooking spray or vegetable oil for mold release
- Short dowels, wine corks, PVC pieces, or sticks for drainage holes
- Optional: concrete reinforcing fibers for larger troughs
- Optional: wire mesh for covering drainage holes after curing
Tools
- Large mixing tub, wheelbarrow, or plastic storage bin
- Rubber gloves
- Dust mask or respirator
- Safety glasses
- Measuring bucket or scoop
- Trowel or gloved hands for packing the mix
- Two nesting boxes, tubs, bowls, or forms
- Wire brush, old screwdriver, or putty knife for texturing
Safety matters. Portland cement is alkaline and can irritate skin, eyes, and lungs. Always wear gloves, eye protection, and a dust mask when handling dry ingredients. Work outside or in a well-ventilated area. This is not a kitchen-counter craft unless your dream interior design style is “abandoned masonry workshop.”
Choosing the Right Mold
The mold determines the shape of your hypertufa garden trough. The easiest method uses two containers: one larger outer mold and one smaller inner mold. The space between them becomes the trough wall. Cardboard boxes, plastic storage bins, dishpans, nursery flats, foam coolers, and old drawers can all work.
For a classic garden trough, choose a rectangular outer mold. A cardboard box lined with plastic creates a softer, slightly irregular look. A plastic bin gives cleaner edges and is easier to reuse. Whatever mold you choose, aim for walls at least 1.5 to 2 inches thick. A very thin trough may crack, especially if it freezes outdoors.
How To Make a Hypertufa Garden Trough Step by Step
Step 1: Prepare the Mold
Line your outer mold with plastic sheeting or a heavy trash bag. Smooth it into the corners, but do not worry about every wrinkle. Wrinkles create natural-looking stone texture. Coat the plastic lightly with cooking spray or vegetable oil to help the cured trough release more easily.
If using an inner mold, wrap or cover it with plastic too. The inner mold should sit evenly inside the outer mold while leaving enough space for the base and walls. Place corks, dowels, or small PVC pieces where you want drainage holes. For a medium trough, two or three holes are better than one.
Step 2: Mix the Dry Ingredients
Measure equal parts Portland cement, peat moss or coir, and perlite into your mixing tub. Break apart clumps of peat or coir. If the organic material is chunky, sift it first. Big sticks and lumps weaken the mix and create awkward holes in the finished trough.
Mix the dry ingredients thoroughly before adding water. This helps distribute the cement evenly. The dry mix should look uniform, like dusty gray garden cereal that nobody should eat under any circumstances.
Step 3: Add Water Slowly
Add water a little at a time. Hypertufa should be damp enough to hold together when squeezed in your hand but not so wet that water runs out. Think cottage cheese, not soup. If the mix slumps like pancake batter, it is too wet. Add more dry ingredients in the same ratio to correct it.
This step is where patience pays off. Too much water makes the trough weaker and harder to shape. A slightly dry mix can still be packed firmly into the mold, while a soupy mix will sag, crack, and generally behave like it has no respect for your weekend plans.
Step 4: Build the Base
Pack a 1.5- to 2-inch layer of hypertufa mixture into the bottom of the mold. Press firmly into the corners and around the drainage-hole forms. The base should be even and compact. If you are making a large trough, consider adding a small amount of reinforcing fiber to the mix or embedding a piece of plastic mesh in the base for extra strength.
Step 5: Build the Walls
Add the inner mold and begin packing hypertufa mixture between the inner and outer forms. Press firmly as you go, working in layers. Keep the wall thickness consistent. Uneven walls can create weak points, especially at corners.
If building by hand without an inner mold, use your gloved hands to form walls upward from the base. This creates a more organic, handmade shape. Keep the rim slightly irregular for an aged-stone effect. Perfectly straight rims are fine, but a little wobble says “artisan,” while too much wobble says “the wheelbarrow got involved emotionally.”
Step 6: Cover and Begin the First Cure
Once shaped, cover the mold loosely with plastic. Let it sit in a shaded, protected place for 24 to 48 hours. The goal is slow curing, not fast drying. If hypertufa dries too quickly, it can crack before it gains strength.
After 24 hours, test the surface gently. It should be firm but not fully hard. If it dents too easily, wait another day. Temperature and humidity affect curing time, so a cool spring garage may require more patience than a warm summer patio.
Step 7: Remove the Mold and Texture the Surface
Carefully remove the inner and outer molds. Peel away the plastic. At this stage, the trough is still young and somewhat fragile, so handle it gently. Use a wire brush, putty knife, or old screwdriver to roughen edges, soften corners, and create a natural stone texture.
This is the fun part. Scrape the rim. Distress the sides. Add shallow grooves. Knock down any sharp points. The goal is not perfection. The goal is a trough that looks like it has been quietly aging beside a cottage path instead of being born yesterday in a recycling bin.
Step 8: Cure the Trough Fully
Place the trough back under plastic or in a shaded area and allow it to cure for at least two to four weeks. Larger troughs benefit from an even longer cure. During the first week, mist it occasionally so it stays slightly damp. Cement gains strength as it cures, and slow curing produces a better container.
Before planting, rinse the trough several times. Some gardeners soak the finished trough or rinse it with a diluted vinegar solution to help reduce surface alkalinity from the cement. After that, let it drain and dry. Once the trough is cured and rinsed, it is ready for soil and plants.
Best Soil Mix for a Hypertufa Trough
Because hypertufa is often used for succulents and alpine plants, the soil should drain quickly. A good starter mix is one part high-quality potting mix, one part coarse sand or grit, and one part small gravel, pumice, or perlite. For herbs, use a slightly richer potting mix but still keep drainage sharp.
Place a small piece of wire mesh, landscape fabric, or broken pottery over each drainage hole before filling. This keeps soil in while letting water escape. Do not block the holes completely. A trough without drainage is not a planter; it is a small swamp with decorative ambitions.
What To Plant in a Hypertufa Garden Trough
Hypertufa troughs shine when planted with small, textural plants. The container itself has a rugged, aged look, so choose plants that feel natural, compact, and slightly wild.
Great Plant Choices
- Succulents: Sempervivum, sedum, echeveria, and hardy stonecrop
- Alpine plants: Saxifraga, alpine dianthus, dwarf campanula, and rock cress
- Herbs: Thyme, oregano, chives, and creeping rosemary in mild climates
- Miniature evergreens: Dwarf juniper, tiny spruce, or compact chamaecyparis
- Groundcovers: Irish moss, creeping thyme, mazus, and small sedges
Group plants with similar sun and water needs. Do not put a thirsty fern next to a drought-loving sedum and expect peace in the trough. That is not container gardening; that is botanical reality television.
Design Ideas for a Beautiful Hypertufa Trough
A hypertufa garden trough can become a miniature landscape. Add small stones to mimic cliffs, gravel paths, or dry creek beds. Use pea gravel as a mulch to keep soil from splashing and to make the planting look finished. A few larger rocks placed vertically can create a crevice-garden effect, which is especially attractive for alpine plants.
For a sunny patio, combine hens-and-chicks, golden sedum, creeping thyme, and small gravel. For a woodland-style trough, use miniature hosta, moss, dwarf fern, and a tiny conifer. For an herb trough near the kitchen, plant thyme, oregano, chives, and compact sage. The trough will look rustic, smell wonderful, and make dinner feel slightly more sophisticated.
Common Mistakes To Avoid
Using the Wrong Cement
Use Portland cement, not ready-mix concrete. Concrete mix contains sand and gravel, which changes the texture and can make small troughs heavy and difficult to shape.
Adding Too Much Water
Wet hypertufa may seem easier to spread, but it usually cures weaker. Add water slowly until the mixture clumps in your hand.
Making Walls Too Thin
Thin walls crack more easily. Keep walls around 1.5 to 2 inches thick for most troughs.
Forgetting Drainage Holes
Drainage holes are essential. Create them while molding the trough, or you will have to drill them later, which is much less fun.
Planting Too Soon
Fresh hypertufa needs time to cure and leach. Planting too early can expose roots to high alkalinity and unstable moisture conditions.
How To Care for a Hypertufa Garden Trough
After planting, place the trough where the plants will receive the right amount of light. Succulents and alpines usually prefer sun and excellent drainage. Woodland miniatures prefer shade and more consistent moisture. Water deeply, then let the soil dry according to the plant type.
In cold climates, hypertufa can often stay outdoors, but it should be raised slightly off the ground so water drains freely and the base does not sit in ice. Pot feet, bricks, or small stones work well. Avoid leaving the trough in a saucer full of water during freezing weather. Freeze-thaw cycles are tough on any container, even one with a rugged personality.
Real-World Experience: Lessons From Making Hypertufa Troughs
The first thing you learn when making a hypertufa garden trough is that the project is both easier and messier than expected. The ingredients are simple, but Portland cement dust has a talent for appearing on elbows, shoes, buckets, and somehow the dog, even if the dog was inside. Set up outdoors, wear old clothes, and cover your work surface. Future you will be grateful.
One practical experience is that mold choice matters more than beginners think. A flimsy cardboard box can work, but if it bulges after the wet mix is packed inside, your trough may cure with bowed sides. That can look charming, but only if you planned it. For a cleaner rectangular trough, use a sturdy plastic tote as the outer mold and a smaller bin as the inner mold. For a more rustic look, use cardboard lined with wrinkled plastic. The wrinkles create texture that looks surprisingly natural after brushing.
Another lesson: mix more slowly than your enthusiasm wants. Dry ingredients need to be blended thoroughly before water is added. If cement clumps remain, the finished surface may have weak pockets. Add water gradually and test the mix by squeezing a handful. When it holds together without dripping, stop. Beginners often add too much water because the mix looks crumbly at first. Resist that urge. Hypertufa is built by packing, not pouring.
Drainage holes deserve more attention than they usually get. Wine corks, short dowel pieces, or sections of PVC pipe work well as placeholders. Place them before packing the base and twist them gently after the first cure to remove them. If a hole looks rough, that is fine; plants do not care whether drainage holes are glamorous. They care that water leaves quickly.
Texturing is where the trough becomes beautiful. After unmolding, the surface may look too new, too smooth, or slightly awkward. A wire brush fixes almost everything. Brush the corners, scratch the sides, soften the rim, and create small irregularities. The goal is to make the trough look weathered, not manufactured. If a corner chips a little, do not panic. A chipped hypertufa corner often looks better than a perfect one.
Curing teaches patience. The trough may feel hard after two days, but it is not ready for planting. Give it several weeks in shade, protected from hot sun and drying wind. Mist it occasionally during the early cure. Rinse it well before planting. If you rush this stage, the trough may be weaker, and sensitive plants may struggle.
Planting is the reward. Small plants look best because they match the scale of the container. A single large plant can overwhelm the trough, while a thoughtful mix of tiny succulents, gravel, and stones creates the feeling of a miniature landscape. Leave space between plants so they can grow. The best hypertufa troughs improve with age: moss settles in, edges soften, and the container begins to look as though it has always belonged in the garden.
Conclusion
Learning how to make a hypertufa garden trough is one of those rare DIY garden projects that feels artistic, practical, and delightfully forgiving. You mix simple materials, press them into a mold, wait patiently, rough up the edges, and end up with a planter that looks far more expensive than it is. With the right recipe, proper drainage, slow curing, and smart plant choices, your hypertufa trough can become a long-lasting home for succulents, herbs, alpine plants, or a tiny garden scene that earns compliments from guests and mild jealousy from neighboring flowerpots.
Note: Always wear gloves, eye protection, and a dust mask when working with Portland cement and dry perlite. Cure and rinse the trough fully before planting, especially when using delicate alpine plants or succulents.





