Table of Contents >> Show >> Hide
- What Counts as an Uploaded Photo on Facebook?
- How to See Your Uploaded Photos on Facebook Desktop
- How to See Uploaded Photos in the Facebook Mobile App
- Use Albums to Find Older Uploaded Photos
- Use Activity Log to Find Photo Posts You Uploaded
- Download Your Facebook Information to See a Full Photo Archive
- Why You May Not See Every Uploaded Photo
- How to Check Who Can See Your Uploaded Photos
- How to Organize Your Facebook Photos
- How to Back Up Uploaded Facebook Photos
- Experience-Based Tips for Finding Facebook Photos Faster
- Conclusion
Note: Facebook changes its menus more often than some people change profile pictures, so the exact wording may vary slightly by device, app version, or region. The steps below reflect the most reliable current paths for finding uploaded Facebook photos on desktop and mobile.
Somewhere inside your Facebook account is a digital time capsule: vacation selfies, birthday cakes, blurry concert photos, pictures of pets doing absolutely nothing, and maybe a few posts from the era when every photo needed a dramatic filter. The problem is that Facebook does not always put every uploaded photo in one obvious, glowing “click here to see your entire life in JPEG form” button.
The good news is that your uploaded photos are not as hidden as they may seem. You can usually find them through your profile’s Photos section, your Albums tab, Activity Log, or by downloading a full copy of your Facebook information. Each method shows your pictures from a slightly different angle, which is why many users get confused. One path may show albums. Another may reveal photo posts. Another may help you locate old uploads that are buried under years of status updates, tagged posts, and “remember this?” memories.
This guide explains how to see all of your uploaded photos on Facebook using the desktop website, iPhone app, Android app, Activity Log, albums, and the Download Your Information tool. We will also cover why some photos may seem missing, how privacy settings affect what others can see, and how to organize or back up your images before they disappear into the social media attic.
What Counts as an Uploaded Photo on Facebook?
Before you start hunting, it helps to understand what Facebook considers a photo connected to your account. Uploaded photos may include pictures you posted directly to your timeline, images placed in albums, mobile uploads, profile pictures, cover photos, photos shared in posts, and images added to older life events. Some uploaded photos may also appear inside posts rather than traditional albums.
There is also a major difference between photos you uploaded and photos you are tagged in. A tagged photo may show up on your profile, but it was uploaded by someone else. That means it may appear in “Photos of You,” but not necessarily in your personal albums or downloaded media archive. Think of it like being in someone else’s yearbook: your face is there, but you did not own the camera.
How to See Your Uploaded Photos on Facebook Desktop
The desktop version of Facebook is still one of the easiest ways to browse your photo history, especially if you have years of uploads. A larger screen makes albums easier to scan, and it is less likely that you will accidentally tap the wrong menu and end up watching a video about someone’s sourdough starter.
Step-by-Step: View Uploaded Photos on Desktop
- Open Facebook in your web browser and log in to your account.
- Click your profile picture or name to go to your profile page.
- Look under your cover photo for the profile navigation menu.
- Click Photos.
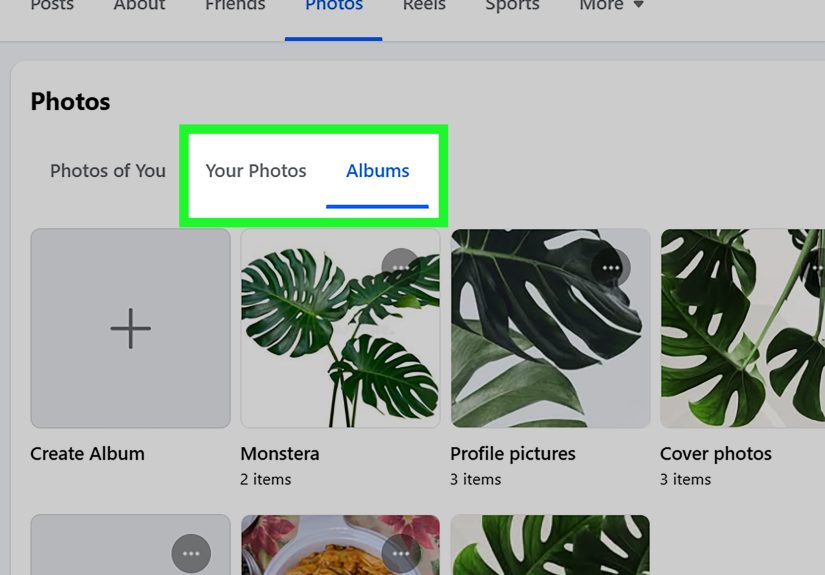
- Choose between sections such as Photos of You, Your Photos, and Albums.
- Open Your Photos to browse pictures you personally posted.
- Open Albums to view grouped collections such as Mobile Uploads, Profile Pictures, Cover Photos, Timeline Photos, or custom albums.
The most useful tab for this topic is usually Your Photos, because it focuses on pictures uploaded or posted by you. However, albums are equally important because Facebook may organize older uploads into default albums. For example, a photo uploaded from your phone years ago may live in “Mobile Uploads,” while a picture added during a profile update may appear under “Profile Pictures.”
How to See Uploaded Photos in the Facebook Mobile App
Most people use Facebook on a phone, so the mobile app matters. The app layout can vary between iPhone and Android, but the general route is similar. The main trick is to start from your profile, not the home feed. Your feed is for scrolling. Your profile is where your uploaded photo history lives.
Step-by-Step: View Uploaded Photos on iPhone or Android
- Open the Facebook app.
- Tap the Menu icon or your profile picture.
- Tap your name to open your profile.
- Scroll down until you see Photos, or tap the profile tabs if Photos appears near Posts, About, Friends, or More.
- Tap Photos.
- Browse sections such as Uploads, Albums, or Photos of You.
- Open Albums to check default and custom folders.
On some versions of the app, Facebook may show “Uploads” instead of “Your Photos.” On others, you may need to tap See More or scroll horizontally through profile sections. If you cannot find Photos immediately, do not panic. Facebook sometimes hides useful buttons like it is running a tiny scavenger hunt.
Use Albums to Find Older Uploaded Photos
Albums are one of the best places to find old Facebook photos. Many uploads are automatically sorted into default albums, while others may be inside albums you created manually. If you are trying to see everything you uploaded, do not stop after checking the first visible page of pictures. Open the album section and inspect each album individually.
Common Facebook Albums to Check
- Mobile Uploads: Photos uploaded from your phone.
- Timeline Photos: Images posted directly to your timeline.
- Profile Pictures: Current and older profile photos.
- Cover Photos: Images used as your profile cover.
- Instagram Photos: Photos cross-posted from Instagram, if connected.
- Custom Albums: Albums you created for trips, events, family, pets, hobbies, or business content.
When reviewing albums, open each one and scroll to the bottom. Facebook may load photos gradually, especially if the album is old or large. If you have a decade of uploads, give the page a moment to catch up. Your photos may be there; they are just arriving fashionably late.
Use Activity Log to Find Photo Posts You Uploaded
If your goal is to find photos by date, post history, or old timeline activity, the Activity Log is your best friend. It records many actions connected to your account, including posts, photos, videos, tags, comments, and other activity. This is especially helpful when you remember posting a picture but cannot remember which album it landed in.
How to Use Activity Log on Facebook
- Go to your Facebook profile.
- Tap or click the three-dot menu near your profile options.
- Select Activity Log.
- Look for filters such as Your Posts, Photos and Videos, or similar categories.
- Use date filters if available to narrow the search by year or month.
- Open any photo post to view, edit, hide, delete, or change its audience.
Activity Log is particularly useful for finding timeline photos that do not appear where you expect. For example, a picture from 2016 may not be in a custom album. It may simply exist as a post with a photo attached. Activity Log helps you track those posts without scrolling through your timeline until your thumb files a complaint.
Download Your Facebook Information to See a Full Photo Archive
For the most complete view of uploaded photos, use Facebook’s Download Your Information tool. This lets you request a copy of your Facebook data, including posts and media connected to your account. It is the best option if you want to back up old photos, search offline, save memories before deleting an account, or organize images outside Facebook.
How to Request Your Facebook Photo Archive
- Open Facebook and go to Settings & privacy.
- Select Settings.
- Open Accounts Center.
- Choose Your information and permissions.
- Select Download your information.
- Choose the Facebook profile you want to export.
- Select the information categories you want. For photos, choose relevant post or media categories.
- Set the date range to All time if you want everything.
- Choose a file format, such as HTML for easier browsing or JSON for structured data.
- Submit the request and wait for Facebook to prepare your file.
When the download is ready, Facebook usually notifies you inside the app or by email. After downloading the file, unzip it on your computer or phone and open the folder. HTML format is usually easier for everyday users because it gives you pages you can click through. JSON format is more useful for developers, data analysis, or advanced archiving. In plain English: choose HTML unless you enjoy reading curly brackets for fun.
Why You May Not See Every Uploaded Photo
Sometimes people open Facebook Photos and think, “Wait, where did everything go?” There are several possible reasons. First, some pictures may be inside albums rather than the main photo grid. Second, photos you were tagged in are not the same as photos you uploaded. Third, you may have hidden a post from your timeline, changed its audience, or deleted it years ago. Fourth, the app may not be loading older content correctly.
Privacy settings can also make photos harder to understand. A picture may still exist in your account but be visible only to you, friends, a custom audience, or people tagged in it. Album privacy can differ from individual post privacy, and some default albums may have special rules. For example, profile pictures and cover photos often behave differently from private custom albums.
Quick Troubleshooting Checklist
- Check both Your Photos and Albums.
- Use Activity Log to search old photo posts.
- Look inside default albums such as Mobile Uploads and Timeline Photos.
- Try Facebook on desktop if the mobile app is not showing everything.
- Update the Facebook app if sections are missing or not loading.
- Download your information for the most complete archive.
How to Check Who Can See Your Uploaded Photos
Finding your photos is only half the job. The other half is knowing who can see them. That beach photo from 2012 may be harmless, but your old public album titled “Random Stuff” might deserve a quick privacy check. To review visibility, open a photo or album and look for the audience selector. You may see options such as Public, Friends, Only Me, or custom lists.
For albums, open the album, find the three-dot menu or edit option, and look for privacy settings. For individual photo posts, open the post and check the audience icon near the date. If you are cleaning up old uploads, start with public albums first. They are the most visible and usually the most important to review.
How to Organize Your Facebook Photos
Once you find your uploaded photos, you may want to organize them. Facebook does not offer the same deep organization tools as dedicated photo apps, but you can still tidy things up. Create specific albums for major events, rename vague albums, delete duplicates, and adjust privacy settings for older uploads.
For example, instead of keeping 200 unrelated images in Mobile Uploads, you might create albums like “Family Holidays,” “College Memories,” “Travel,” “Food Experiments That Worked,” and “Food Experiments That Should Stay Private.” A little organization makes future browsing easier and helps visitors understand what they are looking at.
How to Back Up Uploaded Facebook Photos
If your Facebook photos matter to you, back them up somewhere else. Social media should not be your only photo storage system. Accounts can be hacked, disabled, deleted, or simply become difficult to access. A backup gives you control.
The simplest backup method is to download your Facebook information and save the file to your computer, external hard drive, or cloud storage service. You can also download individual photos by opening the image and using the download or save option. For people with thousands of uploads, a full archive is much more efficient than saving photos one by one.
A smart backup plan uses at least two places: one local copy and one cloud copy. For example, keep a folder on your computer and another copy in a trusted cloud storage account. That way, if your laptop decides to retire without notice, your memories do not retire with it.
Experience-Based Tips for Finding Facebook Photos Faster
After helping people find old Facebook photos, one pattern shows up again and again: most users search in only one place. They tap Photos, scroll for ten seconds, fail to find the picture, and assume Facebook deleted it. In many cases, the photo is still there, but it is hiding in a different category.
The fastest approach is to search in layers. Start with your profile’s Photos section because it is the easiest. Next, open Albums and check default folders. Then use Activity Log if you remember roughly when you posted the photo. Finally, use Download Your Information if you need a complete archive. This layered method saves time because each tool catches something the others may miss.
Another useful habit is to search by memory clues. Ask yourself: Was the picture a profile photo? Was it uploaded from a phone? Was it part of a vacation album? Was it posted with a caption? Was someone tagged? These clues point you toward the right section. A photo used as a cover image probably lives in Cover Photos. A casual phone picture may be in Mobile Uploads. A birthday party may be inside a custom album or timeline post.
Desktop is often better for serious searching. The mobile app is convenient, but it can hide tabs, compress menus, and load older photos slowly. On a computer, you can open albums in separate tabs, scroll more comfortably, and download files more easily. If you are doing a full photo cleanup, use desktop and treat your phone as the quick-check tool.
Do not forget privacy while browsing. Looking through old photos can be funny, nostalgic, and occasionally alarming. You may find public photos you forgot about, albums with outdated audiences, or images that made sense years ago but no longer belong online. When in doubt, change the audience to Friends or Only Me before deciding whether to delete. That gives you breathing room without permanently removing the memory.
One more practical tip: make a backup before major cleanup. If you plan to delete old albums, download your Facebook information first. People often delete quickly and regret slowly. A backup lets you remove clutter from your profile while keeping the original memories for yourself.
Finally, be patient with old accounts. If your Facebook profile has existed for many years, your photos may be spread across old layouts, default albums, timeline posts, tags, and archived activity. Facebook is not always elegant, but it usually provides enough tools to uncover what you need. Think of the process like cleaning a digital closet: you may find the vacation photo you wanted, three forgotten profile pictures, and at least one image that makes you say, “Why did I post that?” That is part of the adventure.
Conclusion
Seeing all of your uploaded photos on Facebook is easiest when you use more than one method. Start with your profile’s Photos section, browse Your Photos or Uploads, open Albums, and check default folders such as Mobile Uploads, Timeline Photos, Profile Pictures, and Cover Photos. If something still seems missing, use Activity Log to search photo posts by category or date. For the most complete view, request a copy of your Facebook information through Accounts Center and download your archive.
The key is understanding that Facebook photos are not always stored in one simple place. Some are in albums, some are attached to posts, some are profile assets, and some are connected to tags. Once you know where to look, the process becomes much less mysterious. And yes, you may discover a few old uploads that deserve retirement. Consider it digital spring cleaningwith fewer dust bunnies and more questionable haircuts.





