Table of Contents >> Show >> Hide
- Before You Start: The Cottage Garden “Rules” (AKA Helpful Suggestions)
- Way #1: Build a “Seed-First” Cottage Border (The Cheapest Way to Look Like a Gardening Wizard)
- Way #2: Use Plant Swaps + Propagation (Because Free Plants Are the Best Plants)
- Way #3: Add Cottage Charm with Thrifted Edging + a Simple Path (Soft Curves = Instant Romance)
- Way #4: Upgrade Soil + Mulch Like a Pro (Because Healthy Soil Is the Real Secret Sauce)
- Putting It All Together: A Simple $25 Cottage Garden Game Plan
- Conclusion: Dreamy Doesn’t Have to Be Pricey
- Experiences & Lessons from Real Budget Cottage Gardens (About )
A dreamy cottage garden is basically the garden equivalent of a rom-com: overflowing flowers, soft edges, a little drama,
and the strong illusion that nobody ever argued with a hose. The good news: you don’t need a landscape budget (or a castle)
to get that lush, “been-here-forever” look. With a few smart moves, you can build cottage-garden charm for under $25
and still have enough left over for an iced coffee to admire your work like a Victorian poet.
This guide breaks down four budget-friendly ways to create a cottage garden aesthetic using real, practical gardening methods:
layered planting, self-seeding flowers, low-cost propagation, simple paths and edging, and soil upgrades that make everything
look better (because healthy plants are always prettierlike sleep, but for petunias).
Before You Start: The Cottage Garden “Rules” (AKA Helpful Suggestions)
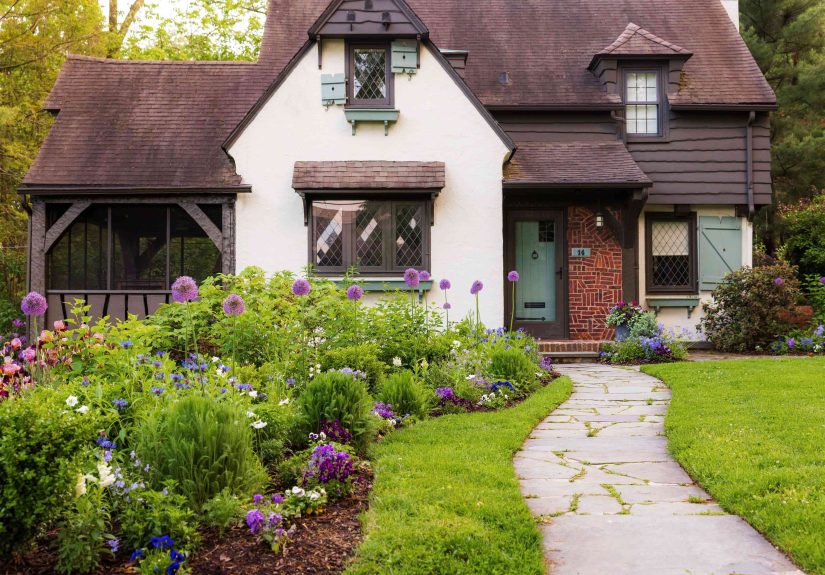
Cottage gardens look spontaneous, but they’re “organized chaos.” The vibe comes from a few repeatable principles:
soft curves, layered plants (tall in back, mid in the middle, low in front), and a mix of textures and blooms
that feels abundant rather than sparse. Add a simple path or a little rustic structure, and suddenly your yard looks like it’s
been featured in a magazineminus the invisible staff of gardeners.
- Think layers: tall “backbone” plants, medium fillers, and low edging flowers or groundcovers.
- Choose a loose color story: not matchy-matchy, more “everyone’s invited.”
- Let some flowers self-seed: that’s next year’s free refill.
- Soften lines: curving bed edges, plants spilling over paths, and relaxed spacing.
Now, let’s get to the fun part: four ways to build that dreamy cottage garden look for less than the cost of a fancy pizza.
Way #1: Build a “Seed-First” Cottage Border (The Cheapest Way to Look Like a Gardening Wizard)
Seeds are the budget gardener’s superpower. A few packets can turn into dozens (sometimes hundreds) of plants, which is
the closest thing gardening has to a legal money hack. For cottage gardens, seeds are especially perfect because you want
lots of flowers woven together in a natural-looking mix.
What to buy (example budget: $20–$25)
- 4–6 seed packets of cottage-style annuals (often $2–$5 each, depending on brand and store)
- 1 bag of basic potting mix or a seed-starting mix (optional if you direct-sow)
- Optional: a cheap spray bottle for watering seedlings
Best “cottage vibe” flowers that are beginner-friendly
You’re aiming for flowers that bloom generously, look romantic, and don’t demand a formal interview process before they’ll grow.
Great options include classics like zinnias and cosmos, plus cottage favorites that often reseed if you let them.
- Big, cheerful bloomers: zinnias, cosmos, sunflowers (dwarf types), calendula
- Airy & whimsical: larkspur, love-in-a-mist (Nigella), poppies (where appropriate)
- Soft edging & fillers: sweet alyssum, baby’s breath (annual types), bachelor’s buttons
How to arrange seeds for a cottage look (without overthinking it)
- Pick a small area: even a 3′ x 6′ strip can look magical when it’s packed with blooms.
- Create layers: place tall growers toward the back (or center if it’s an island bed), medium growers in front, and low growers at the edge.
- Sow in drifts: instead of one plant here, one plant there, sow little clusters so it looks lush and intentional.
- Leave “wiggle room”: cottage gardens evolvesome flowers will outperform others, and that’s part of the charm.
If you start seeds indoors, don’t skip hardening off
Seedlings raised indoors are basically babies in pajamas. If you move them outside suddenly, they can get stressed, scorched,
or stunted. The fix is simple: acclimate them gradually over about a week or twostarting in shade, increasing exposure, and
avoiding harsh wind or cold snaps. Your plants will adjust, and you’ll look like you know what you’re doing (which is the true
purpose of hardening off).
Budget bonus: self-seeding = free repeats
Cottage gardens shine when some flowers drop seed and return next year. To encourage that, let a few of your best performers
finish their life cycle instead of deadheading every bloom. You’ll trade a tiny bit of tidiness for the joy of surprise seedlings
next seasonlike your garden leaving you a thoughtful gift.
Under-$25 win: A seed-based border can give you dozens of plants for the price of one nursery perennial.
Way #2: Use Plant Swaps + Propagation (Because Free Plants Are the Best Plants)
Cottage gardens are traditionally packed with plants, and buying mature plants one-by-one adds up fast. The budget workaround?
Swap plants with other gardeners and propagate (make new plants from old ones). This is the wholesome side
of “networking”: you leave with plants instead of business cards.
Option A: Plant swaps (often free)
Many communities host plant swapssometimes through Master Gardener groups, extension offices, libraries, or neighborhood clubs.
Gardeners bring divisions, seedlings, or cuttings and trade. You can show up with a few extras from your yard (or even a starter
pack of seedlings you grew from Way #1) and leave with a cottage garden starter collection.
Option B: Divide perennials (the “one plant becomes three” trick)
Lots of perennials naturally form clumps. Dividing them keeps plants healthy and gives you more planting material. The basic idea:
lift the clump, separate it into smaller sections, then replant. A good division usually has a healthy root system and multiple shoots
so it can bounce back quickly.
- Good candidates: daylilies, hostas, bee balm, ornamental grasses, many daisies and asters (varies by region)
- When to do it: often in cooler weather (spring or fall for many perennials), when the plant isn’t struggling through heat
Option C: Take cuttings (tiny stems, big dreams)
Many plants can be started from stem cuttings. You snip a healthy piece, remove lower leaves, and place it into a moist rooting medium.
Keeping humidity up (even with a simple plastic cover) and avoiding harsh sun helps cuttings root. Some root quickly; others take weeks.
Either way, it’s ridiculously satisfying to get a new plant from what looks like a salad garnish.
What to buy (example budget: $15–$25)
- Small bag of potting mix
- A few small nursery pots (or reuse yogurt cups with drainage holes)
- Optional: inexpensive rooting hormone (nice, not required for many easy plants)
- Clear plastic bags or a plastic storage bin lid to create a humidity “tent”
How to turn swaps + propagation into a cottage garden layout
- Start with 3 “anchor” plants: taller or more structural plants go first.
- Add mid-height bloomers: repeat them in 2–3 spots so it looks cohesive.
- Fill the edges: low growers or self-seeders soften borders and paths.
- Repeat a few favorites: repetition is what makes “wild” look designed.
Under-$25 win: swaps can be free, and propagation supplies are cheapmeaning you can fill space fast without draining your wallet.
Way #3: Add Cottage Charm with Thrifted Edging + a Simple Path (Soft Curves = Instant Romance)
If flowers are the main character, edging and paths are the supporting cast that makes everything look intentional. Cottage gardens
feel inviting because they’re easy to wander throughcurving lines, little pathways, and plants gently leaning over the edges like
they’re trying to hear the gossip.
Budget path ideas (often free to $25)
- Mulch path: a bag or two of mulch can define a walkway fast.
- Stepping stones (salvaged): ask local buy-nothing groups for leftover pavers or broken concrete (“urbanite”).
- Gravel patch: a small bag of gravel can create a tidy, cottage-y transition area near a gate or patio.
Budget edging ideas that look cottage-style
- Reclaimed brick or pavers: imperfect + weathered = charming.
- Short woven branch border: trim fallen branches into stakes and weave flexible twigs between them.
- Stone “breadcrumb” edge: line a bed with small rocks you already have.
- Thrifted containers: old buckets, enamel bowls, or galvanized tubs as flower planters (drill drainage).
How to lay out a cottage bed for maximum “dreamy”
- Sketch a curve: use a hose or rope to outline a gentle, flowing edge.
- Make the bed deeper than you think: even an extra 6–12 inches helps create that layered, abundant look.
- Let plants spill: choose at least one flower that will soften the edge (alyssum, creeping thyme where suitable, low annuals).
- Add one vertical element: a simple trellis (bamboo stakes + twine) instantly reads “cottage.”
Example $25 “structure kit”
- Bamboo stakes + garden twine (for a quick trellis)
- One bag of mulch (for a tiny path or bed top-dressing)
- A thrift-store container or two (optional)
Under-$25 win: structure makes even a small planting look establishedand curves are basically an optical illusion for “more garden.”
Way #4: Upgrade Soil + Mulch Like a Pro (Because Healthy Soil Is the Real Secret Sauce)
Want your garden to look fuller, faster? Start with the soil. Cottage gardens are dense plantings, which means plants compete for water
and nutrients. Adding organic matter and using mulch helps soil hold moisture, supports roots, reduces weeds, and keeps plants growing steadily.
Translation: more flowers, less crying.
Cheap (or free) ways to boost soil
- Compost: homemade or baggedeither way, it improves soil over time.
- Leaves: shredded leaves are a classic “free mulch” option.
- Grass clippings: use lightly and avoid clumps; best when mixed with leaves or compost.
- Kitchen scraps (via composting): turn yesterday’s salad into tomorrow’s flowers.
Mulch: the low-cost cottage garden polish
Mulch is like mascara for garden beds: it instantly makes everything look more put-together. It also helps with weed suppression and moisture conservation,
which is especially helpful when you’re getting a new bed established.
- Where to mulch: around new plantings, along bed edges, and on paths.
- How much: aim for a light, even layer that covers soil without burying stems.
- Avoid the “mulch mountain” look: don’t pile mulch up against stems or trunksplants like airflow, not a damp hug.
Try a micro “lasagna bed” (sheet mulching) for under $25
If you’re starting a new bed in grass, sheet mulching can reduce digging. You layer cardboard (free) to block light, then top with compost and mulch.
Over time, it breaks down and improves soil. It’s not instant magic, but it’s very closelike slow-cooker magic.
Example $25 soil kit
- 1 bag of compost or soil conditioner
- 1–2 bags of mulch (or free shredded leaves if available)
- Free cardboard (remove tape and glossy coatings)
Under-$25 win: better soil and mulch make every plant you add look more lushso you get a “dreamy cottage garden” payoff with fewer purchases.
Putting It All Together: A Simple $25 Cottage Garden Game Plan
If you want the fastest visual impact
- Define a small curved bed edge (Way #3).
- Improve soil with compost + mulch (Way #4).
- Sow a mix of annual seeds in layers (Way #1).
- Add 1–2 swapped or propagated plants as anchors (Way #2).
If you want the cheapest long-term payoff
- Start with seeds and self-seeders (Way #1).
- Join a plant swap and learn one propagation method (Way #2).
- Use free mulch (leaves) and homemade compost over time (Way #4).
- Add salvaged edging whenever you find it (Way #3).
Conclusion: Dreamy Doesn’t Have to Be Pricey
A cottage garden under $25 isn’t about buying your way to beautyit’s about using smart, time-tested techniques that multiply your effort:
seeds that turn into drifts of flowers, swaps that fill space for free, curving paths that add charm instantly, and soil improvements that make
everything grow better. Start small, layer plants, let a few self-seed, and give your garden the freedom to look a little wild in the best way.
And if anyone asks how you pulled it off so cheaply, you can say: “Oh, this old thing?” like you didn’t just outsmart the entire gardening economy.
Experiences & Lessons from Real Budget Cottage Gardens (About )
To keep this practical, here are a few composite, real-world scenarios based on common experiences budget gardeners sharebecause the only
thing more universal than wanting a cottage garden is realizing you accidentally planted everything six inches apart like you were organizing a shoe rack.
1) The “Front Yard Strip” Transformation
One of the most common budget wins happens in that awkward front-yard strip by the walkwaythe place grass never really thrives, but weeds sure do.
The big lesson: define the shape first. Gardeners who started by curving the bed edge (even just slightly) said the space looked “designed”
immediately, before a single flower bloomed. Then they added compost and a thin mulch layer, which made the bed look tidy and helped new seedlings stay moist.
The surprise? The garden looked better the same day, not months later, because structure and mulch create instant visual order.
2) The Seedling “Sunburn” Moment (and the Comeback)
A classic first-time experience: starting seeds indoors, feeling smug about it, then putting seedlings outside on a bright day… and watching them wilt like
they just read your group chat. The gardeners who bounced back quickest treated it like a process problem, not a personal failure. They moved seedlings into
shade, watered gently, and then did a gradual outdoor transition over the next week. The lesson that stuck: hardening off isn’t optional if
you want strong, resilient plants. Once they adjusted the routine, later plantings took offand the garden looked fuller because plants weren’t stunted.
3) The Plant Swap “Starter Pack” Effect
Budget gardeners often describe plant swaps as the moment their cottage garden went from “a few flowers” to “a whole scene.” Many swapped for clump-forming
perennials or easy-to-root cuttings. The key takeaway: repeat what works. Instead of collecting one of everything (a common beginner impulse),
the gardeners who got the prettiest cottage look repeated two or three favorites in multiple spots. That repetition created rhythm, which made the planting feel
intentionaleven though it was built from free plants and hand-me-down divisions.
4) The “I Mulched Too Much” Realization
Another frequent experience: going heavy on mulch because it looks clean… then realizing you buried small seedlings or trapped too much moisture around stems.
The gardeners who found the sweet spot used mulch like a top-dressing, not a blanketkeeping it off crowns and stems, and refreshing lightly as needed.
The lesson: mulch is powerful, but it works best when it supports plants rather than smothering them.
Across all these stories, the pattern is consistent: the most “dreamy” cottage gardens aren’t boughtthey’re built. A small curved bed,
a handful of seeds, a couple swapped plants, and healthier soil can create the kind of lush, romantic look people assume costs hundreds. The magic is real
it just happens to be affordable.