Table of Contents >> Show >> Hide
- Why Faux Ceiling Tiles Work So Well as Wall Art
- Choosing the Right Faux Ceiling Tiles for a Wall Art Project
- Tools & Materials Checklist
- Prep Like a Pro (So It Looks Like It Cost More Than It Did)
- Step-by-Step: Turning Faux Ceiling Tiles Into Updated Wall Art
- 1) Pick a “hero” finish
- 2) Measure and cut (patientlythis is not a race)
- 3) Prime for paint that actually stays put
- 4) Paint the base coat
- 5) Add depth with highlights or antiquing
- 6) Mount tiles to a backing board (recommended for clean hanging)
- 7) Frame it like you mean it
- 8) Seal if needed
- 9) Hang securely (especially for larger panels)
- Design Ideas That Look Intentional (Not Like You Got Lost in the Ceiling Aisle)
- Mounting Options: Glue, Nails, and the “Please Don’t Fall” Factor
- Budget, Time, and a Realistic Expectations Check
- Common Mistakes (and How to Avoid Them)
- Real-World Experiences: What DIYers Learn After Updating Wall Art With Faux Ceiling Tiles
- Conclusion: A Bigger Impact Than a Bigger Budget
- SEO Tags
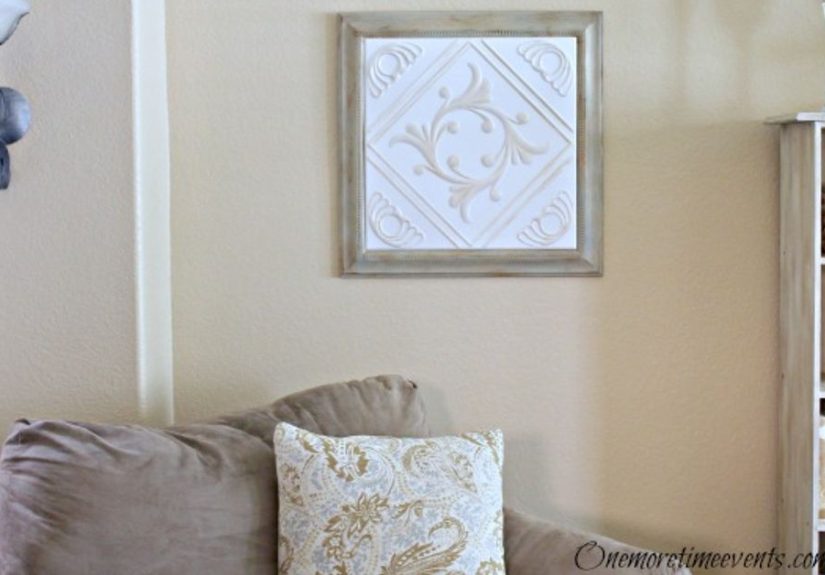
If your walls are giving “waiting room chic” (you know the vibe: bland, polite, and slightly suspicious), faux ceiling tiles might be the unexpected upgrade your art needs. Yesceiling tiles. On a wall. As art. It sounds like a home-improvement prank until you see how the texture, pattern, and shadow play can turn a plain frame or tired canvas into a statement piece that looks custom and expensive… while your budget quietly high-fives you.
Faux ceiling tilesoften designed to mimic pressed tincome in dramatic patterns that instantly add depth. Used the right way, they don’t read as “leftover renovation supplies.” They read as architectural, collected, and intentional. And if you’ve ever stared at a blank wall thinking, “I should buy art,” this is the DIY answer: you’re going to make it, and it’s going to look like you had a design plan all along.
Why Faux Ceiling Tiles Work So Well as Wall Art
Great wall art does at least one of these things: adds texture, adds scale, or adds a focal point. Faux ceiling tiles can do all threefast. Their repeating embossed patterns create highlights and shadows that change throughout the day, which is a fancy way of saying your wall will look interesting even when you’re just walking by with a snack.
They’re also a strong “bang for your buck” choice. Instead of buying oversized art (which can get pricey fast), you can create large-format, high-impact pieces from a few tiles, a backing board, and paint. Bonus: the look can shift from vintage farmhouse to modern minimal to glam metallic just by changing the finish.
Choosing the Right Faux Ceiling Tiles for a Wall Art Project
Material matters (because gravity is real)
Faux ceiling tiles are commonly made from PVC/vinyl, polystyrene/foam, or lightweight composite materials. Some projects use real metal “tin” panels, but for wall art, faux options are usually easier to cut, paint, and hang without turning your drywall into a stress test.
- PVC/vinyl tiles: Durable, usually moisture-friendly, and great for crisp embossed details. Can be slightly flexible.
- Polystyrene/foam tiles: Super lightweight and easy to trimideal for large pieces. Handle gently to avoid dents.
- Real metal panels: Gorgeous and authentic, but heavier and sharperbetter with a solid backing and careful handling.
Size, pattern, and depth
Common tile sizes include 12"x12" and larger formats like 2'x2' panels. For wall art, 12"x12" tiles are a sweet spot: easy to frame, easy to arrange in sets, and easy to customize. Look for patterns with good depthraised details catch light better and look more “gallery” than “grid ceiling.”
Tip: If your room already has lots of pattern (busy rug, bold wallpaper), choose a simpler tile design. If the room is minimal, go dramaticornate medallions and pressed motifs can become the star.
Tools & Materials Checklist
Gather your supplies first. Nothing kills DIY momentum like realizing you’re missing the one tool that makes the whole thing… possible.
- Faux ceiling tiles (enough for your layout)
- Backing board: thin plywood, MDF, foam board, or sturdy canvas panels
- Construction adhesive or recommended tile adhesive (plus a caulk gun if needed)
- Utility knife, heavy scissors, or snips (based on tile material)
- Measuring tape, ruler/straight edge, pencil
- Painter’s tape
- Primer (especially for glossy PVC) and paint (latex or acrylic craft paint works well)
- Optional finishes: metallic wax, rub ’n buff style wax, glaze, or antiquing medium
- Frame(s) or trim molding to create a custom frame
- Hanging hardware: D-rings, picture wire, sawtooth hangers, or a French cleat for larger pieces
- Sandpaper (fine grit) and a tack cloth
- Protective gear: gloves (especially for metal), safety glasses
Prep Like a Pro (So It Looks Like It Cost More Than It Did)
The biggest difference between “DIY project” and “DIY masterpiece” is prep. Start by deciding whether your tiles will be mounted directly in a frame, on a board, or as a multi-tile panel. For most wall art, a backing board is your best friend. It keeps everything flat, makes hanging easier, and prevents warping over time.
Before gluing anything, dry fit your layout on the floor. Arrange tiles, check alignment, and decide where seams will land. If you’re building a larger panel, mark guide lines on your backing board with a ruler and pencil. A couple of measured lines now saves you from “why is that crooked?” later.
Clean the tile surface (especially if it’s glossy PVC). Lightly scuff-sand if needed so primer grips well. If the tile is paintable, prime it anywayprimer helps paint stick, reduces streaks, and keeps your finish from looking patchy.
Step-by-Step: Turning Faux Ceiling Tiles Into Updated Wall Art
1) Pick a “hero” finish
Decide what look you’re going for: matte modern? antique tin? bright and playful? Your finish controls the whole vibe. A quick guide:
- Modern: one color (matte white, charcoal, or greige) with subtle highlights.
- Vintage: layered paint + glaze + light distressing on raised details.
- Glam: black base + metallic rub on the high points.
2) Measure and cut (patientlythis is not a race)
Measure your frame opening or backing board. Cut tiles to fit using the tool that matches the material: a sharp utility knife for foam/polystyrene, snips for metal, or heavy scissors for thin PVC panels. Use painter’s tape on cut lines to reduce chipping or cracking on more brittle materials.
3) Prime for paint that actually stays put
Apply a bonding primer if your tile is slick. Let it fully dry. This is the moment where you don’t skip steps, because peeling paint is the kind of “texture” nobody asked for.
4) Paint the base coat
Use a small foam roller for fast coverage and fewer brush marks, then a brush to reach into grooves. Two thin coats beat one thick coat. Always.
5) Add depth with highlights or antiquing
Once the base is dry, bring out the embossed pattern:
- Dry brushing: lightly drag a nearly-dry brush of a lighter color over raised areas.
- Glazing: apply a darker glaze, then wipe back so it remains in crevices.
- Metallic wax: rub onto high points for a faux tin or brass effect.
6) Mount tiles to a backing board (recommended for clean hanging)
Apply adhesive according to product directions. Most tile adhesives work best on a surface that’s smooth, clean, and firm. Press tiles into place and use painter’s tape to hold edges while the adhesive cures. If you’re making a multi-tile panel, align the first tile carefullyeverything follows that first decision. (Choose wisely. Your future self would like a word.)
7) Frame it like you mean it
A frame instantly upgrades the piece. Options:
- Use a deep “shadow box” frame for dimensional tiles.
- Create a custom frame with simple trim molding around the backing board.
- Repurpose an old frame and paint it to match or contrast.
8) Seal if needed
If the piece will be handled often (or live in a high-humidity space), consider a clear protective topcoat compatible with your paint. Keep it subtletoo glossy can flatten the look unless high shine is the whole point.
9) Hang securely (especially for larger panels)
For small pieces, a sawtooth hanger may be enough. For medium-to-large art, use D-rings and picture wire, or a French cleat if you want it very secure and easy to level. If your piece is substantial, anchor into studs or use appropriate wall anchors.
Design Ideas That Look Intentional (Not Like You Got Lost in the Ceiling Aisle)
Oversized single panel statement art
Mount one large decorative panel on a backing board, frame it, and hang it over a sofa or console. Paint it matte to keep it modern, or antique it for a vintage “found object” feel.
Tile triptych (three-panel set)
Use three matching tiles, each framed separately, and hang them as a set. This is an easy way to fill a large wall without buying a giant print. Keep spacing consistent for that crisp, designer look.
Mixed-media art with a tile backdrop
Use a faux ceiling tile as a textured background behind a monogram, a minimalist line drawing, pressed botanicals in a floating frame, or even a simple mirror. The tile adds depth while the foreground adds personality.
“Antique tin” without the antique price
Start with a dark base coat (charcoal or deep brown), then add metallic highlights. Finish with a gentle glaze to tone it down. The result feels collectedlike you found it at a salvage shop and casually knew exactly what you were doing.
Soft farmhouse whitewash
White or warm ivory tiles with subtle distressing look great in cozy spaces. Pair with natural wood frames or lightly weathered finishes. This is especially effective for cottage, farmhouse, and vintage-inspired homes.
Mounting Options: Glue, Nails, and the “Please Don’t Fall” Factor
For wall art (not full wall installations), mounting tiles to a backing board with adhesive is the simplest, cleanest method. Adhesives typically perform best when both surfaces are clean and smooth. For certain tiles and surfaces, some instructions recommend combining adhesive with mechanical fastening (like staples or small nails), especially for direct-mount installs. For art panels, your backing board acts as the stable surface so you can keep hardware tidy.
If you’re tempted to glue tiles directly onto your wall as “art,” pause and consider removability. A backing board lets you update, repaint, or swap the piece later without turning your drywall into a patchwork quilt.
Budget, Time, and a Realistic Expectations Check
Most faux ceiling tile wall art projects land in the “weekend win” category:
- Time: 2–6 hours active work (plus drying/curing time)
- Cost: often less than buying comparable textured wall decor, especially for large pieces
- Skill level: beginner-friendly if you measure carefully and take your time with paint
The biggest cost variables are tile type and framing. If you thrift a frame (or build one with trim), you can keep this project very budget-friendly. If you go with a deep shadow box and specialty finishes, it can look high-end while still costing far less than store-bought statement art.
Common Mistakes (and How to Avoid Them)
Rushing the layout
Crooked seams are the #1 giveaway. Dry fit first, draw guide lines, and start from a true edge.
Skipping primer on glossy tiles
If paint scratches off with a fingernail, primer was not optional. Use a bonding primer to keep the finish durable.
Overdoing the distressing
A little aging looks vintage. A lot looks like your art survived a small tornado. Build layers slowly and step back often.
Using weak hanging hardware
If your piece is larger than a throw pillow, upgrade your hanging plan. D-rings, wire, or a French cleat can keep everything secure and level.
Real-World Experiences: What DIYers Learn After Updating Wall Art With Faux Ceiling Tiles
Here’s the part no supply list tells you: faux ceiling tile wall art is one of those projects that feels almost too easy on paper, and then reality shows up with a measuring tape and an opinion. The good news? The “real-life lessons” are totally manageableand once you know them, your results look noticeably more polished.
First, people often underestimate how much lighting changes the final look. A tile that seems subtle under overhead lighting can become beautifully dramatic near a window or a lamp because the embossed pattern throws shadows. That’s why many DIYers end up dry-fitting the piece in the room before committing to the finish. If the pattern disappears in your space, a higher-contrast paint approach (like a darker glaze in the grooves or a lighter dry brush on raised areas) brings it back to life.
Second, there’s a learning curve with paint thickness. The fastest way to lose that crisp “pressed tin” vibe is to bury the details in thick paint. DIYers who love their finished piece usually apply thin coats, let them dry completely, and use techniques that emphasize texture rather than smother it. Dry brushing becomes a favorite because it instantly highlights the raised design with minimal effort. Glazing is another common “aha” moment: it looks scary until you realize you can wipe it back and control the intensity.
Third, framing is the secret sauce. Plenty of people start with “I’ll just mount it and hang it,” and then realize the edges need a clean finish to look intentional. Adding a framewhether it’s a thrifted picture frame, a shadow box, or simple trimturns the tile from “material” into “art.” It also solves practical issues like hiding slightly imperfect cuts and giving you a sturdy place to attach hanging hardware. If you’re updating existing wall art, swapping the background of an old frame for a textured faux tile insert can feel like you got brand-new decor without buying new decor.
Another common experience: adhesive patience. Tile adhesives and construction adhesives work best when you follow cure times, but the temptation is to move on immediately. Many DIYers use painter’s tape as a “third hand” to hold corners flat while the adhesive sets. For larger panels, people often learn that a backing board makes everything easiertiles stay aligned, the piece hangs flatter, and you don’t have to worry about direct-to-wall removal later.
Finally, there’s the style discovery piece: faux ceiling tiles are surprisingly versatile. Some folks start aiming for “vintage tin,” then fall in love with a matte monochrome finish that reads modern and sculptural. Others go the opposite directionbold metallic highlights or moody black-and-brass that feels glam. The shared takeaway is that the tile pattern is like a design multiplier: even a simple color palette can look layered and expensive because the texture does the heavy lifting. And once someone finishes one piece, they often start eyeing other walls like, “So… what else in here is overdue for a glow-up?”
Conclusion: A Bigger Impact Than a Bigger Budget
Updating wall art with faux ceiling tiles is one of those rare DIY projects that checks all the boxes: affordable, customizable, beginner-friendly, and legitimately impressive when it’s done. With the right tile pattern, a thoughtful finish, and a solid framing plan, you can create textured wall decor that looks custom-made for your spacebecause it is.
Whether you’re refreshing existing frames, building a large statement piece, or creating a tiled triptych for a gallery wall, faux ceiling tiles offer a high-style shortcut that doesn’t scream “shortcut.” Measure carefully, prime smartly, paint in layers, and hang it like it matters. Your walls will thank you. Probably by looking way better in photos.





