Table of Contents >> Show >> Hide
- What a Coping Saw Is (and Why It Deserves a Spot in Your Drawer)
- What You Can Do With a Coping Saw
- Coping Saw Blades: Teeth Per Inch, Materials, and the “Why Is This So Confusing?” Problem
- Choosing a Coping Saw: What Actually Matters When You Buy One
- How to Set Up a Coping Saw (Without Inventing New Curse Words)
- How to Use a Coping Saw: Techniques That Make It Feel “Easy”
- A Step-by-Step Example: Coping an Inside Corner on Baseboard
- Coping Saw vs. Fret Saw vs. Jigsaw: Which Tool Should You Reach For?
- Safety and Maintenance: Keep the Tool Sharp, Keep Your Fingers Attached
- Troubleshooting: Common Problems and Quick Fixes
- FAQ
- Conclusion: The Small Saw With Big “Finish Carpentry Energy”
- Shop Stories & “Ask Me How I Know” Moments (Extra ~)
The coping saw is the hand-tool equivalent of a skilled barista: small, unassuming, and somehow capable of producing ridiculously fine results when you treat it with a little respect. It’s the tool you grab when a straight-line saw says, “Nope,” and a power tool says, “Sure… but I might also eat your project.”
This guide breaks down what a coping saw actually does, how to pick blades without playing “mystery TPI,” how to cut tight curves and interior cutouts, and why trim carpenters talk about “coping” like it’s a competitive sport.
What a Coping Saw Is (and Why It Deserves a Spot in Your Drawer)
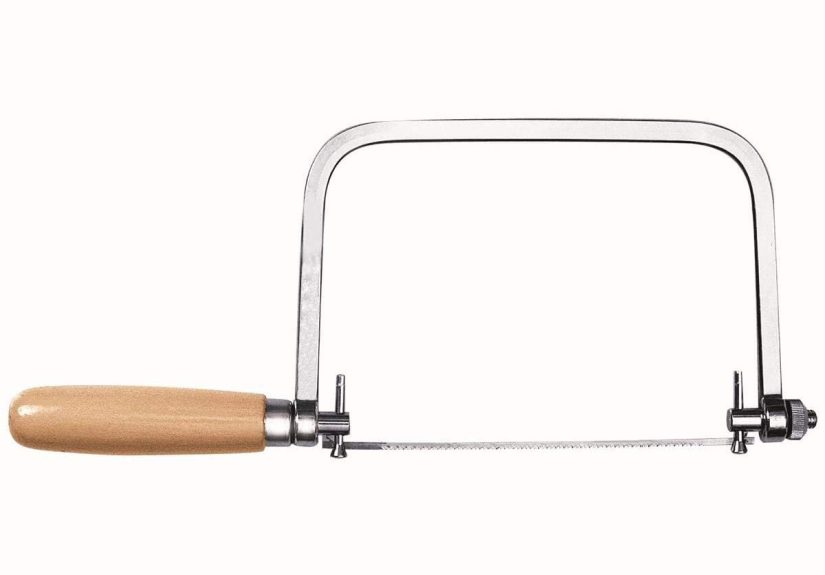
A coping saw is a lightweight, U-shaped frame saw that tensions a very thin blade between two pins. That skinny blade is the whole point: it turns easily, slips into tight spots, and can follow curves that would make a regular handsaw feel clumsy. It’s most famous for coping trim joints (inside corners on baseboard, crown, chair rail), but it’s equally at home in the workshop cutting patterns, cleaning up joinery waste, and creating interior shapes you can’t reach from an edge.
Think of it as a “precision curve saw” that’s powered by your patience and an arm that’s willing to do a little cardio. The tradeoff is control: you can steer it, angle it, and sneak up on a line instead of blasting past it.
The parts you should know
- Frame (U-shaped): Provides spring tension and clearance (the “throat”) around the workpiece.
- Handle: Typically wood or a comfort-grip plastic/rubber style; it’s your steering wheel.
- Blade clamps/yokes: Hold the pinned ends and often allow rotation so you can cut at angles.
- Tensioning mechanism: Often a knob or twist-handle setup that tightens the blade.
What You Can Do With a Coping Saw
If your project includes curves, profiles, or “I need to remove that little bit without wrecking the rest,” a coping saw is a solid candidate. Here are its greatest hits:
1) Cope trim joints for cleaner inside corners
Coping is the technique of shaping the end of one piece of molding so it nests tightly against the face profile of the piece already installed. The big win: inside corners in real houses are rarely perfect 90°and wood movement isn’t exactly famous for staying polite. A coped joint stays visually tight because the face profile meets the face profile, even if the corner is a little off.
The classic workflow is: miter-cut the molding, darken the edge so the profile is easy to see, then saw along that profile while angling the blade slightly back (a “back bevel”) so the front edge fits tight while the backside clears.
2) Cut curves and irregular shapes in wood
Furniture templates, curved brackets, toy parts, decorative cutouts, small arcsthis is where the coping saw feels like it’s showing off. The blade is narrow enough to turn in a surprisingly small radius, especially with finer teeth and good tension.
3) Make interior cutouts
Need a window in the middle of a panel? Drill a starter hole, unhook the blade, thread it through, reattach, and cut the shape from the inside. This is one of the coping saw’s signature party tricks.
4) Trim joinery waste and refine fit
A coping saw can nibble away waste in joinerythink the “bulk removal” phase before you clean up with a chisel. It’s not a replacement for a chisel; it’s the assistant who shows up early and does the boring part.
5) Cut some plastics and thin metals (with the right blade)
With specialty blades, a coping saw can handle plastics and thin sheet metal. There are also abrasive wire-style blades used for hard materials like tile/ceramic in certain scenarios. The key is choosing the correct blade and keeping expectations realistic: a coping saw is a precision hand tool, not a demolition crew.
Coping Saw Blades: Teeth Per Inch, Materials, and the “Why Is This So Confusing?” Problem
Most coping saw blades are pinned-end blades around 6-1/2 inches long between pins, and they come in different tooth counts (TPI), widths, and materials. Blade choice is where your results go from “artisan” to “chewed by beavers,” so it’s worth understanding the basics.
TPI 101: faster vs. cleaner
- Lower TPI (coarser teeth): Faster cutting, rougher finish, more aggressive bite. Good for roughing out shapes or waste removal.
- Higher TPI (finer teeth): Slower cutting, smoother finish, better control in tight curves and delicate work.
In the real world, many common blade packs include a mixoften around 10 TPI, 15 TPI, and 20 TPIso you can match the blade to the job instead of forcing one blade to do everything (and then wondering why it’s doing everything badly).
Typical blade choices by job
- General-purpose woodworking: Around 15 TPI is a dependable middle ground.
- Delicate curves, fine trim profiles: 18–20+ TPI helps you steer and leaves a cleaner edge.
- Fast waste removal: 10 TPI (or similar coarse) is quicker when precision isn’t the main event.
- Ultra-fine work: Extra-fine options (like very high TPI or specialty blades) can be useful for intricate patterns and thin stock.
Blade types beyond “wood”
Specialty blades exist for plastics, metals, and even abrasive wire options for harder materials. If you’re cutting something that isn’t wood, don’t “try it anyway” with a wood blade and then blame the tool. Choose the blade that’s meant for the material and go slower.
Choosing a Coping Saw: What Actually Matters When You Buy One
The best coping saw is the one that keeps the blade tight, stays aligned, and doesn’t make your hand feel like it’s gripping a wet bar of soap. If the blade won’t stay tensioned, your cuts will wander and your mood will sour.
Look for a sturdy frame
A rigid frame helps maintain tension and keeps the blade tracking straight. Flimsier frames can lose their shape over time, which shows up as a blade that twists, chatters, or refuses to cut cleanly.
Comfortable handle and easy tensioning
If tensioning the blade feels like solving a puzzle box, you’ll avoid changing blades, and then you’ll keep using a dull blade “just for one more cut.” (That’s how projects get renamed “firewood.”) A comfortable handle matters too, because coping is often a few minutes of steady, controlled strokesnot one dramatic moment.
Blade rotation can be a superpower
Some models allow the blade to rotate and lock at set increments (commonly in steps like 45 degrees). That lets you keep your hand and frame in a comfortable position while the blade points where it needs to goespecially helpful for coping molding profiles and working in awkward corners.
Don’t overthink “feature overload”
A coping saw is simple by design. You’re paying for stiffness, reliable clamps, comfortable handling, and easy blade changesnot for a tool that needs a user manual thicker than the lumber you’re cutting.
How to Set Up a Coping Saw (Without Inventing New Curse Words)
1) Install and tension the blade
- Loosen the clamps/yokes so the blade can seat properly.
- Hook one pinned end into the rear yoke (near the handle).
- Compress the frame slightly (it’s designed to flex) and hook the other end into the front yoke.
- Tighten the tensioning mechanism until the blade feels taut and “rings” lightly when plucked (not banjo-tight, just firm).
Too loose and the blade will twist and wander. Too tight and it can snap, especially if you’re turning hard through a curve. Aim for “firm and confident,” not “I’m training for the Tool Olympics.”
2) Decide blade direction (the friendly debate)
Some woodworkers prefer the blade teeth oriented for cutting on the push stroke; others set it up for the pull stroke. Both can work, and many coping saws allow you to flip the blade direction to match your technique and the situation.
- Push-stroke setup: Often favored for coping trim profiles because you can see the cut line and drive the blade into supported material.
- Pull-stroke setup: Can feel controlled on thin stock and delicate work, similar in spirit to pull-saw technique.
The practical rule: pick the orientation that gives you the best control and visibility for the cut you’re making, then practice with it until it feels natural. Consistency matters more than winning internet arguments.
3) Rotate the blade when the work demands it
If your saw allows rotation, set the blade angle so your wrist stays neutral while the blade follows the profile. For coping inside corners on molding, a rotated blade can keep the frame out of the way and reduce awkward twisting.
How to Use a Coping Saw: Techniques That Make It Feel “Easy”
Start the cut cleanly
Clamp the work securely. Mark your line clearly (a sharp pencil line, knife line, or darkened profile edge for molding). Start with short, gentle strokes to establish a kerf, then settle into longer strokes using more of the blade. A coping saw likes rhythm. It does not like panic.
Let the blade do the work
If you push too hard, the blade flexes. When the blade flexes, it wanders. When it wanders, you invent a new “creative design decision” that no one asked for. Light pressure, steady strokes.
Turning curves without snapping blades
- Keep moving: Don’t stop mid-curve and twist the blade in place. Maintain gentle forward/back motion as you steer.
- Use small steering inputs: Think “guided persuasion,” not “yank the wheel.”
- Relief cuts help: For tight inside curves, make small relief cuts up to (not past) your line so waste falls away and the blade can turn.
Interior cutouts (the “thread the needle” method)
- Drill a starter hole inside the waste area (size depends on blade width and your pattern).
- Remove one end of the blade from the saw.
- Thread the blade through the hole.
- Reattach and tension the blade.
- Cut your interior shape, staying just shy of the line for a clean final fit.
Pro tip: back bevel for coped molding
When coping trim, angle the blade slightly so the backside of the cut is relieved and the front “face profile” remains proud. This helps the visible edge seat tight against the adjacent piece, even if the wall corner is a little imperfect. After sawing, refine the edge with sandpaper, a file, or a rasp if needed.
A Step-by-Step Example: Coping an Inside Corner on Baseboard
Let’s walk through a practical example that shows why coping is loved by trim carpenters who enjoy sleeping at night (instead of re-cutting miters for hours).
Tools & setup
- Miter saw (or miter box)
- Coping saw with a fine-to-medium wood blade (often ~15–20 TPI)
- Pencil (or marker) to darken the profile edge
- Small file/rasp and sandpaper for cleanup
- Clamps or a bench vise
Steps
- Install the first board square into the corner. This is your “receiving” piece.
- Miter-cut the end of the second board. A standard inside-corner miter reveals the profile you’ll follow.
- Darken the cut profile edge. Trace the leading edge so your cut line pops visually.
- Cope along the profile. Saw right on the line, keeping a slight back bevel so the face edge fits tight.
- Refine the fit. Use a file/sandpaper to remove fuzz and tune tricky bumps in the profile.
- Test-fit and adjust. The goal is a crisp face-to-face contact at the profile. Sneak up on perfection.
Why this works so well: the visible profile is what matters, and coping prioritizes that contact. Minor wall or corner imperfections are less likely to telegraph into a big ugly face gap.
Coping Saw vs. Fret Saw vs. Jigsaw: Which Tool Should You Reach For?
Coping saw vs. fret saw
They look like cousins at a family reunion, but they’re built for different vibes. A fret saw typically has a deeper frame and an even finer blade for delicate fretwork and thin stock. A coping saw is more of a generalist: sturdier, quicker to swap blades, and comfortable on thicker trim and workshop tasks.
Coping saw vs. jigsaw
A jigsaw is faster for big curves and thicker material, but it’s louder, more aggressive, and more likely to tear out or overshoot on fine profiles. A coping saw shines when you need control, tight turns, and a cut that feels like it was hand-delivered to the line.
When the coping saw is the best answer
- Inside-corner trim coping
- Small curves and interior cutouts
- Joinery waste removal before chisel cleanup
- Projects where “one wrong move” is expensive
Safety and Maintenance: Keep the Tool Sharp, Keep Your Fingers Attached
Safety basics
- Clamp the work. If the workpiece moves, the blade finds new and exciting ways to wanderoften toward your knuckles.
- Eye protection. Small blades can snap, and tiny chips can fly. Don’t gamble with eyesight.
- Keep hands out of the line of cut. “I’ll just hold it here” is famous last words.
- Don’t over-tension. Excess tension can lead to blade breakage mid-stroke.
- Use the right blade for the material. Forcing a wood blade through metal is a fast track to frustration.
Maintenance that actually matters
- Replace dull blades. Coping saw blades are consumables. If the saw starts “polishing” instead of cutting, swap the blade.
- Store dry. Rusty clamps and tensioners ruin the tool’s whole mission: maintaining tension.
- Check alignment. If the blade twists in the clamps, clean the seating area and ensure both ends are clamped evenly.
Troubleshooting: Common Problems and Quick Fixes
Problem: The blade keeps snapping
- Likely causes: Over-tensioning, twisting the blade without forward motion, forcing tight turns, or using the wrong blade for the material.
- Fix: Reduce tension slightly, keep strokes moving while steering, add relief cuts, and use a finer blade for tighter curves.
Problem: The cut wanders off the line
- Likely causes: Loose blade tension, pushing too hard, or an unclear line.
- Fix: Increase tension to “firm,” lighten pressure, and re-mark the line darker or use a knife line for precision.
Problem: Tear-out or ragged edge on molding
- Likely causes: Too coarse a blade, incorrect blade direction for the face you care about, or rushing the profile.
- Fix: Move to a finer TPI, adjust direction for cleaner face results, and finish with a small file/sandpaper.
Problem: The saw feels “sticky” or slow
- Likely causes: Dull blade, too fine a blade for thick stock, or binding from not clearing waste.
- Fix: Change blade, pick a more appropriate TPI, and add relief cuts so waste falls away.
FAQ
Can a coping saw cut hardwood?
Yeswithin reason. With a sharp blade and steady technique, it can handle hardwoods for curves and profiles. Expect slower cutting than softwood, and consider a blade that balances control and speed (often mid-range TPI).
Do coping saw blades get sharpened?
Generally, no. Most coping saw blades are meant to be replaced when dull. The good news: blades are inexpensive, and swapping them is faster than trying to resurrect a tiny-tooth blade with a file.
What’s the most “do-it-all” blade choice?
A general-purpose wood blade around the mid-range (often about 15 TPI) is a reliable starting point. Add a finer blade for detailed coping and a coarser blade for faster waste removal and you’ll be covered for most common tasks.
Why cope inside corners instead of mitering them?
Because walls and corners are often out of square, and wood movement can open a mitered inside corner over time. Coping makes the visible profile meet cleanly and can be more forgiving in real-world conditions.
Conclusion: The Small Saw With Big “Finish Carpentry Energy”
The coping saw is proof that you don’t need a motor to do professional-looking workyou need a sharp blade, good tension, and technique that’s more “steady hands” than “wrestling match.” Whether you’re coping inside corners for trim that looks custom, cutting a curve that’s too tight for a jigsaw, or making an interior cutout without turning your project into modern art, the coping saw is a compact problem-solver that earns its keep.
Keep a few blade options on hand, practice on scrap, and remember: the coping saw rewards calm, controlled strokes. Treat it like a precision instrument, and it’ll stop acting like a tiny chaos gremlin.
Shop Stories & “Ask Me How I Know” Moments (Extra ~)
Almost everyone’s first coping saw experience follows the same script: you clamp a board, you start cutting, and within 30 seconds you’re convinced the blade is alive and actively avoiding your pencil line. That’s normal. A coping saw is one of those tools that feels “wobbly” until you learn the trick: it wants to be guided, not shoved. The moment you lighten your pressure and let the teeth do the work, the saw suddenly stops behaving like a shopping cart with a bad wheel.
One common “aha” moment comes when coping baseboard in an older home. You can measure the corner, do the math, and still get a gap because the wall isn’t square, the drywall isn’t flat, and the universe is giggling. Coping is the antidote. You make your miter cut, darken the profile edge, and then you’re basically tracing the shape with the blade. When you test-fit the piece and the face profile closes tighteven though the corner is imperfectit feels like cheating. The good kind of cheating. The “why didn’t I do this sooner” kind.
Another classic experience: the “interior cutout victory lap.” Cutting from an edge is easy; cutting a neat window in the middle of a panel feels like magic the first time. Drill a starter hole, unhook the blade, thread it through, re-tension, and suddenly you’re drawing with a saw from inside the work. The only catch is patiencetight curves invite you to twist the frame hard, and that’s how blades snap. The smoother approach is almost boring: keep the saw moving, steer gradually, and if the curve is tight, make a few relief cuts so the waste breaks free instead of pinching the blade.
There’s also the “blade variety enlightenment.” Many DIYers start with whatever blade came on the saw and assume the tool is the problem. Then they try a finer blade for a detailed trim profile and suddenly the cut looks clean and controllable. Or they switch to a coarser blade for rough waste removal and wonder why they ever tried to muscle a fine-tooth blade through thick stock. Keeping a small assortment of blades (coarse, general-purpose, fine) is like keeping the right screwdriver bits: it’s not fancy, but it saves you from unnecessary suffering.
Finally, the coping saw teaches a quiet skill that transfers to everything: “sneaking up on fit.” Whether you’re coping a molding profile or cutting a curved bracket, the best results usually come from cutting a hair proud of the line and refining. That’s not indecisionit’s craftsmanship. The coping saw is less about brute speed and more about controlled accuracy. Once you embrace that, it becomes one of the most satisfying tools to use because the work feels deliberate, and the results look like you meant them to.





