Table of Contents >> Show >> Hide
- What “Easy” Really Means (and Why It Works)
- 60-Second Diagnosis: What’s the Symptom?
- What You’ll Need (Keep It Simple)
- The Easiest Repair: Clean the Nozzle + Screen and Flush the Head
- If Cleaning Doesn’t Fix It: Swap the Internal Assembly (“Replace the Guts”)
- When You Should Replace the Whole Pop-Up Head
- But WaitShould You Use Plumber’s Tape?
- Fixing a Head That’s Too Low, Tilted, or Buried (The Sneaky “Repair”)
- Adjusting Spray Pattern and Distance (So You Don’t Water the Driveway)
- Common “Pop-Up Head Repair” Mistakes (AKA How Sprinklers Win)
- Prevent the Next Repair (5 Minutes That Saves Hours)
- of Real-World Experience (Stuff You Only Learn After You Get Sprayed)
- Conclusion
Pop-up sprinkler heads have one job: rise up, spray where they’re supposed to, and politely disappear back into the lawn like nothing happened.
And yetevery springat least one of them decides to become a tiny geyser, a sad dribbler, or a permanently shy turtle that won’t pop up at all.
The good news: the easiest way to repair a pop up sprinkler head is usually not a full rebuild, a plumbing epic, or a weekend-long excavation project.
Most fixes come down to one of three quick wins: cleaning a clogged nozzle/screen, swapping the “guts” (internal assembly), or
replacing the head when the body is cracked or mangled. This guide walks you through the fastest, cleanest path to a proper
pop up sprinkler head repairwith the least amount of digging and the fewest chances to get unexpectedly sprayed in the face.
What “Easy” Really Means (and Why It Works)
In irrigation-land, “easy” means you fix the problem at the top before you mess with pipes underground. Why?
Because most sprinkler issues aren’t deep plumbing failuresthey’re debris, worn seals, mower damage,
or a head that settled below grade and now sprays directly into a wall of grass like it’s trying to water the roots of a single dandelion.
Manufacturers and repair guides consistently point to blockages (nozzle or inlet screen) as a common cause of weak spray and poor performance.
And the best part? Clearing a clog is usually faster than making coffee. (Okay, maybe equal. But less likely to require oat milk.)
60-Second Diagnosis: What’s the Symptom?
Run the zone for a minute and watch closely. Then match what you see below.
| What You Notice | Most Likely Cause | Fastest Fix |
|---|---|---|
| Head pops up but barely sprays / short distance | Clogged nozzle or filter screen; debris | Clean nozzle + screen, flush head |
| Head won’t pop up fully (or at all) | Debris around riser; low pressure in zone; internal wear | Clean, flush; check other heads in zone; swap internal assembly if needed |
| Water pooling around the base (“bubbling”) | Cracked head body; broken riser; bad connection | Replace head and/or riser |
| Sprays the sidewalk like it pays rent there | Misalignment; wrong arc/nozzle; head tilted | Adjust direction/arc; level the head |
| Mist/fog instead of droplets | Pressure too high; nozzle mismatch; damaged nozzle | Replace nozzle; consider pressure-regulated body in problem zones |
What You’ll Need (Keep It Simple)
- Small hand trowel (or a sturdy garden scoop)
- Flathead screwdriver (for nozzle/radius adjustments on many spray heads)
- Needle-nose pliers (helpful for grabbing screens and small parts)
- Rag (for cleaning threads and keeping dirt out)
- Replacement nozzle and/or screen (cheap and often the real culprit)
- Optional: replacement internal assembly (“guts”) that matches your head model
- Optional: a new head (same pop-up height and pattern type)
Tip: If your head is from a common series, you can often replace only the internal assembly instead of digging out the whole body.
This can be the fastest “like-new” fix when the head is worn but the body and connection are still fine.
The Easiest Repair: Clean the Nozzle + Screen and Flush the Head
If you only try one thing first, make it this. Clogs are common, easy to confirm, and fast to fix. Many pop-up spray heads have a filter screen
under the nozzle that traps grit. When it’s dirty, your sprinkler turns into a sad fountain.
Step-by-Step: The “No Drama” Cleaning Fix
-
Turn off the zone.
Use your controller to stop watering, or shut off the irrigation supply if you’ll be removing a whole head. -
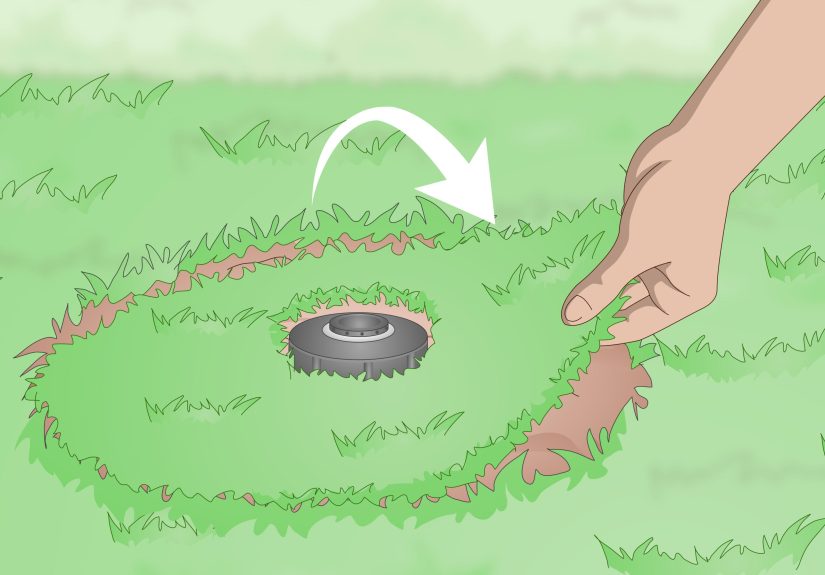
Expose the head (minimal digging).
Dig a small ring around the sprinklerthink “donut,” not “archaeological dig site.”
Clear enough soil to grip the body and keep dirt from falling inside. -
Pull up the stem/riser.
If it’s a spray head, gently pull the pop-up stem up. Hold it with your fingers. If it keeps snapping back down,
wedge it carefully with a screwdriver (gentlythis isn’t a medieval torture device). -
Remove the nozzle.
Unscrew the nozzle at the top of the stem. Under it you’ll often find a small filter screen. -
Clean the nozzle and screen.
Rinse debris away with clean water. If mineral buildup is the issue, soak parts briefly in vinegar and rinse.
Avoid poking the nozzle opening with metalenlarging it can change the spray pattern and flow. -
Flush the head.
With the nozzle off, briefly turn on the zone for a second or two (stand backthis is the sprinkler’s revenge moment).
This helps push grit out of the line and stem. -
Reassemble and test.
Put the screen back, screw the nozzle on, run the zone, and check coverage.
Why this works: Reduced throw and weak spray are frequently caused by blockages in the nozzle or inlet screen.
Cleaning restores flow without replacing the entire sprinkler.
If Cleaning Doesn’t Fix It: Swap the Internal Assembly (“Replace the Guts”)
When a head is old, gritty, or has a tired spring, cleaning might helpbut not enough. This is where the “guts swap” shines:
you keep the body connected to the pipe, but replace the internal moving parts. It’s often faster than fighting
compacted soil to unscrew a stubborn riser.
When a Guts Swap Makes the Most Sense
- The head pops up sluggishly, sticks, or doesn’t retract smoothly.
- It leaks around the stem even after cleaning.
- The nozzle threads are fine, but performance is inconsistent.
- You can match the replacement internal assembly to the existing model.
How to Do a Guts Swap Without Turning Your Lawn into Soup
-
Turn off water to the system/zone.
You don’t want pressure while the head is open. -
Clear soil away from the top.
Keep dirt out of the bodythis is not the time to season your sprinkler like a casserole. -
Unscrew the cap/top.
Many pop-up bodies have a threaded cap you can remove to pull out the internal assembly. -
Lift out the internal assembly.
Pull straight up. If it resists, wiggle gentlyavoid cracking the body. -
Drop in the new assembly.
Match pop-up height and type (spray vs. rotor). Reinstall the cap snugly. -
Test and adjust.
Run the zone and confirm the head pops up fully, rotates/sprays correctly, and retracts cleanly.
When You Should Replace the Whole Pop-Up Head
Sometimes the head is beyond a spa day. If the body is cracked, the threads are stripped, or the sprinkler got
“introduced” to a lawn mower blade, replacement is the easiest path.
Quick Replacement Steps (The Classic Fix)
- Shut off the water.
-
Dig around the head.
Go wide enough to reach the connection and keep dirt from falling into the open pipe. -
Unscrew the old head (counterclockwise).
Hold the riser steady if possible so you don’t twist the underground fitting. -
Inspect the riser.
If it’s cracked or the threads are damaged, replace the riser too. -
Install the new head.
Screw it on hand-tight, align the spray direction, and set the top flush with the soil surface. - Test the zone. Look for leaks and correct coverage.
Important matching tip: Choose a replacement that matches your original pop-up height (e.g., 4-inch, 6-inch)
and the intended spray type/pattern (fixed arc, adjustable arc, rotor radius range). Manufacturer troubleshooting guides emphasize matching
sprinkler characteristics (like radius and pop-up height) when replacing.
But WaitShould You Use Plumber’s Tape?
You’ll see mixed advice, and it’s not because irrigation people enjoy chaos (they do, but that’s unrelated).
Some repair guides recommend wrapping threads with plumber’s tape for a snug seal, while other experts note that tapered pipe threads can seal
fine without tape when parts are in good shape.
- If the connection is clean, undamaged, and seats well, tape may be unnecessary.
- If threads feel loose, are slightly worn, or you’ve had seepage, a couple wraps of thread tape can help.
- If the fitting is cracked or stripped, tape won’t save itreplace the riser or fitting.
Fixing a Head That’s Too Low, Tilted, or Buried (The Sneaky “Repair”)
Sometimes the head works perfectlyexcept it’s now living below grade, blocked by grass, and spraying like it’s trying to water the underside of your lawn.
Settling happens. Landscapes shift. Your yard is a living thing, and sometimes it tries to swallow sprinklers.
The Easy Leveling Method
- Dig around the head until you can see the body and the riser connection.
- Lift the head and check if it’s sitting at an angle.
- Re-seat it so the head stands straight and the top sits flush with soil.
- Backfill gently and tamp lightlyfirm, not “concrete sidewalk.”
Raising a Head (When It’s Sunken)
If the sprinkler is sunk by about half an inch or more, you may need a longer riser or a cut-off riser solution.
The goal is simple: the top of the head should be close to ground level so it can clear grass and spray properly.
Adjusting Spray Pattern and Distance (So You Don’t Water the Driveway)
After a sprinkler head replacement or nozzle swap, you’ll often need to fine-tune coverage. Most spray nozzles allow:
radius (distance) adjustment via a top screw, and arc adjustment if the nozzle is adjustable.
Radius Adjustment (Distance)
Many spray nozzles use a center screw: turning it clockwise typically reduces the radius from the fully open factory setting.
Small adjustments can make a big differenceespecially if your sprinkler is one inch away from turning your sidewalk into a slip-n-slide.
Arc Adjustment (Where It Sprays)
Adjustable nozzles often allow you to increase or decrease arc by twisting the nozzle’s collar/top.
Set the “edge” of the spray first (so you don’t overshoot), then open or close the arc until coverage fits the space.
Common “Pop-Up Head Repair” Mistakes (AKA How Sprinklers Win)
- Digging too aggressively: You can crack fittings or kink flex pipe if you go full shovel-mode.
- Letting dirt fall into the open pipe: That dirt will become next week’s clog.
- Mixing nozzle types: A mismatched nozzle can throw off pressure and coverage across the whole zone.
- Not flushing after cleaning: Grit left behind loves a comeback tour.
- Over-tightening plastic threads: “Hand tight + a tiny nudge” beats “gorilla tight.”
Prevent the Next Repair (5 Minutes That Saves Hours)
A little maintenance goes a long way. Water efficiency programs recommend inspecting irrigation systems regularly for clogged, broken,
or misdirected heads and fixing leaks promptly. In real life, that means: once a month in watering season, run each zone and watch.
- Look for clogged spray streams, odd arcs, and heads that don’t retract.
- Fix misalignment so water hits plantsnot pavement.
- Replace worn nozzles when patterns look ragged or uneven.
- If mineral buildup is common, occasional vinegar soaks on removable parts can help.
of Real-World Experience (Stuff You Only Learn After You Get Sprayed)
After you’ve repaired a few pop-up sprinkler heads, you start to notice patternsmostly in the form of “Why is it always this one?”
and “How did sand get into a closed system?” The first lesson is that sprinkler heads don’t fail randomly; they fail in character.
The head closest to the driveway gets clipped by the mower. The head at the low spot in the yard collects grit like it’s hoarding it for winter.
The head near the flower bed gets buried under mulch and then acts surprised when it can’t pop up. (Same, honestly.)
The second lesson: the fastest repairs are the ones where you keep everything clean. It’s tempting to dig, yank, twist, and declare victory,
but irrigation is basically plumbing’s more delicate cousin. If you take an extra 30 seconds to brush dirt away from the cap before opening it,
you’ll avoid dropping soil into the bodysoil that will immediately clog your freshly cleaned nozzle and make you question your life choices.
A rag in one hand and patience in the other is a powerful combo.
Another experience-based truth: flushing is the unsung hero. You can scrub a nozzle until it sparkles, but if grit is still sitting in the line,
the clog will return like a bad sequel. A quick one- or two-second flush (with you standing safely to the side) often clears the leftover junk
and restores strong spray. Yes, you might get misted. Consider it irrigation baptism.
You’ll also discover that “replacement” doesn’t always mean “the same thing, but new.” The best replacements match the pop-up height and pattern,
but you might upgrade a nozzle style if your yard needs itespecially if you’re trying to reduce overspray or improve uniform coverage.
Just don’t turn one head into a firehose while the rest of the zone stays normal; watering zones like consistency. Think of it as a synchronized
swimming team: one athlete doing freestyle chaos ruins the whole routine.
Finally, you learn to keep a tiny sprinkler kit on hand. One spare nozzle, one spare screen, and one spare head that matches your most common model
can turn a frustrating “I’ll fix it next weekend” problem into a 10-minute win. The moment you’re prepared is the moment sprinklers stop being
dramaticat least until the next mower encounter. But hey, that’s yard life: it’s peaceful, it’s green, and occasionally it tries to water your shoes.
Conclusion
The easiest way to repair a pop up sprinkler head is to start with the simplest, most common failure: a clogged nozzle or filter screen.
Clean, flush, and test. If performance is still off, a quick internal assembly swap can bring a tired head back to life without major digging.
And when the body is cracked or the connection is damaged, replacing the head (and riser if needed) is usually the fastest path to a leak-free,
properly aimed system. Keep repairs clean, match parts carefully, adjust arc/radius thoughtfully, and you’ll spend more time enjoying your lawn
than arguing with it.





