Table of Contents >> Show >> Hide
- Why a Cheap Plastic Pumpkin Is Actually a Great DIY Starting Point
- The Best Makeover: Turn It Into a Faux Heirloom Pumpkin
- What You’ll Need
- How to Give Your Plastic Pumpkin a High-End Makeover
- Other Great Plastic Pumpkin Makeover Ideas
- Mistakes That Keep a Plastic Pumpkin Looking Cheap
- How to Use Your Finished Pumpkin in Fall Decor
- Is the Makeover Really Worth It?
- The Real Secret to Making Cheap Decor Look Expensive
- Experience: What It Feels Like to Rescue a Bargain Pumpkin and Accidentally Become a Fall Person
- Final Thoughts
Let’s be honest: the classic cheap plastic pumpkin has been through a lot. It has held fun-size candy, survived rainy porches, been stuffed into holiday bins, and somehow still shows up every fall with the confidence of a designer centerpiece. That bright orange bucket with the goofy grin is not exactly subtle. It screams “trick-or-treat, circa forever.” But with the right makeover, it can become the kind of fall decor piece that looks like it came from a boutique where everything is styled next to a linen napkin and a candle that smells like “woodsmoke library.”
If you have ever wondered whether a bargain-bin pumpkin can become chic, cozy, and surprisingly expensive-looking, the answer is yes. The best makeover for a $1 plastic pumpkin is a faux heirloom finish: think matte texture, earthy color, a better-looking stem, and just enough dimension to fool the eye. It is easy, affordable, and forgiving. In other words, it is the craft equivalent of good lighting and a flattering haircut.
This plastic pumpkin makeover works because it solves the two biggest problems with cheap seasonal decor: shininess and obviousness. When you remove the toy-like gloss and add layered color, the pumpkin stops looking like a candy bucket and starts looking like intentional fall decor. Better yet, because it is plastic, it will not rot, collapse, attract fruit flies, or turn into a mysterious porch science project by mid-October.
Why a Cheap Plastic Pumpkin Is Actually a Great DIY Starting Point
A plastic pumpkin may not look glamorous at first, but it has a lot going for it. It is lightweight, durable, reusable, and easy to paint. Unlike real pumpkins, it does not care if you forgot about it for three weeks. Unlike ceramic pumpkins, it does not threaten your toes if you drop it. And unlike trendy decor that costs way too much for something you only display for two months, a plastic pumpkin makeover gives you a lot of style for very little money.
That is why faux pumpkin DIY projects keep showing up year after year in fall decor ideas. Crafters and home editors love them because they are blank canvases with curves. You can paint them, decoupage them, gild them, distress them, turn them into centerpieces, or style them with real pumpkins for a layered porch display. The trick is choosing a makeover that looks elevated rather than overworked.
The Best Makeover: Turn It Into a Faux Heirloom Pumpkin
If you want one plastic pumpkin makeover that gives the biggest visual upgrade for the least effort, go with a faux heirloom or faux terra-cotta look. This finish is warm, matte, slightly imperfect, and flexible enough to fit modern, farmhouse, cottage, vintage, or traditional fall decor. It looks expensive because it imitates natural materials: clay, aged plaster, weathered stone, or those muted heirloom pumpkins everyone suddenly becomes emotionally attached to every October.
Why This Makeover Wins
First, it hides the original molded plastic surface beautifully. Second, it is much easier than detailed painting. Third, it lasts from early fall through Thanksgiving without looking too Halloween-specific. A jack-o’-lantern face says, “I have candy.” A textured heirloom pumpkin says, “I own at least one throw blanket in oatmeal.”
The faux heirloom treatment also works on nearly any shape or size. Whether your pumpkin is a little candy pail, a stackable decor piece, or a slightly ridiculous oversized porch version, layered matte color makes it feel intentional. That is the real secret: not perfection, but intention.
What You’ll Need
You do not need a giant craft haul or a suspiciously expensive shopping cart. Most of the supplies are basic:
Start with your plastic pumpkin, mild soap and water, a soft cloth, and optional fine-grit sandpaper for glossy surfaces. For paint, use a spray paint that bonds to plastic or a plastic-friendly primer followed by paint. Matte finishes usually look best for this project. You may also want acrylic craft paint in clay, rust, cream, taupe, brown, sage, or black for layering. Add a dry brush, painter’s tape if needed, and an optional sealer if the pumpkin will live outdoors. To finish the piece, consider twine, floral wire, a metallic wax or paint for the stem, faux leaves, ribbon, dried florals, or battery-operated fairy lights.
How to Give Your Plastic Pumpkin a High-End Makeover
1. Clean It Like It Has a Reputation to Protect
Before you paint anything, wash the pumpkin thoroughly. Dust, stickers, grease, and mystery residue are not your friends. Let it dry completely. If the plastic is very glossy or slick, lightly scuff the surface with fine sandpaper. You are not trying to destroy it. You are just giving the paint a better chance to stick around instead of peeling off the minute your pumpkin experiences weather, sunlight, or an emotional setback.
2. Prime It or Use Paint Made for Plastic
This is where many DIYs go from “pretty good” to “why is it shedding.” If your spray paint is specifically designed for plastic, great. If not, use a primer that helps paint adhere to plastic surfaces. This step matters, especially on smooth or shiny pumpkins. Skip it only if your product label clearly says you can.
For the most expensive-looking result, choose a muted base color. Traditional bright orange is fun, but it usually keeps the project looking crafty. Better options include terracotta, dusty ivory, olive, charcoal, soft black, mushroom, muted green, warm cream, and weathered pumpkin tones. Fancy names help, but really you are aiming for “fall but calmer.”
3. Apply Thin, Even Coats
Do not try to blast the entire transformation into existence with one heavy coat. Light coats are your best friend. Thick paint drips, pools, and highlights every plastic ridge in the worst possible way. Thin coats create a more natural finish and let you build depth. Patience is annoying, yes, but dried drips are much more annoying.
4. Add Depth With Layered Color
Here is where the makeover gets good. Once the base coat is dry, use a dry brush to add subtle dimension. Brush a slightly darker tone into the grooves and around the bottom. Then hit the raised areas with a lighter shade. This creates the visual variation real pumpkins naturally have and cheap plastic never does.
For a faux terra-cotta effect, use warm orange-brown as the base and dry-brush on dusty brown and soft beige. For a chalky heirloom look, start with cream or pale gray and add taupe in the grooves. For a moody designer finish, use matte black and softly rub metallic bronze or antique gold on the stem. Suddenly, your former candy bucket has opinions about table styling.
5. Fix the Stem, Because the Stem Is Telling on You
If there is one part of a cheap pumpkin that gives away the game, it is the stem. Many plastic pumpkins have stems that are too shiny, too bright, too flat, or too obviously molded. Paint it darker for instant realism. Brown, olive, bronze, blackened gold, or weathered wood tones all work beautifully. Wrap it with twine for a rustic look, add a small velvet ribbon for softness, or tuck in faux moss for texture. It is a small detail with a weirdly dramatic payoff.
6. Style It Like Decor, Not a Costume Prop
Once the paint is dry, treat the pumpkin like part of a curated vignette. Place it on a stack of books, nestle it into a tray with candles, pair it with dried eucalyptus, or use it as part of a centerpiece with mini gourds and brass accents. One upgraded pumpkin looks nice. Three in different heights and muted tones look intentional. That is the difference between “I decorated” and “I have a point of view.”
Other Great Plastic Pumpkin Makeover Ideas
If faux heirloom style is the winner, these are the runners-up. They are fun, beautiful, and very workable if your space leans a little more playful, modern, or crafty.
Modern Matte Black and Gold
This is the easiest path to a sleek Halloween look that does not feel cheesy. Paint the whole pumpkin matte black, then highlight the stem with gold or brass. It looks sharp on a mantel, entry table, or front porch, especially with lanterns and neutral decor. It is dramatic without needing fake cobwebs to explain itself.
Cottage-Style Floral Decoupage
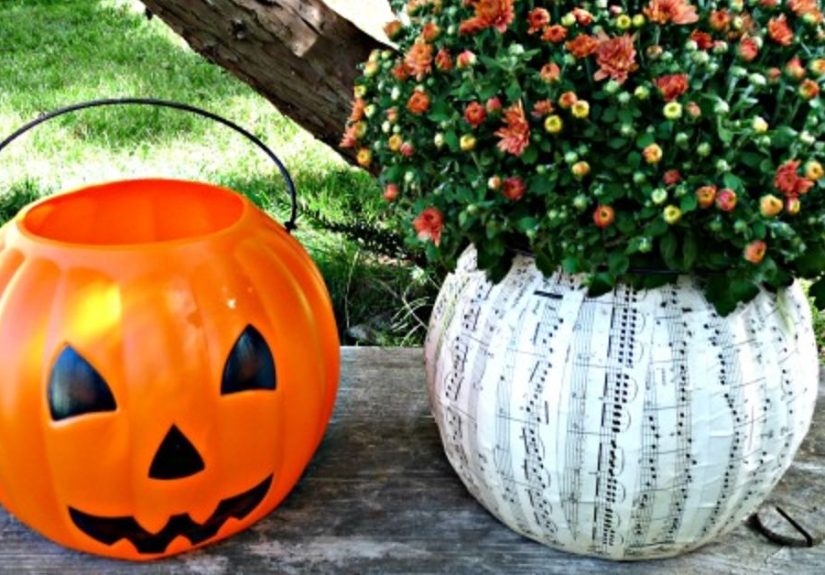
If you love softer fall decor, cover sections of the pumpkin with floral napkin or paper motifs using decoupage medium. The result feels vintage, handmade, and charming rather than spooky. This style works especially well on white, cream, or blush-painted pumpkins and looks lovely indoors on bookshelves or coffee tables.
Pour-Paint Drama
For a more artistic effect, try layered pour paint. Let a few complementary shades drip naturally over the pumpkin for a marbled, abstract finish. This works best when the color palette is restrained. Pick moody earth tones, tonal neutrals, or soft jewel shades rather than turning the pumpkin into a melted crayon situation.
Vintage Paper-Mache Look
Want it to feel like something found in a charming antique store? Build a paper-mache-style surface or use textured medium over the pumpkin, then paint it in faded harvest tones. This gives the piece a nostalgic, handmade quality and is especially good for indoor fall styling.
Mistakes That Keep a Plastic Pumpkin Looking Cheap
The number one mistake is leaving too much shine. Glossy paint on glossy plastic usually looks exactly like what it is. Matte or chalky finishes are more forgiving and more realistic. Another common issue is using only one flat color. Real pumpkins have highs, lows, shadows, and subtle tonal variation. Your makeover should too.
Heavy coats are another problem. They fill in details, drip into the grooves, and create a weird shell-like finish. Ignoring the stem is also a missed opportunity. So is over-accessorizing. A little ribbon, a little leaf, a little metallic highlight? Lovely. Ten bows, six glitter spiders, and one confused fake crow? Your pumpkin deserves boundaries.
How to Use Your Finished Pumpkin in Fall Decor
The beauty of a plastic pumpkin makeover is that the finished piece is much more versatile than the original. Use it on your front porch mixed with real and faux pumpkins for a fuller display. Set it on a dining table with taper candles and branches. Tuck one onto a bookshelf beside framed art and a small vase. Place a cluster on the mantel in a mix of heights and tones for an easy seasonal refresh.
You can also turn larger plastic pumpkins into faux planters or containers by placing a vase, jar, or liner inside rather than filling the pumpkin directly. Add dried stems, mums, faux foliage, or even string lights for a cozy glow. When the shape is good and the finish is elevated, the decorating options multiply fast.
Is the Makeover Really Worth It?
Absolutely. This is one of those rare low-cost DIYs that can genuinely look better than many store-bought seasonal pieces. A single can of spray paint or small bottle of acrylic goes a long way, especially if you are doing more than one pumpkin. The result is reusable year after year, customizable to your home, and far more interesting than the mass-produced version you started with.
It is also a smart project for people who want fall decor without the mess and short lifespan of real pumpkins. No rot. No smell. No squirrels making terrible decisions on your porch. Just an easy, durable decor upgrade that earns its keep.
The Real Secret to Making Cheap Decor Look Expensive
The secret is not spending more. It is editing better. Use fewer colors. Choose more texture. Repeat tones that already exist in your home. Add contrast where it matters, especially in the grooves and stem. And above all, aim for a finish that feels collected rather than overly themed.
That is why the best makeover for a $1 plastic pumpkin is not the loudest one. It is the one that makes people do a tiny double take. The one that makes someone say, “Wait, that used to be a plastic pumpkin?” That is the dream. Not because we need validation from decor, but because it is deeply satisfying to turn something cheap and cheerful into something beautiful and slightly smug.
Experience: What It Feels Like to Rescue a Bargain Pumpkin and Accidentally Become a Fall Person
There is a very specific kind of joy that comes from making over a plastic pumpkin. It starts with low expectations. You pick up the pumpkin because it costs almost nothing and because, frankly, it looks like it has potential if you squint. At first, the whole thing feels like a tiny experiment. You wash it, set it on an old towel, shake the spray paint, and hope for the best. Then the transformation starts, and suddenly you are emotionally invested in a piece of molded plastic.
The first big surprise is how fast the pumpkin changes character. One coat of matte paint and the candy bucket energy disappears. Add a second tone into the grooves, darken the stem, and now it looks less like a last-minute Halloween purchase and more like decor with a backstory. You start holding it at different angles in the light like a jeweler inspecting a gemstone, except the gemstone used to carry peanut butter cups.
The second surprise is how contagious the project becomes. One pumpkin never stays one pumpkin. Once you realize how easy it is to make a cheap piece look custom, you begin scouting the house for anything vaguely pumpkin-shaped that might also deserve a glow-up. A mini gourd. A thrifted tray. An old candle holder. Suddenly your weekend craft has turned into a seasonal rebrand.
There is also something satisfying about how forgiving the project is. A little too much brown in one groove? Dry-brush over it. Stem too dark? Add a bit of gold. Surface looking flat? Layer in cream. Unlike fussy DIYs that punish every mistake, a plastic pumpkin makeover often looks better with a few imperfections. That is part of the charm. A slightly uneven finish can read as handmade, aged, and textured rather than flawed.
And then there is the styling moment. You put the finished pumpkin on a console table or porch step, add a candle or some dried stems nearby, and the whole area instantly looks more intentional. It is a small project, but it changes the mood of a space. It feels cozy without being cluttered, festive without being loud, and seasonal without yelling “October!” from across the room.
Maybe the best part is that the makeover gives you permission to rethink cheap decor entirely. Instead of seeing bargain finds as temporary or tacky, you start seeing them as raw material. A $1 plastic pumpkin becomes proof that good style is not always about buying the right thing the first time. Sometimes it is about seeing what something could be, adding a little patience and paint, and letting texture do the heavy lifting.
So yes, the experience is partly about crafting. But it is also about perspective. You take something obvious and make it personal. You take something mass-produced and make it feel curated. And somewhere between the primer and the dry brushing, you realize the pumpkin is not the only thing getting a makeover. Your whole attitude toward fall decorating gets one too.
Final Thoughts
The best makeover for a $1 plastic pumpkin is the one that transforms it from novelty into decor, and the faux heirloom finish does that beautifully. It is easy enough for beginners, stylish enough for design lovers, and budget-friendly enough to make multiple pumpkins at once. Clean it well, use paint that works with plastic, build color in thin layers, and do not neglect the stem. That humble little pumpkin can absolutely become one of the prettiest pieces in your fall setup.
In other words, do not underestimate the power of a cheap pumpkin and a decent paint plan. Fall decorating has been built on less.





