Table of Contents >> Show >> Hide
- What Does It Mean to See Satellites With Radio?
- How a Simple Satellite Radio Telescope Works
- What Satellites Can Beginners Receive?
- Beginner Equipment List
- Step-by-Step: Your First Satellite Detection
- How to Know You Really Detected a Satellite
- Legal and Safety Notes
- Why This Hobby Is More Than a Gadget Trick
- Best Beginner Targets and Project Ideas
- Experiences From the Backyard: What It Feels Like to Hear a Satellite
- Conclusion
- SEO Tags
Yes, you can hear space from your backyard. You do not need a billionaire’s launchpad, a mountaintop observatory, or a dish antenna large enough to scare the neighbors. With a simple radio telescope setup, a modest antenna, and free software, you can detect satellites as they pass overhead, watch their signals bend with Doppler shift, and turn invisible spacecraft into real, measurable data.
For many beginners, the first surprise is that “seeing” satellites does not always mean looking through glass. Radio astronomy and satellite monitoring use antennas instead of eyeballs. A satellite may be hidden by clouds, daylight, city lights, or your neighbor’s enthusiastic porch lamp collection, but its radio signal can still slide quietly through the sky. Your job is to catch it.
What Does It Mean to See Satellites With Radio?
When people hear the phrase radio telescope, they often imagine a giant white dish listening to distant galaxies. That is one version. But at the beginner level, a radio telescope is simply a receiving system designed to collect radio waves, send them to a receiver, and display the signal as sound, a waterfall graph, telemetry, or decoded data.
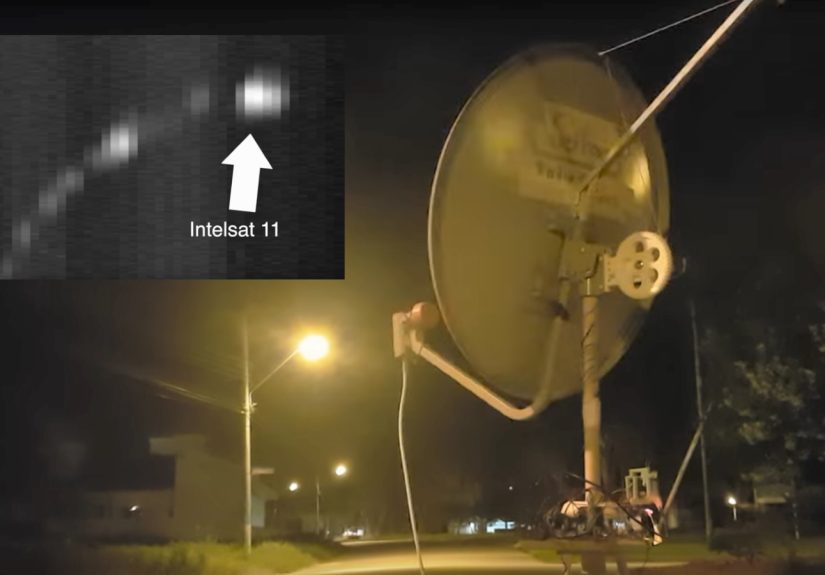
Radio waves are part of the electromagnetic spectrum, just like visible light, infrared, and X-rays. Satellites use radio waves to transmit telemetry, voice, images, beacons, and data. A simple radio telescope for satellite watching is not usually trying to photograph a satellite. Instead, it detects the radio energy coming from the spacecraft or reflected by it. Think of it as “seeing with ears,” except the ears are made of metal and the sound is processed by software. Very stylish, in a nerdy garage-lab way.
The main keyword here is simple radio telescope, but the practical setup often overlaps with software-defined radio, satellite tracking, amateur radio satellites, and radio astronomy for beginners. The same basic skills can lead you into weather satellite reception, ISS slow-scan television events, CubeSat telemetry, and more advanced radio astronomy projects.
How a Simple Satellite Radio Telescope Works
A satellite radio receiving station has four basic jobs: collect the signal, amplify or filter it when needed, tune the correct frequency, and record or decode what arrives. The antenna is the “eye.” The receiver is the “brain stem.” The computer is the “overexcited intern” that turns raw radio energy into something humans can understand.
1. The Antenna Collects the Signal
For low-Earth orbit satellites, VHF and UHF antennas are common. A basic V-dipole, turnstile, quadrifilar helix, or small Yagi antenna can work depending on the target frequency and satellite type. Omnidirectional antennas are easier for beginners because they do not require precise aiming. Directional antennas, such as Yagis, can produce stronger signals but require you to point them at the satellite as it moves.
2. The Receiver Tunes the Frequency
Many hobbyists use an affordable SDR dongle, such as an RTL-SDR class receiver, because it plugs into a computer and allows wide-range tuning through software. This turns your laptop into a flexible radio receiver. You can watch a live spectrum display, see signal strength, adjust bandwidth, and record the pass.
3. Software Shows the Satellite Pass
Satellite tracking software uses orbital data to predict when a satellite will rise above your horizon, reach its highest point, and disappear again. Tools that use two-line element data, often called TLE data, help show where satellites are in the sky. This matters because many low-Earth orbit satellites are only receivable for several minutes at a time. Miss the pass, and the satellite is gone. Space is punctual. Humans are the weak link.
4. Doppler Shift Confirms Motion
One of the most satisfying signs that you are listening to a real satellite is Doppler shift. As the satellite approaches, the received signal appears slightly higher in frequency. As it passes and moves away, the signal drifts lower. On a waterfall display, this can look like a slanted line. That curve is not a software glitch; it is orbital motion waving at you.
What Satellites Can Beginners Receive?
The best target depends on what is currently active, what frequencies your equipment covers, and what is legal and appropriate to receive in your area. Satellite activity changes, so always check current satellite status databases, official mission pages, and amateur satellite communities before setting up a pass.
Amateur Radio Satellites and CubeSats
Amateur radio satellites are excellent beginner targets because many are designed for education, experimentation, and public participation. Some transmit beacons, telemetry, or voice repeater activity in VHF and UHF bands. CubeSats from universities and small research teams may also transmit identifiable signals. You may not decode every bit of data on day one, but simply detecting the signal at the predicted time is already a victory.
The International Space Station
The International Space Station is a favorite because it is large, fast, famous, and occasionally very chatty. During scheduled amateur radio events, the ISS may transmit voice or slow-scan television images. The common downlink for many ISS amateur radio events is around 145.800 MHz FM, though schedules and modes change. The ISS moves quickly across the sky, so passes are short, dramatic, and perfect for beginners who enjoy a little adrenaline with their antennas.
Weather Satellites: Important Update
For years, beginners loved receiving analog weather images from NOAA POES satellites using APT signals around 137 MHz. Many older tutorials still describe this method, and the history is worth learning. However, NOAA’s legacy POES constellation was decommissioned in 2025, including NOAA-15 and NOAA-19, with NOAA-18 also ending service earlier that year. That means a modern article should not promise that those classic APT satellites are still available. If you want weather imagery today, verify current active satellites, transmission modes, and required equipment before buying hardware.
SatNOGS and Public Satellite Monitoring
SatNOGS is a useful ecosystem for learning because it connects satellite observers, open-source ground station tools, and a database of satellite transmitters. Even if you build a very simple station, studying public observations can teach you what real satellite signals look like, which satellites are active, and how frequency, elevation, and antenna choice affect reception.
Beginner Equipment List
You can start small. The goal is not to build a deep-space network in your living room. The goal is to detect real satellite passes reliably, learn what signals look like, and improve one component at a time.
Basic Starter Setup
- SDR receiver: A USB software-defined radio receiver that covers VHF and UHF bands.
- Antenna: A V-dipole, discone, turnstile, small Yagi, or other antenna suited to your target frequency.
- Computer: A laptop or desktop capable of running SDR and tracking software.
- Coax cable: Keep it reasonably short and low-loss, especially at higher frequencies.
- Optional LNA: A low-noise amplifier can help weak signals, but it can also overload your receiver if strong local signals are present.
- Optional filter: Band-pass filters reduce interference from broadcast FM, pagers, and other strong local transmitters.
Recommended Software Categories
You will usually need two kinds of software: SDR software and satellite tracking software. SDR software lets you tune and visualize signals. Tracking software predicts passes and helps you aim your antenna. Some advanced workflows also use decoders for specific satellites or modes. Start with listening and waterfall viewing before diving into decoding. It is easier to troubleshoot one mystery at a time.
Step-by-Step: Your First Satellite Detection
Step 1: Choose a Target
Pick an active satellite with a known downlink frequency and a pass that reaches at least 30 degrees above your horizon. Higher passes are usually easier because the satellite is closer and the signal has less atmosphere, terrain, and urban clutter to fight through.
Step 2: Check the Frequency and Mode
Do not guess the frequency from a random old forum post. Satellite transmitters change, missions fail, and spacecraft get decommissioned. Use current satellite databases, official mission pages, and reputable amateur radio resources. Note the frequency, mode, bandwidth, and whether Doppler correction is needed.
Step 3: Place the Antenna Wisely
Get the antenna away from computers, power supplies, LED lights, routers, and large metal objects. If possible, place it outdoors with a clear sky view. A balcony, backyard, or rooftop can work. If you are indoors, a window facing the pass direction may help, but buildings can block or reflect signals.
Step 4: Open the SDR Waterfall
Before the pass begins, tune near the published frequency and watch the waterfall. Set the gain manually if possible. Too little gain hides weak signals; too much gain turns the display into a colorful soup of nonsense. The correct setting is usually the boring middle ground, because radio loves humility.
Step 5: Track the Pass
When the satellite rises above the horizon, watch for a signal appearing near the expected frequency. If using a handheld directional antenna, slowly sweep the sky along the predicted path. Do not move too frantically. The satellite is fast, but your antenna should not look like it is fighting a bee.
Step 6: Record Everything
Record the IQ data or audio if your software allows it. A recording lets you replay the pass, adjust decoding settings later, and compare results. Many beginners fail to record their first good pass and then spend the next hour describing it like a fishing story: “It was huge, I swear.”
How to Know You Really Detected a Satellite
A real satellite signal usually appears at the predicted time, on or near the expected frequency, and changes strength as the pass rises and falls. It may show Doppler drift. If the signal appears when no satellite is overhead and never moves, it may be local interference. If it appears exactly when the tracking software predicted and curves across the waterfall, congratulations: you have caught a spacecraft in the act of existing.
Common Signs of Success
- A signal appears within a minute or two of the predicted acquisition time.
- The signal grows stronger near maximum elevation.
- The frequency shifts gradually during the pass.
- The signal fades near the predicted loss-of-signal time.
- The pattern repeats on future passes of the same satellite.
Common Beginner Problems
Strong local interference can hide weak satellite signals. Try a different location, use a filter, or reduce gain. Wrong polarization can weaken reception, especially for satellites that tumble or use circular polarization. Outdated frequency lists cause endless frustration. Bad coax quietly ruins everything while looking innocent. And low passes are simply harder; wait for a higher pass before blaming your entire setup.
Legal and Safety Notes
Receiving publicly transmitted satellite signals for education and hobby monitoring is common, but transmitting is a different matter. In the United States, amateur radio transmitting requires proper licensing and compliance with FCC Part 97 rules. Receiving does not give you permission to transmit, interfere, rebroadcast private communications, bypass encryption, or treat the spectrum like a personal playground. Be curious, but be polite. The sky is shared.
Also, do not climb unsafe roofs, mount antennas near power lines, or create trip hazards with coax cables. A successful satellite pass is not worth becoming a cautionary tale with a very technical obituary.
Why This Hobby Is More Than a Gadget Trick
Seeing satellites with a simple radio telescope teaches practical science. You learn electromagnetic waves, orbital prediction, signal processing, antennas, noise, Doppler shift, and data analysis. Instead of reading about satellites as abstract objects, you measure them. You see how a low-Earth orbit pass lasts only minutes. You learn why elevation matters. You learn that space is not silent; it is just speaking in frequencies most people never tune.
This is also a perfect STEM project for students, families, makerspaces, and amateur radio clubs. The learning curve is friendly at the beginning and wonderfully endless later. First you hear a beacon. Then you decode telemetry. Then you build a better antenna. Then you automate passes. Then one day you are explaining orbital elements at dinner while everyone else quietly regrets asking how your weekend went.
Best Beginner Targets and Project Ideas
Project 1: Detect an ISS Pass
Start by tracking the ISS and listening during a high pass. Even when no special event is active, tracking the station teaches timing, aiming, and pass prediction. During scheduled amateur radio events, reception can become much more exciting.
Project 2: Log CubeSat Beacons
Choose an active CubeSat with a published beacon frequency. Record the pass and note the time, signal strength, maximum elevation, and observed Doppler shift. Repeat the process over several days to build a simple observation log.
Project 3: Compare Antennas
Use the same satellite pass type to compare a V-dipole, discone, and small Yagi. Track which antenna gives the strongest signal and which is easiest to use. The best antenna is not always the fanciest one; sometimes it is the one you can set up correctly before the satellite leaves.
Project 4: Build a Public Observation Habit
Study open satellite monitoring networks and compare your results with other ground stations. You may notice that stations with better horizon views receive longer passes, while stations with cleaner radio environments capture weaker signals. This kind of comparison turns a hobby into real observational thinking.
Experiences From the Backyard: What It Feels Like to Hear a Satellite
The first time you try to see satellites with a simple radio telescope, the experience may feel suspiciously unimpressive at the start. You place the antenna outside, open your SDR software, and stare at a waterfall display that looks like digital rain. There are lines, blocks, fuzzy noise, and mysterious spikes. Some are local electronics. Some are broadcast signals. Some are probably your laptop judging you. Then the predicted pass time approaches, and suddenly the project becomes strangely thrilling.
At first, nothing happens. You check the tracking software. You check the frequency. You wonder whether the coax cable is connected. You wonder whether clouds affect radio signals more than everyone said. You wonder whether the satellite saw your antenna and decided to be shy. Then a faint line appears near the expected frequency. It is not dramatic. It does not arrive with orchestral music. But it is there, sliding slowly across the display like a tiny scratch in the universe.
That moment changes the project. The satellite is no longer a dot on a tracking map. It is a real object moving overhead at orbital speed, transmitting energy that your homemade station is receiving. You can watch the signal strengthen as the satellite climbs. If you are using a directional antenna, you may find yourself turning in the yard with careful, ridiculous seriousness. Anyone watching from a window might assume you are trying to communicate with a garden gnome. Let them wonder. Science has always needed a little theater.
The best passes are the ones where everything lines up: a high elevation, low local noise, correct frequency, and a clean waterfall trace. You may hear a tone, bursts of data, or FM audio depending on the satellite. If there is Doppler shift, you can follow the signal as it drifts. That drift is deeply satisfying because it proves motion. The satellite approaches, passes, and recedes. The radio display becomes a live graph of geometry.
Not every attempt works. Some passes vanish behind buildings. Some signals are too weak. Sometimes the software crashes right as the satellite rises, because computers enjoy comic timing. Sometimes the antenna connector is loose, and you spend twenty minutes blaming the ionosphere. These failures are part of the hobby. Each one teaches something specific: better cable management, better pass selection, better filtering, better notes.
Over time, you develop habits. You check current satellite status before each session. You update orbital data. You write down the pass time, maximum elevation, frequency, antenna, gain settings, and result. You learn your local radio environment. You discover which side of the house has the cleanest horizon. You start recognizing interference by shape. You begin to understand that radio observing is not magic; it is careful listening plus patient troubleshooting.
The most rewarding part is that the equipment remains humble. A simple radio telescope does not need to look impressive to do meaningful work. A small antenna and inexpensive receiver can reveal satellites, teach orbital mechanics, and create a direct connection to space technology. It is one thing to read that satellites pass overhead every day. It is another thing to catch one in real time and say, with complete honesty, “I heard that.”
Conclusion
Learning how to see satellites with a simple radio telescope is one of the most approachable ways to bring space science home. You can begin with modest equipment, free software, and a willingness to experiment. Along the way, you will learn how radio waves travel, how satellites move, how Doppler shift reveals speed, and how careful observation turns faint signals into meaningful evidence.
The smartest beginner strategy is to start with active, well-documented satellites, verify current frequencies, record your passes, and improve slowly. Do not chase every mode on day one. Build confidence by detecting signals first, then move into decoding, antenna upgrades, and automated tracking. The sky is full of signals, but patience is the real receiver.




