Table of Contents >> Show >> Hide
- First: What’s Actually Stripped?
- A Quick Decision Tree (So You Don’t Overthink It)
- Part 1: Removing a Screw with a Stripped Head
- 1) The “Stop Spinning and Get Serious” Reset
- 2) Size Up (or Change Types)
- 3) Add Friction: Rubber Band, Duct Tape, or Steel Wool
- 4) Tap the Driver In (The Gentle Hammer Persuasion)
- 5) Locking Pliers (When the Head Sticks Up)
- 6) Cut a New Slot (Rotary Tool or Hacksaw Trick)
- 7) Screw Extractor Kit (The Purpose-Built Solution)
- 8) Left-Handed Drill Bit (The “It Might Back Out by Itself” Move)
- 9) Drill the Head Off (Last Resort, Very Effective)
- Part 2: Repairing Stripped Screw Holes in Wood
- Part 3: Repairing Stripped Threads in Metal
- Part 4: Stripped Screws in Drywall (A Different Animal)
- Part 5: Prevention (Because You Deserve Fewer Future Headaches)
- Common Mistakes That Make Stripped Screws Worse
- When to Call a Pro
- Real-World “Stripped Screw” Experiences (About )
- 1) The Cabinet Hinge That Won’t Stay Put
- 2) The Door Jamb Hinge Screw That Keeps Stripping
- 3) The Tiny Electronics Screw with a Mangled Head
- 4) The Bathroom Fixture Screw That’s Half-Rusted, Half-Stripped
- 5) The Aluminum Threads That Give Up (But the Part Matters)
- 6) The Stainless Deck Screw That Strips at the Worst Possible Moment
A stripped screw is the DIY equivalent of dropping a single sock behind the dryer: small problem, huge emotional impact.
One second you’re tightening a hinge, swapping a cabinet pull, or opening a laptop… the next, your bit is spinning like it’s
auditioning for a fidget-spinner commercial.
The good news: “stripped” doesn’t mean “doomed.” In most cases, you can remove the damaged screw, repair the hole or threads,
and reinstall hardware so it holds like it’s supposed to. This guide covers practical, real-world repairs for stripped screws
from quick kitchen-drawer fixes to heavier-duty thread repairswithout turning your project into a full weekend saga.
First: What’s Actually Stripped?
People say “stripped screw” for two different problems, and the fix depends on which one you’ve got:
- Stripped screw head: The drive (Phillips, flat, Torx, hex/Allen) is chewed up, so your tool can’t grip to remove it.
- Stripped screw hole/threads: The screw turns but won’t tighten because the material (wood, drywall, metal threads) is worn out.
Sometimes you win the “combo platter” and both are stripped. Don’t worrywe’ll handle it in the order that keeps your work intact.
A Quick Decision Tree (So You Don’t Overthink It)
- Head stripped and screw needs to come out? Start with grip tricks (better bit, rubber band), then move to extractor/drilling.
- Screw spins but won’t tighten in wood? Fill and re-bite (toothpicks/dowel/plug), then pre-drill and reinstall.
- Threads stripped in metal? Re-tap to a larger size or install a thread insert (Helicoil/threaded insert).
- Drywall? Skip “patch-and-pray.” Use the right anchor or move the fastener to solid backing.
Part 1: Removing a Screw with a Stripped Head
1) The “Stop Spinning and Get Serious” Reset
Before you break out specialty tools, do the basics that prevent further damage:
- Switch to a manual screwdriver (not a drill). Drills love cam-out; your hand can feel what’s happening.
- Apply firm downward pressure and keep the driver perfectly aligned (no wobble).
- Try a fresh, correct-size bit (worn bits strip screws like it’s their day job).
2) Size Up (or Change Types)
If the screw head is slightly rounded, a bit that’s a hair larger can bite better. For Phillips screws, you can sometimes
get traction by switching to a square (Robertson) or Torx bit that fits snugly. The goal is simple: tight fit + no wobble = grip.
3) Add Friction: Rubber Band, Duct Tape, or Steel Wool
When the head is only moderately stripped, adding a friction layer can help the bit grab:
- Rubber band method: Lay a wide rubber band over the screw head, press the driver in, and turn slowly.
- Duct tape method: Sticky-side down over the head, then drive carefully.
- Steel wool: A tiny tuft can increase bite in some heads (useful when rubber bands tear).
Pro tip: “Slow and steady” matters here. If you crank like you’re opening a pickle jar, you’ll just chew it more efficiently.
4) Tap the Driver In (The Gentle Hammer Persuasion)
If the screw is soft metal (common in hinges, fixtures, and budget hardware), lightly tapping the screwdriver/bit into the head
can seat it deeper and create new bite points. Use controlled tapsthis is “convince,” not “demolish.”
5) Locking Pliers (When the Head Sticks Up)
If the screw head is proud of the surface, grab it with locking pliers (Vise-Grips). Clamp hard, then twist slowly.
If you can rotate even a quarter turn, you’ve basically wonkeep backing it out.
6) Cut a New Slot (Rotary Tool or Hacksaw Trick)
When a Phillips head is hopeless, turn it into a flathead:
- Protect surrounding surfaces (tape/cardboard helps).
- Cut a straight groove across the head with a rotary tool cut-off wheel (or a hacksaw if accessible).
- Use a large flathead screwdriver and steady pressure to back it out.
Safety note: wear eye protectioncut-off wheels can break, and nobody wants “tiny disc shrapnel” as a new hobby.
7) Screw Extractor Kit (The Purpose-Built Solution)
If you do DIY more than twice a year, a screw extractor set is worth having. Most kits follow the same idea:
drill a small hole in the screw head, then use a reverse-threaded extractor to bite and turn the screw out.
- Choose the extractor size that matches your screw.
- Drill a centered pilot hole (go slow; keep it straight).
- Insert the extractor and turn counterclockwise (often with a drill in reverse or a wrench, depending on the kit).
If the screw is in metal or rusty, a drop of penetrating oil and a little patience can make the extractor’s life much easier.
8) Left-Handed Drill Bit (The “It Might Back Out by Itself” Move)
A left-handed bit runs in reverse and sometimes grabs enough to spin the screw out while drilling. Even when it doesn’t,
it creates the perfect pilot hole for an extractor. Use low speed, steady pressure, and keep the bit centered.
9) Drill the Head Off (Last Resort, Very Effective)
When nothing else works, drill the head off the screw:
- Use a bit slightly larger than the screw shank but smaller than the head’s full diameter.
- Drill until the head pops free from the part it’s clamping.
- Remove the hardware piece, then grip the remaining screw shank with pliers and twist it out.
This sounds dramatic, but it’s often the cleanest optionespecially in electronics, fixtures, and tight spaces.
Part 2: Repairing Stripped Screw Holes in Wood
If a screw turns but never tightens in wood, the threads have chewed out the fibers. Your fix depends on how damaged the hole is
and how much load it needs to hold (a cabinet hinge is different from a stair handrail).
1) Quick Fix: Toothpicks (or Matchsticks) + Wood Glue
Great for: light-to-medium duty (cabinet hardware, small brackets, interior hinges that aren’t carrying major weight).
- Remove the screw and clean loose debris from the hole.
- Add a small amount of wood glue.
- Insert toothpicks (or matchsticks) until snug.
- Snap them off flush, let glue dry, then re-drive the screw.
Don’t overfill so hard you split the wood. The goal is new “meat” for the threads to bite into.
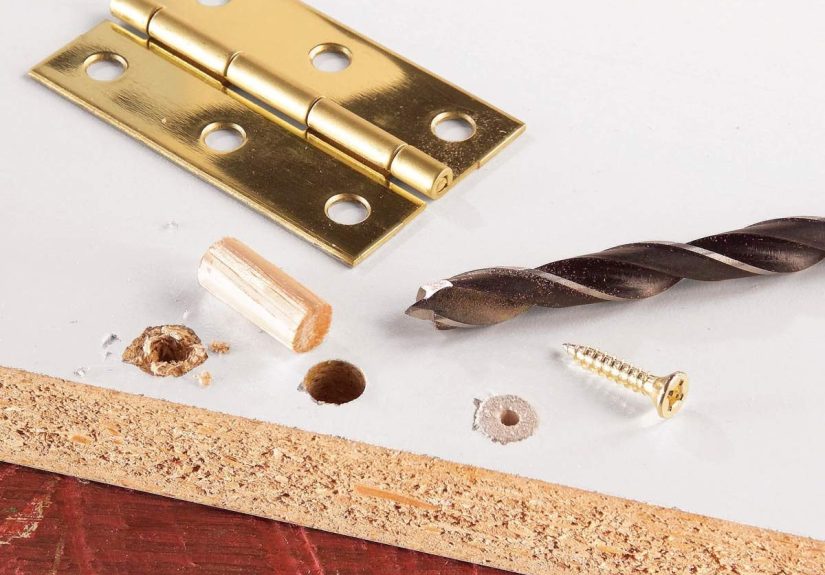
2) Stronger Fix: Drill and Dowel Plug (A “Rock-Solid Remedy”)
Great for: door hinges, frequently used hardware, and holes that are truly blown out.
- Drill the damaged hole to a clean, uniform diameter (commonly 1/4 inch for many hinge repairs).
- Vacuum out dust.
- Glue in a matching hardwood dowel.
- Trim flush after drying.
- Drill a proper pilot hole and reinstall the screw.
This turns a ragged hole into fresh wood that holds better than the original, especially when you use hardwood dowels.
3) The “Longer Screw” Upgrade (When There’s Solid Wood Deeper)
Sometimes the hole near the surface is stripped, but solid framing exists just a bit deeper (common with door jambs).
A longer screw can reach fresh woodjust be sure you’re not drilling into something you’ll regret, like hidden wiring.
4) Threaded Inserts for Wood (When You Want Machine-Screw Strength)
For furniture that’s assembled/disassembled often, threaded inserts can be a game changer. You drill to size, install the insert,
and then use a machine screw. It’s sturdier, more repeatable, and less likely to strip again.
5) What About Epoxy or Wood Filler?
Two quick guidelines:
- Wood filler alone is usually too weak for threads under load.
- Epoxy putty can work for some repairs, but you still want a pilot hole once cured, and it’s easy to make a mess on finished surfaces.
If the screw matters structurally, choose dowel plugs or inserts instead of “hope in a tube.”
Part 3: Repairing Stripped Threads in Metal
Metal is less forgiving than wood, but the fixes can be more permanentespecially if you do them cleanly.
The two main options are: re-tap larger or install a thread insert.
1) Re-Tap to the Next Size Up
If you’ve got enough material around the hole, you can drill to the correct tap size and cut new threads for a larger screw/bolt.
This is common in automotive and equipment repairs. Make sure the new fastener size fits the part and won’t interfere with clearances.
2) Use a Thread Insert (Helicoil / Solid Inserts)
Thread inserts restore the original thread size (or create stronger threads) by drilling out damaged threads, tapping to a special size,
and installing an insert that provides fresh threads. This is a go-to fix for aluminum and frequently serviced components.
- Drill out the damaged threads to the insert kit’s specified size.
- Tap the hole to match the insert.
- Install the insert with the kit’s tool.
- Use the original-size fastener again.
Take your time: crooked drilling or tapping is how “simple repair” becomes “why is everything vibrating?”
Part 4: Stripped Screws in Drywall (A Different Animal)
Drywall isn’t meant to hold much by itself. If a drywall screw spins out, it’s usually telling you one of two things:
(1) the screw never hit a stud, or (2) you need an anchor designed for the load.
- Light items: use a quality drywall anchor rated for the weight.
- Medium/heavy items: toggle bolts or anchors designed for higher loads.
- Best option: hit a stud or add blocking if the item must be solid (towel bars, shelves, TV mounts).
Part 5: Prevention (Because You Deserve Fewer Future Headaches)
The easiest stripped screw to fix is the one you never strip. A few habits make a huge difference:
- Use the right bit type and size (and replace worn bits).
- Stay alignedangled driving causes cam-out and chewed heads.
- Go slower with drills/drivers; let torque do the work.
- Use the clutch on a drill/driver to prevent over-driving.
- Pre-drill pilot holes in hardwoods and near edges to reduce binding and splitting.
- Upgrade your fastenersTorx/star-drive screws resist stripping better than Phillips for many projects.
- Wax or soap on wood screws can reduce friction (especially in dense wood).
Common Mistakes That Make Stripped Screws Worse
- Using a drill at high speed like you’re in a pit crew.
- Trying the same slipping bit repeatedly (that’s not persistence; it’s sanding).
- Skipping protection around finished surfaces when cutting or drilling.
- Going too aggressive too soonstart simple; escalate only as needed.
- Not pre-drilling after a repairfresh dowels and inserts still need proper pilot holes.
When to Call a Pro
Most stripped screw situations are DIY-friendly, but consider help if:
- The fastener is part of a safety-critical system (vehicle brakes, structural supports, gas/electrical components).
- The screw is seized in a delicate or expensive part (appliances, electronics, precision fixtures).
- You need to drill/tap in a place where misalignment could cause costly damage.
Real-World “Stripped Screw” Experiences (About )
Below are common scenarios DIYers run intoplus what tends to workso you can recognize your situation before you accidentally
invent a brand-new problem.
1) The Cabinet Hinge That Won’t Stay Put
A classic: a kitchen cabinet door starts sagging, you tighten the hinge screws, and one hole spins like it’s on vacation.
In particleboard or MDF cabinets, toothpicks-and-glue might hold for a while, but the “forever fix” is usually a dowel plug.
Drilling the hole clean and gluing in a hardwood dowel gives the hinge screw fresh material that doesn’t crumble the next time
someone yanks the door open like they’re on a cooking show.
2) The Door Jamb Hinge Screw That Keeps Stripping
Interior doors get thousands of cycles a year. If the hinge screws in the jamb strip out repeatedly, many people discover that
the first inch of wood is tired, but deeper framing is solid. A longer screw can sometimes reach stronger woodespecially if
you pre-drill properly. For doors that sag, this can feel like magic: the door closes smoothly, and you stop living in fear
of the “click… scrape… thud” soundtrack.
3) The Tiny Electronics Screw with a Mangled Head
Small screws strip easily because you’re working with shallow heads and tiny bits. In these cases, friction tricks are common:
a thin rubber band can help if the damage is mild. If it’s badly stripped, drilling the head off is often cleaner than trying
to bully it outespecially when the surrounding plastic or metal is easy to scar. Once the cover is removed, the remaining shank
usually comes out with fine pliers because it’s no longer clamping anything.
4) The Bathroom Fixture Screw That’s Half-Rusted, Half-Stripped
Moisture is a fastener’s worst enemy. People often succeed by combining patience with the right escalation: penetrating oil,
a few taps to break rust’s grip, then a screwdriver that’s seated firmly. If the head is too far gone, a new slot cut into the head
can turn “impossible Phillips” into “manageable flathead.” The big lesson here is not to rush: rushing is how you go from
“replace towel bar” to “learn drywall repair at midnight.”
5) The Aluminum Threads That Give Up (But the Part Matters)
In automotive and equipment work, stripped aluminum threads are common. Many DIYers learn the hard way that “just tighten more”
is not a strategyit’s a confession. Thread inserts (like Helicoil-style repairs) are popular because they restore usable threads
without oversizing the fastener. The experience-based tip: drill and tap straight, and keep everything clean. A crooked tap creates
a bolt that feels tight… right up until it cross-threads again.
6) The Stainless Deck Screw That Strips at the Worst Possible Moment
Stainless screws resist corrosion, but the heads can strip when driven aggressively. Some builders have success backing them out by
clamping the drill chuck directly onto the screw head (when it’s proud enough) and reversing slowly, or by grabbing with locking pliers.
The theme is consistent: slow torque beats fast spinning. Once removed, using a fresh bit, pre-drilling, and driving at a controlled speed
helps prevent a repeat performance.
If there’s one universal “experience takeaway,” it’s this: the best repair for stripped screws is a calm escalation plan.
Start with grip and friction, move to cutting or extraction, and only then go full “drill it out.” Your projectsand your blood pressurewill thank you.




