Table of Contents >> Show >> Hide
- Why Use Conduit for a Deck Hand Rail?
- Hand Rail vs. Guard Rail: Know the Difference
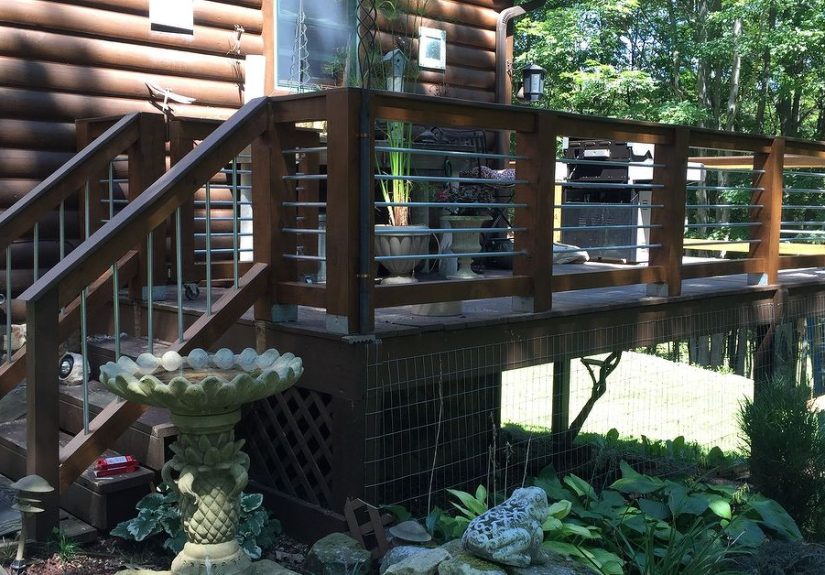
- The Basic Design: Wood Frame, Metal Conduit Infill
- Planning the Project Before Buying Materials
- Spacing the Conduit Correctly
- Building the Conduit Deck Railing
- Finishing Options for a Better Look
- Safety and Code Considerations
- Common Mistakes to Avoid
- Cost: Why Conduit Is So Appealing
- Maintenance After Installation
- Real-Life Experience: What We Learned Building a New Hand Rail Out of Conduit
- Conclusion
A deck without a solid hand rail is a little like a porch swing with one chain: technically interesting, but not something anyone wants to test after a barbecue. If your deck railing is tired, wobbly, outdated, or simply blocking the view you worked so hard to enjoy, a conduit railing can be a smart, budget-friendly upgrade. It gives the deck a clean modern look, keeps the space open, and costs far less than many cable railing systems.
This guide walks through the idea behind building a new hand rail for a deck made out of conduit, including planning, materials, spacing, safety, finishing, and real-world lessons from the project. The goal is not to pretend conduit magically turns every homeowner into a master carpenter. The goal is to show how a simple, practical material can create a deck railing that looks sharp, performs well, and does not require selling your lawn mower to fund the project.
Why Use Conduit for a Deck Hand Rail?
Electrical metallic tubing, commonly called EMT conduit, is usually used to protect electrical wiring. For DIY builders, however, it has become a popular material for deck railing infill because it is straight, lightweight, widely available, easy to cut, and relatively inexpensive. Its galvanized finish also gives it a clean industrial look that pairs well with wood posts, stained deck boards, farmhouse exteriors, cabins, and modern outdoor spaces.
Compared with traditional wood balusters, conduit can make a deck feel more open. Instead of creating a visual wall of vertical spindles, horizontal conduit lines allow the eye to travel through the railing. That means the yard, garden, fire pit, trees, or sunset remains part of the experience. In other words, you get a railing without making your deck feel like it joined witness protection.
Hand Rail vs. Guard Rail: Know the Difference
Many homeowners casually call the entire deck railing a “hand rail,” but building codes often separate the terms. A guard rail is the protective barrier along the edge of a deck, especially when the walking surface is more than 30 inches above grade. A handrail is the graspable rail used along stairs. This distinction matters because height, strength, grip shape, and spacing rules can vary depending on whether you are building a deck guard, a stair handrail, or both.
For many residential decks in the United States, guards are commonly required when the deck surface is more than 30 inches above the ground, with a minimum guard height of 36 inches. Openings in guard systems usually must prevent a 4-inch sphere from passing through. Local requirements can be stricter, so checking with your city or county building department before drilling holes is not optional. It is much easier to adjust a plan on paper than to rebuild a railing while muttering motivational words at your tape measure.
The Basic Design: Wood Frame, Metal Conduit Infill
The most common conduit deck railing design uses wood posts and rails with horizontal conduit running between posts. The wood provides structure and warmth, while the conduit creates slim, durable infill. A typical layout includes sturdy deck posts, a top rail, a bottom rail or lower support, and multiple rows of conduit spaced evenly between them.
For example, a homeowner might use pressure-treated 4×4 posts, a 2×6 top cap, and 1/2-inch or 3/4-inch EMT conduit as horizontal rails. The conduit slides into holes drilled into the posts or is attached with brackets, collars, or fittings. The final look depends on spacing, finish, wood stain, and whether the metal is left silver, painted black, or sealed for extra protection.
Planning the Project Before Buying Materials
Start by measuring the deck perimeter carefully. Measure each railing run from post to post, not just the overall deck length. Decks are rarely as square as they look, especially older ones. Wood moves, posts shift, and previous builders may have used “close enough” as a design philosophy.
Make a simple sketch that includes post locations, railing height, conduit rows, stair sections, gates if needed, and any corners. Decide whether you will replace the entire railing or reuse existing posts. Existing posts must be solid, properly attached, and free from rot. If a post wiggles when pushed, do not trust it to hold a new railing. A beautiful conduit rail attached to weak posts is just decorative optimism.
Suggested Materials
A basic conduit railing project may include EMT conduit, pressure-treated lumber or cedar for the frame, exterior screws or structural fasteners, wood stain or paint, metal primer if painting conduit, exterior caulk or sealant, drill bits, a conduit cutter or hacksaw, measuring tape, level, clamps, and safety gear. If the conduit passes through posts, you will also need a drill bit sized slightly larger than the conduit diameter.
For exterior projects, pay close attention to corrosion resistance. EMT conduit is commonly zinc-coated or galvanized, but cut ends and scratched areas are more vulnerable to rust. Sealing cut ends, touching up scratches, and keeping water from sitting inside the tubing will help the railing last longer.
Spacing the Conduit Correctly
Spacing is one of the most important parts of this project. The railing should look balanced, but it also needs to meet safety expectations. Many deck codes use the 4-inch sphere rule, meaning gaps in the guard should not allow a 4-inch sphere to pass through. This is especially important for homes with children, pets, or visiting relatives who believe every railing is also a jungle gym.
When laying out horizontal conduit, measure from the deck surface to the underside of the top rail, then decide how many conduit rows are needed to keep openings within the allowed limit. Do not assume that “about four inches” is good enough. Use an actual spacer block, mark every post consistently, and check the layout before drilling. A small measuring mistake repeated across six posts becomes a very visible design feature, and not the kind people compliment.
Building the Conduit Deck Railing
Step 1: Inspect and Strengthen the Posts
The posts are the backbone of the railing. Before installing conduit, inspect every post for rot, cracks, loose fasteners, and poor attachment. Posts should be firmly connected to the deck framing, not simply nailed to deck boards. If needed, reinforce or replace posts before continuing. This is the part of the project where boring structural work beats exciting cosmetic work every time.
Step 2: Mark the Conduit Holes
Use a level, tape measure, and spacer block to mark each conduit row on every post. Mark from the same reference point each time, such as the deck surface or bottom rail. Keep the marks aligned so the conduit runs straight across the railing. A laser level can make this easier, but a regular level and patience will also do the job.
Step 3: Drill Clean Holes
If your design runs conduit through the posts, drill holes slightly larger than the conduit. Keep the drill straight and avoid blowing out the back of the post. A scrap board clamped behind the post can help create a cleaner exit hole. Test-fit a short piece of conduit before drilling every post. This prevents the classic DIY tragedy of discovering that all 48 holes are technically beautiful and completely wrong.
Step 4: Cut the Conduit to Length
Measure each span individually. Cut conduit with a tubing cutter, hacksaw, or metal-cutting blade. After cutting, remove sharp burrs from the ends with a file or deburring tool. Smooth ends matter because they make installation easier, reduce scratches, and prevent sharp edges from hiding inside the posts like tiny metal gremlins.
Step 5: Dry-Fit Everything
Before final fastening or finishing, dry-fit the conduit in place. Check that the spacing is even, the rails are level, and the conduit ends sit properly in the posts or brackets. This is the best time to make adjustments. Once the top cap is installed and everything is fastened, changes become more annoying, more time-consuming, and more likely to involve dramatic sighing.
Step 6: Install the Top Rail
The top rail ties the design together visually and physically. Many DIY builders use a 2×6 top cap because it creates a comfortable ledge for hands, drinks, flower pots, or the occasional squirrel with real estate ambitions. Fasten the top rail securely with exterior-rated screws or approved connectors, and make sure the finished height meets local requirements.
Finishing Options for a Better Look
A conduit deck railing can look rustic, modern, industrial, or farmhouse depending on the finish. Natural galvanized conduit has a bright silver tone that works well with gray decking, black hardware, and weathered wood. Painting the conduit black creates a look similar to cable railing or metal balusters. Staining the wood frame dark brown or cedar red adds warmth and contrast.
If painting conduit, clean it thoroughly first. Metal can carry oil, dust, and manufacturing residue. Use a primer made for metal and an exterior paint that can handle moisture and temperature changes. If leaving conduit unpainted, consider sealing the cut ends and checking them every season for rust. The railing may not need much maintenance, but it still appreciates a little attention now and then.
Safety and Code Considerations
Deck railings are not just decorative. They are safety systems. That means the design must be strong enough to resist pressure, properly attached to the deck framing, and built with safe spacing. Horizontal conduit can also be easier for children to climb than vertical balusters, so households with young children should think carefully before choosing this style. In some areas, local inspectors may have specific opinions about climbable horizontal railings.
Before starting, contact the local building department or review the adopted residential code in your area. Ask about guard height, infill spacing, stair handrail rules, load requirements, permits, and inspection expectations. A quick phone call can save money, reduce stress, and prevent the painful discovery that your finished railing is charming but not compliant.
Common Mistakes to Avoid
One common mistake is spacing conduit too far apart. Another is using weak posts because they “seem fine.” A third is forgetting to seal cut metal ends, especially in wet climates. Homeowners also sometimes drill holes too close to the edge of a post, which can weaken the wood or cause splitting. Take your time during layout and drilling. The project is simple, but it rewards accuracy.
Another mistake is relying on conduit as the main structural rail. In most DIY deck railing designs, conduit is used as infill, while the posts and top rail provide the primary structure. Treating thin conduit like a structural guard system without proper design can create safety issues. When in doubt, consult a qualified contractor, engineer, or building official.
Cost: Why Conduit Is So Appealing
Cost is one of the biggest reasons homeowners choose conduit for deck railings. Cable railing kits can be beautiful, but they can also be expensive once posts, tensioners, fittings, and hardware are included. Wood balusters are affordable, but they can block views and require more painting or staining. Conduit lands in a useful middle ground: clean-looking, inexpensive, easy to source, and friendly to weekend DIY budgets.
The final price depends on deck size, conduit diameter, lumber choice, finish, hardware, and whether posts need replacement. A small deck might require only a handful of 10-foot conduit sticks, while a large wraparound deck will naturally require more material. Even then, conduit often remains one of the more economical ways to create a modern horizontal railing effect.
Maintenance After Installation
After the railing is installed, inspect it at least once or twice a year. Check for loose fasteners, rust spots, cracked wood, water damage, and movement in the posts. Clean the conduit with mild soap and water. Touch up paint or sealant when needed. If you live near salt air, heavy snow, or constant rain, inspect more often because moisture and metal have a relationship best described as complicated.
Wood components will need the usual deck maintenance. Stain or seal them as recommended for your climate and lumber type. Keep leaves and debris from piling against the bottom rail or posts. Good drainage and airflow help both wood and metal last longer.
Real-Life Experience: What We Learned Building a New Hand Rail Out of Conduit
The best part of building a new hand rail for our deck made out of conduit was how quickly the deck changed personality. Before the project, the old railing made the deck feel boxed in. It was functional, but it had the charm of a waiting room chair. Once the conduit went in, the whole space opened up. The yard looked bigger, the deck felt brighter, and the view finally got invited back to the party.
The biggest lesson was that layout matters more than muscle. Cutting conduit was easy. Drilling holes was manageable. The real work was measuring, marking, checking, rechecking, and convincing ourselves not to rush. Every post needed consistent marks, and every row had to line up. One slightly crooked hole can be forgiven. A whole row of crooked holes looks like the railing had too much coffee.
We also learned that dry-fitting is not a cute optional step. It is the difference between a smooth installation and a Saturday afternoon argument with a metal tube. By testing each piece before final assembly, we caught small problems early. Some conduit pieces needed a tiny trim. A few holes needed slight adjustment. None of those fixes were difficult because we found them before everything was locked in place.
Another surprise was how much the finish affected the final look. Raw galvanized conduit looked clean and practical, but painting it black gave the railing a more polished, modern feel. The contrast between dark conduit and warm stained wood made the deck look intentional rather than improvised. That said, painting added extra prep time. Metal needs cleaning, priming, and patience. Paint does not enjoy sticking to dusty, oily conduit, and it will absolutely make its feelings known later.
The project also reminded us that budget-friendly does not mean careless. Conduit may be inexpensive, but the railing still has to be safe. We checked spacing, tightened fasteners, reinforced questionable areas, and made sure the top rail felt solid. A deck railing is something people lean on without thinking. That means it has to be ready for real life: kids, guests, pets, windy days, and someone balancing a paper plate while declaring they are “just going to lean here for a second.”
If we were doing the project again, we would label every conduit piece by section as soon as it was cut. Deck spans can vary slightly, and a piece that fits one opening may be just a bit short or long for another. Labeling would have saved time and prevented the fun little puzzle game called “Where Did This One Go?” We would also seal the cut ends immediately after cutting instead of waiting until the end. It is a small step, but small steps are what keep outdoor projects from aging like forgotten patio furniture.
Overall, building a conduit deck hand rail was one of those DIY upgrades that felt satisfying because it solved several problems at once. It improved safety, refreshed the look of the deck, preserved the view, and kept costs under control. It did not require exotic tools or contractor-level wizardry, but it did require respect for measurement, structure, and local code. The finished railing looked simple, but in the best way: clean lines, strong posts, open views, and no unnecessary fuss.
Conclusion
A new hand rail for a deck made out of conduit can be a practical and attractive DIY project when it is planned carefully. Conduit offers a sleek look, reasonable durability, and a lower cost than many specialty railing systems. Paired with strong wood posts and a secure top rail, it can transform an ordinary deck into a more open, modern outdoor space.
The key is to treat the project as a safety upgrade first and a design upgrade second. Check local code, use solid posts, keep openings within approved limits, protect cut metal ends, and inspect the railing regularly. Do that, and your conduit railing can become the kind of weekend project that makes the whole deck feel new again. It may not make you a professional builder overnight, but it will give your deck a fresh lookand possibly make your neighbors wander over with suspiciously specific questions.




