Table of Contents >> Show >> Hide
- What a “Belt 3D Printer” Actually Is (and Why the Z Axis Gets Weird)
- Why Use a Treadmill as the Belt?
- Start With the Right Concept: “Build a Printer on a Conveyor,” Not “Turn a Treadmill Into a Printer”
- Planning Checklist: What to Evaluate Before You Grab a Hex Key
- The Core Hardware: What You Need to Add to the Treadmill
- How Belt Motion Becomes “Infinite Z”
- Adhesion: The Make-or-Break Problem (Literally)
- Slicing and Software: Teaching Your Models to Live on a Moving Belt
- Calibration and Tuning: The Boring Stuff That Makes the Cool Stuff Possible
- What Can You Print on a Treadmill Belt 3D Printer?
- Safety Notes That Are Worth Taking Seriously
- Conclusion: From Dusty Cardio to Continuous Printing
- Real-World Maker Experiences (The Extra You Asked For)
Somewhere in your garage (or the corner of a bedroom doing its best “modern art” impression) sits a treadmill.
It was purchased with heroic intentions. It is now a very expensive clothes hanger that occasionally whirs to life
when you accidentally bump the power button. But what if that treadmill could finally earn its keepby becoming
a giant, belt-style 3D printer?
The idea sounds like a meme, but it’s grounded in real engineering. Conveyor-belt 3D printers already exist, and
they’re famous for “infinite” printingmeaning you can print extremely long parts or run batch jobs continuously
as finished pieces roll off the belt. People have even experimented with building oversized belt printers on top of
a full-size treadmill to push scale way beyond a desktop machine.
This guide is a deep, practical look at how a treadmill becomes a belt 3D printer: the mechanics, the motion control
logic, what makes prints succeed (or face-plant at hour 9), and the real-world “gotchas” you only learn after
you’ve watched a nozzle draw spaghetti over a moving belt like it’s signing autographs.
What a “Belt 3D Printer” Actually Is (and Why the Z Axis Gets Weird)
A belt 3D printer swaps the usual stationary build plate for a moving conveyor belt. Instead of finishing a print
and stopping, the machine can advance the belt so the part gradually exits the print zone. That’s the “infinite”
trick: the belt motion effectively becomes a continuous axis, letting you print very long objects or keep printing
new parts in a queue.
Many belt printers also tilt the print planecommonly around 45 degreesso the nozzle prints onto the belt at an angle.
Commercial examples like Creality’s CR-30 popularized this approach, pairing an angled nozzle with a rolling belt to
achieve “infinite Z” (continuous build length in the belt direction).
Why the 45-degree approach matters
Printing on an angled plane changes how overhangs behave, how support material is generated, and how layer lines
stack. It also changes the mental model: your “height” is no longer strictly verticalyour part grows along a tilted
coordinate system while the belt carries it away. This is why belt-printer slicing and firmware settings look like
they’ve been written by someone who enjoys geometry just a little too much.
Why Use a Treadmill as the Belt?
A treadmill is basically a ready-made conveyor system: a wide belt, rollers, a frame designed to handle motion,
and a drive system meant to run steadily for long periods. In other words, it’s already halfway to “industrial vibes,”
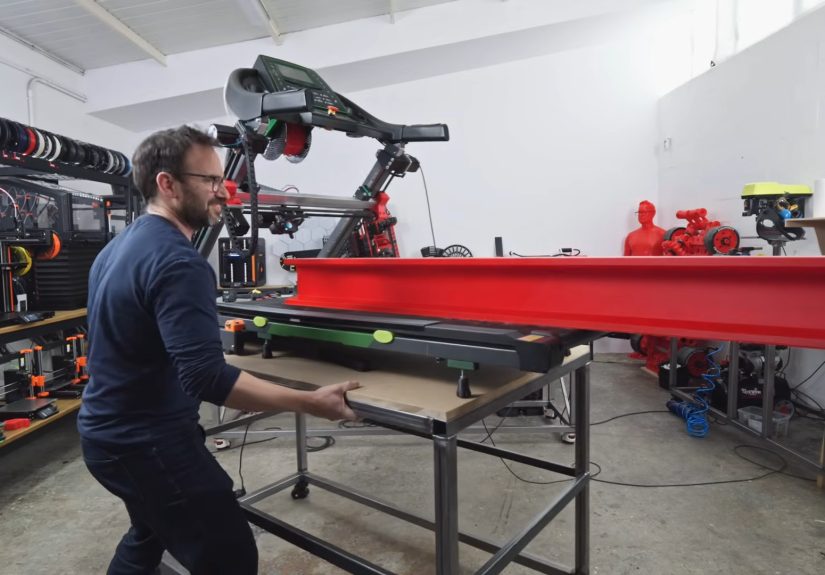
just with more sweat in its origin story. And makers have proven the concept is viable by mounting a large-format
print setup over a treadmill belt to enable massive, continuous prints.
The big advantages
- Huge printable length: The belt can carry parts far beyond any normal build volume.
- Built for motion: Rollers, tensioning, and tracking are already solved (at least in theory).
- Batch printing potential: Small parts can roll off automatically, turning your printer into a tiny factory.
- Reuse and upcycle: One less treadmill destined for a tragic end on a curb with a “FREE” sign.
The honest tradeoffs
- Adhesion is harder: Treadmill belts were not designed for melted plastic to stick perfectly every time.
- Vibration and flex: A long belt surface can bounce, especially at speed, which is bad for first layers.
- Control complexity: Coordinating belt motion with extrusion is more demanding than a standard printer.
- Safety considerations: Moving belts + hot ends + electronics require a “no shortcuts” mindset.
Start With the Right Concept: “Build a Printer on a Conveyor,” Not “Turn a Treadmill Into a Printer”
The most reliable way to think about this project is: you’re building a 3D printer gantry system, and the treadmill is
your moving build surface (your conveyor Z axis). That mental shift is important because it prevents a common mistake:
assuming the treadmill’s stock motor system will magically behave like a precision motion axis.
You can absolutely reuse treadmill hardware, but 3D printing demands repeatability. That means consistent belt speed,
stable belt tracking, and predictable layer-to-layer motion. If you approach the treadmill as a “conveyor module” and
design your printer around it, you’ll make better decisions about structure, motion, and calibration.
Planning Checklist: What to Evaluate Before You Grab a Hex Key
1) Belt width and usable “flat” zone
You want a belt that’s wide enough for your target parts and flat enough in the print zone to support a clean first layer.
Many treadmills have a slightly compliant deck and belt that can flex under pressure; that’s great for knees, less great for
dimensional accuracy.
2) Tracking and tension stability
A treadmill belt that drifts left or right will eventually ruin prints. If the belt can’t hold center alignment under steady
motion, you’ll spend your weekends adjusting tension bolts instead of printing.
3) Noise and vibration
Belt printers already have a different sound profile than standard machines. Add treadmill rollers and you may create a
“mechanical whale song” situation. Plan for vibration damping and a rigid mounting strategy.
4) Safety and ventilation
This is still FDM printingheated plastics can emit ultrafine particles and VOCs, especially depending on material and
temperature. Makerspace-style guidance emphasizes ventilation and exposure awareness.
The Core Hardware: What You Need to Add to the Treadmill
Your treadmill gives you the belt. A functional 3D printer still needs the rest of the body: a rigid frame, a motion gantry,
an extruder/hotend, sensors, and a controller.
Rigid frame and gantry
The gantry is the “printer” partlinear rails or smooth rods, a carriage, and an axis layout (Cartesian or CoreXY are common).
Belt printers like the CR-30 use a motion system that looks familiar to FDM users, just rotated into a belt-friendly geometry.
On a treadmill build, rigidity is everything. If the nozzle-to-belt distance fluctuates because the frame flexes, the first layer
will fail, the part will peel, and your printer will produce modern art instead of functional pieces.
Extruder and hotend (and why “bigger” can be smarter)
Printing large objects on a treadmill-sized bed often benefits from a higher-flow setup: a larger nozzle, higher volumetric flow
hotend, and a filament path that won’t choke. The goal isn’t always super fine detail; it’s reliable extrusion for long prints.
Many treadmill-belt demonstrations lean toward “get it done” extrusion rather than “microscopic Benchy eyebrows.”
Control electronics and firmware
Most builders use common 3D printer controller boards and firmware, because you want features like temperature safety, stepper
coordination, and repeatable motion control. Marlin includes belt-printer configuration options (e.g., enabling belt-style “endless Z”
behavior).
Important note for real life: treadmills often involve mains power components. For safety, keep modifications high-level unless you’re
working with a qualified adult/mentor who understands electrical systems. You can still design the mechanical concept and use
3D-printer-grade electronics for the print motion without relying on the treadmill’s original high-voltage control stack.
How Belt Motion Becomes “Infinite Z”
On a standard printer, Z moves the nozzle up. On a belt printer, the belt’s forward motion effectively becomes the axis that lets the
part continue “growing” and then exit the build area. Commercial belt printers explicitly market this as an “infinite” build direction.
Two common motion strategies
-
Continuous belt advance: The belt moves steadily while the nozzle lays down plastic in synchronized motion. Great for
very long parts, but requires careful tuning. -
Stepwise belt advance: Print a segment, advance the belt slightly, print the next segment. This can simplify tuning and
reduce drift, depending on your design.
Either way, the belt must move predictably. If the belt speed varies (even subtly), layer alignment shifts and your “straight” print turns
into a gentle, unintended spiral. Which is fun in a seashell, less fun in a bracket.
Adhesion: The Make-or-Break Problem (Literally)
Belt adhesion is the hardest part of belt printingespecially on a treadmill belt that was never meant to be a build surface. You’re trying
to make hot plastic stick reliably to a moving, flexible surface, then release cleanly after it cools. That’s a high bar.
Surface prep and cleanliness
Real belt-printer maintenance guidance often emphasizes cleaning to improve adhesion. For example, BlackBelt’s manual discusses cleaning the
belt surface (including detergent and isopropyl alcohol steps) as part of adhesion maintenance.
“Belt raft” and first-layer helpers
Belt printing sometimes benefits from a purpose-built raft that anchors the model to the belt before the real geometry begins.
Some slicers include belt-specific optionsideaMaker, for instance, documents a “Belt Raft” feature intended to help models stick to the conveyor.
Heat management
Desktop belt printers often rely on a heated zone (not necessarily heating the whole belt equally) to stabilize early layers. A treadmill
conversion has to grapple with the same physics: the part needs enough heat in the contact region to bond, but you can’t cook the entire belt
or create safety issues. Think localized, controlled heatnot “let’s turn the treadmill into a toaster oven.”
Slicing and Software: Teaching Your Models to Live on a Moving Belt
The slicer is where a treadmill printer stops being a fun mechanical contraption and becomes a repeatable manufacturing tool. Belt printers
need special handling: belt offset, belt rafts, and angled print planes.
Slicer options people actually use
-
Belt-focused Cura variants: Some belt-printer ecosystems use specialized Cura setups (often referenced as “Blackbelt Cura”)
for conveyor-belt geometry and custom machine definitions. - ideaMaker belt settings: ideaMaker documents belt-printer parameters like belt offset and belt raft to help with adhesion and geometry.
-
Community tooling and plugins: Belt printing has enough quirks that communities often build plugins or workflows around it.
(Translation: expect to tinker a bit.)
Design rules that save you hours
- Favor long parts: Handles, rails, trim pieces, cosplay props, ducts, cable guidesbelt printing shines here.
- Avoid huge flat bases: Large flat contact areas can fight the belt’s texture and flex; consider breaking geometry into belt-friendly shapes.
- Use “belt-aware” supports: Support strategies differ because the print plane is angled.
- Plan the “exit path”: As the belt advances, ensure the part won’t collide with the gantry or snag on rollers.
Calibration and Tuning: The Boring Stuff That Makes the Cool Stuff Possible
If you want a treadmill 3D printer to be more than a viral clip, tuning is where you earn it. Belt printing is less forgiving than a standard
bed-slinger because the build surface is moving and the geometry is unusual.
Key tuning targets
- Belt tracking: The belt should run centered, consistently, and without lateral drift.
- Nozzle-to-belt distance: Your “Z offset” must be rock solid to prevent peeling or scraping.
- Extrusion consistency: Long prints expose any filament-path weakness. If it can fail, it will fail at hour 12.
- Belt speed vs. flow: Synchronize belt advance with extrusion so layers fuse cleanly without stretching.
Commercial belt printers like the CR-30 demonstrate that the approach is viable, but they also show that belt printing has a learning curve.
The belt, the angled nozzle geometry, and the continuous motion all demand patience and systematic tuning.
What Can You Print on a Treadmill Belt 3D Printer?
A treadmill conversion is especially good at two things: printing parts that are too long for normal printers, and printing many parts without
babysitting each job.
Examples that make sense
- Ultra-long functional parts: rails, trim, tubing supports, ducts, racks, camera sliders, or structural ribs.
- Batch production: brackets, clips, spacers, holdersprint, advance, print again.
- Large-format experimentation: oversized prototypes where “it’s big” matters more than “it’s perfect.”
Makers have used treadmill-style belt concepts to push the limits of size, turning the belt into an endless print bed for massive projects that
would normally require industrial hardware.
Safety Notes That Are Worth Taking Seriously
Moving belt + hot end = keep hands clear
This sounds obvious until you’re reaching in to remove a stringy blob and the belt keeps moving because you forgot a setting. Treat it like
a machine tool: stay alert, keep clearances, and use tools instead of fingers near moving parts.
Ventilation and materials
Different filaments can release different emissions profiles. Makerspace guidance highlights concerns like ultrafine particles and VOCs and
emphasizes ventilation and exposure awareness.
Electrical caution
Treadmills may include high-voltage components. If you’re not trained in electrical work, keep your design focused on mechanical integration
and standard 3D-printer electronics for the printer itself, and work with a qualified adult/technician for anything involving mains power.
Conclusion: From Dusty Cardio to Continuous Printing
Making a treadmill into a 3D printer isn’t a weekend “glue gun and vibes” projectbut it’s also not magic. Conceptually, it’s a belt 3D printer:
a moving build surface that enables continuous printing, super-long parts, and batch production. Commercial machines like the Creality CR-30
show how angled extrusion and a conveyor belt can create an “infinite” build direction.
The treadmill conversion adds scale and a satisfying dose of upcycling, but it also adds challenges: belt adhesion, belt tracking, vibration,
and motion control. If you plan the build around rigidity, repeatable belt motion, belt-aware slicing, and disciplined tuning, the payoff can
be hugesometimes literally.
And if nothing else, you’ll finally be able to say your treadmill is helping you “make gains.” Just… not the kind your fitness app tracks.
Real-World Maker Experiences (The Extra You Asked For)
Makers who try a treadmill-based belt printer tend to describe the journey in three acts: excitement, confusion, and finally,
suspicious confidence. The excitement is easyyou stand over a moving belt and imagine endless prints streaming out like a pasta
machine for prototypes. The confusion shows up the moment you realize your usual “first layer ritual” doesn’t work the same way.
On a normal printer, you can brute-force bed adhesion with a good mesh and a steady plate. On a treadmill belt, you’re asking a
flexible surface to behave like precision tooling while it’s literally in motion. That’s a different relationship. It’s less
“set it and forget it” and more “earn trust through consistency.”
A common early experience is the “perfect start, tragic exit.” The first few layers look fantastic, and you start celebrating
like you just discovered fire. Then, 20 minutes later, the belt advances, the part transitions across a slightly different belt
texture or tension zone, and adhesion changes just enough for the edge to curl. Builders learn to watch transitions: when the belt
moves, when the contact patch changes, and when the part starts acting like it wants to become a banana. That’s often when people
experiment with belt-oriented rafts, adjusted belt offsets, and more conservative temperatures and speedsanything to keep the part
stable until it has enough mass to behave. Some belt ecosystems even document special raft behavior to help parts anchor during the
earliest phases, which lines up with what hobbyists report as a practical “make it stick first, optimize later” tactic.
Another near-universal experience is learning that belt tracking is not “a one-time setup.” Builders often get the belt centered,
run a print, and feel victoriousuntil the belt gradually walks a millimeter to the left over an hour. That tiny drift becomes
huge when your nozzle is calibrated to a narrow sweet spot. So people get in the habit of checking alignment like pilots checking
instruments: quick, regular glances, not panicked fixes after the crash. The treadmill itself helps here because it was designed to
track a belt, but 3D printing is more sensitive than jogging. The belt doesn’t just need to stay on the rollersit needs to stay
predictably positioned relative to your nozzle and gantry.
There’s also a fun psychological shift: once makers succeed, they stop thinking in “build volume” and start thinking in “production
flow.” Instead of asking “Will it fit on my bed?”, they ask “Can I design it so it prints cleanly as it exits?” That changes how
people model parts. They add chamfers, rethink support angles, break large flats into ribs, and design features that are belt-friendly.
The treadmill printer becomes less of a novelty and more of a specialized manufacturing toolperfect for long rails, repeated brackets,
and weirdly satisfying batches of identical parts that roll off the belt like a tiny automated factory.
Finally, makers often report that the project teaches patience. Not the motivational poster kindreal patience. The kind where you
change one setting, run a short test, document results, and repeat. When everything clicks, the experience is electric: you watch a
print finish and glide away, and for a moment you feel like you’ve hacked reality. Then you remember you still own a treadmillexcept
now it’s producing parts instead of guilt. That’s progress.




