Table of Contents >> Show >> Hide
- What Is a Trucker’s Hitch (and Why Is It So Effective)?
- Before You Start: Quick Gear & Setup Checklist
- How to Tie a Trucker’s Hitch: Easy Steps
- Common Trucker’s Hitch Variations (Pick Your Favorite)
- Best Uses: Where This Knot Shines
- Trucker’s Hitch Troubleshooting: Mistakes That Make It Slip
- Safety Tips (Because Gravity Is Patient and Petty)
- Conclusion
- Experiences & “Been-There” Lessons From Real-World Use (About )
The trucker’s hitch is the knot equivalent of showing up to a move with a pickup truck, a dolly, and “I’ve got straps.”
It’s a tensioning knot that lets you crank a line way tighter than just pulling and hoping for the best.
Use it for tarps, roof loads, canoes, kayaks, awkward bundles of lumber, or anything that needs to stay put while you drive over
a pothole the size of a kiddie pool.
In this guide, you’ll learn an easy, reliable trucker’s hitch you can tie fast, tighten hard, and (most importantly) untie without
inventing new swear words. We’ll also cover rope choice, common mistakes, and a few variations so you can pick what works best
in real life.
What Is a Trucker’s Hitch (and Why Is It So Effective)?
A trucker’s hitch is a compound knot that creates a simple pulley system using only rope. You form a loop in the standing part,
run the working end around an anchor point, then back through that loop. When you pull, you get mechanical advantageoften somewhere in the
2:1 to 3:1 range in ideal setups, though friction can reduce the “wow” factor a bit.
Translation: it’s a rope tie-down knot that can get a line seriously tight for securing a load, tensioning a tarp ridgeline,
or stabilizing gear. It’s like a ratchet strap’s outdoorsy cousin who drinks black coffee and owns exactly one cast-iron pan.
Before You Start: Quick Gear & Setup Checklist
Choose the right rope (this matters more than your confidence)
- Low-stretch line is best for load securing and tarps (polyester is a common winner). Too much stretch (often nylon) can loosen over time.
- Diameter: Thin cord is great for tarps; thicker rope is easier on your hands for heavy loads.
- Condition: If your rope is fuzzy, glazed, or damaged, retire it from serious tie-down duty.
Pick solid anchor points
- For vehicles: roof rack bars, bed tie-down points, frame-rated anchors.
- For camping: sturdy trees, stakes set well, or reliable hardware.
- Avoid sharp edges that can cut the rope (or pad them).
How to Tie a Trucker’s Hitch: Easy Steps
There are many versions. This one is popular because it’s simple, tightens smoothly, and finishes cleanly.
We’ll use a midline loop plus a secure tie-off.
Step-by-step instructions
-
Anchor one end of the rope.
Tie the rope to your first anchor point (a fixed point on a truck bed, a tarp grommet line, a tree, etc.).
A bowline works well, but any solid, non-slipping attachment is fine. -
Create a loop in the standing part (your “pulley”).
About 1–3 feet from where you want the tightening action to happen, form a loop in the standing line.
A common, easy option is an overhand on a bight (tie an overhand knot using a doubled section of rope so it leaves a loop).
This loop is what your working end will run through. -
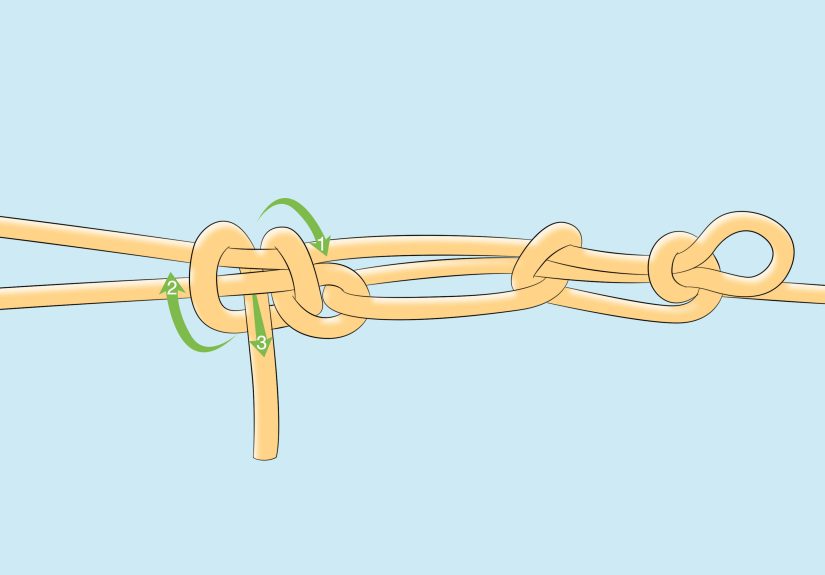
Run the working end around the far anchor.
Take the free end (working end) and wrap it around your second anchor point (like the other side of a roof rack, a stake, a tree, or a tie-down loop). -
Feed the working end back through your loop.
Bring the working end back and pass it through the loop you created in Step 2.
Now you’ve built the “pulley” path. -
Crank it tight (the fun part).
Pull the working end steadily. As you pull, the line tightens between anchors with mechanical advantage.
Use your body weight if neededjust keep your face out of the recoil zone (rope can snap back if something slips). -
Pinch to hold tension, then lock it off.
While holding tension, pinch the rope where it passes through the loop so it can’t slip back.
Then tie a half hitch below the loop around the standing line to “capture” the tension. -
Add a second half hitch (recommended).
Follow with another half hitch (two half hitches total) for security. This helps prevent loosening under vibration (hello, highway driving).
If you want quick release, you can make the last half hitch “slipped” by pulling a bight through instead of the whole end.
What it should look/feel like when it’s right
- The line is taut with minimal sag.
- The loop (“pulley”) is stable and not collapsing into a mess.
- The finishing hitches are snug and stacked neatly.
- When you release, it loosens without becoming a permanent rope sculpture.
Common Trucker’s Hitch Variations (Pick Your Favorite)
1) The “quick-release” finish
If you’re tying down something you’ll undo soon (like a tarp or temporary load), finish with a slipped hitch so you can pop it free quickly.
It’s the knot version of velcroexcept it won’t clog with pine needles (usually).
2) The midline loop options
The trucker’s hitch is really a system: loop + wrap + return + lock. Your loop can be made a few ways:
- Overhand on a bight: easy and fast, great for learning.
- Slippery half hitch (slip knot loop): common in quick-release styles; make sure the loop won’t cinch down on itself under load.
- Alpine butterfly: a strong, clean midline loop that behaves nicely under load.
- Figure-eight loop: stable and structured, often used when you want a very defined loop.
3) “Modified” trucker’s hitch ideas
Some folks use a modified approach that adds a second adjustable loop so the “pulling loop” can sit exactly where your hand wants it
which is a fancy way of saying: “I got tired of the knot ending up in an annoying spot.” If you tie down loads often, experimenting with
placement and loop style is absolutely worth it.
Best Uses: Where This Knot Shines
Securing loads on vehicles (truck beds, trailers, roof racks)
This is the classic: tie down a cooler, lumber, totes, or outdoor gear. If you’re securing something like a kayak or canoe with rope instead
of straps, use low-stretch line and stop to re-check tension shortly after you start driving. Road vibration can loosen any system if it isn’t set well.
Camping tarp ridgelines and shelter setups
A trucker’s hitch is excellent for tensioning a ridgeline between two trees. Your tarp pitches tighter, flaps less, and sounds less like a
haunted grocery bag at 2 a.m. Pair it with sliding attachment knots (like prusiks) if you want easy tarp adjustment along the ridgeline.
Hanging and hauling (with common-sense limits)
Outdoors groups often recommend the trucker’s hitch for tasks like tensioning lines for a clothesline, creating a taut line between trees, or
even helping with camp utility setups. That said: don’t use it for life-safety (climbing, rescue, or critical human loads) unless you’re trained and using rated systems.
Trucker’s Hitch Troubleshooting: Mistakes That Make It Slip
Mistake 1: The loop is formed the wrong way
Some loop styles only work if formed correctly. If your loop collapses, twists, or “eats” itself under tension, rebuild it and keep the structure simple:
try an overhand on a bight or an alpine butterfly.
Mistake 2: Not enough tail or not enough half hitches
Leave enough working end to finish cleanly. Two half hitches is a solid baseline. If the line will vibrate or jerk (driving, wind, waves),
add an extra hitch or use a better quick-release lock-off.
Mistake 3: Super slippery rope with a lazy finish
Slick cordage can creep. Solutions:
- Add an extra half hitch.
- Dress and tighten the finishing hitches neatly.
- Consider switching to a rope with a grippier sheath for tie-down duty.
Mistake 4: Overtightening delicate materials
The trucker’s hitch can generate a surprising amount of force. That’s a featureuntil you tear a tarp grommet or crush a lightweight item.
Tight is good. “Structural damage tight” is not.
Safety Tips (Because Gravity Is Patient and Petty)
- Stand out of the snap-back path. If something slips, rope can recoil fast.
- Protect rope from sharp edges with padding or better anchor routing.
- Check tension periodically, especially after driving a short distance or after wind picks up.
- Don’t treat this as climbing gear. It’s a fantastic tensioning knot, not a certified life-safety system.
Conclusion
If you want one knot that makes you look like you know what you’re doingwhether you’re pitching a tarp, tying down a canoe, or securing a questionable
stack of storage binslearn the trucker’s hitch. The core idea is simple: make a loop, run the working end around an anchor, pass it back through the loop,
pull to tension, then lock it off with clean finishing hitches.
Practice a few times at home (yes, even while watching TV). Once your hands memorize the motions, you’ll be able to tie a trucker’s hitch quickly,
tighten it confidently, and untie it without bargaining with the universe.
Experiences & “Been-There” Lessons From Real-World Use (About )
The first time most people use a trucker’s hitch, they have the same reaction: “Wait… that’s too tight.”
And honestly, that’s the point. In everyday use, the trucker’s hitch tends to teach three lessons fast: friction is real, placement matters,
and your future self will judge you for messy finishes.
One common scenario: tying down something bulky in a truck bedsay, a plastic tote tower that definitely looked stable in the garage.
You cinch it down, give it a confident slap, and take off. Ten minutes later, you stop for gas and the stack has shifted just enough to make you
question every decision you’ve made since middle school. The fix is usually not “pull harder” (though that’s emotionally satisfying).
The fix is (1) use low-stretch rope, (2) choose anchor points that pull down and innot sidewaysand (3) lock the finish with two half hitches
that are snug and dressed. A sloppy lock-off can creep under vibration no matter how heroic your initial tightening was.
Another classic: a tarp ridgeline that hums like a guitar string in the wind. The trucker’s hitch can get your ridgeline tight enough that your tarp
pitches cleaner and flaps less, but people often overdo it. If you’re using a lightweight tarp, you’ll notice that “maximum tension” can turn into
“surprise grommet surgery.” The sweet spot is tight enough to shed water and resist wind, but not so tight that you’re stressing fabric and stitching.
Many campers end up using a trucker’s hitch to tension the ridgeline, then use sliding attachment knots (like prusiks) to position the tarp exactly where
they want it without retying the whole system.
Then there’s the “my knot is stuck forever” moment. Under heavy tension, some finishes can jamespecially if you crank down and leave the knot loaded for
hours. People who use the trucker’s hitch regularly tend to adopt one of two habits: they either (a) finish with a quick-release option so it pops open
when needed, or (b) add a small “handle” bight and keep the tie-off neat so it’s easier to break free. The lesson: the last 10% of the knot (the lock-off)
determines whether you feel like a competent adult or a raccoon fighting a bungee cord.
Finally, practice changes everything. The trucker’s hitch is one of those knots that’s much simpler to tie than to explain. After a handful of reps,
your hands stop thinking about “steps” and start thinking about “shape.” And that’s when it becomes truly usefulbecause the best knot is the one you can tie
correctly, quickly, and calmly when it’s raining, windy, or you’re trying to beat sunset to camp.




