Table of Contents >> Show >> Hide
- Quick Reality Check: What Kind of Sink Swap Are You Doing?
- Planning and Measuring: The Stuff That Prevents Regret
- Tools and Materials Checklist
- Step-by-Step: Removing the Old Kitchen Sink
- Step 1: Shut off water (and power if you have a disposal)
- Step 2: Clear the cabinet and set up for water spills
- Step 3: Disconnect the supply lines
- Step 4: Disconnect the drain and disposal (if present)
- Step 5: Free the sink from the countertop
- Step 6: Lift out the sink
- Step 7: Scrape, clean, and prep the opening
- Prep the New Sink Before It Goes In
- Installing the New Sink
- Reconnect Plumbing and Get Everything Talking Again
- Leak Testing: The Moment of Truth (Bring a Flashlight)
- Troubleshooting Common Problems
- When to Call a Pro (No Shame in It)
- FAQ
- From the Trenches: Real-World Experiences and Lessons (About )
- Conclusion
Replacing a kitchen sink is one of those home upgrades that feels like it should require a magic wand, a plumbing license,
and a personal assistant named “Bucket.” The good news: if your new sink fits the existing countertop cutout (or you’re willing
to do a little careful trimming), this is a very doable DIY project.
The even better news: you’ll get a fresh, clean sink, fewer mystery drips, and the satisfaction of knowing what’s happening
under your cabinet (spoiler: it’s mostly pipes and crumbs). This guide walks you through removal and installation for both
drop-in (top-mount) and undermount sinks, plus the plumbing reconnect and leak-testing that separates
“nailed it” from “why is the cabinet floor wet?”
Safety note: If you’re under 18, do this with a supervising adult. You’ll be working with tools, water lines, and possibly electrical connections for a garbage disposal.
Quick Reality Check: What Kind of Sink Swap Are You Doing?
1) Like-for-like replacement (easiest)
You’re swapping a sink with the same installation style and similar dimensions (drop-in to drop-in, undermount to undermount).
If the new sink matches your existing cutout, you’re living the dream.
2) New size, same style (medium)
A larger or smaller sink may require resizing the countertop opening. This is straightforward on laminate and wood with the right tools,
but can be risky on stone unless you’re experienced (or hiring help).
3) Switching styles (hard mode)
Going drop-in to undermount (or vice versa) can involve countertop compatibility, mounting support, and finishing details.
It can be done, but it’s often smarter to keep the same mount style unless you’re already replacing the countertop.
Planning and Measuring: The Stuff That Prevents Regret
Confirm the sink will fit the cabinet
Sink specs usually list a minimum base cabinet width. A common guideline is to choose a cabinet that’s about
3 inches wider than the sink’s overall length to leave room for cabinet walls, clips, and plumbing.
Always check the manufacturer’s spec sheet for your exact model.
Check the faucet hole situation
Count your existing faucet holes (common setups are 1, 2, 3, or 4). If your new sink has fewer holes, you may need a deck plate
(also called an escutcheon) to cover unused openings. If your new sink has more holes than your faucet needs, you can cap extras
with hole covers or add accessories like a soap dispenser.
Decide what you’re replacing
Most people replace the sink and keep the faucet. Many people replace the sink and then decide the faucet suddenly looks like it
survived a pirate shipwreck. Installing a faucet is usually easier before the sink goes in (especially for drop-in sinks),
so consider doing both at once if your faucet is older.
Tools and Materials Checklist
You don’t need a truck full of specialty gear, but you do need the right basics so you’re not improvising with a butter knife
and optimism.
Tools
- Bucket, towels, and a small container for screws/clips
- Adjustable wrench and/or slip-joint pliers
- Basin wrench (optional but very helpful for faucet nuts)
- Screwdrivers (Phillips and flathead)
- Utility knife (for cutting caulk/sealant)
- Putty knife or scraper
- Flashlight or headlamp
- Safety glasses and work gloves
Materials (typical)
- New sink (drop-in or undermount) and mounting hardware
- Silicone sealant (kitchen/bath, mildew-resistant)
- Plumber’s putty (if your drain/fittings call for it)
- New basket strainer(s) and/or disposal flange kit (as needed)
- New supply lines (recommended if yours are old or short)
- Plumber’s tape (PTFE tape) for threaded connections where appropriate
- P-trap parts or slip-joint washers (optional, but handy if things are crusty)
Tip: Snap a few photos under the sink before you disconnect anything. They’re the “cheat code” when it’s time to put everything back.
Step-by-Step: Removing the Old Kitchen Sink
Step 1: Shut off water (and power if you have a disposal)
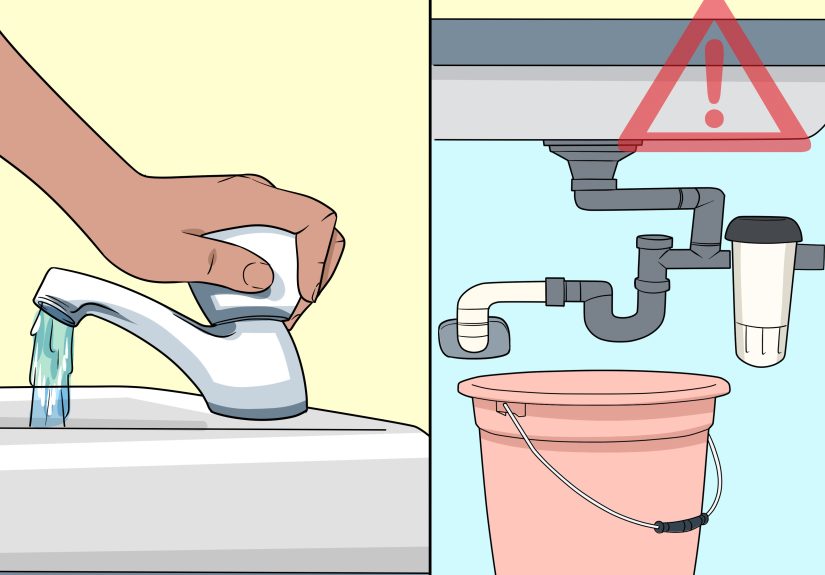
Turn off the hot and cold shutoff valves under the sink. Then open the faucet to relieve pressure and drain the lines.
If you have a garbage disposal, switch off the disposal at the wall switch and turn off the breaker to be safe.
Step 2: Clear the cabinet and set up for water spills
Remove everything from under the sink. Place a bucket under the trap and keep towels nearby.
Even if you think it’s dry, plumbing loves surprises.
Step 3: Disconnect the supply lines
Use a wrench to loosen the nuts connecting the supply lines to the shutoff valves and the faucet tailpieces.
If the valves look corroded or won’t budge, stop and consider replacing the valves or calling a plumberforcing it can turn a simple
sink job into a “water feature.”
Step 4: Disconnect the drain and disposal (if present)
Unscrew the slip nuts on the P-trap and drain assembly. Let water drain into the bucket.
If you have a disposal, disconnect the dishwasher drain hose (if attached) and the disposal discharge tube.
Many disposals twist off the mounting ring, but designs varyfollow your disposal manufacturer’s instructions.
Step 5: Free the sink from the countertop
For a drop-in (top-mount) sink
Look under the counter rim for metal clips around the sink perimeter. Loosen them and rotate them inward so the sink can lift out.
Then cut the caulk bead along the top edge where sink meets countertop using a utility knife.
For an undermount sink
Undermount sinks are usually held with clips and silicone sealant. Support the sink from below (a helper is ideal), then remove or loosen
the clips. Carefully cut through the silicone seam where the sink meets the countertop. Plan for this to be a two-person liftundermounts can
drop suddenly once the seal lets go.
Step 6: Lift out the sink
Drop-in sinks lift out from above. Undermount sinks drop down from below once freed.
Set the old sink aside somewhere safe (not directly on your toesthis is not a cartoon).
Step 7: Scrape, clean, and prep the opening
Scrape off old caulk, putty, and grime. Clean the countertop surface where the sink will seal.
The cleaner the mating surfaces, the better your seal and the fewer “why does it smell damp?” moments later.
Prep the New Sink Before It Goes In
Dry-fit the sink first
Place the new sink into/under the opening (depending on mount style) without sealant to confirm fit.
If it doesn’t fit, don’t “encourage it” with force. Double-check measurements, countertop cutout size, and cabinet clearance.
Install the faucet (usually easier now)
For most installations, it’s easier to attach the faucet and accessories (soap dispenser, filtered water tap) to the sink while it’s out in the open.
Tighten mounting nuts firmly, but don’t overdo itespecially on thinner stainless steel.
Install basket strainers and/or the disposal flange
Follow the instructions that come with your drain parts. Many sink strainers use plumber’s putty under the flange,
while some materials or manufacturers prefer silicone. Tighten evenly, wipe away squeeze-out, and make sure the gasket seats properly.
Putty vs. silicone: Plumber’s putty is common for metal drain flanges and parts that may be removed later. Silicone is often preferred for certain plastics, acrylic surfaces, porous stone, or when a manufacturer specifies it.
Installing the New Sink
Option A: Drop-in (top-mount) sink installation
-
Apply sealant: Run a continuous bead of silicone around the countertop opening where the sink rim will sit.
(Some sinks use a gasket; follow your sink’s instructions.) - Set the sink: Lower the sink into the cutout carefully, align it, and press down to seat it.
- Secure clips: From underneath, tighten the mounting clips evenly in a crisscross pattern so the rim pulls down uniformly.
- Clean up: Wipe away excess silicone squeeze-out promptly for a neat finish.
Option B: Undermount sink installation
Undermount sinks depend on solid support and a clean seal to prevent leaks around the rim.
If your countertop is stone and the sink is heavy (cast iron, fireclay), consider professional installation or extra structural support.
- Prep and clean: Make sure the underside of the countertop and sink rim are clean and dry.
-
Apply silicone: Run a bead of silicone along the sink rim where it contacts the countertop.
Some setups apply silicone on the countertop surface insteadeither can work if the contact zone is continuous and clean. - Lift and hold the sink in place: This is where a helper shines. Press the sink up into position.
-
Attach clips/support: Install undermount clips per your countertop/sink hardware instructions.
Many methods require the sink to be held in place while sealant sets (a common trick is bracing with a 2×4 across the cabinet and shims beneath). -
Let it set: Follow the sealant instructions. You may need to support the sink until the silicone is set enough to hold.
Full cure can take a day or more depending on product, temperature, and bead thicknessavoid stressing the joint early.
Reconnect Plumbing and Get Everything Talking Again
Reconnect the drain assembly and P-trap
Reassemble the drain tailpieces and P-trap. Make sure slip-joint washers are facing the correct direction and seated properly.
Tighten slip nuts hand-tight, then snug slightly with pliers if neededover-tightening can crack washers and cause leaks.
Reconnect the garbage disposal (if you have one)
If you removed the disposal, reinstall it according to the manufacturer’s instructions. Reconnect the discharge tube and dishwasher drain hose (if applicable).
Ensure the dishwasher knockout plug is removed if you’re connecting a dishwasher line to the disposal inlet.
Reconnect water supply lines
Connect new (or existing) supply lines to the shutoff valves and faucet tailpieces. Avoid cross-threading.
Tighten firmly, but don’t muscle it like you’re tightening lug nuts on a truck.
Leak Testing: The Moment of Truth (Bring a Flashlight)
- Turn the water back on slowly: Open the shutoff valves gradually.
- Check the supply connections: Look and feel for drips at valve connections and faucet connections.
- Fill the sink and drain it: Watch the drain flange, tailpiece joints, trap connections, and disposal discharge.
- Run the disposal (if present): Restore power at the breaker, then test briefly while watching for leaks.
Pro tip: Wrap a dry paper towel around each joint. Even tiny leaks show up quickly as a wet spot.
Troubleshooting Common Problems
“The sink doesn’t fit the hole.”
Confirm you bought the correct mounting style and size. If the sink is slightly too large for a laminate/wood top, careful trimming may work.
If it’s stone, don’t force itstone modifications are best left to pros with the right tools.
“I have a slow drip at the strainer.”
This usually means the flange didn’t seat evenly, the gasket is misaligned, or the wrong sealant was used. Disassemble, clean, and reinstall.
Tighten evenly and confirm the instructions for your specific strainer and sink material.
“Water shows up around the sink rim.”
For drop-ins, the caulk bead may be discontinuous or the sink rim isn’t pulled down evenly by the clips.
For undermounts, the silicone seam may have gaps or wasn’t allowed to cure before use.
“The disposal hums but doesn’t grind.”
Many disposals have a reset button underneath and can be freed with the manufacturer’s wrench/hex key.
If you’re unsure, shut off power and follow the disposal manufacturer’s troubleshooting steps.
When to Call a Pro (No Shame in It)
- You need to cut or modify a stone countertop.
- Your shutoff valves are stuck, leaking, or corroded.
- You’re relocating plumbing, adding a dishwasher line, or changing venting/drain configuration.
- You’re dealing with electrical wiring you’re not comfortable with (especially for a disposal).
- You’re installing a very heavy sink (cast iron/fireclay) that needs extra support.
FAQ
How long does it take to replace a kitchen sink?
If it’s a straightforward swap and you’re prepared, many DIYers finish in a few hours. Undermount installs and disposal changes can add time,
especially if you’re waiting for sealant to set or replacing extra plumbing parts.
Should I replace the supply lines?
If supply lines are old, kinked, too short, or show corrosion, replacing them during a sink replacement is a smart, low-cost upgrade.
Can I go from drop-in to undermount without changing the countertop?
Sometimes, but it depends on the countertop material, cutout finish, and available mounting support. Many homeowners keep the same style unless
they’re redoing counters.
From the Trenches: Real-World Experiences and Lessons (About )
If you ask a handful of homeowners about their kitchen sink replacement experience, you’ll hear the same themesoften told with the emotional
intensity of someone describing a dramatic wildlife encounter. Here are the most common “wish I knew that earlier” moments people run into,
plus what typically fixes them.
1) The “I didn’t measure the cabinet” surprise. A sink can match your countertop opening but still be awkward below, especially if the bowl is
deeper or the drain sits farther back. People often discover their disposal suddenly collides with a drawer, or the trap sits at an angle that makes
everything feel cramped. The fix is usually planning: checking the sink spec sheet for bowl depth and drain placement, and making sure there’s room
for the disposal body and drain plumbing. If space is tight, some swap to a shallower disposal or adjust plumbing with the right fittings.
2) Old plumbing is basically a museum exhibit. Slip nuts that haven’t moved since the early 2000s can be stubborn. Homeowners often report a
“simple” swap getting delayed because a trap arm is corroded, washers crumble, or threads are rusted. A surprisingly effective strategy is to plan
for minor replacements: have a new trap kit and extra washers on hand. It’s not admitting defeatit’s avoiding a second trip to the store while your
kitchen looks like a plumbing-themed escape room.
3) Sealant drama: too much, too little, too soon. People frequently learn that silicone has opinions about timing. If you apply a beautiful bead and
then immediately start wrestling the sink into position, you can smear sealant where it shouldn’t go and leave gaps where it should. On the flip side,
waiting too long can make it hard to seat parts cleanly. The real lesson is to work deliberately: dry-fit first, then apply sealant with a clear plan,
then set the sink carefully and tighten clips evenly. And for undermount sinks, the “let it cure” rule is realrushing use can break the seal before it’s ready.
4) The disposal is heavy and has a sense of humor. A common story: someone removes the disposal, turns away for one second, and it swings like a
bowling ball on a short leash. The fix is simple: support it with a hand, a box, or a helper, and never trust gravity to behave politely.
Once reinstalled, people often feel accomplished… until they remember the dishwasher hose and realize it needs the knockout plug removed.
That one is practically a rite of passage.
5) Leak testing is a process, not a moment. Many DIYers turn on the water, see no immediate drip, and declare victory.
Then they discover a slow leak hours later after the cabinet floor starts to look glossy. The more experienced approach is slow and methodical:
check every joint with a dry paper towel, fill and drain the sink, run both hot and cold, and watch the trap and strainer connections under pressure.
Tighten only what’s needed, because over-tightening can deform washers and create the very leak you’re trying to stop.
In the end, the most common “experience-based” advice sounds almost boring: measure twice, replace aging parts while you’re there, keep everything clean,
and don’t rush sealant cure time. It’s not glamorousbut it’s exactly what keeps your new kitchen sink replacement from becoming an ongoing cabinet
moisture documentary.
Conclusion
A kitchen sink replacement is a perfect mix of “practical upgrade” and “secretly satisfying.”
The keys are planning (fit and compatibility), clean prep (old caulk must go), careful sealing (continuous bead, even pressure),
and patient leak testing (because water will always find the one thread you forgot).
Take your time, follow your sink and drain instructions, and you’ll end up with a solid install that looks great and stays dry where it matters most.




