Table of Contents >> Show >> Hide
- Why Tissue Paper Flowers Work So Well for Party Decor
- What You Need to Make Tissue Paper Flowers
- How to Make Tissue Paper Flowers Step by Step
- Easy Tissue Paper Flower Variations to Try
- Endless Ways to Use Tissue Paper Flowers at a Party
- Common Mistakes to Avoid
- How to Store and Reuse Tissue Paper Flowers
- Real-World Experience: What Happens When You Actually Decorate With Tissue Paper Flowers
- Conclusion
If you have ever looked at a party backdrop and thought, “Wow, that looks expensive,” I have good news: sometimes it is just tissue paper having a very glamorous day. Tissue paper flowers are one of the easiest, cheapest, and most versatile DIY decorations you can make. They work for birthdays, baby showers, bridal showers, weddings, graduation parties, holiday tables, classroom celebrations, and even that last-minute brunch where the decor plan was basically “light a candle and hope for the best.”
The beauty of tissue paper flowers is that they deliver maximum drama with minimum fuss. A few folded sheets, a little trimming, a bit of fluffing, and suddenly you have oversized blooms, pom-pom flowers, floral garlands, gift toppers, chair decor, or a full-on photo booth backdrop. Better yet, they are lightweight, easy to customize, and simple enough for beginners. Once you learn the basic method, the creative possibilities multiply fast.
Why Tissue Paper Flowers Work So Well for Party Decor
Fresh flowers are beautiful, but they are also expensive, delicate, and notorious for wilting right when guests arrive. Tissue paper flowers, on the other hand, are budget-friendly, colorful, reusable, and delightfully low-maintenance. You can make them days or weeks ahead of time, match them to any party theme, and scale them from tiny accents to giant statement pieces.
They also play well with almost any decorating style. Want something whimsical for a kids’ birthday? Go bright and fluffy. Planning a bridal shower? Choose layered blush, ivory, and sage blooms. Decorating for a fiesta, garden party, or baby sprinkle? Mix colors, sizes, and petal shapes for a lush handmade look. Tissue paper flowers are basically the overachievers of DIY party decor.
What You Need to Make Tissue Paper Flowers
- Tissue paper in your chosen colors
- Scissors
- Floral wire, craft wire, twist ties, or pipe cleaners
- Ribbon, fishing line, or string if you want to hang them
- Optional: glue, floral tape, paper straws, wooden dowels, cardstock leaves
If you are making flowers with kids, pipe cleaners are a great substitute for wire because they are easier to handle and less fussy. If you want more sculpted flowers, floral wire and floral tape create a cleaner, more polished finish.
How to Make Tissue Paper Flowers Step by Step
1. Choose Your Flower Size
Before you cut anything, decide where the flowers will go. For hanging ceiling decor or a big party backdrop, use full sheets of tissue paper to create large flowers. For centerpieces, gift toppers, wreaths, or garlands, cut the sheets in half or into smaller rectangles. This simple choice changes the final effect dramatically.
Large flowers feel bold and festive. Medium flowers are the all-purpose workhorses of party decorating. Small flowers are perfect for filling gaps, layering into wreaths, or adding detail to favors and table settings.
2. Stack the Tissue Paper
Layer about 6 to 12 sheets of tissue paper, depending on how full you want the flower to look. More sheets create a fluffier bloom. Fewer sheets create a lighter, airier flower. You can use one color for a clean, classic look or mix shades for an ombre effect.
Try layering light colors on top and darker colors underneath for extra depth. That tiny detail makes the finished flower look more dimensional, not flat and sad like a paper pancake.
3. Accordion-Fold the Stack
Fold the stacked tissue paper back and forth like a fan. Pleats between about 1/2 inch and 2 inches work well depending on the flower size. Smaller folds create tighter, more delicate flowers. Wider folds create fuller, more dramatic blooms.
Keep the folds as even as possible, but do not panic if they are not perfect. Tissue paper flowers are forgiving. They are like party guests who actually improve after a little fluffing.
4. Secure the Center
Wrap floral wire, a twist tie, or a pipe cleaner tightly around the middle of the folded stack. Twist it firmly enough to hold the layers together, but not so hard that you tear the paper. If you plan to hang the flower, leave extra wire or tie on ribbon or string now.
If you want a flower stem, attach the wire to a paper straw, wooden skewer, or dowel and wrap the connection with floral tape. This works beautifully for bouquets, vase arrangements, or table centerpieces.
5. Trim the Ends to Create Petals
This is where the personality shows up. Rounded edges create soft, peony-like petals. Pointed ends make the flower look sharper and more starburst-like. Scalloped cuts create a classic pom-pom effect. Fringe cuts can mimic a frilly center.
You can also vary the layers if you want a more realistic bloom. Trim the inner layers shorter, fringe the center slightly, and leave the outer layers longer and rounded. That trick gives the flower a fuller center and more natural-looking petal structure.
6. Open and Fluff the Layers
Now for the magic. Gently separate each sheet of tissue paper, pulling it up toward the center one layer at a time. Work slowly. Tissue paper tears easily, and no one enjoys shouting, “I ruined the good pink one!” while holding a sad half-petal.
Once one side is fully opened, turn the flower over and repeat on the other side. Fluff, rotate, and adjust until it looks balanced. If needed, gently curl some edges with your fingers for a softer, more natural finish.
Easy Tissue Paper Flower Variations to Try
Classic Pom-Pom Flowers
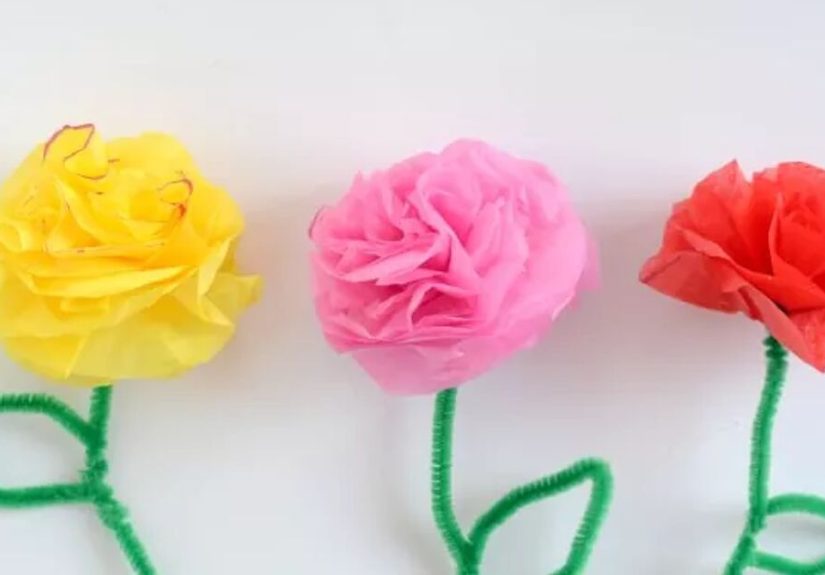
These are the easiest version and perfect for party ceilings, dessert tables, and hanging installations. Use 8 to 12 sheets, accordion-fold, round the edges, wire the center, and fluff into a sphere. They are fluffy, cheerful, and wonderfully forgiving.
Layered Petal Flowers
For a bloom that looks closer to a peony or giant party flower, cut inner layers shorter and outer layers longer before re-folding them together. Add a fringed center and shape the petals with your fingers. This version works beautifully on walls and backdrops.
Kid-Friendly Pipe Cleaner Flowers
If little hands are helping, scale it down. Use fewer sheets, smaller rectangles, and pipe cleaners instead of floral wire. Kids can help stack, fold, trim, and fluff. These smaller flowers are great for classroom decor, handmade bouquets, or greeting card embellishments.
Circle-Scrunch Flowers
Another fun variation is made by stacking tissue circles, stapling or securing the center, and scrunching each layer upward. The result is more compact and rosette-like, which is perfect for hats, wreaths, and gift decorations.
Endless Ways to Use Tissue Paper Flowers at a Party
Once you make a few, you will start seeing decorating opportunities everywhere. A cluster of large blooms can turn a blank wall into a photo backdrop. A garland of smaller flowers can dress up a dessert table or entryway. Single-stem flowers in jars make easy centerpieces. Tiny blooms can decorate napkin rings, party favors, wreaths, and gift bags.
For birthdays, try bold color mixes and oversized flowers. For baby showers, pastel ombre blooms look sweet without being overdone. For weddings or bridal showers, a mix of ivory, blush, dusty blue, or soft peach gives the decor a romantic handmade feel. For holidays, switch the palette: red and pink for Valentine’s Day, orange and fuchsia for summer fiestas, metallics for New Year’s Eve, or white and silver for winter parties.
You can also combine tissue paper flowers with tassel garlands, balloons, paper fans, ribbons, and greenery. Because they are so lightweight, they layer well without weighing down a display. That makes them especially useful for renters, classroom parties, and temporary event setups where you want something impressive but easy to remove.
Common Mistakes to Avoid
Using Too Few Layers
If your flower looks skimpy, the problem is usually not your folding skills. It is probably the number of sheets. Add more layers for fullness.
Pulling Too Fast
The fluffing stage rewards patience. Pull one sheet at a time and support the paper near the center as you lift it.
Skipping the Petal Trim
Trimming the ends makes a huge difference. Even a simple rounded cut helps the flower look intentional instead of like a decorative accordion someone forgot to finish.
Ignoring Color Balance
When mixing colors, think in families. Pair shades that belong together, such as coral, peach, and blush, or mint, sage, and white. Random neon chaos has its place, but that place is not every baby shower.
How to Store and Reuse Tissue Paper Flowers
One of the best things about tissue paper flowers is that they are not one-and-done decor. After the party, store them in a shallow box or large plastic bin. Keep heavier items off the top so they do not flatten. If a flower gets squished, you can usually revive it with a little gentle re-fluffing.
Reuse them for future parties, nursery decor, seasonal wreaths, classroom bulletin boards, bedroom walls, gift wrapping, or even craft days with kids. When a decoration can survive more than one event, it officially earns hero status.
Real-World Experience: What Happens When You Actually Decorate With Tissue Paper Flowers
In theory, tissue paper flowers sound like a cute little DIY. In real life, they often become the surprising star of the whole event. The first time many people make them, they expect something small and crafty. Then the flowers go up on a wall, around a dessert table, or over a gift station, and suddenly the room feels finished. That is the sneaky power of paper decor: it fills space fast, photographs beautifully, and makes a setup look far more intentional than its price tag suggests.
A common experience is underestimating how many flowers you need. One bloom looks adorable in your hand. Ten blooms finally start looking like “party decor.” Twenty blooms make it look like you planned ahead and have your life together. The good news is that once you get into a rhythm of stacking, folding, trimming, and fluffing, the process speeds up. It becomes a great assembly-line craft for an afternoon with friends, siblings, or kids helping at the table.
Another real-world lesson is that color matters more than perfection. A flower with slightly uneven folds still looks charming if the color palette is cohesive. But a flower with perfect folds in colors that clash with the rest of the party can stick out in the wrong way. Choosing shades that echo the cake, plates, balloons, or table linens usually makes the whole setup look polished, even when every bloom is a little different.
Most people also discover quickly that tissue paper flowers are much more versatile than expected. Extra blooms often migrate after the party. They end up taped above a child’s bed, tucked into a wreath, added to a gift bag, or reused for another celebration a month later. That kind of second life is part of what makes them so satisfying. You spend an hour crafting, but the payoff stretches far beyond one event.
There is also the very specific experience of fluffing too aggressively and tearing a petal. Almost everyone does it once. Usually, it happens when you get impatient and try to separate three layers at the same time like some sort of tissue paper daredevil. The fix is simple: slow down, support the paper near the middle, and accept that gentle hands win. After a few flowers, you get a feel for how much pressure the paper can handle.
Perhaps the most interesting experience is how these flowers change the mood of decorating. Fresh flowers can feel precious. Expensive decor can feel stressful. Tissue paper flowers feel playful. They invite experimentation. You can make giant blooms, tiny rosettes, ombre layers, mixed garlands, or over-the-top wall installations without feeling like one wrong snip ruined the budget. That freedom is part of the charm.
And finally, there is the photo factor. Tissue paper flowers catch light softly and add texture behind cakes, gifts, and people. Even a simple setup suddenly looks more festive in pictures. So while they begin as an easy DIY project, they often end as the detail guests remember most. Not bad for a stack of paper that started life folded next to a gift bag.
Conclusion
Learning how to make tissue paper flowers is one of those DIY skills that pays off immediately. The technique is simple, the materials are affordable, and the decorating possibilities are practically endless. From pom-pom flowers and layered peonies to garlands, centerpieces, and backdrops, these handmade blooms can transform a space without draining your budget or your patience.
If you want party decor that is cheerful, customizable, and impressively low-drama, tissue paper flowers deserve a permanent place in your craft toolkit. Make a few for your next event, and do not be surprised when people ask where you bought them. That is your moment. Try to look modest.




