Table of Contents >> Show >> Hide
- Why a Peter Pan Costume Works So Well
- What You Will Need
- How to Make a Peter Pan Costume in 15 Steps
- Step 1: Decide on Your Version of Peter Pan
- Step 2: Choose the Right Green Fabric
- Step 3: Take Basic Measurements
- Step 4: Draft a Simple Tunic Shape
- Step 5: Cut a Neck Opening and Front Slit
- Step 6: Shape the Sleeves
- Step 7: Sew or Glue the Side Seams
- Step 8: Create the Signature Jagged Hem
- Step 9: Add a Collar or Leave It Simple
- Step 10: Make the Peter Pan Hat
- Step 11: Add the Red Feather
- Step 12: Choose the Right Bottoms
- Step 13: Add a Belt
- Step 14: Finish the Shoes
- Step 15: Style the Final Look
- Helpful Tips for a Better DIY Peter Pan Costume
- Common Mistakes to Avoid
- How to Make the Costume Look More Expensive Than It Is
- Real-Life Experiences Making a Peter Pan Costume
- Conclusion
If you want a costume that says, “I’m whimsical, adventurous, and possibly one swordfight away from bedtime,” a DIY Peter Pan costume is a solid choice. It is recognizable, budget-friendly, surprisingly comfortable, and flexible enough for kids, teens, and adults. Better yet, you do not need Broadway-level sewing skills or a fairy named Tinker Bell hovering over your shoulder with moral support.
The classic Peter Pan look is built around a few easy visual cues: a green tunic, jagged hems, a pointed hat with a feather, a belt, fitted bottoms, and simple shoes or boot covers. Once you nail those details, the outfit reads “Peter Pan” almost instantly. That is the beauty of this costume. It looks more complicated than it really is.
In this guide, you will learn how to make a Peter Pan costume in 15 steps, whether you want to sew it properly, fake it beautifully, or finish it the night before an event while drinking coffee and making questionable life choices. We will cover materials, fit, styling tricks, and the little finishing details that take the costume from “green shirt guy” to “leader of the Lost Boys.”
Why a Peter Pan Costume Works So Well
A homemade Peter Pan costume is popular for one very simple reason: it gives you a lot of visual payoff without demanding a lot of materials. The main tunic can be made from felt, fleece, or even an oversized T-shirt. The jagged hem does most of the heavy lifting. Add a pointed cap and a belt, and suddenly you are not just dressed in greenyou are headed to Neverland.
It also adapts well to different ages and styles. For a child, you can make it soft, warm, and easy to run in. For an adult, you can lean into storybook charm, stage-play drama, or Halloween-party polish. And if you are putting together a group look, Peter Pan pairs easily with Wendy, Tinker Bell, Captain Hook, or a whole squad of Lost Boys. Family theme achieved. Group chat satisfied.
What You Will Need
- Green felt, fleece, microsuede, or an oversized green T-shirt
- Matching thread or fabric glue
- Scissors or fabric shears
- Measuring tape
- Chalk or washable fabric marker
- Pins or clips
- Brown cord, faux leather strip, or belt
- Green leggings, tights, or slim pants
- Green felt for the hat
- One red feather
- Soft shoes, flats, loafers, or boot covers
- Optional toy dagger, leaf-inspired trim, or light makeup
How to Make a Peter Pan Costume in 15 Steps
-
Step 1: Decide on Your Version of Peter Pan
Before cutting anything, choose your style. Do you want a quick no-sew costume, a polished handmade costume, or something in between? A no-sew version works best with felt or an oversized tee. A sewn version looks cleaner and holds up better if you plan to wear it more than once. Deciding early will save you from turning your living room into a green fabric crime scene.
-
Step 2: Choose the Right Green Fabric
Not all green fabrics behave the same way. Felt is beginner-friendly because it does not fray much and holds its shape well, which is great for jagged hems and pointed hats. Fleece is soft and comfortable, especially for children. Microsuede or faux suede gives a more elevated storybook look. If you need a shortcut, start with a thrifted green shirt and customize it instead of sewing from scratch.
-
Step 3: Take Basic Measurements
Measure the chest, shoulder width, desired tunic length, and sleeve length. If you are making the costume for someone else, measuring a shirt that already fits well is often easier than trying to convince a wiggly child or distracted adult to stand still. The tunic should skim the body, not cling to it. Peter Pan is adventurous, not vacuum-sealed.
-
Step 4: Draft a Simple Tunic Shape
Fold the fabric in half so you can cut the front and back at once. A Peter Pan tunic is basically a long, simple top with room to move. Start with a loose T-shape: shoulder line, slight underarm curve, straight sides, and a tunic length that hits around the upper thigh. Keep the fit slightly relaxed so you can layer it over a base shirt if the weather is cold.
-
Step 5: Cut a Neck Opening and Front Slit
Cut a modest neck opening first. You can always widen it later, but you cannot un-cut fabric unless you possess actual fairy magic. Add a short slit in the center front to create that classic tunic look. If you want extra detail, fold the edges inward and stitch them down, or use fabric glue for a clean finish.
-
Step 6: Shape the Sleeves
You have two easy options here. You can make short sleeves by extending the shoulder slightly, or create separate simple sleeves if you want more structure. For many DIY versions, slightly dropped short sleeves are enough. They keep the costume airy and instantly more theatrical. Comfort matters, especially if the wearer plans to run around, trick-or-treat, or dramatically challenge Captain Hook in public.
-
Step 7: Sew or Glue the Side Seams
With right sides together, sew the shoulder seams and side seams, leaving enough room for the arms. If you are going no-sew, use fabric glue in thin lines and let each section dry before moving the garment. Do not rush this step. Fresh glue plus impatient hands equals costume sabotage. A simple straight seam is more than enough for this project.
-
Step 8: Create the Signature Jagged Hem
This is the step where the costume suddenly becomes Peter Pan. Cut irregular triangular points along the bottom hem and sleeve edges. Keep the points varied but balanced. You want “storybook woodland hero,” not “my scissors slipped during a power outage.” If the triangles look too perfect, rough them up a little. If they look too chaotic, trim for a cleaner rhythm.
-
Step 9: Add a Collar or Leave It Simple
Some homemade Peter Pan costumes skip the collar entirely, and that is perfectly fine. But if you want a slightly more finished look, add a simple pointed collar or fold the neckline slit edges outward to suggest one. Even a subtle collar detail helps the tunic feel intentional rather than improvised from a green pajama top. We are aiming for “clever DIY,” not “laundry-day cosplay.”
-
Step 10: Make the Peter Pan Hat
The hat is easy and important. Cut two long leaf-like triangles from green felt, sew or glue them together along the curved outer edge, then turn up one side of the brim. The hat should sit snugly but not squeeze the wearer’s brain into another dimension. If you are using felt, the shape usually holds without much fuss. That is one reason it is such a costume MVP.
-
Step 11: Add the Red Feather
Slide, sew, or glue a red feather into the turned-up side of the hat. This tiny detail does a shocking amount of work. Without it, the hat can read as “generic elf.” With it, the costume starts signaling Peter Pan immediately. If you do not have a feather, you can cut one from red felt and draw simple vein lines with a fabric marker. Not identical, but still effective.
-
Step 12: Choose the Right Bottoms
For kids, leggings or soft knit pants are the easiest option. For adults, green tights, slim pants, or fitted joggers all work. Ideally, choose a shade that is slightly lighter or darker than the tunic so the costume has some visual depth. A fully matching green outfit can work, but a bit of contrast keeps the look from turning into one giant broccoli-colored blur in photos.
-
Step 13: Add a Belt
A simple brown cord, faux leather strip, or thrifted belt tied at the waist pulls the whole costume together. It breaks up the green, defines the silhouette, and adds that adventurous, slightly rustic finish. If you want to be extra, hang a small toy dagger or pouch from the belt. Just make sure it stays lightweight. Peter Pan should look nimble, not like he is carrying camping gear for a three-day hike.
-
Step 14: Finish the Shoes
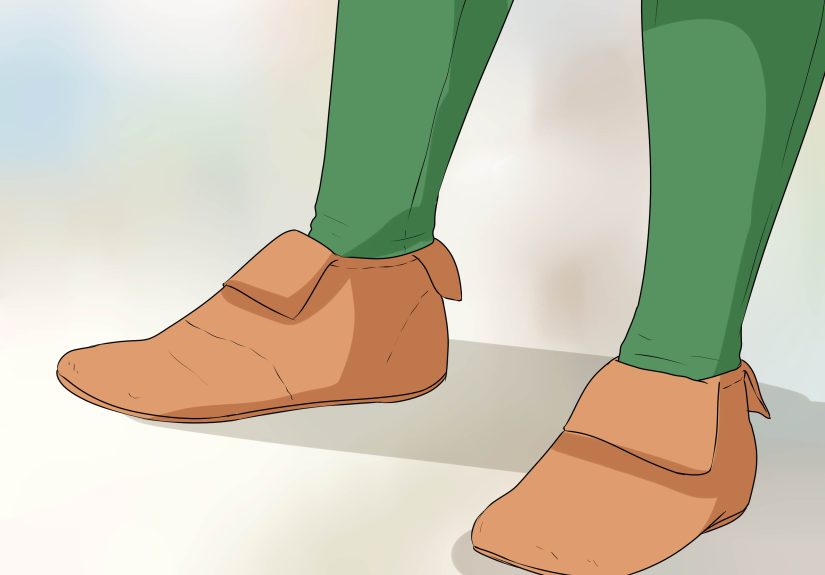
You do not need elaborate footwear. Brown flats, loafers, soft boots, or even neutral sneakers hidden under simple felt shoe covers can work. If you want a more theatrical look, create pointed boot covers from felt or fleece and secure them over shoes with elastic. The goal is not historical accuracy. The goal is making the lower half look like it belongs in Neverland and not at a suburban grocery store.
-
Step 15: Style the Final Look
Now bring everything together. Put on the tunic, belt, bottoms, hat, and shoes. Check the balance in a mirror. If the costume feels too plain, add a few subtle touches: messy hair, rosy cheeks, a toy dagger, leaf-inspired trim, or a playful pose that says, “I absolutely know where the second star to the right is.” Great costumes are not just worn. They are performed a little.
Helpful Tips for a Better DIY Peter Pan Costume
Use Layers for Comfort
If the weather is chilly, layer a fitted long-sleeve shirt under the tunic. Choose green, tan, or brown so it blends into the costume. This is especially helpful for kids on Halloween night. Nobody looks magical when they are shivering aggressively on a sidewalk.
Prioritize Movement
Peter Pan is a high-energy character. The wearer should be able to walk, sit, crouch, and run without fighting the costume. Keep the tunic loose enough for movement and avoid stiff materials that restrict the shoulders.
Do a Photo Test
Take a few quick photos before the event. Some costumes look great in person and oddly flat in pictures. If that happens, add contrast with a darker belt, brighter feather, or slightly different shade of leggings.
Common Mistakes to Avoid
One common mistake is making the tunic too short. It should look playful, not stressful. Another is skipping the hat, which removes one of the strongest visual clues. A third is overcomplicating the costume with too many pirate-style accessories. Peter Pan is simple by design. The best version keeps the silhouette clear and lets the character do the rest.
Also, be careful with the jagged hem. The points should look intentional, not random. A few test cuts on scrap fabric can help you find the right shape before you start chopping into the actual tunic like a sleep-deprived woodland tailor.
How to Make the Costume Look More Expensive Than It Is
If you want the costume to look more polished, the trick is texture and finish. Choose felt only if you are going for simplicity. If you want a richer result, use fleece, velour, or microsuede. Press seams if you are sewing. Trim loose threads. Use a belt with a nice texture. Keep the hat shape clean. None of these upgrades are dramatic on their own, but together they make the costume feel thoughtful and camera-ready.
You can also add subtle details that suggest storybook realism: a tiny shoulder patch, a laced neckline, soft brown wrist cuffs, or a neatly shaped hat brim. The difference between a last-minute costume and a memorable one is often just two or three small choices made on purpose.
Real-Life Experiences Making a Peter Pan Costume
The first time I helped put together a Peter Pan costume, I assumed the tunic would be the hard part. It turned out the real challenge was resisting the urge to overdo it. Peter Pan is one of those characters where a few strong details work better than a mountain of accessories. We started with a green shirt that looked disappointingly ordinary on a hanger. The moment we cut the jagged hem and added a brown belt, though, the whole thing transformed. It was annoyingly effective, which is the dream scenario for any DIY costume.
Another memorable lesson came from the hat. I thought it would be the quickest piece to make, and technically it was, but it also had the highest drama-to-material ratio. The first hat came out too floppy and looked less like Peter Pan and more like a sad garden elf who had given up on his ambitions. We switched to thicker felt, turned up the brim on one side, added a red feather, and suddenly it looked right. That tiny feather did more work than half the costume combined.
I have also seen how much the base layers matter in real life. One costume looked fantastic standing still but became chaos the moment the wearer tried to move. The tunic was too narrow through the shoulders, and every enthusiastic wave looked like a fabric emergency. Since then, I always recommend leaving a little ease in the body and testing the costume with real movement. Walk in it. Sit in it. Reach for imaginary pixie dust. If anything pulls or twists strangely, fix it before the event.
For kids, comfort wins every time. The best child-size Peter Pan costume I saw was not the fanciest one. It was made from a soft green sweatsuit base with felt details added on top. It stayed warm, held up through an entire evening, and did not trigger a meltdown halfway through trick-or-treating. That is costume success in its purest form. Parents often underestimate how much easier the night goes when the costume feels like clothes instead of a wearable craft project.
For adults, the biggest surprise is how much attitude carries the look. A Peter Pan costume can be very simple on paper, but once the wearer adds posture, expression, and a little confidence, it becomes instantly more believable. Stand a little taller. Smirk like you know something Captain Hook does not. Angle the hat just enough. A costume is fabric, but a character is all in the delivery.
The funniest moment I remember was during a rushed final fitting when someone asked whether the outfit needed more detail. We tried adding extra trim, extra props, and even more decorative elements. Each addition somehow made the costume worse. The final verdict was humbling: remove the clutter, keep the tunic, belt, hat, feather, and boots, and call it done. Peter Pan, it turns out, is not improved by looking like he shops at a pirate outlet mall.
That is probably the best takeaway from the entire experience. This costume works because it is clear, playful, and easy to read. You do not need perfection. You need shape, color, and a few iconic details. Once those are in place, the costume basically does the talking for you.
Conclusion
If you have been wondering how to make a Peter Pan costume without turning it into a full theatrical production, the answer is simple: focus on the silhouette, keep the materials practical, and let the details do the storytelling. A green tunic with jagged edges, a pointed hat with a red feather, fitted bottoms, and a belt are the heart of the look. Everything else is optional seasoning.
Whether you sew from scratch, refashion a thrifted shirt, or create a no-sew version in an afternoon, this costume is one of the most approachable DIY character outfits around. It is fun, easy to customize, and charming enough to work for Halloween, school plays, theme parties, or family costume sets. In other words, it is a great project for anyone who wants a costume that feels magical without requiring actual magic.




