Table of Contents >> Show >> Hide
- What You’re Making (and Which Method to Choose)
- Supplies Checklist
- Plan Your Necklace Length (Without Needing a Geometry Degree)
- Method A: Classic Knotted Pearl Necklace on Silk (Step-by-Step)
- Method B: Fast Pearl Necklace with Beading Wire + Crimps (Step-by-Step)
- Common Problems (and Fixes That Don’t Involve Screaming)
- Care Tips So Your Pearls Stay Pretty
- Conclusion
Pearl necklaces have an unfair reputation for being “fancy-only” jewelrylike they only come out for weddings,
black-tie events, or when your aunt wants to remind everyone she “summered” somewhere. In reality, pearls are
surprisingly wearable, and making your own pearl necklace is one of the most satisfying DIY wins in jewelry.
You’ll end up with a piece that looks classic, feels personal, andbest partdoesn’t require selling a kidney
to finance it.
This tutorial walks you through two beginner-friendly methods:
(1) the classic silk-knotted strand (the traditional “real pearl necklace” look), and
(2) a faster beading-wire-and-crimp method (strong, clean, and very “I finished this in one afternoon”).
Pick your vibe, grab your supplies, and let’s make something that looks expensive… without the expensive.
What You’re Making (and Which Method to Choose)
Option A: Classic silk-knotting (most traditional)
Pearls are strung on silk cord with a knot between each pearl. This improves drape, helps prevent the whole strand
from spilling if it breaks, and keeps pearls from rubbing together. It’s the “heirloom energy” option.
Option B: Beading wire + crimps (fast and sturdy)
Pearls are strung on flexible beading wire and secured with crimp beads (often hidden with crimp covers).
It’s quicker, beginner-friendly, and still looks polishedespecially for casual or modern designs.
Supplies Checklist
Pearls (or “pearls”)
- Freshwater pearls are common for DIY (round, semi-round, or baroque).
- Choose pearls with holes large enough for your stringing method (silk knotting often needs the cord to pass through some pearls twice).
- Tip: If your pearls vary slightly in size (normal!), sort them before stringing for a smoother look.
Stringing material
- Silk bead cord (with attached needle) for knotting (beginner-friendly because threading is easier).
- Beading wire (multi-strand) for the crimp method.
Findings and finishing parts
- Clasp (lobster, toggle, box claspyour choice).
- French wire (bullion): a tiny spiral coil that protects thread at the clasp area from wear.
- Bead tips / clamshell tips (optional alternative finish): conceal knots and provide a loop to attach a clasp.
- Crimp beads + crimp covers (for beading wire method).
Tools
- Fine scissors or thread snips (silk does not respect dull scissors).
- Tweezers or a beading awl (helps place knots right next to pearls).
- Crimping pliers (if using beading wire).
- Flush cutters or nippers (for wire and for trimming French wire).
- Beading mat or bead board (pearls love rolling away at the speed of regret).
- Optional: bead reamer (to slightly enlarge pearl holes) and jewelry glue/cement (tiny amounts only).
Plan Your Necklace Length (Without Needing a Geometry Degree)
Before you string anything, decide your finished length. Common lengths include:
16″ (short), 18″ (classic), 20″ (a little longer),
24″ (matinee), 30″ (opera), and 36″ (rope/double-wrap potential).
If you’re going for a choker, measure your neck comfortably and add a little extra so it’s not actually choking you.
Two easy ways to measure
-
String method: Wrap a piece of string around your neck to where you want the necklace to sit.
Mark it, then measure it with a ruler or tape measure. - Existing necklace method: Lay a necklace you like flat and measure from one clasp end to the other.
Pro tip for accuracy: when measuring a finished necklace, include the main clasp body but don’t stress over the tiny “tongue”
or insert portion on certain claspsit’s easy to accidentally overcount length if you measure every metal millimeter.
(The goal is how it wears, not how it wins a measuring contest.)
Method A: Classic Knotted Pearl Necklace on Silk (Step-by-Step)
Step 1: Prep your pearls
Lay your pearls out in order. If they’re graduated (bigger in front, smaller in back), arrange them now.
Check the drill holes. If you’re knotting and need the cord to pass through certain pearls twice (especially near the clasp),
confirm the holes can handle it. If a pearl hole is tight, a bead reamer can gently enlarge it.
Step 2: Prep your silk cord
Unwind your silk cord from the card. Silk can kink from packaging, so gently stretching it helps it behave better and can improve longevity.
Keep hands cleansilk loves grabbing oils and dirt like it’s collecting souvenirs.
Step 3: Start the clasp end (two popular finishing styles)
Style 1: French wire (bullion) finish (classic and durable)
- Tie a secure knot at the tail end of the silk cord (opposite the needle).
- String on a few pearls (many tutorials start with three near the clasp for stability).
- Trim a short piece of French wire (bullion) and slide it onto the needle and down the cord.
- Slide on the clasp ring (or one half of your clasp).
- Pass the needle back through the closest pearl in the opposite direction to form a loop at the clasp.
- Pull gently until the French wire forms a neat, protective curve, then tie a knot snug against the pearl.
The goal is a smooth, protected loop so your silk doesn’t fray where it meets the clasp.
Keep the French wire centered while tightening so it sits nicely instead of looking like it got into a bar fight.
Style 2: Bead tips / clamshell tips (clean, professional-looking)
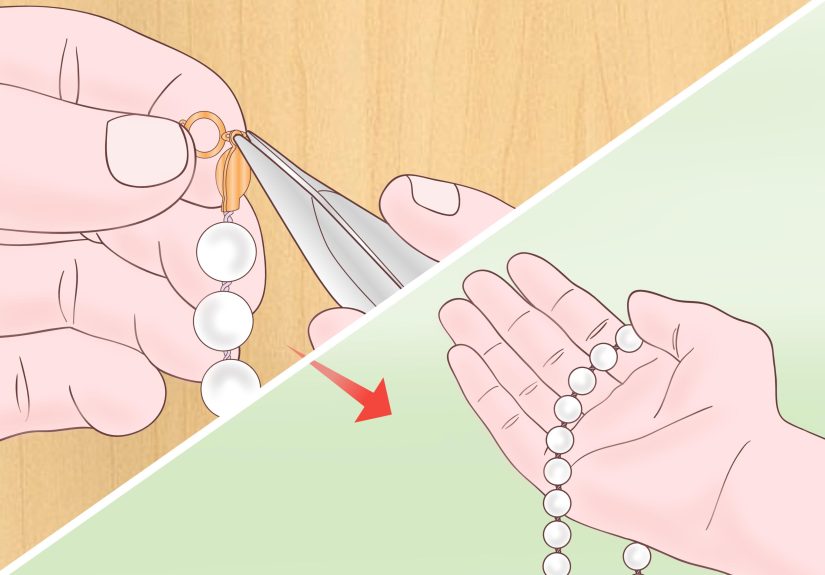
Bead tips (often clamshell-shaped) conceal a knot and provide a loop to attach a clasp.
You tie your knot, tuck it inside the tip, close it with pliers, and attach your clasp using a jump ring.
This is a favorite for a tidy, “store-bought” finish.
Step 4: Knot between each pearl
Slide the first pearl down toward your clasp end. Make a loose knot in the cord. Insert tweezers or an awl into the loop
as close to the pearl as possible, tighten the knot down to your tool, then use the tool to nudge the knot right up against the pearl.
Repeat: pearl → knot → pearl → knot. It takes a few tries to feel natural, and then suddenly your hands understand the assignment.
Keep knots consistent. You want them snug, but you don’t need to strangle the cord. Pearls look best when they drape smoothly,
not when they stand at attention like a bead army.
Step 5: Check length before finishing
As you approach your planned length, stop and test. Lay the strand flat and measure. If you’re using a bead board, even better.
Remember: once you attach the second half of the clasp, “adding a little more” becomes “un-tying tiny knots,” which is a hobby
no one asked for.
Step 6: Finish the second end
Add your last pearls, then finish with French wire + clasp (or bead tip/clamshell) the same way you started.
After final knots are secure, trim the cord ends close and seal with a tiny dab of jewelry cement/glue if desired.
Let everything dry fully before wearing.
Method B: Fast Pearl Necklace with Beading Wire + Crimps (Step-by-Step)
If silk-knotting sounds like a beautiful craft you’ll “totally do someday,” the wire-and-crimp method is your practical best friend.
It’s also great for baroque pearls, mixed-bead designs, or whenever you want a clean finish without tying 80 tiny knots.
Step 1: Cut your beading wire
Cut a length longer than your finished necklace (many makers use a generous extra length so you have working room).
Add bead stoppers if you have themthey prevent accidental pearl avalanches.
Step 2: Attach the first side of the clasp with a crimp
- Slide on a crimp bead.
- Slide on one side of the clasp.
- Pass the wire back through the crimp to form a loop.
- Adjust the loop so it’s snug but not stiff, then crimp firmly with crimping pliers.
- Optional: add a crimp cover to hide the crimp and make it look like a smooth metal bead.
Step 3: String your pearls
String pearls in your planned order. For a modern look, mix pearl sizes or add small metal spacers.
For a classic strand, keep spacing minimal and let the pearls do the talking.
Step 4: Finish the second side
- Slide on a crimp bead.
- Slide on the second half of the clasp.
- Pass the wire back through the crimp and (optionally) back through the last pearl or two for extra security.
- Pull gently to remove slack, then crimp.
- Trim excess wire neatly and add a crimp cover if you want that polished look.
Quick reality check: measure the finished necklace before the final crimp. Even a small change in pearl size can shift length,
and clasps do add a bit of extra.
Common Problems (and Fixes That Don’t Involve Screaming)
My knots slip into the pearl holes
- Use a thicker silk cord, or choose pearls with smaller holes.
- Consider bead tips/clamshells to secure and conceal the end knots.
The necklace looks kinked or stiff
- Silk method: make sure knots are snug but not over-tightened; stretching the cord before you start helps.
- Wire method: use flexible multi-strand beading wire, and don’t crank the crimp loop down too tightly.
The silk is fraying near the clasp
- Use French wire (bullion) to protect the cord at stress points.
- Alternatively, use bead tips/clamshell tips for a protected, clean finish.
My length is off by half an inch (aka the tragedy of our time)
- Always test-measure before final closure.
- Remember the clasp contributes some length; measure like you’ll wear it, not like you’ll frame it.
Care Tips So Your Pearls Stay Pretty
- Put pearls on last (after perfume, hairspray, lotionspearls are sensitive and hold grudges).
- Wipe gently with a soft cloth after wearing.
- Store separately from harder jewelry to avoid scratches.
- Avoid soaking knotted silk strands; moisture can weaken thread over time.
Conclusion
Making a pearl necklace at home is one of those projects that feels oddly powerful: you start with a pile of pearls and a clasp,
and you end with something that looks like it belongs in a velvet box with dramatic lighting. Whether you choose classic silk knotting
for tradition and drape, or beading wire and crimps for speed and strength, the keys are the same: plan your length, keep your work tidy,
and don’t rush the finish.
If you’re brand new, try the wire-and-crimp method first to build confidence. If you want the iconic “knotted pearls” look,
practice knotting on a few inexpensive beads before moving to your pearls. Your future self will thank youand your pearls will,
too, in their silent, glossy way.
Experience Notes (500-ish Words of “What I Wish Someone Told Me”)
The first time you make a pearl necklace, you learn two things fast: (1) pearls can roll farther than physics says they should,
and (2) “tiny knot” is a deceptively big emotional journey. The good news is that almost every beginner mistake is fixableand
most of them become funny later, which is the best kind of educational upgrade.
My favorite early lesson: measure twice, crimp once. With the beading wire method, it’s tempting to pull everything tight,
crimp the final end, and declare victory. Then you try it on and realize you made a perfectly engineered pearl… collar. Now you’re either
redoing the end (doable) or gifting it to someone with a smaller neck (also doable, but emotionally complicated). So I now do a quick “test wear”
before the final crimp: I hold the unfinished end, mimic the clasp position, and check where it sits. It feels silly. It saves time.
With silk knotting, the most common surprise is how much thread behavior matters. Silk shows dirt easily, and it also remembers
every kink from being wrapped on a card. Stretching it gently before starting makes knot placement more consistent and keeps the strand from looking
wavy. Also: clean hands. Not “I wiped my hands on my jeans” cleanactually clean. Silk will highlight fingerprints like it’s auditioning for a crime
show.
Another big “aha” moment: not all pearl holes are created equal. Some strands have a few pearls with tighter holes (especially if
the pearls are more organic or the drilling varies slightly). If your method needs the cord to pass through a pearl twice near the clasp, check that
before you’re 40 pearls deep. Nothing tests your patience like realizing your last pearl won’t accept the doubled cord when you’re already committed
to the final finish. A bead reamer can help, but go slowlypearls may be durable enough for daily wear, but they don’t enjoy aggressive tool work.
I also learned to love “fancy little helpers” like French wire (bullion) and bead tips. At first they feel like optional extras,
but they dramatically improve durability and finish. French wire protects silk at the clasp so the thread doesn’t fray at the stress point, and bead tips
conceal knots so the ends look crisp. Think of them like the hem on a nice pair of pants: nobody compliments it directly, but everyone notices when it’s missing.
Finally, design-wise: baroque pearls are incredibly forgiving and stylish. If your pearls aren’t perfectly matched (welcome to reality), lean into it.
Make a slightly irregular pattern intentionaladd tiny spacer beads, graduate sizes, or place the most interesting baroque pearl in the center like it’s the
lead singer. The best pearl necklaces don’t always look factory-perfect; they look like someone chose each pearl on purpose. And now that someone is you.




