Table of Contents >> Show >> Hide
- Why Make Your Own Ethernet Cable?
- Tools & Materials
- Before You Start: Straight-Through vs. Crossover
- Make a Network Cable in 15 Steps
- Measureand add a little slack
- Pick the right cable category
- Choose solid vs. stranded conductors
- Cut the cable cleanly
- Strip the jacketjust enough
- Untwist and fan out the pairs
- Arrange wires to T568B (or T568A)
- Straighten, flatten, and trim
- Slide on the boot (optional but smart)
- Insert the conductors into the RJ45
- Crimp with confidence
- Repeat the process for the other end
- Test the cable
- Label and boot up
- Do a live check
- Pro Tips for Reliable Cables
- FAQ & Smart Choices
- Troubleshooting: Fast Fixes
- Step Gallery (Add Your Pictures)
- Conclusion
- of Real-World Experience (What Actually Helps)
Building your own Ethernet patch cable is part science, part DIY therapy. With the right tools and the right wire order, you’ll go from “why isn’t this working?” to “blazing-fast LAN legend” in minutes. This guide walks you through a standards-based, no-guesswork method that works for Cat5e and Cat6, with tips for PoE and modern auto-sensing gear.
Why Make Your Own Ethernet Cable?
Custom cables are cheaper at scale, perfect lengths reduce spaghetti wiring, and you get to choose quality (solid vs. stranded, shielded vs. unshielded). Plus, learning the T568A/T568B color codes once pays off forever.
Tools & Materials
- Bulk Ethernet cable (Cat5e or Cat6; UTP for most homes, shielded where EMI is heavy)
- RJ45 connectors (regular or pass-through; match to cable category and conductor type)
- Crimp tool (compatible with your connector style)
- Cable stripper and flush cutters
- Optional: strain-relief boots and snagless sleeves
- Cable tester (continuity and pair mapping at minimum)
- Label maker or painter’s tape + marker
Quick choice: For general home patch cords, Cat6 UTP with pass-through plugs is a friendly combo. For in-wall runs, use solid copper, riser or plenum rated as required by code, and terminate to keystone jacks.
Before You Start: Straight-Through vs. Crossover
In 2025, most switches, routers, and NICs support Auto-MDIX, which detects and fixes pair direction automatically. Translation: you’ll almost always build a straight-through cable (T568B to T568B, or T568A to T568A). Only special legacy scenarios still need crossover cables.
This guide uses T568B because it’s common in the U.S., but T568A works equally welljust pick one and use it on both ends for a straight-through patch.
Make a Network Cable in 15 Steps
-
Measureand add a little slack
Route the cable path, then measure the length you need. Add 10–15% for service loops and strain relief. Remember the industry maximum for a channel (end-to-end patching) is about 100 meters (328 feet), which you’ll never hit with typical patch cords.
-
Pick the right cable category
For Gigabit up to 100 m, Cat5e is sufficient; for better headroom and 2.5/5 GbE or even short 10 GbE, choose Cat6. Cat6 has thicker conductors and tighter specs, which helps reduce crosstalk. If you’re buying fresh spools today, Cat6 is the easy “future-proofish” default.
-
Choose solid vs. stranded conductors
Solid copper is ideal for fixed runs and punch-downs; it attenuates less and handles PoE heat better. Stranded flexes repeatedly and shines for movable patch cords. For this DIY patch, stranded Cat6 plus pass-through plugs is beginner-friendly.
-
Cut the cable cleanly
Use flush cutters for a perfectly square end. If the cut looks angled or mashed, trim again. Clean cuts make insertion and crimping painless.
-
Strip the jacketjust enough
With a cable stripper, score about 1 inch (25 mm) of the outer jacket and bend to split. Don’t nick the inner conductors. If you see copper, cut it off and try again.
-
Untwist and fan out the pairs
Separate the four twisted pairs. Keep untwisting to the minimum needed; the twists are what fight noise and crosstalk. For Cat6, you may have a splinetrim flush with the jacket.
-
Arrange wires to T568B (or T568A)
For T568B front-to-back order (left to right with clip away): White-Orange, Orange, White-Green, Blue, White-Blue, Green, White-Brown, Brown. For T568A, swap the green/orange pairs.
-
Straighten, flatten, and trim
Pinch the wires between your fingers to flatten into a neat row. Trim the tips evenly so the copper ends line upabout 1/2 inch (12–13 mm) from the jacket for standard plugs or a touch longer for pass-through connectors.
-
Slide on the boot (optional but smart)
If you’re using strain-relief boots or snagless sleeves, slide them onto the cable before you crimp. Everyone forgets this once. Only once.
-
Insert the conductors into the RJ45
Keep the clip facing down (or away, depending on your perspective) and slide the wires in so each conductor reaches the end of its channel. Ensure the jacket seats under the connector’s strain-relief tab. With pass-through plugs, the conductors exit the nosenice visual confirmation.
-
Crimp with confidence
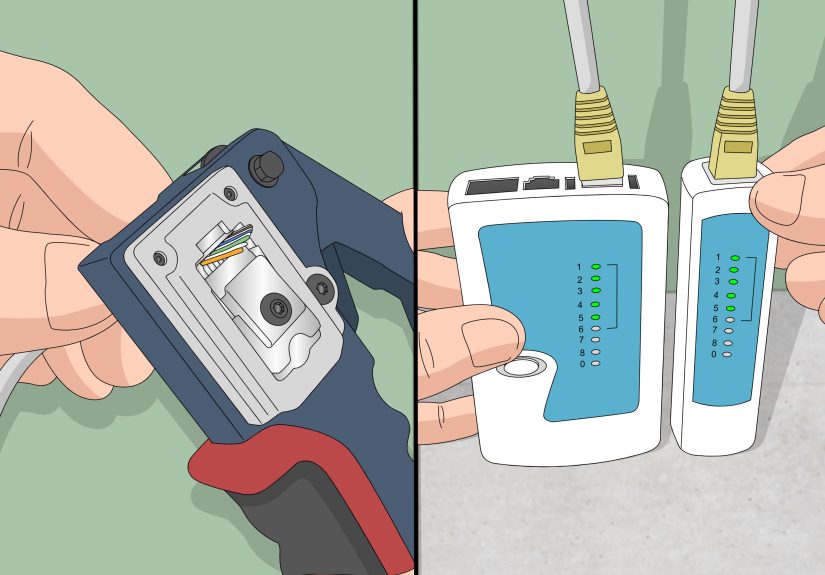
Insert the loaded plug into the crimper and squeeze fully. For pass-through connectors, the tool both trims and crimps in one action. You should see the gold contacts pierced into copper and the jacket captured by the plug’s clamp.
-
Repeat the process for the other end
For a standard patch cord, terminate the second end using the same standard (T568B → T568B). If you truly need a crossover for legacy gear, wire one end T568A and the other T568B.
-
Test the cable
Use a basic tester to verify continuity and pair mapping (1↔1, 2↔2, … 8↔8). Advanced testers can measure NEXT, return loss, and lengthoverkill for most home patches, but essential for pro installs.
-
Label and boot up
Add labels (“NAS↔Switch-A-Port-12”) and slide the boot into place. Tidy cables are faster to support, and future-you will be grateful.
-
Do a live check
Plug it in and confirm link lights and negotiated speed. If you see a 10/100 fallback on modern gear, suspect a termination error or damagere-crimp with fresh hardware.
Pro Tips for Reliable Cables
- Mind the twist: Untwist only what you must near the plug; twists preserve performance against crosstalk.
- Respect bend radius: Gentle arcs, no tight kinks. Pinches and sharp bends can raise return loss.
- Use quality copper: Avoid copper-clad aluminum (CCA). Real solid or stranded copper performs and lasts.
- Consider pass-through connectors: They simplify alignment and reduce mis-termination on your first few builds.
- PoE awareness: For cameras/APs drawing power, prefer solid copper and quality terminations to manage heat and resistance.
FAQ & Smart Choices
Should I use Cat5e or Cat6?
For basic Gigabit and short runs, Cat5e works. If you want room for 2.5/5 GbE and better noise tolerance, go Cat6. It costs a bit more but gives you headroom.
Do I need a crossover cable in 2025?
Almost never. Auto-MDIX in modern switches and NICs lets straight-through cables work in scenarios that once required crossover. Keep crossover in your trivia bank, not your toolkit.
What’s the maximum Ethernet length?
The classic rule is a channel of 100 m (328 ft), including patch cords. Data rates above 10 GbE and special categories like Cat8 have their own limits, but for home/office patching, 100 m is the guardrail.
Do the T568A and T568B color codes perform differently?
Performance is identical if you use the same pattern on both ends for straight-through cables. The difference is which pair stands on which pinstypically a building or org standard decides which to use.
Can I use this for PoE?
YesPoE injects DC over the same pairs that carry data (Mode A) or the other pair set (Mode B). Just prioritize good copper and tight terminations, especially for higher-power devices.
Troubleshooting: Fast Fixes
- Tester says “split pair”: You crossed the orderre-terminate carefully using the T568B (or A) sequence.
- Only 10/100 links: A conductor may not be seated; check that each blade pierced copper and that the jacket is captured.
- No link light: Inspect for a short (two conductors touching). Re-crimp with a fresh plug if needed.
- Flaky PoE: Re-make ends and consider solid copper for long powered runs. Verify injector/switch wattage.
Step Gallery (Add Your Pictures)
-
Measure and add slack. -
Strip 1 in / 25 mm of jacket. -
Lay out to T568B (or T568A). -
Insert, crimp, test, label. Done.
Conclusion
That’s ityou’ve built a standards-compliant patch cord that’ll hum along for years. Whether you’re wiring a desk, a NAS, or a PoE camera, the same playbook applies: neat color order, clean crimps, quick test. Your future network self will thank you.
sapo: Want perfect-length Ethernet cables without the guesswork? This hands-on guide shows you exactly how to build professional-quality patch cords in 15 stepswith pictures. You’ll learn the T568B color order, the right tools, how to crimp like a pro, when to pick Cat5e vs. Cat6, and the fast tests that guarantee full-speed links and reliable PoE. By the end, you’ll have neat, labeled cables and the confidence to wire your home office, gaming rig, or cameras the right way.
of Real-World Experience (What Actually Helps)
The first time I crimped an RJ45, I learned a universal truth: if the conductors aren’t perfectly straight and perfectly flush, the plug will teach you humility. The fix is simpleslow down for 30 seconds. After stripping the jacket, pinch the wires between your index finger and thumb and “comb” them gently. If they still corkscrew, roll them between finger and nail. You’ll feel when the row turns into a neat little ruler; that’s when you cut the tips flat and feed them into the plug.
Pass-through connectors are training wheels you’ll gladly keep. Being able to see all eight conductors peeking outstill in ordersaves rework. It also surfaces the “oops” instantly: if blue and green swapped in the middle, you’ll catch it before the crimper makes it permanent. With regular plugs, the best trick is a light pre-trim: leave the conductors 12–13 mm long, then push until your thumb feels them hit the end of the channels. Visually confirm the copper is under each gold contact line before you crimp.
If your tester flags a split pair, don’t just remake the same mistake faster. Place a sticky note with the T568B order next to your hands. Read it out loud (yes, really): “White-Orange, Orange, White-Green, Blue, White-Blue, Green, White-Brown, Brown.” That chant has saved me hundreds of minutes. Another saver: pre-stage boots on every cable section before you even strip. A little assembly linestrip, order, trim, insert, crimp, bootbuilds muscle memory and makes 10 cords feel like three.
For PoE runs, I favor solid copper and high-quality plugs or jacks. If a camera is rebooting randomly, suspect voltage drop from high resistance in a bad crimp or cheap CCA cable. Redo both ends with fresh hardware; it’s amazing how often “flaky device” becomes “rock solid” after clean terminations. And for outdoor or attic paths, heat matters. Don’t cable-tie the life out of bundles, and avoid sharp 90-degree yanks around studs. Gentle radii keep return loss and alien crosstalk at bay.
Last, labeling and documentation feel boringuntil 2 a.m. The most practical convention I’ve used is “Device-A:Switch-Port-XX” at both ends, with a tiny QR sticker linking to a spreadsheet. It sounds extra, but when a link negotiates at 100 Mb instead of 2.5 Gb, knowing exactly where each end lands turns you into the hero who fixes it in five minutes. That, and a cable tester, is the DIYer’s secret to pro-level uptime.





