Table of Contents >> Show >> Hide
- What Are Sweet Potato Slips, Exactly?
- Why Grow Your Own Sweet Potato Slips?
- When to Start Sweet Potato Slips
- Choose the Best Sweet Potatoes for Slip Production
- Two Easy Methods for Growing Sweet Potato Slips
- The Secret Sauce: Warmth, Moisture, and Light
- When Are Slips Ready to Remove?
- How to Root Slips Before Planting
- How to Transplant Sweet Potato Slips Successfully
- How to Care for Slips After Planting
- Common Mistakes That Slow Down Slip Production
- How Many Slips Can One Sweet Potato Produce?
- Experience Notes: What Gardeners Learn After a Few Rounds
- Final Thoughts
If you have ever looked at a sweet potato and thought, “You seem suspiciously capable of becoming a whole garden,” congratulations. You were right. Sweet potatoes are not usually grown from seed like beans or lettuce. They are grown from slips, which are tender sprouts or vine cuttings that grow from a mature sweet potato root. Once you understand how slips work, growing them feels less like wizardry and more like a very satisfying kitchen-to-garden upgrade.
Learning how to grow sweet potato slips like a pro can save money, give you better control over variety selection, and set you up for a stronger harvest. It is also one of those gardening projects that looks wildly impressive to other people. They see jars, sprouts, vines, and confidence. You see a sweet potato doing what it was born to do.
In this guide, you will learn when to start slips, how to choose the best sweet potatoes for propagation, which method works best, how to avoid the most common mistakes, and what experienced growers wish they had known sooner. Whether you want a few backyard plants or enough slips to make your raised bed look gloriously tropical, this article will help you do it right.
What Are Sweet Potato Slips, Exactly?
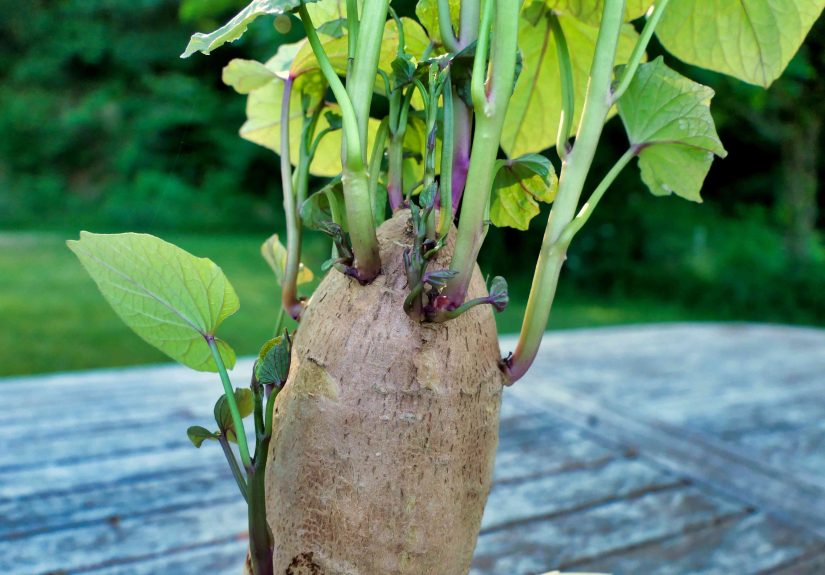
Sweet potato slips are young shoots that emerge from a mature sweet potato root. Those shoots can be removed, rooted if needed, and transplanted into the garden to grow into full sweet potato plants. In other words, the sweet potato itself is not the seed. It is the launchpad.
This matters because sweet potatoes behave differently from regular potatoes. Regular potatoes are usually planted from pieces of tuber with eyes. Sweet potatoes, on the other hand, are generally propagated from slips. That difference trips up plenty of beginner gardeners, right before the sweet potato quietly wins the argument.
If your goal is healthy plants and a strong harvest, slips are the way to go. Good slips are sturdy, green, and actively growing. Weak, pale, stretched-out slips usually come from poor light, cool conditions, or too much patience in the wrong direction.
Why Grow Your Own Sweet Potato Slips?
Buying slips from a nursery is convenient, but growing your own has some real advantages. First, it is budget-friendly. One healthy sweet potato can produce multiple slips, and one well-managed root can keep sending up new growth for several rounds. Second, you get to start on your own schedule. Third, you get the weirdly delightful satisfaction of making a plant nursery out of one grocery-store-looking root.
That said, professional-level results start with smart material. If possible, use certified disease-free sweet potato roots or slips. That is the best choice for reducing disease problems. Many home gardeners do start slips from store-bought sweet potatoes, but you should choose firm, healthy roots with no soft spots, mold, bruising, or shriveled skin. The better the parent root, the better your odds of producing vigorous slips.
When to Start Sweet Potato Slips
Timing is everything here. Start too early and your slips become lanky, crowded, and annoyed. Start too late and your garden season gets shorter than your patience.
A solid rule is to begin your sweet potato slips about 6 to 8 weeks before you plan to transplant outdoors. The transplant date should come after all danger of frost has passed and when the soil has warmed up well. Sweet potatoes love heat and strongly dislike cold soil. They are not shy about this preference. In fact, they are dramatic about it.
If you garden in a warm climate, you can begin earlier in spring and move quickly into the ground once conditions are right. In cooler climates, you may need to start slips indoors, use a warmer microclimate outdoors, or take extra steps to warm the soil before transplanting.
Choose the Best Sweet Potatoes for Slip Production
Look for Healthy Roots
Choose sweet potatoes that are firm, plump, and free from cuts or signs of rot. Avoid roots that look dried out, wrinkled, or damaged. A stressed root can still sprout, but it is less likely to give you those sturdy, cheerful slips you want.
Pick the Right Variety for Your Region
If you are serious about growing sweet potatoes like a pro, variety matters. Gardeners in short-season regions often do best with earlier-maturing varieties. In longer, hotter seasons, you have more flexibility. If you are buying roots specifically for propagation, check with local nurseries, seed companies, or extension recommendations for varieties that perform well in your area.
Certified Is Best
Using certified disease-free roots is one of the best pro moves you can make. It helps reduce problems later and gives you cleaner starting material. Think of it as hiring a reliable lead actor instead of hoping the understudy figures it out mid-show.
Two Easy Methods for Growing Sweet Potato Slips
There are two classic ways to grow sweet potato slips: the water method and the soil method. Both can work. One is more photogenic, and one is often more productive.
Method 1: The Water Jar Method
This is the method most people picture first. You suspend part of the sweet potato in water with toothpicks and place it in a warm, bright spot. It is simple, fun to watch, and perfect if you only need a few slips.
How to do it:
Fill a jar or glass with water. Suspend the sweet potato so the lower portion sits in the water while the upper portion stays above it. Place the jar in bright light and warm conditions. Change the water regularly so it stays fresh and does not turn funky. Funk belongs in music, not propagation jars.
In time, roots will form below and sprouts will emerge above. Once those sprouts reach a usable size, you can remove them and root them further if needed.
Method 2: The Soil or Potting Mix Method
Many experienced growers prefer the soil method because it often produces more slips and creates a setup that feels more natural for the plant. It is also great if you want more than a tiny handful of starts.
How to do it:
Fill a shallow tray or container with moist potting mix, sand, or light growing medium. Lay the sweet potato horizontally or partially nestle it into the medium, leaving part of it exposed. Keep the medium moist but not soggy, and keep the container warm. Some growers use a humidity cover early on, removing it once sprouts appear.
This method can be especially effective when you want multiple slips from several roots. It also avoids the “which end goes where?” panic that sometimes happens with the water method.
The Secret Sauce: Warmth, Moisture, and Light
If you remember only one thing, remember this: sweet potato slips need warmth. Warmth is not optional. It is the entire mood board.
Sweet potatoes sprout best in warm conditions, and many propagation recommendations center around temperatures in the mid-70s to around 80 degrees Fahrenheit. If your house runs cool, a warm room, sunny window, greenhouse bench, or heat mat can make a big difference. In cooler conditions, the root may just sit there like a loaf of bread with trust issues.
Moisture also matters, but the goal is steady moisture, not swamp conditions. Water-grown roots need fresh water and stable levels. Soil-grown roots need evenly moist medium, not a soaking wet container. Too much water invites rot, mold, and regret.
Bright light helps keep slips compact and sturdy. Weak light leads to long, pale growth that looks impressive from across the room and disappointing up close.
When Are Slips Ready to Remove?
Most slips are ready when they are about 4 to 6 inches long, have several leaves, and look strong enough to survive a little handling without writing a formal complaint. Some gardeners let them get a little longer, but waiting too long can make them more crowded and harder to separate cleanly.
To remove a slip, gently twist or pull it from the sweet potato. You want the slip intact and healthy. If it already has tiny roots, great. If not, no panic. You can place the removed slips in water for a few days to encourage rooting before transplanting, or in some cases plant them directly if conditions are right and you will keep them well-watered.
The mother root can continue producing more slips after the first round, so do not toss it after one harvest unless it is clearly declining.
How to Root Slips Before Planting
Rooting slips in water for a short period is a popular next step. Place the lower stems in a jar of clean water and keep the leaves above the waterline. Within a few days, you may see roots form. This gives the slip a head start and can make transplanting feel less risky, especially for beginners.
Some growers skip pre-rooting and plant slips directly into warm garden soil. That can work well too, especially in hot climates or when the soil is already ideal. The real key is matching your method to your conditions. A rooted slip in warm soil is great. An unrooted slip in cold mud is a tiny tragedy.
How to Transplant Sweet Potato Slips Successfully
Wait for Warm Soil
Do not rush the planting date. Sweet potato slips should go outside only after frost danger has passed and the soil is warm. Many recommendations use about 65 degrees Fahrenheit or higher as a minimum soil temperature target. Warm soil helps slips establish quickly and reduces stress.
Prepare Loose, Well-Drained Soil
Sweet potatoes grow best in loose, well-drained soil. Sandy loam or amended garden soil is ideal. Heavy, soggy soil can lead to misshapen roots and poor growth. Raised rows or ridges are especially helpful because they improve drainage, warm faster, and make the roots easier to harvest later.
Give Them Sun and Space
Choose a site with full sun. Sweet potatoes are not interested in a half-hearted lighting situation. Space slips roughly 12 to 18 inches apart in rows about 3 feet apart, depending on variety and growing system. This gives vines room to spread and roots room to size up underground.
Plant Deep Enough
Bury the lower portion of the slip so the stem nodes are under the soil while the upper leaves stay above ground. Many gardeners plant slips a few inches deep. Firm the soil gently around the roots or stem, then water thoroughly.
How to Care for Slips After Planting
The first week or two after transplanting is crucial. Keep the soil consistently moist while the slips establish. After that, aim for even moisture, often around an inch of water per week, depending on rain and heat. The goal is steady growth, not feast-or-famine watering.
Keep weeds down early, especially before the vines spread and shade the ground. Once the vines take off, they can do a respectable job of crowding out competition. Until then, weeds are rude roommates.
Be careful with fertilizer, especially nitrogen. Too much can push lush vine growth at the expense of good root development. A soil test is the smartest route if you want to dial things in like a pro. Sweet potatoes like fertile soil, but not a buffet that turns them into all leaves and no storage roots.
Common Mistakes That Slow Down Slip Production
Starting Too Cold
Cool temperatures are one of the biggest reasons slips stall. If your sweet potato is just sitting there doing absolutely nothing, the room is probably too cool.
Keeping the Medium Too Wet
Whether you are using water or soil, too much moisture without enough oxygen can cause rot. Clean water, fresh containers, and moderate moisture matter more than people think.
Using Weak or Damaged Roots
Propagation is easier when the parent root is healthy. A poor-quality sweet potato may still sprout, but you are starting the race in flip-flops.
Planting Outdoors Too Early
Even strong slips can struggle when planted into cold soil. Waiting for warmth is one of the most professional choices you can make, even if spring sunshine is trying to talk you into bad decisions.
How Many Slips Can One Sweet Potato Produce?
The exact number depends on the variety, the size and health of the root, and how well you manage the conditions. Some roots produce just a modest batch. Others keep sending up sprouts like they are trying to win an award. If conditions are warm and the root stays healthy, you may be able to harvest multiple rounds of slips from a single sweet potato.
That is one reason home propagation is so appealing. A few roots can turn into a surprisingly generous number of transplants.
Experience Notes: What Gardeners Learn After a Few Rounds
Once gardeners have grown sweet potato slips a few times, their experience tends to sound very similar. The first lesson is that warmth solves half the problems. People often assume they need a more complicated setup, when what they really need is a warmer room or a heat mat. A sweet potato placed in a cool kitchen can sit still for weeks. The same root moved to a warmer, brighter place suddenly decides life is worth living again and starts pushing out sprouts.
The second lesson is that the soil method often feels easier in real life than it looks on paper. The water jar method is charming, visible, and fun for a windowsill project, but many gardeners find that roots started in moist potting mix produce more slips with less fuss. There is no need to top off water every other day, and you avoid that moment when the jar starts smelling like a science experiment that should not have been left unattended over the weekend.
Another common experience is that patience matters most right before success. Sweet potatoes can appear inactive for a while, especially early in the process. Then, once they begin, growth picks up quickly. Gardeners who give up too soon often toss perfectly good roots just before the sprouts would have emerged. The pros learn to watch for firmness, warmth, and moisture instead of demanding instant drama.
Many backyard growers also discover that bigger is not always better when it comes to slips. It is tempting to leave them attached until they are long and viney, but medium-sized slips are usually easier to handle, easier to root, and easier to transplant. Shorter, sturdier slips tend to adjust better than giant floppy ones that look like they just pulled an all-nighter.
One practical observation that comes up again and again is how important it is to harden slips gently if they have been growing indoors in cozy conditions. A tender slip that moves straight from a warm windowsill to bright sun and wind outside may wilt dramatically. That does not always mean it will die, but it definitely means it is having a terrible day. Gradually introducing slips to outdoor conditions improves survival and reduces transplant stress.
Experienced growers also become less obsessed with perfection. Not every slip needs a huge root system before planting. Not every mother potato needs to be beautiful. Not every vine needs to look like it belongs in a catalog. What matters most is a warm start, healthy growth, and smart transplant timing. Once the slips are in warm soil with sun, moisture, and room to spread, they often take off with surprising speed.
And finally, almost every gardener who succeeds with sweet potato slips says some version of the same thing: the process is much easier the second time. The first year, you overthink everything. Is the root upside down? Is the room too cold? Is that a sprout or just wishful thinking? By the second round, you know what healthy growth looks like, you stop fussing so much, and the entire project becomes one of the most satisfying parts of the growing season.
Final Thoughts
If you want to grow sweet potato slips like a pro, focus on the fundamentals: start with healthy roots, begin 6 to 8 weeks before planting time, keep everything warm, provide steady moisture and bright light, remove slips when they are sturdy, and transplant only after the soil is truly warm. That is the formula.
You do not need fancy gear, a greenhouse empire, or secret gardening powers. You just need to respect the sweet potato’s love of warmth and avoid rushing the outdoor planting date. Do that, and your slips can turn from a humble root on the counter into a productive patch of sweet potatoes in your garden. Not bad for a vegetable that started its journey looking like lunch.





