Table of Contents >> Show >> Hide
- What Is a Plié in Ballet?
- Why the Plié Matters So Much
- Before You Start: Set Up Your Body the Right Way
- How to Do a Demi-Plié in Ballet: Step by Step
- How to Do a Grand Plié Without Turning It Into a Disaster
- Common Beginner Mistakes in a Plié
- Expert Tips for a Better Plié
- Simple At-Home Drills to Improve Your Plié
- How Often Should Beginners Practice?
- Beginner Experiences: What Your First Month of Pliés Really Feels Like
- Conclusion
If ballet had a “start here” button, it would be the plié. This simple-looking bend of the knees shows up at the barre, in the center, before jumps, after jumps, before turns, after turns, and basically whenever ballet decides your legs haven’t worked hard enough yet. For beginners, learning how to do a plié in ballet is one of the smartest things you can do, because it teaches alignment, control, balance, and that very ballet-specific skill of looking calm while your thighs quietly file a complaint.
A well-done plié is not just a knee bend. It is a full-body movement that starts from posture, travels through the hips and legs, and finishes in the feet pressing into the floor. Done correctly, it helps you move with more strength and less strain. Done badly, it can turn into a wobbly squat wearing ballet shoes and optimism.
This beginner-friendly guide breaks down what a plié is, how to do it step by step, what mistakes to avoid, and how to practice safely at home. Whether you are starting ballet as a child, teen, or adult beginner, these tips will help you build a cleaner, stronger foundation from day one.
What Is a Plié in Ballet?
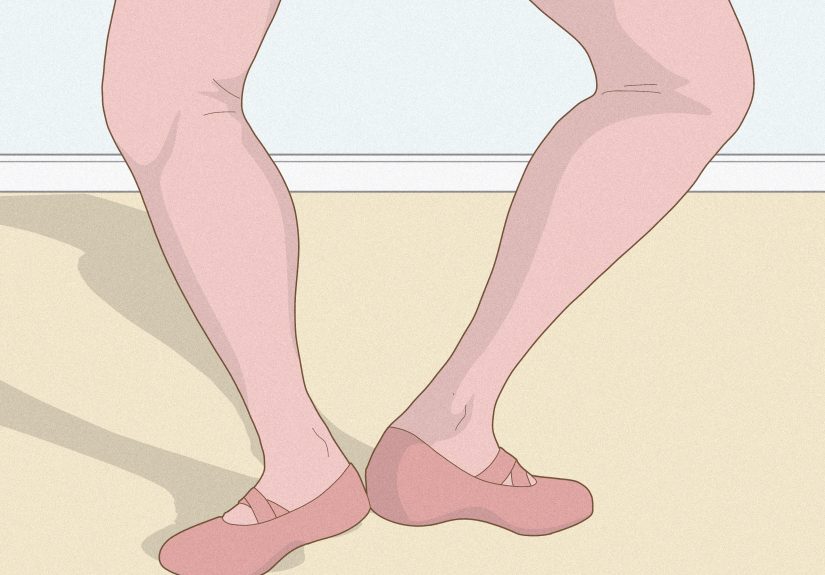
In ballet, plié means “to bend.” It refers to bending the knees while maintaining turnout from the hips and keeping the knees tracking in the same direction as the toes. There are two main versions beginners should know:
Demi-Plié
This is a half bend of the knees. It is the version most beginners practice first, and for good reason. A demi-plié teaches control, posture, and coordination without asking your body to go too deep too soon.
Grand Plié
This is a deeper bend of the knees. It requires more strength, mobility, and awareness. Beginners can absolutely learn about it, but they should not rush it. A grand plié is not a contest to see how dramatically you can descend toward the floor. Ballet is not impressed by panic depth.
A plié can be done in all five ballet positions, but most beginners start in first position or second position. Those are more accessible and make it easier to learn alignment before adding more complicated foot placement.
Why the Plié Matters So Much
The plié is one of the most important building blocks in ballet technique. It helps warm the body, strengthen the legs, improve balance, and prepare the dancer for bigger movements. In class, pliés often come early because they wake up the ankles, knees, hips, and feet while reinforcing posture and turnout.
It also teaches an important ballet principle: going down correctly helps you go up correctly. A clean plié supports jumps, turns, changes of direction, smooth landings, and transitions into steps like relevé and pirouette. In other words, if your plié is messy, the rest of your dancing may start looking like a group project where nobody did their part.
Before You Start: Set Up Your Body the Right Way
Before you bend your knees, make sure the rest of your body is organized. A good plié starts long before the actual bending begins.
1. Start in First or Second Position
First position places the heels together with the toes turned outward. Second position places the feet apart with turnout. If first position feels too tight or forced, second position is often more beginner-friendly because it gives you more room to balance and more space for the knees to travel.
2. Turn Out from the Hips, Not the Knees
This is one of the biggest beginner lessons in ballet. Turnout should come from the hip joint, not from twisting the knees, ankles, or feet into an angle they hate. You do not need a perfect 180-degree turnout to do a good plié. You need honest turnout that your body can support safely.
3. Stack Your Posture
Stand tall with a long spine, relaxed shoulders, lifted chest, and a neutral pelvis. Avoid sticking the ribs forward or tucking the pelvis under too aggressively. Think of your head floating upward while your legs root down into the floor.
4. Wake Up the Feet
Your feet should not be floppy decorations attached to your legs. Press evenly through the floor and keep the arches active. A beginner cue that helps is to imagine the whole foot staying awake rather than rolling inward or collapsing toward the big toe side.
5. Warm Up First
Before practicing pliés, do a brief dynamic warm-up. Gentle leg swings, ankle circles, marching, hip circles, and easy calf raises can help prepare the body. Save long static stretches for after class or after practice, when the muscles are warm.
How to Do a Demi-Plié in Ballet: Step by Step
- Stand in first or second position. Keep your turnout natural and manageable.
- Lengthen through the spine. Think tall, not stiff. Your upper body should feel lifted without looking robotic.
- Engage your core gently. You do not need to brace like you are about to bench-press a piano. Just feel supported through the center of the body.
- Bend the knees over the toes. The knees should travel in the same direction as the feet. If the knees collapse inward, reset and reduce the turnout.
- Keep the heels grounded. In a demi-plié, the heels stay on the floor. This helps build proper alignment and control.
- Do not fold forward. The torso stays lifted and centered. A plié is not a bow, a slump, or a dramatic apology to the floor.
- Press through the feet to rise. Straighten the legs with control, using the floor to help you return to standing.
The up portion matters just as much as the down portion. Many beginners sink carefully, then pop back up like toast. Try to make both directions smooth and controlled.
How to Do a Grand Plié Without Turning It Into a Disaster
Once your demi-plié feels clean, you can begin learning the grand plié. The deeper bend requires more strength and more joint awareness, so it is best approached slowly.
Here are the basics:
- Start exactly as you would for a demi-plié: tall posture, supported core, turnout from the hips, active feet.
- Continue bending past demi-plié only as far as you can maintain alignment.
- In first position, the heels may release naturally as you go deeper.
- In second position, the heels generally stay down.
- Descend and rise with control rather than dropping quickly into the bottom of the bend.
The goal is not maximum depth. The goal is a balanced, supported movement that your body can handle well. If your pelvis tips, your knees collapse, or your feet roll in, you have gone too far for your current level.
Common Beginner Mistakes in a Plié
Forcing Turnout
This is the classic mistake. Beginners often try to mimic advanced dancers by turning the feet out farther than the hips can support. The result is usually twisted knees, rolling ankles, and unhappy feet. Use the turnout you can actually control.
Knees Not Tracking Over Toes
When the knees cave inward, alignment breaks down. This can place extra stress on the joints and make the movement unstable.
Rolling Inward on the Feet
If the arches collapse, the plié loses its strength. Think of evenly grounded feet with energy through the arches instead of sinking into the inner edges.
Sticking the Seat Out
A plié is not a gym squat. In ballet, the pelvis stays organized under the torso rather than tipping way back.
Lifting the Heels in Demi-Plié
Unless you are doing a grand plié in a position where the heels naturally release, keep the heels down. A floating heel in demi-plié usually means the ankles, turnout, or weight placement need attention.
Going Too Deep Too Soon
Depth without control is not progress. Ballet rewards precision, not chaos with good intentions.
Expert Tips for a Better Plié
Think “Down Through the Floor, Up Through the Spine”
This cue helps keep the movement grounded and lifted at the same time. You are not collapsing downward. You are resisting gravity while staying long.
Use the Whole Leg
Your plié is supported by the thighs, glutes, hips, calves, and feet. It is not just a knee action. When the whole leg works together, the movement feels smoother and stronger.
Practice in Front of a Mirror, Then Away From It
A mirror can help you check whether your knees and toes are traveling together. But do not become dependent on it. Good ballet technique eventually has to live in your body, not only in your reflection.
Hold the Barre Lightly
If you are practicing at a barre, chair, or countertop, use it for balance rather than survival. Gripping too hard often creates tension in the shoulders and neck.
Breathe
It sounds obvious, yet many beginners hold their breath the second they try to look elegant. Inhale to prepare, exhale through effort, and keep the upper body relaxed.
Stay Musical
Even the most technical plié should have rhythm and flow. Ballet is not only about mechanics. It is technique set to music, not a silent negotiation with your quadriceps.
Simple At-Home Drills to Improve Your Plié
Supported Demi-Pliés
Stand at a sturdy surface and do 8 slow demi-pliés in first position and 8 in second. Focus on alignment more than depth.
Relevé to Plié
Rise to demi-pointe, lower the heels, then bend into a demi-plié. This helps you feel the connection between feet, ankles, and legs.
Wall Posture Check
Stand with the back of your head, upper back, and pelvis lightly against a wall. Step forward and try to keep that same tall organization in your plié.
Gentle Ankle and Hip Mobility Work
Before practice, add ankle circles, calf raises, hip circles, and marching. These small movements can make a surprising difference in how your plié feels.
How Often Should Beginners Practice?
For most beginners, a few focused sessions each week are better than daily marathon practice fueled by ambition and vibes. Ten to fifteen minutes of careful plié work, two to four times per week, is enough to build awareness without overdoing it.
If you feel sharp pain, ongoing knee discomfort, ankle instability, or soreness that keeps getting worse instead of better, stop and check your technique. If needed, ask a qualified ballet teacher, dance-trained physical therapist, or medical professional with experience working with dancers.
Beginner Experiences: What Your First Month of Pliés Really Feels Like
Here is the part many beginners do not hear often enough: your first pliés may feel surprisingly awkward, and that is completely normal. In week one, many new dancers discover that “bend your knees” is somehow not simple when you also have to stand tall, turn out from the hips, keep the heels down, engage the core, relax the shoulders, breathe naturally, and avoid looking like a confused flamingo. Ballet has a talent for making very small movements feel hilariously complex.
During the first few practices, beginners often notice their feet working much harder than expected. The arches may feel sleepy at first, and then suddenly very awake. Some students realize one foot rolls inward more than the other. Others notice that one knee tracks cleanly while the other likes to wander. That is not failure. That is information. A plié is honest. It quickly shows you where you are strong, where you are tight, and where your body needs better coordination.
By the second week, many beginners start to feel the difference between “going low” and “moving well.” At first, the temptation is to bend deeper because deeper feels more impressive. But once you learn to keep the spine lifted and the knees aligned over the toes, you realize a smaller, cleaner plié looks and feels much more like ballet. This is usually the moment when a teacher says something simple like, “Less depth, more control,” and it changes everything.
Another very common experience is discovering that the rise out of the plié is harder than the descent into it. Going down feels manageable. Coming up with the same smoothness, while keeping the heels grounded and the torso organized, is where beginners often start shaking. That gentle leg tremble is not glamorous, but it is a pretty good sign that your muscles are finally doing the correct job instead of letting momentum take over.
Emotionally, the plié can also be a strange little teacher. Some beginners feel self-conscious because the movement looks basic. Others get frustrated because it does not look elegant right away. But the dancers who improve fastest are usually the ones who stop trying to make the plié look advanced and start trying to make it look accurate. Ballet rewards patience in a very old-fashioned way. It basically says, “Yes, you may be graceful later. First, please learn where your knees are going.”
After a few weeks, the most encouraging change is often not visual. It is sensory. You begin to feel more grounded in the floor. Your turnout becomes more honest. Your ankles feel more responsive. Your posture starts to organize itself faster. A plié that once felt like five instructions happening at once begins to feel like one connected movement. That is when beginners usually realize they are not just copying ballet anymore. They are starting to understand it from the inside out.
And honestly, that is the real beginner win. Not a perfect shape. Not a dramatic grand plié. Just the moment when your body stops arguing with the exercise and starts working with it.
Conclusion
If you want to learn ballet well, start by learning your plié well. It may seem basic, but it teaches nearly everything a beginner needs: posture, turnout, foot pressure, coordination, strength, musicality, and control. A good plié is grounded, lifted, aligned, and never forced. Keep your turnout honest, your knees tracking over your toes, your feet active, and your practice consistent. With time, this simple movement becomes one of the most useful tools in your ballet technique.




