Table of Contents >> Show >> Hide
- What Is an Upside-Down Christmas Tree (and Why Would You Do This)?
- Start Here: Choose the Right Tree for an Upside-Down Setup
- Safety First (Because “Holiday Cheer” Shouldn’t Include a Trip to the Hardware Store ER)
- How to Hang an Upside-Down Christmas Tree (Step-by-Step)
- How to Decorate an Upside-Down Christmas Tree So It Looks Intentional
- Design Ideas That Make an Upside-Down Tree Look High-End
- Common Mistakes (and How to Fix Them Fast)
- FAQ: Upside-Down Christmas Trees
- Conclusion: Flip the Tree, Keep the Cozy
- Real-World Experiences: What It’s Actually Like Decorating an Upside-Down Tree (500+ Words)
Every holiday season, the Christmas tree has the same two jobs: look magical and quietly steal a chunk of your living room like it pays rent. If you’ve ever tried to squeeze a tree into a small space (or you share a home with energetic pets, curious kids, or a Roomba with big opinions), you already know the struggle.
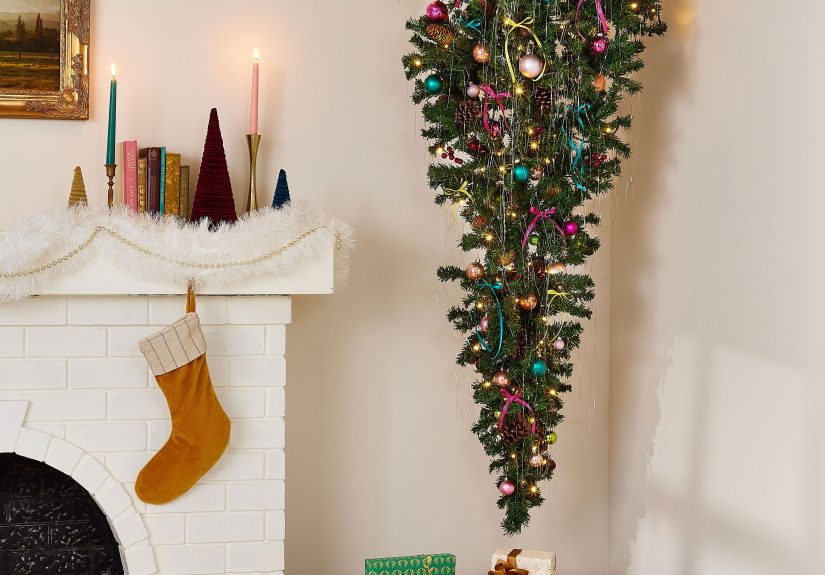
Enter the upside-down Christmas treealso called an inverted or hanging Christmas tree. It’s exactly what it sounds like: the trunk goes up, the point goes down, and suddenly your floor space feels like it got a holiday bonus.
Is it a little dramatic? Yes. Is it a conversation starter? Absolutely. And when it’s styled well, it can look surprisingly elegantlike your home hired a professional set designer… who also likes to live dangerously (but safelymore on that in a second).
What Is an Upside-Down Christmas Tree (and Why Would You Do This)?
An upside-down Christmas tree flips the traditional silhouette so the widest branches are at the top and the narrower point faces the floor. There are two common setups:
- Ceiling-hung: the tree is suspended from a ceiling joist or heavy-duty mount.
- Purpose-built inverted tree: a manufactured tree designed to stand “upside down” using a special base.
The real benefits (beyond “because it’s cool”)
- More usable floor space: Great for apartments, narrow rooms, and layouts where a standard tree blocks traffic flow.
- Better ornament visibility: Ornaments hang lower, closer to eye level, so your favorites don’t disappear in the upper branches.
- Pet and kid strategy: When styled thoughtfully, fragile ornaments can go higher (closer to the ceiling), while shatterproof pieces shine within reach.
- A built-in “wow” factor: It’s a holiday centerpiece that looks intentionalnot accidental.
A quick note on “meaning” and history
You’ll hear a few origin stories: some sources tie inverted evergreens to medieval European hanging traditions, while others connect it to religious symbolism. The truth is, it’s hard to pin down one single origin with total certaintyso treat the “meaning” as optional and the style as the main event.
Start Here: Choose the Right Tree for an Upside-Down Setup
Option A: A purpose-built upside-down tree (easiest)
If you want the look with the least engineering, buy a tree made to be displayed inverted. These usually come with a base designed for stability. They’re especially handy if you don’t want ceiling hardware involved.
Option B: A ceiling-hung artificial tree (most dramatic)
This is the iconic “floating” look. Artificial trees are strongly preferred here because they’re lighter, cleaner, and don’t come with the real-tree challenge of daily watering (or the fear of pine needles raining down like festive confetti).
Option C: A real tree… but think twice
Real trees are heavier, harder to secure, and require consistent watering to stay fresh. If you’re determined, consider a smaller real tree and consult someone experienced with safe mounting. For most homes, an artificial tree is the practical (and safer) route.
Safety First (Because “Holiday Cheer” Shouldn’t Include a Trip to the Hardware Store ER)
Let’s make this simple: if you’re hanging a tree, you’re hanging a weighted object over the area where people walk, sit, take selfies, and dramatically unwrap gifts. So we’re prioritizing safety like it’s the star on topexcept, you know, the star is now at the bottom.
Hanging safety basics
- Anchor into a structural support: Use a ceiling joist/stud or a properly installed mount designed for load-bearing weight.
- Know your weight: Estimate the combined weight of the tree + lights + ornaments + garland. Choose hardware rated comfortably above that.
- Test before decorating: Hang the bare tree first and gently check stability before adding anything.
- Keep it clear: Don’t hang the tree where it blocks a doorway or an exit path.
Fire and electrical safety (non-negotiable)
- Keep distance from heat: Leave generous space between the tree and fireplaces, radiators, candles, vents, and space heaters.
- Inspect your lights: Avoid strings with frayed wires, loose sockets, cracked insulation, or missing bulbs.
- Use tested lights: Look for lights listed/certified by a qualified testing lab.
- Turn off lights when sleeping or leaving: Make it a habit (or use a properly rated timer).
Pro tip: If you’re hanging the tree in a high-traffic area, consider using lightweight ornaments and skipping heavy décor entirely. Your design style can be “minimalist-chic,” not “gravity-chic.”
How to Hang an Upside-Down Christmas Tree (Step-by-Step)
This section assumes an artificial tree designed for standard assembly. If you’re using a purpose-built inverted tree, follow the manufacturer instructions and jump to the decorating section.
Step 1: Pick the right spot
- Choose a location with enough ceiling height so the point of the tree doesn’t poke someone in the forehead during movie night.
- Make sure the “visual center” works: above gifts, above a tree collar display, or centered over a rug.
- Confirm you have a sturdy joist/stud where the hanging hardware will be installed.
Step 2: Assemble and secure the tree
Most artificial trees are designed so gravity helps the sections nest and stay aligned. When inverted, you may need to secure the sections (for example, with manufacturer-approved fasteners or additional stabilization) so nothing shifts over time.
Step 3: Add a strong hanging point
The goal is a single, secure attachment point that can handle the load without twisting. Many decorators use heavy-duty hanging wire, straps, or hardware made for supporting ceiling-hung décor. Keep it clean and tight so the tree hangs straight.
Step 4: Hang the tree bare and level it
Before décor, hang the tree and step back. Does it tilt? Does it spin? Fix that now. A slightly off-center upside-down tree is like a crooked picture frame: you’ll notice it forever.
Step 5: Fluff like you mean it
Artificial branches need shaping, especially when inverted. Spread and fluff the branches so the top looks full and balanced. This is also when you decide where you want visual “weight” (more décor near the lower point, or a fuller look at the top).
How to Decorate an Upside-Down Christmas Tree So It Looks Intentional
Decorating an upside-down tree is like decorating a traditional tree… except your instincts will betray you for the first five minutes. That’s normal. Here’s the strategy that works.
1) Lights: start near the ceiling and work down
Because the trunk and cords begin up top, it helps to wrap lights starting near the ceiling area and moving downward toward the tip. Secure loose cords so nothing dangles. If you’re pre-lit, still do a quick check for cord visibility and tuck where needed.
2) Ornaments: go lighter at the bottom point
The narrow bottom tip draws attentionso it’s tempting to load it up. Resist. Use lightweight ornaments toward the bottom and save heavier pieces for the wider, sturdier branches nearer the ceiling.
Easy visual rule: The closer an ornament is to the very bottom point, the smaller and lighter it should be.
3) Garlands and ribbon: drape downward for a waterfall effect
Garland and ribbon can look stunning on an inverted tree because gravity naturally creates graceful lines. Try these looks:
- Ribbon cascade: Attach ribbon near the ceiling and let it drape in soft curves down the branches.
- Beaded garland: Use it sparingly and let it fall naturally (too much can feel chaotic).
- Minimalist strand: One statement garland spiraling down is often more elegant than five fighting for attention.
4) The “tree topper” problem (and the fun solutions)
On an upside-down tree, the point faces the floorso the traditional star-on-top becomes star-on-bottom. That’s not a problem; it’s an opportunity.
- Bottom star: Use a lightweight star or bow at the tip, then build a “spotlight moment” underneath with wrapped gifts.
- Ceiling statement: Place a wreath, oversized bow, or ceiling medallion above the trunk attachment to disguise hardware and create a polished finish.
- Halo lighting: Add a small ring of warm lights near the ceiling mount to create a soft glow and make the whole setup look deliberate.
5) What replaces the tree skirt?
Since the “base” is now at the ceiling, a traditional tree skirt doesn’t make sense. Instead, try:
- Gift cluster on a rug: Place gifts in a circle under the tree tip to anchor the display.
- Tree collar vignette: Use baskets, lanterns, faux snow, or wrapped boxes to create a “holiday landing zone.”
- Small table moment: If the tip hangs above a console or side table, create a mini display with candles (battery-operated), greenery, and ornaments.
Design Ideas That Make an Upside-Down Tree Look High-End
Style 1: Modern minimal
Stick to one or two ornament finishes (matte + glossy) and one light color temperature. Add ribbon sparingly. The upside-down silhouette is already boldminimal décor makes it feel curated, not cluttered.
Style 2: Glam metallic
Gold, champagne, silver, and crystal-like ornaments look especially striking because they catch light at eye level. Add a single dramatic garland and keep everything else refined.
Style 3: Cozy rustic
Use wood ornaments, pinecones, plaid ribbon, and warm white lights. Put the most textured elements near the ceiling where branches are wider, then let simpler pieces trail downward.
Style 4: Candy-color fun
Pastels or bright candy shades look playful and modern. Pair with oversized ornaments (lightweight!) and ribbon that drapes like a peppermint waterfall.
Style 5: Ornament “gallery” tree
Because ornaments hang lower on an inverted tree, it’s perfect for showcasing sentimental pieces. Group ornaments by theme (travel, childhood, handmade) in clusters rather than scattering randomly.
Style 6: Small-space Scandinavian
Keep it airy: simple baubles, straw stars, white lights, and natural greenery. Let the negative space do some of the decorating for you.
Common Mistakes (and How to Fix Them Fast)
Mistake: The tree looks “top heavy”
Fix: Reduce dense ornament clusters near the ceiling and move a few medium ornaments lower to balance the silhouette. Also, add a ribbon cascade to visually connect top to bottom.
Mistake: Ornaments swing or fall off
Fix: Use secure hooks, ornament ties, or gentle wire (especially if there’s airflow from vents). Lightweight ornaments help, too.
Mistake: You can see the cords and hardware
Fix: Wrap a greenery swag or ribbon around the ceiling mount area. Add a decorative element above (wreath, bow, ceiling medallion look) to make it feel finished.
Mistake: The bottom point is awkward
Fix: Make the area under the tip a “moment.” Add wrapped gifts, a plush tree skirt alternative (like a small faux fur rug), or a simple holiday vignette.
FAQ: Upside-Down Christmas Trees
Are upside-down Christmas trees safe?
They can beif they’re installed correctly with load-rated hardware and sensible decorating choices. Prioritize structural support, keep the tree away from heat sources, inspect lights, and turn lights off when you’re asleep or away.
Do upside-down trees work with pets?
They can help, especially if you keep fragile ornaments higher and use shatterproof décor lower. But if your cat considers gravity a suggestion, choose lightweight ornaments and avoid dangling temptations near the bottom tip.
What’s the easiest way to get the look without hanging anything?
Buy a purpose-built upside-down tree that’s designed to stand inverted with its own base. You still get the silhouette, without ceiling installation.
Conclusion: Flip the Tree, Keep the Cozy
An upside-down Christmas tree isn’t just a quirky trendit’s a smart design move for small spaces, busy households, and anyone who wants their holiday décor to feel fresh. The keys are simple: choose the right tree, install it safely, decorate with lightweight balance, and treat the ceiling area like part of the design (not an awkward secret you hope nobody notices).
If you’ve been craving a holiday centerpiece that feels newwithout losing the warm, nostalgic vibethis is your sign to turn tradition on its head. Literally.
Real-World Experiences: What It’s Actually Like Decorating an Upside-Down Tree (500+ Words)
Here’s what people often discover once they commit to an upside-down Christmas treebecause there’s “how it looks on Pinterest” and then there’s “how it feels when you’re holding a string of lights and questioning your life choices.” The good news: the learning curve is short, and the payoff is huge.
Experience #1: The setup feels weird… until it suddenly doesn’t.
The first few minutes are the hardest. Many decorators say their brains keep trying to “correct” the shape. You’ll instinctively reach for the widest branches as if they should be near the floor. Then you step back, see the outline, and it clicks: the room looks bigger. The tree feels like it’s floating. And you realize you’ve created a centerpiece that doesn’t eat your walking space.
Experience #2: Ornament placement becomes more intentional (in a good way).
With a traditional tree, it’s easy to mindlessly scatter ornaments and hope the lights make everything look fine. An inverted tree encourages a more thoughtful approach. People often end up curating their ornaments by size and weightheavier pieces up high where branches are strongest, lighter pieces down low where the silhouette narrows. The result is usually more polished than their usual “toss it on and call it festive” method (no judgment; we’ve all been there).
Experience #3: The bottom tip becomes a spotlight moment.
The narrow point facing the floor naturally draws the eye, so many households turn that area into a mini stage. Some stack wrapped gifts in a tidy cluster. Others place a small bench or basket underneath with cozy throws, holiday books, or plush pillows. The best part? That bottom area is photo-friendly. If your family does holiday pictures, the inverted tree creates a natural frame without taking over the whole background.
Experience #4: Kids and pets change the decorating strategy.
Families with kids often love that the lower ornaments are easy to reachespecially if they use shatterproof ornaments and kid-made decorations. One common approach is to treat the bottom third as the “family zone” (soft ornaments, handmade pieces, candy-cane vibes) and keep the upper area more styled (metallics, glass, heirlooms). Pet owners tend to do the opposite: they keep tempting, breakable ornaments higher and choose non-breakable décor lower so a curious paw doesn’t turn the living room into a hazard zone.
Experience #5: Lighting is easier than you expectif you hide cords early.
People who love the look but worry about visible cords usually find that the fix is simple: tuck cords while you wrap lights instead of waiting until the end. A small habitlike securing cords with clips or hooks as you gomakes the finished tree look clean. Many decorators also report they prefer a timer, because it keeps the tree glowing at the best times (evenings) without having to remember to turn it off later.
Experience #6: Guests either love it or need a minute.
Upside-down trees get reactions. Some guests immediately want one. Others stare for a second like they’re trying to solve a riddle. But nearly everyone ends up talking about itwhich is kind of the point. Holiday décor is meant to create atmosphere, and an inverted tree brings a playful, modern twist without losing that classic Christmas sparkle.
The biggest lesson people share: treat it like a design installation, not just a tree. When you style the ceiling area (hide hardware, add greenery, make the mount look intentional) and balance the décor by weight and size, the upside-down Christmas tree stops looking like a gimmick and starts looking like an interior design choice.




