Table of Contents >> Show >> Hide
- What You Need Before You Cut Drywall
- Method 1: Score and Snap for Straight Cuts
- Method 2: Use a Drywall Saw for Cutouts and Small Openings
- Which Drywall Cutting Method Is Better?
- Common Drywall Cutting Mistakes to Avoid
- Safety Tips for Cutting Drywall at Home
- Specific Examples of Easy Drywall Cuts
- of Real-World DIY Experience and Lessons Learned
- Conclusion
If you have ever stared at a full sheet of drywall and thought, “This seems simple, which means I should be nervous,” welcome to the club. The good news is that cutting drywall is not some mysterious contractor superpower. In fact, once you know the right approach, it is one of the friendlier DIY skills out there. The trick is using the right method for the right kind of cut.
For most homeowners, there are really only two easy drywall cutting methods worth mastering. The first is the classic score-and-snap method, which is perfect for long, straight cuts. The second is the drywall saw method, which is ideal for outlet openings, small cutouts, and shapes that are too fussy for a utility knife alone. Learn these two techniques, and you will be able to handle most drywall projects without turning your workspace into a gypsum snow globe.
In this guide, you will learn which tools matter, how to make clean cuts, how to avoid common mistakes, and how real-world DIYers can save themselves time, dust, and frustration. Let’s make your drywall fit like it actually wants to be there.
What You Need Before You Cut Drywall
You do not need a truckload of specialty gear to cut drywall cleanly. For most projects, a small stack of basics gets the job done:
- Utility knife with fresh, sharp blades
- Drywall T-square or straightedge
- Tape measure
- Pencil
- Drywall saw or jab saw
- Drywall rasp for smoothing rough edges
- Safety glasses
- Dust mask or respirator if dust will be generated
- Work gloves if you want to keep your knuckles on speaking terms with the material
If you are cutting full sheets, a stable work surface helps a lot. A pair of sawhorses or a sacrificial sheet of foam insulation under the drywall makes the job easier. If you are only cutting a small repair patch, a flat floor works fine too.
Method 1: Score and Snap for Straight Cuts
The score-and-snap drywall method is the gold standard for straight cuts. It is fast, clean, and usually creates less dust than powering through the board with a saw. If you are trimming a sheet to length or width, this is almost always the best place to start.
When to Use This Method
Use score and snap when you need:
- Long straight cuts
- Rip cuts along the length of a sheet
- Crosscuts to shorten a panel
- A cleaner, lower-dust alternative to power cutting
Step 1: Measure Carefully
Measure the opening or wall area where the drywall will go. Mark the measurement on both edges of the panel if you are making a long cut. Then connect those marks using a drywall square or straightedge.
This is not the moment for wild optimism. If your framing is a little out of square, measure in more than one spot. Drywall is pretty forgiving once it is taped and finished, but not forgiving enough to reward guessing.
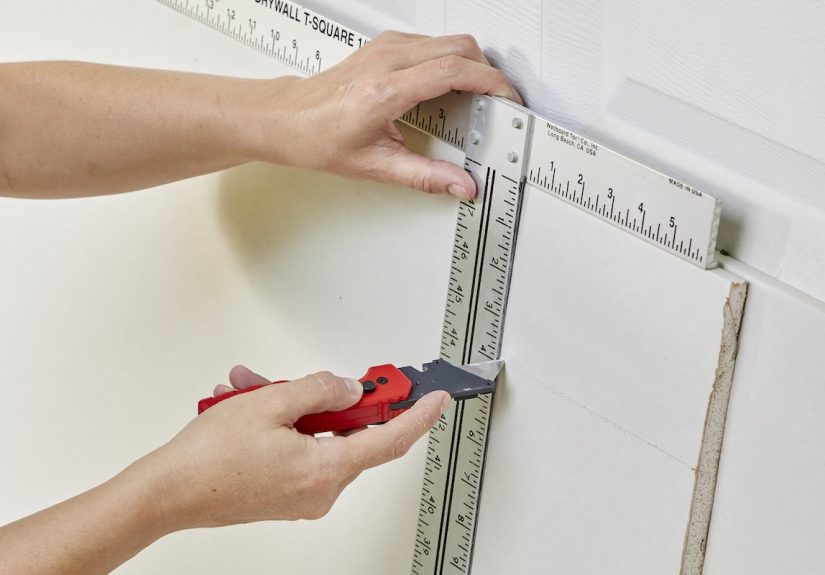
Step 2: Score the Face Paper
Place the T-square firmly on your cut line. Run the utility knife along the straightedge in one steady pass, cutting through the face paper and slightly into the gypsum core. You do not need to carve a canyon into the sheet. A clean, controlled score is enough.
Use a fresh blade. A dull blade drags, tears paper, and turns a simple cut into an exercise in creative vocabulary.
Step 3: Snap the Panel
Move the panel so the scored line aligns with the edge of your work surface, or tilt the sheet slightly and apply firm pressure on the waste side. The drywall should snap cleanly along the score line. This breaks the gypsum core while leaving the back paper intact.
The snap is the most satisfying part of the process. It feels dramatic, but in a good way. Think less “destruction” and more “precision with flair.”
Step 4: Cut the Back Paper
Fold the snapped piece open and run the utility knife through the back paper to separate the pieces completely. This leaves you with a clean edge and a cut that looks far more professional than the effort required.
Step 5: Smooth the Edge
If the edge is slightly rough, use a drywall rasp to shave it smooth. A few quick passes can make fitting much easier, especially for patch pieces and seams where you want a snug but not impossible fit.
Why DIYers Love Score and Snap
This method is popular for a reason. It is quick, accurate, and beginner-friendly. It also avoids a lot of airborne dust compared with more aggressive cutting methods. If your cut is straight, score and snap is usually the smartest choice.
Method 2: Use a Drywall Saw for Cutouts and Small Openings
Not every drywall cut is a nice, civilized straight line. Sometimes you need to cut around an electrical outlet, switch box, pipe, vent, or other obstacle that refuses to move just because your wall plans are beautiful. That is where the drywall saw method comes in.
When to Use This Method
Use a drywall saw or jab saw when you need:
- Outlet or switch cutouts
- Small rectangular openings
- Curved or irregular cuts
- Access holes for repairs
Step 1: Mark the Opening
Measure the location of the obstacle carefully and transfer those dimensions to the drywall sheet. Double-check everything before cutting. An outlet opening that is off by half an inch is not a “small issue.” It is the sort of issue that forces you to explain yourself to a patch kit later.
For boxes, mark the outline clearly. For round penetrations like small pipes, mark the diameter and center point as accurately as possible.
Step 2: Start the Cut
Use the sharp tip of the jab saw to puncture the drywall near a corner of the marked shape. If the panel is tight or the opening is delicate, you can drill a starter hole first. Once the blade is through, begin sawing with steady, even strokes.
Step 3: Follow the Line Slowly
Cut along the marked line with controlled pressure. At corners, pull the saw back slightly, pivot, and continue cutting in the new direction. Do not rush. Drywall is easy to cut, but it is also easy to overcut, especially at corners and narrow strips.
If you are cutting an opening for an electrical box, staying just outside the line can be helpful. You can always refine the fit with a rasp or knife. It is much harder to explain a giant accidental skylight for an outlet.
Step 4: Test the Fit
Before fastening the sheet permanently, test the panel against the wall or framing. Make sure the opening actually lines up. A little trimming with a rasp or knife is normal. A lot of trimming usually means the measurements deserve a stern review.
Which Drywall Cutting Method Is Better?
Neither method is better in every situation. The best approach depends on the cut.
Choose Score and Snap If:
- The cut is long and straight
- You want cleaner edges
- You want to reduce dust
- You are cutting full sheets to size
Choose a Drywall Saw If:
- You are making interior cutouts
- You need to work around outlets, pipes, or vents
- The cut is curved, boxed in, or awkward
- You are doing a small patch or repair
In many projects, you will use both. For example, you might score and snap a sheet to overall size, then use a drywall saw to cut the outlet opening. That is not cheating. That is called being efficient.
Common Drywall Cutting Mistakes to Avoid
Using a Dull Blade
A dull utility knife tears the paper instead of slicing it cleanly. Replace blades often. Drywall is cheaper than your time, but fresh blades are cheaper than both.
Skipping the Straightedge
Freehand knife cuts often wander. Unless you are intentionally scribing to an uneven surface, use a T-square or straightedge for better results.
Forcing the Saw
If the jab saw is binding, slow down. Let the tool do the work. Over-muscling the cut can crack the paper face or blow out the back edge.
Ignoring Dust Control
Drywall and joint-compound dust can irritate the eyes, nose, and throat. Keep the area ventilated, wear eye protection, and clean up dust sensibly. Avoid sweeping clouds of dust back into the air if you can help it.
Cutting Once, Measuring Never
Everyone knows the phrase “measure twice, cut once,” but drywall somehow inspires people to forget it in real time. Resist the urge. Cutouts around outlets and pipes especially need careful layout.
Safety Tips for Cutting Drywall at Home
Drywall is not especially dangerous when handled correctly, but it does deserve respect. The knives are sharp, the panels are heavy, and dust is annoying at best and unhealthy at worst if you ignore it.
- Wear safety glasses when cutting or sawing.
- Use sharp blades so you do not need excessive force.
- Support full sheets properly so they do not crack unexpectedly.
- Minimize dust and clean with a HEPA vacuum or damp methods when practical.
- Consider a dust mask or respirator if you are creating a lot of dust or working in a tight space.
- Check the wall for wiring, plumbing, or other hidden hazards before cutting into installed drywall.
Specific Examples of Easy Drywall Cuts
Example 1: Trimming a Sheet for a Basement Wall
You need to shorten a standard drywall panel by 6 inches. This is a perfect score-and-snap job. Measure the cut, line up the T-square, score the face, snap the sheet, cut the back paper, and rasp the edge. Quick, clean, done.
Example 2: Cutting an Outlet Opening
You are installing drywall over a wall with one electrical outlet. Measure from the edge of the last sheet and from the floor to locate the box. Transfer those measurements, mark the rectangle, puncture a corner with the jab saw, and follow the lines carefully. Test-fit before fastening.
Example 3: Making a Repair Patch
A damaged section of drywall needs a square patch. Use the drywall saw to remove the damaged area neatly, then cut a replacement patch to size using score and snap. This is a great example of both methods working together in one small repair.
of Real-World DIY Experience and Lessons Learned
One of the most common experiences people have with drywall is assuming the hard part will be cutting the material, when the real challenge is usually layout. The board itself is surprisingly cooperative. What causes trouble is a bad measurement, a lazy mark, or confidence that arrives five minutes too early. Many first-time DIYers are shocked to discover that drywall does not require brute force. It rewards patience more than power. The cleanest cuts usually come from slowing down, using a straightedge, and trusting the simple score-and-snap process.
A very typical beginner story goes like this: the first sheet takes forever, the second sheet takes half as long, and by the third sheet the DIYer is suddenly giving drywall advice to the family dog. That learning curve is real. Once you feel how deep the knife score should be and how firmly the panel should snap, the process becomes much more intuitive. People often start out scoring too deeply, almost trying to slice all the way through the board. Then they realize the face paper and a shallow groove in the gypsum are enough. The snap does the rest.
Another common experience involves outlet cutouts. Straight cuts make people feel smart. Outlet cutouts make people humble. The measurements can look perfect on paper and still be wrong because someone measured from the wrong edge, forgot the thickness of an adjacent sheet, or mixed up top and bottom after rotating the panel. A smart habit many DIYers learn quickly is labeling the panel clearly before cutting. Writing “top,” “left,” or “outlet side” right on the face can prevent one of the most irritating mistakes in home improvement: making an accurate cut in the wrong place.
Small patches also teach useful lessons. When replacing a damaged area, many people cut the patch beautifully but make the wall opening messy. Then the patch does not fit, and suddenly a ten-minute repair becomes a mini drywall saga. Experienced DIYers learn to make the wall opening clean and square first, then cut the patch to match. They also learn that a rasp is a secret weapon. A patch that feels just slightly too tight often only needs three or four light passes with a rasp to fit perfectly.
Dust is another lesson that tends to arrive in dramatic fashion. Plenty of people discover after one messy job that cleanup matters almost as much as the cut itself. A quick, low-dust score-and-snap cut feels very different from aggressively sawing through multiple openings in a closed room. After that first dusty surprise, DIYers get better about ventilation, eye protection, and smarter cleanup. It is one of those lessons that seems obvious right after you have ignored it.
In the end, the big takeaway from real drywall experience is comforting: you do not need to be a pro to get professional-looking results. Most successful DIYers are not magical. They are just methodical. They measure carefully, cut with the right tool, test-fit before fastening, and accept that one imperfect piece is part of the learning process. Drywall is a material that rewards calm repetition. The more you work with it, the more you realize it is less about fancy technique and more about doing simple things well.
Conclusion
If you want to know how to cut drywall without turning the project into a weekend-long puzzle, remember this: use score and snap for straight cuts, and use a drywall saw for cutouts and openings. Those two easy DIY methods cover the majority of drywall jobs homeowners actually face. Add careful measuring, a sharp blade, and basic dust control, and you are already working smarter than a lot of people who charge into the job with pure confidence and a questionable pencil line.
The best drywall cuts are not flashy. They are accurate, clean, and boring in the most beautiful way possible. And in home improvement, boring usually means the wall fits, the patch disappears, and you get to act like the whole thing was easy from the beginning.





