Table of Contents >> Show >> Hide
- Before You Convert: 3 Things That Affect Image Quality
- Way 1: Convert PowerPoint to JPEG Using PowerPoint (Fastest + Most Direct)
- Way 2: Convert PowerPoint to JPEG Without PowerPoint (Online Tools or Google Slides)
- Troubleshooting: Fix the Most Common PowerPoint-to-JPEG Problems
- When to Use Each Method (So You Don’t Overthink It)
- Real-World Use Cases (Because This Isn’t Just a “Computer Trick”)
- Experiences From the Slide Trenches (500-ish Words of Real Talk)
- Conclusion
PowerPoint slides are great… right up until you need to post one on a website, drop it into an email, upload it to a digital sign, or send it to someone who replies, “I can’t open PPTXcan you send it as a picture?” That’s when converting PowerPoint to JPEG (aka JPG) becomes your new favorite life skill.
The good news: converting PowerPoint to JPEG is easy. The even better news: you have two solid ways to do itone inside PowerPoint itself, and one that works even if you don’t have PowerPoint installed. Let’s do this with minimal drama and maximum image quality.
Before You Convert: 3 Things That Affect Image Quality
1) JPEG vs PNG (and why JPEG is sometimes the “meh” choice)
JPEG is a compressed image format. That’s great for smaller files and faster sharing, but it can soften fine detailsespecially tiny text or sharp lines. If your slide has lots of text, charts, or UI screenshots, consider exporting as PNG instead, then convert to JPEG only if you truly need it. (Yes, “JPEG because the website demands it” is a valid reason.)
2) Your slide size becomes your image size
PowerPoint doesn’t magically invent extra pixels. If your slide is set up for standard widescreen and you export it, the resulting JPEG can look fuzzy on big displays. If you’re aiming for crisp images on a large monitor (or digital signage), it helps to set the slide dimensions intentionally before exporting.
3) One slide or all slides? PowerPoint will ask
When you export as JPEG, PowerPoint typically prompts you to save just the current slide or every slide. If you choose all slides, it usually creates a folder full of JPEGs (one per slide). Convenientunless you didn’t want 74 images named “Slide1, Slide2, Slide3…” which is how many people accidentally learn the meaning of “batch export.”
Way 1: Convert PowerPoint to JPEG Using PowerPoint (Fastest + Most Direct)
If you have the PowerPoint desktop app (Windows or Mac), this is the simplest method. You’re basically telling PowerPoint: “Congratulationsyou’re an image editor now.”
Windows: Save As (or Export) to JPEG
- Open your presentation in PowerPoint.
- (Optional but smart) Click the slide thumbnail you want to export if you only need one slide.
- Go to File > Save As (or Save a Copy depending on your setup).
- Choose where you want the file(s) to go.
- In Save as type, pick JPEG File Interchange Format (*.jpg).
- Click Save.
- When prompted, choose Just This One (one slide) or All Slides (every slide).
What you’ll get: If you export one slide, you’ll get one JPEG. If you export all slides, you’ll usually get a folder containing one JPEG per slide. This is ideal when you need individual slide images for a website gallery, learning module, or signage playlist.
Mac: Export to JPEG (Similar steps, slightly different menu)
- Open your presentation in PowerPoint for Mac.
- Go to File > Export.
- Choose JPEG as the file format.
- Select whether you’re exporting the current slide or all slides (PowerPoint may prompt you).
- Pick a destination folder, then export.
On Mac, PowerPoint commonly uses Export for image formats. The outcome is similar: one JPEG for one slide, or a folder of JPEGs for all slides.
Power tip: Export only what you need (your Downloads folder will thank you)
If you only need a single slide image, select that slide first and export “Just This One.” It’s the difference between “one neat file” and “an unexpected photo album titled ‘Quarterly Update Final FINAL v7’.”
How to get sharper JPEGs (without becoming a full-time pixel wrangler)
If your exported JPEG looks slightly blurry, try these upgradesstarting with the easiest:
- Use Widescreen (16:9) and clean fonts: Modern screens are widescreen; mismatched slide ratios can lead to scaling.
- Increase slide dimensions before exporting: If the image will be displayed large (like a TV), consider designing your slide for that display. Bigger slide dimensions generally mean more pixels in the export.
- Avoid over-compressing images: If you used PowerPoint’s picture compression tools aggressively, your export may inherit that softness.
- For print-quality needs: Some Windows setups allow adjusting PowerPoint’s default export resolution through advanced settings (often via registry values). This is powerful but also the “handle with care” optiongreat for posters and publications, not something you want to tinker with five minutes before a deadline.
Quick example: Export a slide for Instagram
Let’s say you want a single slide as a JPEG for social media. A common target is a square image. You could set your slide to a square format (or design within a square-safe area), then export the current slide as JPEG. Result: a clean, shareable image that doesn’t look like it was screenshotted during an earthquake.
Way 2: Convert PowerPoint to JPEG Without PowerPoint (Online Tools or Google Slides)
No PowerPoint app? No problem. This method is also useful when you’re on a Chromebook, using a borrowed computer, or you just don’t want to install anything. The trade-off is that you should be thoughtful about privacy if your slides contain sensitive info.
Option A: Use Google Slides to export a slide as JPEG
- Upload your PowerPoint file (PPT or PPTX) to Google Drive.
- Open it with Google Slides (Drive usually offers “Open with Google Slides”).
- Navigate to the specific slide you want as an image.
- Go to File > Download > JPEG image (.jpg) (often “current slide”).
- Your JPEG downloads to your device.
This is fantastic when you only need one slide. If you need every slide as a JPEG, you may need a dedicated converter, because Google Slides is commonly geared toward exporting the current slide as an image.
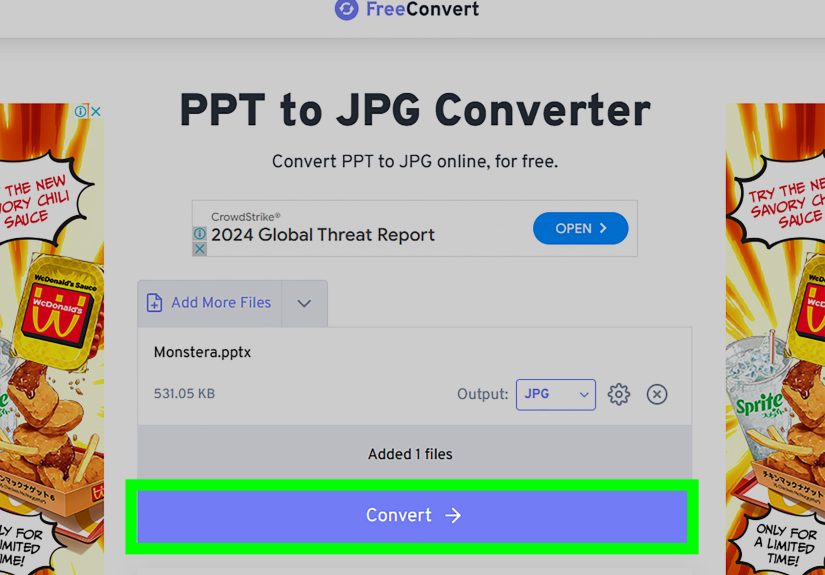
Option B: Use an online PPT-to-JPG converter
Online converters can turn an entire PowerPoint into a set of JPEGsoften as a downloadable ZIP. The general workflow looks like this:
- Upload your PPT/PPTX to the converter.
- Select JPEG/JPG as the output format.
- Convert and download the result (often one image per slide).
If you’re using a well-known tool from a recognizable company, the process is usually smooth. Still, treat your slides like you’d treat your browser history: if it’s sensitive, don’t upload it unless you understand where it’s going and how it’s stored.
Privacy checklist (because “Oops” is not a security strategy)
- Remove confidential slides before uploading (budgets, client data, personal info, internal screenshots).
- Use trusted services and avoid sketchy “free converter” sites with aggressive pop-ups and suspicious download buttons.
- Delete uploads if the service provides a delete option, and don’t reuse the same public link forever.
Troubleshooting: Fix the Most Common PowerPoint-to-JPEG Problems
Problem: My JPEG looks blurry
This is usually caused by exporting at a low resolution or designing a slide that gets scaled up later. Try:
- Export as PNG first for better clarity, then convert to JPEG if required.
- Increase your slide dimensions before exporting (especially for large displays).
- Avoid tiny fonts; use larger type and thicker lines for graphics.
Problem: The file size is huge
High-resolution JPEGs can be chunky. Reduce file size by:
- Using PowerPoint’s Compress Pictures feature carefully (don’t crush it into a blurry mess).
- Exporting at a reasonable size for the platform (web needs less than print).
- Using an image compressor after export if needed.
Problem: Colors look different
Color shifts can happen due to compression or display differences. If color accuracy matters (branding, product shots), test your export on the device where it will be shown and consider PNG if gradients or subtle tones look “off.”
Problem: Animations don’t show up in the JPEG
CorrectJPEG is a static image. If you need motion, you’re looking for video export (MP4) or animated GIF workflows instead. For a JPEG, you’re capturing a single moment in time. Choose the slide state you want visible, then export.
When to Use Each Method (So You Don’t Overthink It)
- Use Way 1 (PowerPoint export) if you have PowerPoint installed, want the most straightforward process, or need consistent results across many slides.
- Use Way 2 (Google Slides or online converters) if you don’t have PowerPoint, you’re on a different device, or you need a quick conversion without installing software.
Real-World Use Cases (Because This Isn’t Just a “Computer Trick”)
Digital signage
Many signage systems love image files. Exporting slides as JPEGs makes it easy to upload announcements, rotating schedules, menus, or event promos. If your signs are large TVs, focus on resolution and readabilitybig fonts, high contrast, and no microscopic bullet points.
Training docs and SOPs
Need a slide in a PDF manual or a learning platform? Export the slide as a JPEG and place it where it belongs. Bonus: your audience won’t have to open PowerPoint just to see one diagram.
Email and support tickets
A single JPEG slide is easy to attach, preview, and annotate. If you’ve ever tried to explain a workflow in an email, you know a picture is worth at least three paragraphs and one frustrated emoji.
Experiences From the Slide Trenches (500-ish Words of Real Talk)
The first time I exported PowerPoint slides as JPEGs, I assumed it would be a flawless “click button, receive perfection” moment. Spoiler: it was not. The images looked fine on my laptop… and then I opened them on a big monitor and watched my crisp title text turn into something that resembled a polite suggestion of letters. It wasn’t unreadable, exactly. It just looked like my slide had taken off its glasses.
That’s when I learned the most important rule of PowerPoint-to-JPEG conversion: the export quality is only as good as your slide setup. If the slide is designed for a typical presentation screen and you later ask it to be a billboard, the pixels don’t magically multiply out of sheer optimism. Now, whenever I know the slide needs to become an image, I design with the end in mind. If it’s going onto a website, I keep text large and layouts simple. If it’s for signage, I treat the slide like it’s going to be seen from across a roombecause it is.
Another lesson I learned the hard way: JPEG is not always your friend. JPEG compression can introduce tiny artifacts around text and sharp edges. It’s subtle until it’s notespecially if your slide has thin lines, small labels, or screenshots with tiny UI elements. These days, if a platform allows it, I export as PNG for clarity and only switch to JPEG if I need a smaller file or the upload tool demands “JPG only.” Think of PNG as the neat freak of image formats and JPEG as the friend who shows up late but brings snacks.
I’ve also accidentally exported all slides when I only needed one. PowerPoint kindly created a folder and filled it with dozens of JPEGs, and I stared at it like it was a surprise party I never agreed to attend. Now I always pause at the “All Slides or Just This One?” prompt and ask myself: “Do I actually need 62 images… or do I just need Slide 7 where the chart finally makes sense?”
My favorite “pro move” is doing a quick test export. I’ll export one slide, open the JPEG, zoom in to 200%, and check the text and logos. If it holds up, I export the rest. If it looks soft, I adjust slide size or switch formats before I waste time exporting everything and then redoing it. It’s a tiny step that saves a lot of “Why does this look blurry?” later.
The biggest takeaway: converting PowerPoint to JPEG is easy, but converting it well is about knowing your destination. Once you do, the process goes from “quick hack” to “repeatable workflow”and that’s when your slides stop looking like screenshots and start looking like polished graphics.
Conclusion
Converting PowerPoint to JPEG doesn’t have to be complicated. If you have PowerPoint, use Way 1 (Save As/Export) for the most direct results. If you don’t have PowerPointor you’re working on a different deviceuse Way 2 (Google Slides or a trusted online converter). Then, level up the quality by designing slides with the final image use in mind: readable text, intentional sizing, and the right format choice.




