Table of Contents >> Show >> Hide
- Why Cleaning a Dryer Vent Matters More Than Most People Think
- Signs Your Dryer Vent Needs Cleaning
- What You Need Before You Start
- Safety First: What to Do Before Cleaning
- How to Clean a Dryer Vent Indoors
- How to Clean a Dryer Vent Outside
- Reassemble and Test the Dryer
- How Often Should You Clean a Dryer Vent?
- Common Dryer Vent Cleaning Mistakes to Avoid
- When to Call a Professional
- Final Thoughts
- Experiences and Practical Lessons From Cleaning a Dryer Vent
If your dryer has started taking forever to dry a basic load of towels, your laundry room feels hotter than a summer sidewalk, or the outside vent flap barely moves when the machine runs, your dryer vent is probably begging for attention. Loudly. And while this is not the most glamorous cleaning task in America, it may be one of the most important. A clogged dryer vent can reduce efficiency, wear out your dryer faster, and create a real fire hazard. In other words, this is the home-maintenance version of “ignore at your own peril.”
The good news is that learning how to clean a dryer vent, both indoors and outside, is far less intimidating than it sounds. You do not need a PhD in appliance wizardry. You just need a little patience, a few simple tools, and the willingness to pull your dryer away from the wall without suddenly discovering a sock cemetery, three missing pencils, and a mysterious trail mix raisin from 2019.
This guide walks you through the full process step by step. You will learn how to clean the indoor section behind the dryer, how to clear the outside vent hood, what signs point to a blockage, which mistakes to avoid, and when it is smarter to call a professional. By the end, your dryer vent should be cleaner, your dryer should breathe easier, and your laundry routine should stop acting like it is training for a marathon.
Why Cleaning a Dryer Vent Matters More Than Most People Think
A dryer works by moving warm, moist air through clothes and pushing that moisture out through the vent system. When lint, dust, pet hair, and debris build up in the duct, airflow drops. That causes longer drying times, higher energy use, and extra strain on the machine. It also means heat can build up where it should not, which is exactly the kind of drama you do not want from an appliance designed to quietly spin socks.
Cleaning your dryer vent is not just about efficiency. It is about safety, performance, and extending the life of your appliance. A clean vent helps clothes dry more evenly, reduces that “why is this still damp?” frustration, and may lower the odds that your dryer overheats. It also helps keep the outside vent flap working properly, so moisture and exhaust can actually escape instead of hanging around like an unwanted houseguest.
Signs Your Dryer Vent Needs Cleaning
Sometimes a dryer vent clog announces itself with all the subtlety of a marching band. Other times, it is more sneaky. Watch for these common signs:
1. Clothes Take Too Long to Dry
If a normal load suddenly needs two or three cycles, restricted airflow is one of the first things to suspect. The dryer may still heat, but the moist air is not leaving efficiently.
2. The Dryer Feels Hotter Than Usual
A dryer that is overly hot on the outside, or a laundry room that feels warmer and more humid than normal, may be struggling with a blocked vent.
3. You Notice a Burning Smell
This is not the time for optimism. Turn the dryer off and investigate right away. Lint buildup near heat sources can create a serious problem.
4. The Outside Vent Flap Barely Opens
When the dryer is running, the vent hood outside should open and release a steady stream of air. Weak airflow often means lint or debris is reducing the path.
5. There Is Lint Around the Dryer Hose or Outside Hood
Visible lint where it should not be is a clue that the vent system needs attention. Think of it as your dryer leaving breadcrumbs to the problem.
What You Need Before You Start
Before cleaning the dryer vent indoors and outside, gather a few basic tools. You likely will not need every single item, but having them nearby makes the process smoother.
- Vacuum with hose attachment
- Dryer vent cleaning brush or flexible vent brush kit
- Screwdriver or nut driver
- Work gloves
- Flashlight
- Microfiber cloth or rag
- Dust mask, if you are sensitive to dust and lint
If your dryer is connected with a flexible foil duct, this is also a good time to inspect its condition. Crushed, torn, or poorly routed ducting can make airflow worse. Many manufacturers and safety experts favor rigid or semi-rigid metal ducting for better performance and durability.
Safety First: What to Do Before Cleaning
Start by turning the dryer off and unplugging it. If you have a gas dryer, do not start disconnecting gas components unless you know exactly what you are doing and the manufacturer instructions allow it. For many homeowners, cleaning the vent path and duct without disturbing the gas connection is the safest move. If your setup is cramped, complicated, or makes you nervous, that is your cue to call a pro instead of auditioning for a home-repair blooper reel.
Next, pull the dryer away from the wall carefully. Move slowly so you do not crush the vent hose even more or damage the flooring. Place a towel, cardboard, or furniture sliders under the feet if you need to protect a delicate surface.
How to Clean a Dryer Vent Indoors
The indoor part of the job focuses on the lint screen area, the vent connection behind the dryer, and the section of duct you can access from inside the laundry room.
Step 1: Clean the Lint Screen and Lint Screen Housing
Remove the lint screen and clear off the lint by hand. Then use the vacuum hose attachment to clean inside the lint screen slot or housing. This step matters because lint often drops below the screen and builds up where fingers cannot reach. If you notice a sticky residue on the screen from dryer sheets or fabric softener, wash it gently with warm water and a little dish soap, scrub lightly with a soft nylon brush, and dry it completely before putting it back.
Step 2: Disconnect the Vent Hose from the Back of the Dryer
Use a screwdriver or nut driver to loosen the clamp holding the vent hose in place. Carefully remove the hose from the back of the dryer. Expect lint. Lots of lint. This is the moment when many people discover that their dryer has apparently been knitting a secret sweater behind their back.
Step 3: Vacuum the Dryer Exhaust Port
With the hose removed, vacuum around the dryer’s exhaust opening. Remove loose lint from the opening and surrounding area, but do not jam sharp tools deep into the appliance. You want to clean the accessible area, not perform unlicensed surgery on your dryer.
Step 4: Clean the Hose or Duct Section
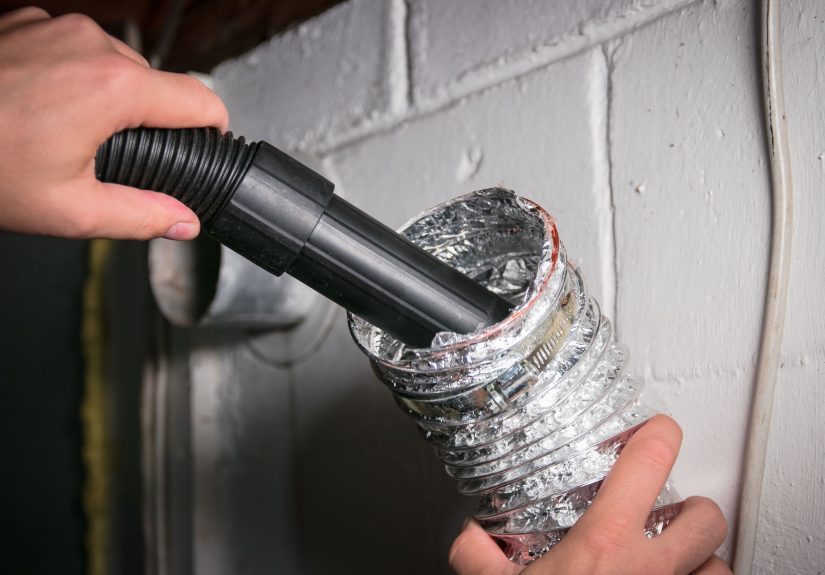
Vacuum out as much lint as possible from the vent hose. Then run a dryer vent brush through the duct to loosen debris stuck to the sides. If your vent path includes bends, work slowly and avoid forcing the brush too aggressively. The goal is to pull out lint, not damage the duct or disconnect hidden joints inside the wall.
Step 5: Clean the Floor and Wall Area Behind the Dryer
While you have access, vacuum and wipe down the space behind and under the machine. Lint around the back of the dryer can also build up over time, especially in homes with pets. This part is not glamorous, but it is weirdly satisfying in the way all deep cleaning is once you stop resisting it.
How to Clean a Dryer Vent Outside
Now it is time to head outdoors and clean the exterior end of the vent. This part is just as important because even if the indoor duct looks decent, the outside hood can still be blocked by lint, leaves, dirt, or even nests.
Step 1: Find the Exterior Vent Hood
Locate where the dryer exhaust exits your home. It may be on an exterior wall, near the foundation, or sometimes higher up, depending on your home’s layout. Check that the vent hood flap or damper is not stuck shut, packed with lint, or blocked by plants, snow, dirt, or outdoor debris.
Step 2: Remove Debris from the Vent Opening
Put on gloves and remove visible lint and debris by hand. Then use your vacuum and brush to clean inside the opening as far as you can safely reach. If you have a vent brush kit, feed it into the duct gently and rotate it to loosen buildup. Work slowly so lint comes out instead of just relocating deeper into the duct like a tiny dusty squatter.
Step 3: Check for Nests or Obstructions
Birds, insects, and other small creatures occasionally treat vent hoods like desirable real estate. If you find a nest or serious obstruction, remove it carefully. A vent cover that does not close or a hood without proper screening can invite repeat visitors, so inspect the exterior cap while you are there.
Step 4: Confirm the Flap Opens Freely
The vent hood flap should move freely. If it sticks, clean around the hinge area and remove any lint or grime preventing smooth movement. A stuck flap can trap moisture and reduce airflow even after the duct itself is clean.
Reassemble and Test the Dryer
Reconnect the vent hose securely to the back of the dryer. Make sure the duct is not crushed or kinked when you move the dryer back into place. This step matters more than people think. You can clean a vent beautifully and then destroy the airflow in five seconds by shoving the machine too hard against the wall.
Plug the dryer back in. Run it on an air-fluff or short drying cycle and go outside to check the exterior vent. You should see the flap open and feel a steady flow of air. That is your dryer’s way of saying, “Finally. I can breathe again.”
How Often Should You Clean a Dryer Vent?
For many households, cleaning the full dryer vent system at least once a year is a smart baseline. If you do laundry constantly, have pets, dry bulky loads like towels and bedding, or notice performance issues, you may need to inspect and clean it more often. The lint screen, on the other hand, should be cleaned every single load. Not every month. Not whenever you remember. Every load.
A practical schedule looks like this: remove lint from the screen after each cycle, vacuum the lint screen housing and the area behind the dryer every few months, and clean the full vent path indoors and outside at least yearly or sooner if drying times creep up.
Common Dryer Vent Cleaning Mistakes to Avoid
Ignoring the Outside Vent
Many people clean behind the dryer and stop there. But if the outside hood is clogged, your vent system is still not really clean.
Using the Wrong Duct Material
Plastic or flimsy foil-style venting can sag, trap lint, and damage more easily. A metal duct setup generally performs better and is often preferred for safety and durability.
Pushing the Dryer Too Close to the Wall
One careless shove can crush the vent hose and undo your entire afternoon of cleaning.
Skipping the Lint Screen Housing
The lint screen catches a lot, but not everything. Fine lint often falls into the cavity below it.
Assuming the Dryer Is the Problem
Before you blame the machine for slow drying, check the vent. Airflow issues often masquerade as appliance failure.
When to Call a Professional
DIY dryer vent cleaning works well for many homes, but sometimes a professional makes more sense. Call one if your vent run is very long, has multiple sharp bends, exits through a difficult location, or still seems restricted after cleaning. You should also bring in help if you notice a persistent burning smell, signs of damage inside the duct, disconnected vent sections in a wall or crawl space, or you are dealing with a gas dryer setup you are not comfortable moving.
Professional dryer vent cleaners have specialized tools for deeper blockages and can inspect the whole route more thoroughly. This is especially helpful in older homes or homes where the vent path seems to have been designed by someone who hated future maintenance.
Final Thoughts
Knowing how to clean a dryer vent, both indoors and outside, is one of those home-care skills that pays off immediately. Your dryer works better, clothes dry faster, the machine experiences less strain, and the safety risk from lint buildup goes down. Best of all, it is a manageable task for most homeowners once you break it into simple steps.
Think of dryer vent cleaning as preventive maintenance with a solid return on effort. It is not flashy. No one is going to post a dramatic before-and-after reel of your vent hood and crown you the ruler of laundry kingdom. But your appliance will run more efficiently, your home will be safer, and your towels may finally stop taking two full cycles to become something other than warm disappointment.
Experiences and Practical Lessons From Cleaning a Dryer Vent
One of the most common experiences people have after cleaning a dryer vent is sheer disbelief at how much lint comes out. Homeowners often assume that because they clean the lint filter regularly, the vent system must be mostly fine. Then they disconnect the hose and discover a fuzzy gray traffic jam the size of a small squirrel. The lesson is simple: the lint screen is the first line of defense, not the entire defense team. Fine lint still slips through, and over time it clings to the inside of the duct like dust with commitment issues.
Another surprisingly common experience is realizing that long drying times were not caused by an aging dryer at all. Plenty of people start shopping for a replacement appliance when the real problem is poor airflow. After a thorough vent cleaning, loads that once needed two or three cycles suddenly dry in one. That is why vent maintenance is worth trying before declaring your dryer retired. Sometimes the machine is not failing dramatically; it is just suffocating politely.
People also tend to underestimate the outside vent. Indoors feels like the obvious place to clean because that is where the machine is, where the lint screen lives, and where the mess is visible. But many first-time cleaners find the exterior hood packed with lint, leaves, spiderwebs, or even nesting material. In some cases, the flap has been stuck for months without anyone noticing. Once it is cleared, the difference in airflow can be immediate. The dryer sounds happier, the room feels less humid, and there is a satisfying blast of warm air outside that says the system is finally doing its job.
There is also a practical lesson in how the dryer gets pushed back into place. Many people do the hard part correctly, reconnect everything, and then accidentally crush the duct when sliding the appliance back. This is one of those maddeningly preventable mistakes that can erase the benefits of cleaning in seconds. Experienced homeowners learn to leave a bit of breathing room, check the angle of the hose, and avoid turning the vent line into an accordion.
Pet owners usually report an extra layer of drama. Homes with dogs or cats tend to collect more hair, and that hair mixes with lint to create stubborn buildup faster than expected. Families who wash lots of towels, blankets, and fleece fabrics also notice they need to inspect the vent more often. In these homes, dryer vent cleaning is not a once-in-a-blue-moon task. It becomes regular maintenance, like changing an HVAC filter or pretending you will finally organize the garage this weekend.
Then there is the emotional side of the project, which is oddly real. People begin this job expecting annoyance and end it with a strange sense of accomplishment. It is one of those chores that gives immediate proof of value. The duct is cleaner, the airflow is stronger, and the dryer performs better right away. In the glamorous universe of home maintenance, that counts as a thrilling plot twist.
The biggest takeaway from real-world dryer vent cleaning experiences is that small maintenance tasks can prevent bigger headaches. Cleaning the vent regularly is easier than dealing with overheated cycles, high energy bills, damp laundry, or a repair appointment you did not budget for. Once homeowners do it properly one time, most realize it is not particularly difficult. It is just easy to postpone. And like many postponed chores, it becomes much less intimidating after the first round.
If you build it into your routine, the task gets faster every time. Keep the lint screen clean after each load, check airflow outside once in a while, and give the full vent path a real cleaning on a regular schedule. That combination of small habits and occasional deep cleaning is what keeps a dryer vent system working the way it should. No heroics required. Just a brush, a vacuum, and the willingness to stop your dryer from living a needlessly complicated life.





