Table of Contents >> Show >> Hide
- What You’ll Learn
- Add Basic Page Numbers in InDesign (Parent Pages Method)
- Style and Position Page Numbers (So They Don’t Look Like an Afterthought)
- How to Start Page Numbering on a Certain Page (Skip the Cover)
- How to Use Roman Numerals for Front Matter (i, ii, iii…)
- Sections, Prefixes, and Section Markers (Optional but Powerful)
- How to Make “Page X of Y” in InDesign
- How to Keep Page Numbers Consistent Across Multiple InDesign Files (Book Feature)
- Troubleshooting: Common InDesign Page Number Problems (and Fixes)
- Conclusion
- Real-World Experiences & Lessons Learned (Extra )
Page numbers are the unsung heroes of any multi-page layout. Nobody applauds them… until they’re missing and your
readers start playing “Where am I?” like it’s an escape room.
In this tutorial, you’ll learn how to add automatic page numbers in Adobe InDesign the right way:
using Parent Pages (formerly called Master Pages), customizing styles, starting numbering on a
specific page, mixing Roman numerals with Arabic numbers, and troubleshooting the classic “why is it showing A?”
moment.
Add Basic Page Numbers in InDesign (Parent Pages Method)
The best way to add page numbers in InDesign is to place them on a Parent Page. That way, every
document page using that parent automatically gets the right numbereven if you add, delete, or reorder pages.
Step-by-step: Insert the Current Page Number marker
-
Open the Pages panel (usually on the right side). If you don’t see it, go to
Window > Pages. -
In the Pages panel, double-click your main parent page (often named something like A-Parent).
Older tutorials may call this A-Master. Same idea, new name. -
Select the Type Tool (T), then draw a text frame where you want the page number to appear
(commonly in the footer area). -
Click inside the text frame so your cursor is blinking. Then choose:
Type > Insert Special Character > Markers > Current Page Number. -
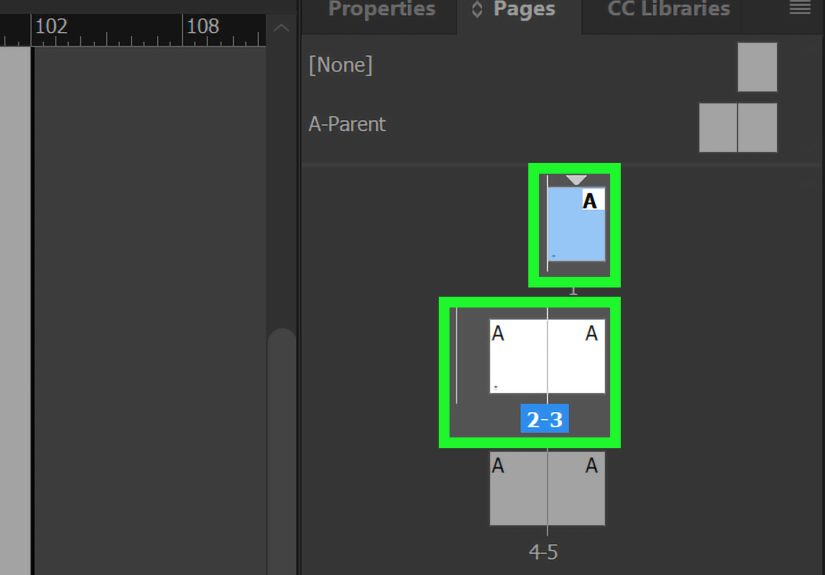
You’ll likely see a letter (like A) instead of a number. Don’t panic. On parent pages,
InDesign displays the parent prefix letter; on document pages, it becomes the actual page number. - Double-click a normal document page in the Pages panel to check. You should now see real page numbers.
If your document uses Facing Pages
If you’re designing a book, magazine, or anything with spreads, you’ll want page numbers on both left and right
pages. Create one text frame on the left parent page and another on the right parent page (or duplicate and
reposition). Align left-page numbers to the left and right-page numbers to the right for a clean look.
Shortcut tip: Many designers use the keyboard shortcut for the Current Page Number marker:
Cmd + Opt + Shift + N (Mac) or Ctrl + Alt + Shift + N (Windows).
It’s the fastest way to drop in the marker once your cursor is inside the text frame.
Style and Position Page Numbers (So They Don’t Look Like an Afterthought)
Once the marker is in place, you can format it like normal text: font, size, tracking, color, paragraph alignment,
and even character styles. But if you want your future self to send you a thank-you note, use styles.
Best practice: Use a Paragraph Style for folios
- Select the page number in the parent page text frame.
- Open Window > Styles > Paragraph Styles.
- Create a new style called something like Folio or Page Number.
-
Set alignment (left for left pages, right for right pages), choose a font and size, and set spacing so it sits
comfortably in the margin or footer area.
Add text before/after the number (optional)
Want “Page 3” instead of just “3”? On the parent page, type the word “Page ” before the marker. The marker will
still update automatically. Just make sure your text frame is wide enough to handle the longest number
(especially if your project is… ambitious).
Keep page numbers visible over full-bleed images
If you use full-bleed photos, your page numbers can get covered by page artwork. A common fix is to place page
number frames on a top layer (or lock them on their own layer) so they stay visible.
How to Start Page Numbering on a Certain Page (Skip the Cover)
Real projects often have a cover, title page, or intro spread that shouldn’t show “Page 1.” InDesign handles this
with sections.
Example: Start numbering at 1 on the first chapter page
- In the Pages panel, click the page where you want numbering to begin (for example, the first page of Chapter 1).
- Go to Layout > Numbering & Section Options (or right-click the page thumbnail and choose it).
- Check Start Section.
- Set Start Page Numbering at: 1.
- Choose the numbering style you want (usually 1, 2, 3, 4…).
- Click OK.
Hide the page number on just one page
For a cover or title page, you have two common options:
-
Option A (clean): Create a second parent page with no page number (often called “None” or “Cover”),
and apply it only to that page. -
Option B (quick): Override the parent page number frame on that one document page, then delete it.
(This is handy, but can get messy if you do it a lot.)
How to Use Roman Numerals for Front Matter (i, ii, iii…)
Books and reports often use Roman numerals for the table of contents, foreword, or intro pagesthen switch to
Arabic numerals when the main content begins. InDesign supports this using sections.
Example workflow: Roman front matter + Arabic main pages
- Select the first page of your front matter in the Pages panel (often page 2 if the cover is unnumbered).
- Open Layout > Numbering & Section Options.
- Check Start Section.
- Set the style to i, ii, iii, iv….
- Set Start Page Numbering at: 1 (it will display as i).
-
Then select the first page of your main content (Chapter 1), open the same dialog, start a new section, and set:
Start Page Numbering at 1 with 1, 2, 3….
This gives you professional pagination without doing weird manual math like “Okay, so the foreword is 6 pages,
which means Chapter 1 is actually… wait, why am I like this?”
Sections, Prefixes, and Section Markers (Optional but Powerful)
Sections aren’t only for restarting at 1. You can also add section prefixes (like A-1, A-2… for
appendices) and insert section markers (useful for running headers).
When a Section Prefix makes sense
- Appendix pages labeled like A-1, A-2, A-3…
- Multi-part manuals where each chapter restarts at 1, but needs a prefix for clarity
- Documents where a table of contents/index needs prefixed page numbers
How to add a Section Prefix
- Select the first page of the section (like your Appendix start page).
- Open Layout > Numbering & Section Options.
- Enter a short prefix in Section Prefix (example: A-).
- Check Include Prefix When Numbering Pages if you want it to print/show in exports.
- Click OK.
How to insert a Section Marker in your layout
If you want the section name (like “Appendix” or “Chapter 2”) to appear in a header/footer, place your cursor in a
text frame (often on a parent page) and insert:
Type > Insert Special Character > Markers > Section Marker.
How to Make “Page X of Y” in InDesign
“Page 3 of 24” looks simpleuntil you try to type it manually and realize you’ve volunteered to update it forever.
The good news: InDesign can build this automatically using a page number marker plus a text variable.
Step-by-step: Page X of Y
- On your parent page, create (or click into) the page number text frame.
-
Insert the X part:
Type > Insert Special Character > Markers > Current Page Number. - Type: of
-
Insert the Y part:
Type > Text Variables > Insert Variable > Last Page Number. - Format it using your Folio paragraph style.
Now your layout automatically updates the total number of pages when you add, delete, or rearrange pages.
(Yes, it’s a little magical. No, it doesn’t fix typos. We all have limits.)
Bonus: Page ranges on spreads (advanced, niche, and kind of satisfying)
If you ever need something like “Pages 10–11” shown once per spread, you can link text frames across a spread and
combine the Current Page Number and Next Page Number markers. This is more specialized, but helpful for some print
layouts and instructional materials.
How to Keep Page Numbers Consistent Across Multiple InDesign Files (Book Feature)
If your project is split into multiple InDesign documents (common for long books or big reports), don’t try to
“guess” page numbering file-by-file. Use the Book feature so InDesign can manage continuous page
numbering across documents.
Typical Book workflow
- Create a book file: File > New > Book.
- Add your InDesign documents to the Book panel.
-
Use the Book panel menu to set numbering options (for example, ensuring documents use
automatic page numbering so the numbering flows correctly from one file to the next). - If needed, sync parent pages and styles across documents so page number placement and formatting stay consistent.
This is the difference between “professional production workflow” and “I will be manually renumbering pages until
retirement.”
Troubleshooting: Common InDesign Page Number Problems (and Fixes)
Problem: My page number shows “A” instead of “1”
That’s normal on a parent page. Go to a document page to see the actual number. If it still shows a letter on a
document page, confirm you inserted the Current Page Number marker (not typed a letter) and that
the page is using the parent that contains the marker.
Problem: The number doesn’t appear on some pages
- Those pages may have a different parent applied (or “None”).
- The page number might be hidden behind objects (check layers and stacking order).
- Parent items might be hidden on that page/spread.
Problem: I can’t select or delete the page number on one page
If the page number is coming from a parent page, you must override it on the document page first
(then you can delete it). Many designers do this for a title page, but a cleaner long-term solution is applying a
“no folio” parent to that page instead.
Problem: My numbering style suddenly changed (hello, Roman numerals)
Check for a section start in the Pages panel (a little section indicator above a page). Right-click that page and
open Numbering & Section Options to confirm the numbering style and starting number.
Problem: My “X of Y” total is wrong
Make sure you used Last Page Number as a Text Variable, not typed the last page
manually. Also remember: in multi-document “Book” workflows, totals can behave differently depending on whether
you want totals per document or across the entire book. (This is where the Book panel settings matter.)
Conclusion
Adding page numbers in InDesign is easy once you use the right building blocks: a parent page for placement, the
Current Page Number marker for automation, and sections for real-world numbering (like skipping covers and mixing
Roman numerals with Arabic numbering).
Set it up once, style it cleanly, and your page numbering will quietly do its job in the backgroundlike a great
stage crew member who never misses a cue.
Real-World Experiences & Lessons Learned (Extra )
In real production work, page numbering issues rarely happen because someone “doesn’t know the menu command.”
They happen because projects evolve. Pages move. A client adds “just one more section” (famous last words). And
suddenly your neat little 12-page brochure becomes a 40-page report with a cover, a table of contents, a foreword,
three chapters, an appendix, and a last-minute legal disclaimer that must start on a right-hand page.
One of the most common “experience-driven” lessons designers learn is this: page numbers should be a system,
not a decoration. When folios are built as a systemon parent pages, with paragraph styles, and with
sectionsyour document becomes flexible. When folios are treated like a decoration (manually typed, copied, and
nudged around page-by-page), they become fragile. The layout might look fine today, but the moment someone inserts
two pages near the front, the entire house of cards starts wobbling.
Another real-world gotcha: full-bleed images and background shapes. Designers often build gorgeous
spreads with edge-to-edge photography, then discover the page numbers “disappear” on a few pages. The page numbers
are still therethey’re just being covered. The fix is rarely complicated, but it’s the kind of detail you only
learn after it bites you once: keep folios on a dedicated top layer or ensure they’re above background objects in
stacking order. That single habit prevents a lot of last-minute export panic.
Then there’s the “skip the title page” dilemma. Many people override the parent item and delete the number on page
1, and it worksuntil you later switch parent pages or sync changes, and the overridden page behaves differently.
In longer projects, teams often find it cleaner to create a separate parent (like “Cover/Title”) with no folio and
apply it intentionally. It’s not about being fancy; it’s about making the file predictable for whoever touches it
next (which might be you in three weeks, wondering why past-you made such chaotic choices).
Sections also become essential when your document has multiple numbering conventions: Roman numerals for front
matter, Arabic numerals for main content, and maybe prefixed numbering for appendices (A-1, A-2…). This is where
InDesign’s Numbering & Section Options earn their keep. The experience-based tip here is simple:
plan your sections early. You don’t need every detail locked down, but you do want a rough map:
“Cover unnumbered, front matter i–v, main starts at 1, appendix prefixed.” Once your sections are in place, it’s
much easier to build a table of contents, match print specs, and communicate page references with editors.
Finally, if you ever work on long publications, you’ll likely run into multi-file workflows. That’s when the Book
feature starts feeling less like an “advanced option” and more like the seatbelt you didn’t know you needed.
Continuous numbering across documents can save hoursespecially when chapters get rearranged late in the process.
The big lesson from experienced production teams is that automation isn’t about laziness; it’s about reducing
avoidable errors. Page numbering is the perfect example: once automated correctly, it becomes one less thing to
worry about when deadlines get tight.





