Table of Contents >> Show >> Hide
- What a Heater Blower Motor Does (and Why It Matters More Than You Think)
- Blower Motor Symptoms: How to Tell When It’s the Motor (and Not Something Else)
- Quick Diagnosis Before You Replace Anything (Save Your Money, Save Your Saturday)
- Tools and Parts You’ll Typically Need
- Heater Blower Motor Replacement: The Typical Step-by-Step
- 1) Prep the vehicle
- 2) Locate the blower motor
- 3) Remove trim and access panels
- 4) Disconnect the blower motor electrical connector
- 5) Remove mounting screws/bolts
- 6) Remove the blower motor and inspect the fan wheel
- 7) Transfer the fan wheel (if required)
- 8) Install the new motor
- 9) Test before reassembly
- The “Don’t Come Back Next Week” Pro Tips
- Heater Blower Motor Replacement Cost (Parts, Labor, and Realistic Ranges)
- When You Should Let a Pro Handle It
- FAQ: Fast Answers to Common Blower Motor Questions
- Real-World “Expert Experience” Notes ( of What Actually Happens Out There)
- Conclusion
Your car’s heater (or A/C) can be doing absolutely heroic work under the hood, but if the blower motor quits,
the cabin still feels like a walk-in freezer (or a slow-roasting crockpot). That’s because the blower motor is the part that
moves air through the vents. No airflow = no comfort, no defrost power, and no chance of looking cool while you’re
driving with fogged windows like a mysterious movie villain.
In this guide, we’ll walk through what the heater blower motor does, the most common symptoms when it fails, how to diagnose
the real cause (so you don’t “parts-cannon” your bank account), and what a typical blower motor replacement looks like on most
cars and trucks. We’ll also talk about the sneaky sidekickslike the blower motor resistor or control modulethat can make a
healthy motor look guilty.
What a Heater Blower Motor Does (and Why It Matters More Than You Think)
The heater blower motor (also called the HVAC blower motor or heater fan motor) is a small electric motor that spins a fan
wheeloften a “squirrel cage” style impellerinside the HVAC housing. When you set your fan speed, you’re telling that motor
how fast to spin. The motor then pushes air across the evaporator (for A/C) or heater core (for heat) and into the cabin.
On many vehicles, the blower motor lives behind the glove box or under the passenger-side dash. On some older vehicles, it may
be located on the firewall in the engine bay. Larger SUVs and vans may even have a second blower motor for rear climate control.
Blower Motor Symptoms: How to Tell When It’s the Motor (and Not Something Else)
A failing blower motor rarely sends a formal invitation. It prefers drama. Here are the most common signs:
1) No air from vents, even on high
If the fan is set to max and the vents are giving you absolutely nothing, the blower motor is a prime suspectbut don’t skip
the basics (fuse, relay, wiring, resistor/module, and a clogged cabin filter can also cause weak or zero airflow).
2) Fan works only on one speed (often “high”)
This is the classic clue that points to the blower motor resistor (or an electronic blower control module on
newer systems). In many setups, high speed bypasses the resistor, so when the resistor fails, the blower may
only run on high.
3) Weak airflow that gradually gets worse
If the air is coming out, but it feels like your car is politely exhaling instead of actually blowing, the motor may be worn,
the fan wheel may be damaged, the cabin air filter may be clogged, or the system voltage may be low.
4) Noise: squealing, grinding, rattling, or the “card in bicycle spokes” remix
Squealing often points to dry bearings. Grinding can suggest internal wear. Rattling can be debris (leaves, pine needles, or
the world’s tiniest acorn collection) in the fan wheel.
5) Burning smell or intermittent operation
A burning odor can indicate overheating wiring, a failing motor drawing excess current, or damaged connectors. Intermittent fan
operation can be a failing motor, a bad resistor/module, a loose connector, or a tired relay.
Quick Diagnosis Before You Replace Anything (Save Your Money, Save Your Saturday)
Replacing the blower motor isn’t usually hardbut replacing the wrong part is always expensive. Use this practical checklist
before you commit.
Step 1: Confirm the symptom
- Does the blower work on some speeds but not others?
- Does it work only on high?
- Does it work sometimes, then cut out?
- Do you hear the motor running, but airflow is weak?
Step 2: Check the fuse (and don’t just eyeball it)
Find the HVAC/blower fuse using the owner’s manual or fuse-box diagram. If it’s blown, replace it with the correct amperage
rating. If it blows again, that’s not “bad luck”that’s an electrical problem that needs diagnosing (often an over-amping motor
or shorted wiring).
Step 3: Check the cabin air filter
A clogged cabin air filter can reduce airflow and make the blower work harder. If you pull the filter and it looks like it’s
been filtering a compost pile since 2019, replace it.
Step 4: Understand the “only high works” clue
In many traditional systems, the blower resistor uses different resistance paths to create multiple fan speeds.
When you select high, the circuit may bypass the resistor to deliver maximum currentso a failed resistor can
leave you with “high or nothing.” Newer vehicles may use a solid-state blower control module instead of a simple resistor pack.
Step 5: Test for power and ground at the blower motor connector
With the fan switch on, check for power and ground at the blower motor electrical connector (a test light or multimeter works).
If you have solid power and ground but the motor doesn’t run, the motor is likely bad. If power/ground are missing, trace back
toward the resistor/module, relay, switch, or wiring.
Tools and Parts You’ll Typically Need
This job is usually more “tight spaces and tiny screws” than “heavy lifting.” Here’s what most replacements require:
- Replacement blower motor (sometimes sold with the fan wheel, sometimes not)
- Basic hand tools: screwdrivers, small socket set, ratchet, extensions
- Trim tool (helpful for plastic panels and clips)
- Flashlight/headlamp (your future self will thank you)
- Shop vacuum (for debris in the fan housing)
- Optional but smart: replacement cabin air filter
- Optional but often wise: blower motor resistor/control module and connector “pigtail” if heat damage is present
Heater Blower Motor Replacement: The Typical Step-by-Step
Exact steps vary by vehicle, but the workflow is surprisingly consistent across many makes and models.
1) Prep the vehicle
- Park on a flat surface, set the parking brake, and turn the ignition off.
- Disconnect the negative battery terminal (especially important if you’ll be working near SRS/airbag wiring).
- Move the passenger seat back for space (your knees deserve dignity).
2) Locate the blower motor
Most are under the passenger-side dash, near or behind the glove box. Some vehicles require removing a lower trim panel first.
Others require dropping the glove box door or removing the glove box assembly.
3) Remove trim and access panels
- Remove the lower hush panel or trim under the glove box (usually a few screws/bolts and clips).
- If needed, open the glove box and release the stops so it swings down (or remove it fully on some vehicles).
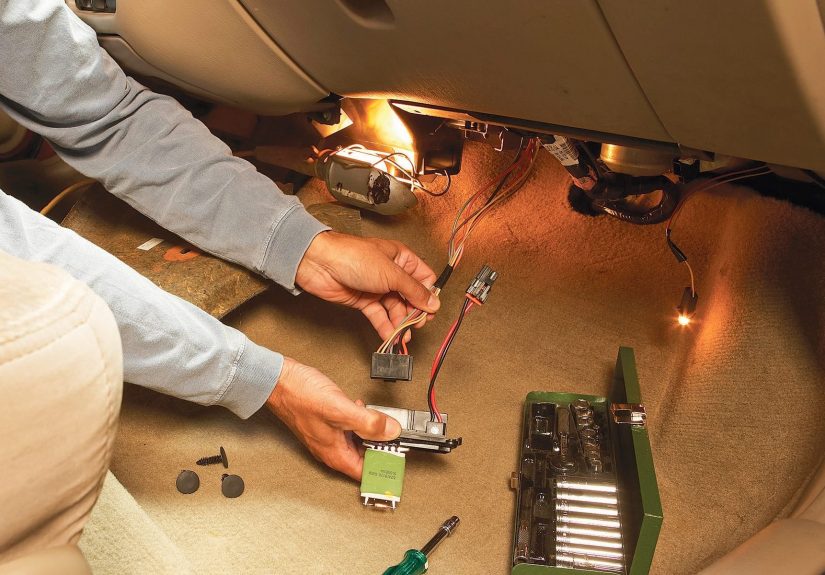
4) Disconnect the blower motor electrical connector
Press the locking tab and unplug the harness. If the connector is melted, brittle, or discolored, plan on repairing or
replacing itbad connectors create resistance, heat, and future failures.
5) Remove mounting screws/bolts
Many blower motors are held in with several small screws (often three). Support the motor as you remove fasteners so it doesn’t
drop suddenly and yank wiring.
6) Remove the blower motor and inspect the fan wheel
Carefully lower the motor and fan wheel out of the housing. Look for:
- Leaves, pine needles, dirt, or evidence of critter activity (yes, it happens)
- Cracks or missing blades on the fan wheel
- Rubbing marks that indicate the wheel has been contacting the housing
7) Transfer the fan wheel (if required)
Some replacement motors come with the wheel attached; others require transferring the original wheel. If you must transfer it,
do it carefullyforcing the wheel can crack it or misalign it, causing vibration and noise.
8) Install the new motor
- Clean the housing opening and vacuum debris.
- Insert the blower motor into position, aligning tabs/holes.
- Install screws/bolts evenlysnug, not “gorilla tight.”
- Reconnect the electrical connector firmly.
9) Test before reassembly
Reconnect the battery and test the fan on all speeds. Confirm airflow direction and listen for rubbing or rattling. Once it
checks out, reinstall trim and the glove box.
The “Don’t Come Back Next Week” Pro Tips
Replace the cabin air filter if it’s dirty
A restricted filter can reduce airflow and increase stress on the system. It’s inexpensive insurance compared with repeating
repairs.
If the resistor/module failed, ask “why”
Blower resistors generate heat and are typically placed in the airflow path to stay cool. If that airflow is compromisedor if
the blower motor is drawing excessive currentthe resistor/module can overheat and fail. A resistor that repeatedly burns out
is often a clue that something else (like the motor or wiring) is still unhealthy.
Inspect connectors for heat damage
Melted or discolored connectors aren’t cosmetic; they’re electrical resistance in plastic form. If you see heat damage, repair
the connector and address the root cause (often a high-draw motor or poor connection).
Know when “only high works” is a resistor clue
Since high speed may bypass the resistor in many designs, a dead lower-speed function often points toward the resistor pack or
blower control modulenot necessarily the motor itself.
Heater Blower Motor Replacement Cost (Parts, Labor, and Realistic Ranges)
Pricing swings wildly based on vehicle design and access. On the parts side, blower motors commonly land in an approachable
range. Labor can be the bigger wild cardespecially if the dash has to come apart or if access is tight.
Typical cost ranges
- Parts: Often around $50–$200 for many vehicles (more for certain models or OEM parts).
- Labor: Commonly $100–$500+, depending on access and local rates.
- Shop estimate example: Some national estimators put an average total in the mid-hundreds for many vehicles.
For example, one widely used repair cost estimator lists an average blower motor replacement cost between
$363 and $444, combining parts and labor, with model-specific ranges for vehicles like the Ford F-150, Toyota
Camry, and Honda Accord. Always treat these numbers as a starting pointnot a universal truthbecause trim level, HVAC options,
and regional labor rates matter.
When You Should Let a Pro Handle It
DIY is greatuntil it isn’t. Consider a professional shop if:
- The blower motor is buried behind the dashboard with major disassembly required.
- You’re working near airbag components and don’t have service info or confidence.
- There’s melted wiring, repeated fuse failures, or signs of overheating.
- Your vehicle uses a complex electronic blower control module and the diagnosis isn’t clear.
- The issue might be HVAC control head, body control module logic, or networked diagnostics.
FAQ: Fast Answers to Common Blower Motor Questions
Can I drive with a bad blower motor?
You can often drive the vehicle, but you may lose defrost/defog functionwhich becomes a visibility and safety issue quickly.
In cold or wet weather, that alone is reason to fix it promptly.
Is it the blower motor or the resistor?
If the fan works only on high (or certain speeds), suspect the resistor or control module. If you have power and ground at the
motor connector and it won’t run, suspect the motor.
Should I replace the resistor/module when I replace the blower motor?
Not always, but it’s smart to inspect it closely. If the connector is heat-damaged, if the resistor failed recently, or if the
motor showed signs of overheating/high current draw, replacing the companion part can prevent repeat repairs.
Why did my resistor keep burning out?
Repeated failures can happen when the motor draws excessive amperage, wiring/connectors are damaged, or airflow meant to cool
the resistor is compromised. A blower motor can still “work” while pulling far more current than it shouldenough to cook the
resistor over time.
Real-World “Expert Experience” Notes ( of What Actually Happens Out There)
If you’ve ever wondered why mechanics sometimes sound like suspicious detectives, blower motor jobs are a big reason. On paper,
the replacement looks simple: unplug, unscrew, swap, done. In real life, the blower motor is basically the HVAC system’s
stress-ballit reveals every bad habit the car has been hiding.
One common “experience” technicians report is the debris surprise. A customer comes in complaining about
squealing or a rhythmic thump-thump-thump from the dash. You pull the motor andboomthere’s a leaf collection that could
qualify as a seasonal centerpiece. Pine needles are the usual suspects, but occasionally you’ll find chunks of foam, small
twigs, or a cabin air filter that looks like it was used to strain chili. Cleaning the housing and replacing the filter
instantly makes the new motor quieter and helps it live longer.
Another common scenario is the “only high speed works” trap. Many owners replace the blower motor first
because it’s the most obvious “fan” part. Then they discover the exact same symptom remains: still only runs on high. That’s
when the lightbulb goes onhigh speed often bypasses the resistor path, so the motor was never the problem. On newer vehicles,
it may be a solid-state blower control module rather than a resistor pack, but the idea is similar: the speed-control side
fails, not the motor itself.
The third big real-world lesson is the heat-damaged connector. A blower motor or resistor can fail, get
replaced, and then fail againbecause the connector pins are loose, corroded, or partially melted. That poor connection creates
resistance, resistance creates heat, and heat turns plastic into modern art. If a connector looks browned, brittle, or warped,
replacing it is not “extra.” It’s the difference between “fixed” and “see you again in two weeks.”
Then there’s the “motor that still spins but is secretly a problem child.” It’s entirely possible for a blower motor to run
and still be unhealthy. Techs will sometimes measure current draw and find numbers that are way higher than expected. In one
widely discussed example, a blower that seemed normal was measured pulling 27 amps on highan amount that can
overheat circuits and chew through resistors over time. That’s why a careful diagnosis matters: “it turns” doesn’t always mean
“it’s good.”
Finally, real replacements often come down to fit and finesse. Some blower motors drop out in minutes. Others
require glove box gymnastics, contorting around brackets, and trying not to drop screws into the HVAC case (which is basically
a black hole with a sense of humor). The most “expert” move isn’t fancyit’s patience: test the blower on all speeds before
reassembly, confirm airflow is strong, and make sure nothing rubs or vibrates. That’s how you turn a Saturday project into a
one-and-done win.
Conclusion
Heater blower motor replacement is one of those repairs that’s often approachable for DIYers, but it rewards careful diagnosis.
If your fan is dead, intermittent, noisy, or stuck on one speed, don’t guessverify. Check the fuse, confirm airflow and filter
condition, understand the role of the resistor/control module, and test for power and ground at the motor. Replace the motor
when it’s proven faulty, and address wiring or connector heat damage so the fix actually lasts.





