Table of Contents >> Show >> Hide
- What Is a DIY Macro Keyboard, Really?
- Why Build It in Wood Instead of Buying a Generic Macropad?
- The Core Parts of a Wooden Macro Keyboard
- Choosing the Right Wood for a Macro Keyboard
- How the Build Process Usually Goes
- Best Uses for a DIY Wooden Macropad
- Common Mistakes That Make a Nice Build Feel Not So Nice
- Why This Project Has Staying Power
- Builder Experiences: What a Wooden DIY Macro Keyboard Teaches You
- Conclusion
- SEO Tags
Some DIY projects are practical. Some are pretty. And then there is the glorious overlap where a tool actually earns desk space and looks like it belongs in a boutique furniture catalog. That is the charm of a wooden DIY macro keyboard. It is part productivity machine, part conversation starter, and part gentle flex that says, “Yes, I do care about shortcuts, and yes, I also care about grain direction.”
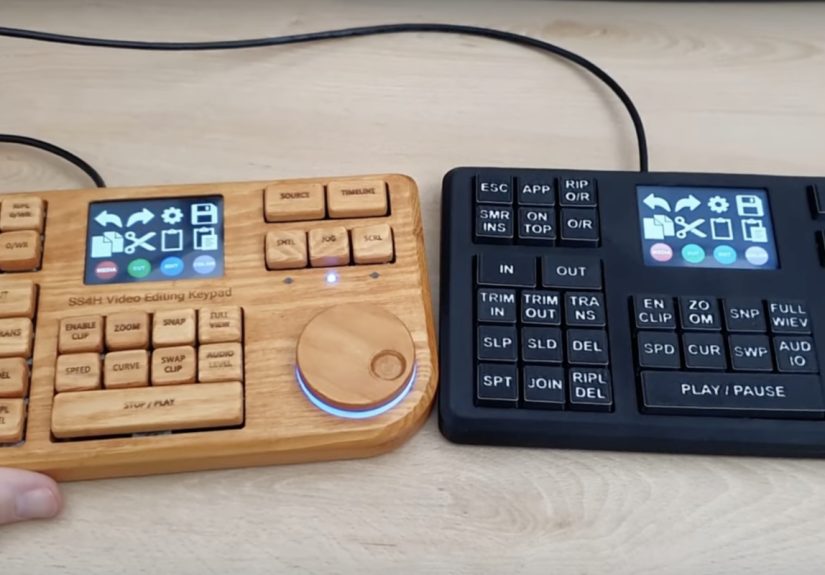
A macro keyboard, or macropad, is a compact programmable keypad that can trigger shortcuts, text strings, media controls, app commands, or layered functions. In other words, it takes repetitive keyboard gymnastics and turns them into a single, satisfying press. Add a wooden case, laser-etched keycaps, and maybe a rotary encoder for volume, scrubbing, or brush size, and suddenly your desk has a tiny handmade sidekick with real personality.
This guide breaks down what makes a wooden macro keyboard worth building, how it works, what parts matter most, and what real-world experience teaches you after the first heroic round of sanding, soldering, and saying, “Wait, why is this key sending Escape?” Whether you are building for video editing, streaming, coding, photo work, or general workflow wizardry, this is the kind of project that can be both useful and ridiculously fun.
What Is a DIY Macro Keyboard, Really?
A DIY macro keyboard is a small programmable input device that acts like a USB keyboard but focuses on custom actions rather than full typing. Instead of 60, 75, or 104 keys, you might build a 3×3, 3×4, or 4×4 layout with only the buttons you actually need. That could mean timeline cuts for video editors, mute and scene-switching controls for streamers, copy-paste tools for office work, or app-launch shortcuts for the person who opens the same six programs every single morning like it is a sacred ritual.
The best part is flexibility. One key can send a single shortcut. Another can trigger multiple keystrokes. A layer key can transform the entire pad into a second or third function set. Add a rotary encoder and you gain smooth analog-style control for tasks like volume, scrolling, zoom, page navigation, or timeline scrubbing. In practice, a good macropad feels less like a gadget and more like a tiny control surface designed around your habits.
The “Wood Be Nice” angle takes that same concept and gives it warmth. Wood changes the vibe completely. Plastic cases are fine. Aluminum cases are sleek. But wood makes a macro keyboard feel handcrafted, a little nerdy in the best way, and unexpectedly premium. It turns a shortcut tool into an object people ask about. That is not bad for something whose day job is launching Photoshop actions and muting Zoom calls.
Why Build It in Wood Instead of Buying a Generic Macropad?
Prebuilt macropads are easy to find, and many of them work well. But building your own wooden version gives you three advantages that off-the-shelf gear often cannot match: layout freedom, workflow precision, and style.
1. You control the layout
You are not stuck with whatever a manufacturer thinks is “universal.” If you need nine keys and one encoder, build that. If you want twelve keys, a tiny display, and legends etched into wooden caps, go for it. If your ideal layout is a slightly weird diagonal cluster because your left hand apparently has opinions, that can happen too.
2. You control the behavior
With firmware like QMK or beginner-friendly approaches using CircuitPython, each key can be programmed for layers, macros, media controls, consumer HID functions, or encoder actions. That means a single pad can become a video-editing deck by day and a coding shortcut board by night. Your keyboard does not judge. It only obeys.
3. You control the look
This is where wood wins. Walnut, maple, oak, cherry, or even plywood can create a more personal and refined feel than generic plastic housings. Pair that with custom legends, oil or polyurethane finish, and keycaps that match your desk setup, and the result feels custom because it actually is.
The Core Parts of a Wooden Macro Keyboard
If you are planning your own DIY macro keyboard, think of the project in five layers: controller, switches, matrix, enclosure, and firmware. Each one matters, but none of them needs to be overly dramatic.
Microcontroller
The controller is the brain. Popular choices include RP2040-based boards and Teensy-style boards that can present themselves as USB keyboards. RP2040 boards are especially popular because they are powerful, affordable, and widely supported. They work beautifully for compact macro builds and can handle LEDs, encoders, displays, and key scanning without breaking a sweat.
Mechanical switches
This is the fun part where builders become philosophers. Linear, tactile, or clicky? Quiet and smooth, or loud enough to alert nearby wildlife? A macro keyboard is a perfect playground because you only need a handful of switches. You can splurge a little, mix styles, or choose switches based on the task. Some builders even reserve one heavy switch for an important action so accidental presses become less likely.
Matrix and diodes
Many compact keyboards wire keys in a row-column matrix to save pins. Instead of one microcontroller pin per key, the pad scans rows and columns to determine which switch is pressed. Diodes are commonly added to prevent false key presses when multiple keys are pressed at once. This is one of those invisible details that makes a build feel solid instead of haunted.
Rotary encoder
A rotary encoder is the “Oh, now we’re fancy” feature. It can control volume, zoom, scrolling, brush size, timeline movement, layer selection, or anything else your firmware can map. On a wood build, a nicely chosen knob adds both function and visual charm. In plain English: it makes the keyboard look smarter.
Case and keycaps
Wood is the star here. You can build a solid wood case, a layered plywood shell, or a hybrid structure with 3D-printed internal supports and a wooden outer frame. Keycaps can be standard MX-compatible caps, custom resin, or wooden caps with etched legends. If you want maximum personality, this is where it happens.
Choosing the Right Wood for a Macro Keyboard
Not every piece of wood wants to become a keyboard. Some boards are stable and pleasant to finish. Others behave like they were raised by chaos. For a small desk accessory, you want wood that machines cleanly, finishes well, and stays stable over time.
Good options
Walnut looks rich, premium, and dramatic without trying too hard. Maple feels clean and modern, especially in brighter workspaces. Cherry ages beautifully and develops character over time. Baltic birch plywood is less flashy but very practical, especially for layered cases or CNC-cut parts.
What to watch out for
Softwoods can dent more easily. Some porous woods stain unevenly if not conditioned. Thin pieces can chip if you rush cutting or drilling. Because a macro keyboard is small and handled often, surface prep matters more than people expect. If the case feels rough, blotchy, or unfinished, the whole build can look homemade in the wrong way. Charming handmade is the goal. “I found this in a garage behind a lawnmower” is not.
Finish matters
For small, intricate wood projects, hand sanding is often the safer move. Sand with the grain, remove dust between stages, and test stain on scrap before committing. Thin finish coats work better than one heavy coat that tries to solve everything at once. A satin clear coat, hard wax oil, or polyurethane can all work depending on the look and durability you want.
How the Build Process Usually Goes
A solid DIY macro keyboard build usually starts with the workflow, not the saw. Before you cut wood or solder anything, decide what the pad is supposed to do. A 12-key editing pad needs a different layout than a 9-key coding pad or a stream control board.
Step 1: Define your use case
Write down the actions you use most. Maybe it is cut, ripple delete, zoom in, zoom out, marker, play-pause, export, and mute. Maybe it is copy, paste values, screenshot, terminal, browser dev tools, and a text-expansion macro. Build around your behavior, not around an abstract idea of productivity.
Step 2: Design the layout
Once you know the functions, choose the key count and arrange the layout so the most-used commands are easiest to hit. If you use an encoder, position it where your fingers can reach it naturally. Macro keyboards are tiny, so ergonomics matter quickly.
Step 3: Wire or assemble the electronics
You can hand-wire a small matrix or use a PCB-based approach. A PCB is cleaner and easier to repeat. Hand-wiring is flexible and deeply satisfying if you enjoy projects that make you feel like a garage inventor in a movie montage. Just remember that neat wiring saves future-you from making mysterious eye contact with a multimeter at midnight.
Step 4: Program the firmware
This is where the hardware becomes useful. QMK is popular for advanced customization, including layers, macros, encoder mapping, and dynamic behavior. CircuitPython-based solutions are also approachable, especially for fast iteration and friendly tinkering. Start simple. Get each key working. Then add layers and fancy macros. Do not begin with a 19-step export chain unless debugging is your favorite hobby.
Step 5: Build and finish the wooden enclosure
Cut the case, dry-fit the hardware, sand carefully, test the finish on scrap, and only then commit. If you are using wooden keycaps or engraved legends, finalize those after you are certain the functions will not change. Nothing humbles a maker faster than a beautifully engraved key that now does the wrong thing forever.
Best Uses for a DIY Wooden Macropad
The beauty of a macropad is that it can be wildly specific. It does not need to serve everyone. It just needs to save you time.
For video editing
This is one of the most natural uses. Editing software is packed with shortcuts, and a dedicated pad can make cutting, trimming, jumping, zooming, and scrubbing feel faster and less tiring. A rotary encoder is especially handy here.
For streaming and content creation
Scene switches, mute toggles, sound effects, clip markers, recording controls, and app launching can all live on a small pad next to your main keyboard. It is like having a tiny studio assistant who never asks for coffee.
For design and photo work
Brush sizes, tool changes, zoom controls, undo-redo, and export functions are excellent candidates. If you work in Photoshop, Illustrator, Lightroom, or similar apps, a dedicated macropad can reduce repetitive strain and mental friction.
For coding and office work
Macros for terminal commands, snippets, navigation shortcuts, text templates, meeting controls, and window management can make daily work smoother. Even simple functions like opening common apps or inserting repeated text can justify the build.
Common Mistakes That Make a Nice Build Feel Not So Nice
Most DIY macro keyboard mistakes are not fatal, but they do have a way of teaching expensive little lessons.
Skipping the prototype
If you jump straight to the final wood case without checking fit, spacing, and hand feel, there is a decent chance you will discover a problem after the finish is already beautiful. Prototype in cardboard, foam, acrylic, or 3D print if you can. Your future self will clap politely.
Choosing looks over usability
A gorgeous layout that feels awkward will annoy you every day. The best desk accessory is the one you actually use.
Going too complex too soon
Start with a smaller build. Get the keys working. Add one layer. Add one encoder function. Then grow from there. A compact project can snowball into a miniature operating system if you let it.
Rushing the wood finish
Dust, uneven stain, and heavy coats can ruin the visual payoff. Small wood projects reward patience. Sand carefully, wipe off dust, apply thin coats, and resist the urge to “just fix it with one more wet coat.” That is how regrets become glossy.
Why This Project Has Staying Power
DIY trends come and go, but a wooden macro keyboard has real staying power because it solves a real problem. It reduces repetitive motions, speeds up workflows, and can evolve as your needs change. You are not buying a trendy gadget that will collect dust next to an abandoned ring light. You are building a tool that can be remapped, rebuilt, refinished, and improved over time.
That is what makes the “DIY Macro Keyboard Wood Be Nice” idea so appealing. It is not just about showing off a handmade object. It is about creating a compact tool that feels tailored, tactile, and personal. It looks better than a generic plastic pad, teaches useful skills, and makes your setup feel more intentional. Also, if someone asks where you bought it, the answer “I made it” never gets old.
Builder Experiences: What a Wooden DIY Macro Keyboard Teaches You
The first thing many builders learn is that a macro keyboard is small only in size. In every other sense, it is a full project. It asks you to think about electronics, ergonomics, case design, materials, finishing, and software logic all at once. That sounds intense, but it is exactly why the experience is memorable. You are not just assembling parts. You are translating your workflow into an object.
One common experience is the shock of how quickly a simple idea gets personal. You begin by saying, “I just want a few shortcut keys.” A few hours later you are debating whether the top-left button should be undo, save, or mute, and whether the encoder should control timeline zoom or system volume. Somewhere in the middle of that, you realize the project is not really about the keyboard. It is about understanding how you work.
Another frequent lesson is that prototyping saves sanity. Builders who start with cardboard templates, rough 3D-printed shells, or unfinished scrap wood usually end up happier than the ones who go straight into premium walnut like they are starring in a confidence documentary. Tiny differences in spacing, knob placement, and typing angle matter a lot on a device this small. The first mock-up may look ugly, but it teaches you where your fingers naturally land. That information is gold.
Then comes the wood itself, which is where the romance and the reality finally meet. Wood looks incredible, but it has opinions. Grain direction matters. Tear-out happens. Stain can turn moody. A finish that looked perfect on scrap may suddenly look darker on the final piece, as if the project decided to age ten years overnight. Builders often discover that patience with sanding and finishing is what separates a decent result from a desk piece they genuinely feel proud of.
Soldering is another interesting chapter. On paper, a small macropad seems less intimidating than a full keyboard, and that is true. But it is still enough to teach humility. One backwards diode, one cold joint, or one swapped row and column can turn a clean build into a delightful detective story. The good news is that troubleshooting a small pad is manageable. You learn to check continuity, inspect joints, and think systematically. It is frustrating in the moment and weirdly satisfying once solved.
Programming the pad often becomes the turning point. Before firmware, it is a pretty object. After firmware, it becomes your tool. This is where builders feel the biggest reward. The first time a hand-built key sends a shortcut exactly as intended, it feels like a tiny magic trick. The first time a second layer works, or the encoder scrolls precisely the way you wanted, the project stops being theoretical. It becomes useful in a very concrete, everyday way.
Many people also discover that the project keeps evolving after it is “done.” They change labels. They swap switches. They tweak the layer logic. They refinish the case six months later because apparently that is who they are now. A wooden macro keyboard invites iteration because it sits right in front of you every day. If something feels off, you notice quickly. If something works brilliantly, you appreciate it constantly.
And that may be the best experience of all: the keyboard earns its place. It is not a novelty for one weekend. It becomes part of the rhythm of editing, designing, coding, gaming, or working. Your hand reaches for the encoder without thinking. Your favorite shortcut sits under a finger like it was always meant to be there. That is when the project really succeeds. Not when it photographs well, though that helps. It succeeds when it quietly makes your day easier.
So yes, building a wooden macro keyboard teaches practical skills. It teaches patience, precision, and problem-solving. But it also teaches a subtler lesson: tools feel better when they reflect the person using them. A DIY macropad is a small reminder that productivity does not have to look boring. Sometimes it can look like polished wood, etched legends, and a tiny knob that makes you grin every time you turn it.
Conclusion
A DIY wooden macro keyboard is one of those projects that hits a rare sweet spot. It is useful enough to justify the effort, customizable enough to stay interesting, and beautiful enough to feel special long after the build is finished. If you choose the right controller, map the right shortcuts, respect the sanding process, and design around your actual workflow, you can create a tool that is equal parts craftsmanship and convenience.
In a world full of disposable accessories, a wooden macropad feels refreshingly deliberate. It is compact, programmable, tactile, and personal. And yes, wood really does make it nicer.




