Table of Contents >> Show >> Hide
- Why Full Wall Industrial Pipe Shelves Are Worth the Effort
- Before You Build: Think Like a Designer and a Practical Person
- Materials That Make Sense
- Tools You Will Probably Need
- How to Build DIY Full Wall Industrial Piping Shelves
- Design Tips That Make the Finished Wall Look Custom
- Common Mistakes to Avoid
- Where These Shelves Work Best
- What It Costs and Whether It Saves Money
- The Real Experience of Building Full Wall Industrial Pipe Shelves
- Final Thoughts
If you have ever looked at a blank wall and thought, “You know what this room needs? More drama, more storage, and a tiny bit of workshop swagger,” then DIY full wall industrial piping shelves might be your kind of project. They are bold, functional, customizable, and just rugged enough to make guests assume you own at least one flannel shirt and a favorite drill bit.
A full wall shelf system made from industrial pipe and wood has a special kind of charm. It feels custom without looking precious. It is practical without being boring. And unlike flimsy flat-pack furniture that starts wobbling when you place a third hardcover on it, a well-built pipe shelf wall can look like it belongs in a stylish loft, a hardworking home office, a cozy library corner, or a kitchen that means business.
This guide walks through how to plan, design, build, and finish DIY full wall industrial piping shelves with confidence. We will cover layout, materials, tools, installation tips, styling ideas, and the common mistakes that turn a dream shelving wall into a weekend-long argument with a level.
Why Full Wall Industrial Pipe Shelves Are Worth the Effort
There are a lot of shelf options out there. Floating shelves look sleek. Bracket shelves are classic. Modular systems are convenient. But industrial piping shelves have one big advantage: presence. They do not just hold stuff. They define the room.
The combination of raw or black metal pipe and warm wood shelves creates a look that is equal parts workshop, warehouse, and “yes, I absolutely arranged those books by color on purpose.” That contrast is why this style works so well in modern farmhouse, urban industrial, rustic, minimalist, and even traditional homes that need a little edge.
Another major win is flexibility. You can build shelves from floor to ceiling, wall to wall, around a desk, over a sofa, beside a fireplace, or across a home office backdrop. You can make them display-focused, storage-heavy, book-friendly, or part bookshelf and part command center. In other words, they are less “one-size-fits-all” and more “build exactly what your weird wall needs.”
Before You Build: Think Like a Designer and a Practical Person
Start with the wall, not the pipe
The wall decides a lot. Measure the full height, the full width, the baseboards, outlet locations, switches, vents, windows, trim, and anything that might interfere with your layout. A shelf plan that looks perfect on paper can get very humble very quickly when it meets an outlet in the real world.
Next, think about what the shelves need to hold. Books are heavy. Plants are sneaky heavy. Storage bins are fine until someone loads them with old magazines, power banks, and mysterious cables from 2014. Decorative objects are usually lighter, but the overall weight still matters when you are building a full wall unit.
Decide what kind of “full wall” you mean
Some people want a dramatic library wall with six or seven long shelves. Others want a mixed-use system with open sections, lower cabinets, a desk niche, or space for a television. There is no single right layout, but there is a right layout for your room.
Here are three smart approaches:
- Display wall: ideal for decor, framed art, baskets, and plants.
- Book wall: tighter shelf spacing, more support points, and deeper planning for weight.
- Work wall: combines shelving with a desk, printer station, or closed storage below.
Materials That Make Sense
Industrial pipe shelving looks straightforward, but the materials you choose will affect cost, strength, and style. The basics are simple: pipe, fittings, wood, hardware, and finish.
Pipe and fittings
Most DIY builders use black pipe or galvanized pipe with threaded fittings. Black pipe gives that classic industrial look right away. Galvanized pipe looks brighter and a little cleaner. Either can work, depending on the room and your taste.
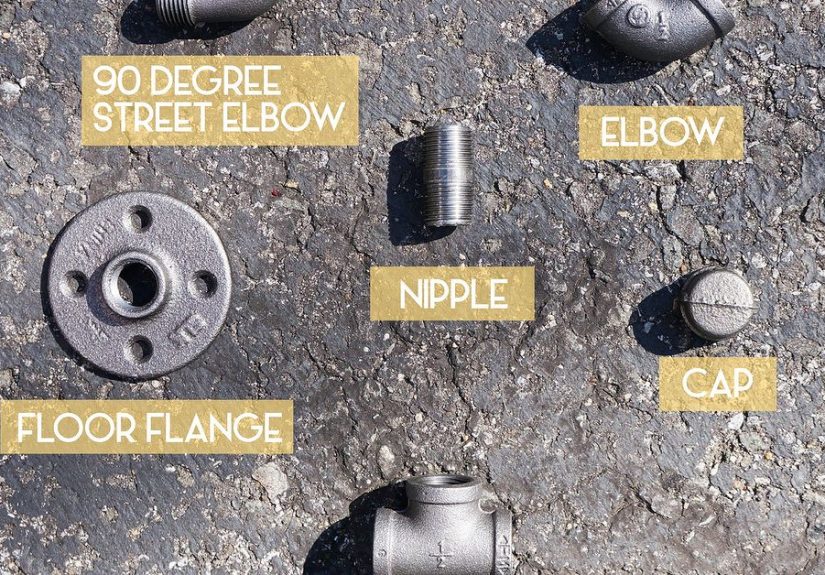
Typical fittings include flanges, elbows, tees, couplings, caps, and nipples in various lengths. If you want a heavier visual profile, go larger. If you want something less chunky, go smaller. The best approach is consistency. Mixing sizes without a plan can make the whole thing look like you built it from leftovers behind a hardware store.
Wood shelves
Wood is where the style softens. Pine is budget-friendly and easy to work with. Oak is tougher and more refined. Common boards are convenient, while plywood can be a smart option for long runs when finished well. Reclaimed wood brings character, knots, grain variation, and that delicious “I have a story” energy.
For a full wall system, thicker shelves usually look more substantial. Thin boards can work, but they often feel visually underdressed next to metal pipe. If the wall is large, give the shelves enough thickness to hold their own.
Finishes
You can stain the wood dark for a moody industrial vibe, go medium walnut for a warm balanced look, or keep it natural for something more modern. A protective topcoat matters, especially in kitchens, offices, and busy family spaces. For metal, some people leave the pipe raw-looking; others clean and coat it for a more polished finish.
Tools You Will Probably Need
- Tape measure
- Stud finder
- Level
- Drill and bits
- Driver bits or impact driver
- Pipe wrench or adjustable wrench
- Sander or sanding block
- Screws and heavy-duty anchors if needed
- Wood finish supplies
- Pencil, patience, and at least one moment of “why is this wall not square?”
How to Build DIY Full Wall Industrial Piping Shelves
1. Map the studs first
This is the grown-up part of the project, and it matters. Locate every stud across the wall and mark them clearly. Full wall shelving should be anchored into studs whenever possible. That is what turns the unit from “cute” into “solid.” If you have sections where a stud does not line up with your ideal design, adjust the layout before drilling. The wall does not care about your sketch.
2. Create a full-size layout
Use painter’s tape on the wall to mock up shelf positions, widths, and spacing. This is one of the easiest ways to catch bad proportions before you buy or cut materials. Step back. Look at it from the doorway. Sit down and view it from the sofa or desk. If the shelves feel too crowded or too far apart, now is the time to fix it.
3. Build your pipe sections
Pre-assemble your pipe frames or vertical supports on the floor. Keep the design simple unless you genuinely enjoy solving metal puzzles. Straight vertical runs with flanges and horizontal support arms are usually the easiest path to a clean full wall look.
If your system spans a wide wall, symmetry helps. For example, repeating support columns evenly across the wall creates rhythm and keeps long shelves from feeling droopy or awkward. A good industrial shelf wall often looks intentional because the spacing is consistent, not because it is complicated.
4. Cut, sand, and finish the wood
Sand every board thoroughly. Round over rough edges if you want a softer finished look. Test your stain on a scrap piece first, because the wood you imagined in your head and the wood in your hands are not always the same species emotionally.
Once you like the color, apply your finish evenly and allow it to dry fully between coats. Do not rush this part. Half the reason great shelving looks expensive is because the wood finish looks calm, even, and deliberate rather than sticky and chaotic.
5. Clean the pipe before final install
Many DIYers discover that black pipe can arrive with oil, residue, or grime. Clean it before installation, especially if you plan to topcoat, paint, or use the shelves in living areas where no one wants their books smelling like a machine shop. This one step makes the entire project feel more finished.
6. Install the wall-mounted supports
Mount your flanges or other support points carefully, checking level constantly. Full wall shelving magnifies small errors. If the first section is off, the rest of the wall will happily continue the mistake in a straight line all the way across your room.
Pre-drill holes where appropriate. Tighten hardware securely, but do not overdo it. The goal is “firmly mounted,” not “I have fused this flange to drywall forever.”
7. Set the shelves and secure them
Once the pipe supports are installed, place the wood shelves and fasten them as needed from underneath or through discreet support points. Check level again. Then check it one more time because shelves have a remarkable ability to look level until you place a vase on them and suddenly the whole room feels emotionally tilted.
Design Tips That Make the Finished Wall Look Custom
Mix open space with filled space
A full wall shelf unit should not look like a warehouse inventory problem. Leave some breathing room. Group books, baskets, framed art, and objects so the eye has places to rest. Open shelving looks best when everything is not fighting for attention like contestants on a reality show.
Use repeated materials
Repeat the wood tone elsewhere in the room through frames, a desk top, a coffee table, or accent pieces. Repeat black or steel finishes through lighting, cabinet hardware, or chair legs. The shelves will feel connected to the room rather than dropped in from another zip code.
Plan for cords and clutter
If your full wall system includes electronics, speakers, printers, or charging stations, think ahead about cord routing. The best industrial shelf walls look effortless because the messy practical stuff was handled early.
Common Mistakes to Avoid
Going too shallow: A shelf that cannot actually hold books or baskets is basically a horizontal confidence issue.
Ignoring wall structure: If you build without considering studs and support points, you are not designing. You are gambling.
Using too few support columns: Long shelves need proper support, especially when they will carry books or storage bins.
Skipping finish prep: Unclean pipe and poorly finished wood can make a custom project look unfinished, even when the construction is solid.
Decorating every inch: Full wall shelving is dramatic enough on its own. Let it breathe.
Where These Shelves Work Best
One reason DIY full wall industrial piping shelves are so popular is that they work in more rooms than people expect.
- Living room: books, plants, sculpture, media storage, framed photos
- Home office: supplies, binders, equipment, awards, and a sharp video-call background
- Kitchen: dishes, glassware, cookbooks, pantry baskets
- Bedroom: books, decor, folded clothing, baskets
- Basement or loft: serious storage with serious style
In smaller rooms, a pipe-and-wood wall can still work beautifully if the styling is restrained and the color palette is kept clean. In larger rooms, it can become the anchor that makes the entire space feel finished.
What It Costs and Whether It Saves Money
This project can be budget-friendly or premium, depending on your choices. Pine boards and standard pipe fittings can keep costs reasonable. Hardwood, custom cuts, specialty finishes, and a giant wall will raise the total quickly. Still, a DIY build often gives you more size, more character, and more customization than store-bought shelving at a similar price point.
The real value is not just the material cost. It is getting a shelf wall that fits your space exactly. No awkward gaps. No weird proportions. No mass-produced unit that almost works but leaves two inches of disappointment on each side.
The Real Experience of Building Full Wall Industrial Pipe Shelves
Building a full wall of industrial piping shelves is one of those DIY experiences that starts with a burst of confidence and a cup of coffee and ends with you standing in the middle of the room, covered in sawdust, whispering, “Actually, this is going to look incredible.” It is not a one-hour project, and it is not a zero-frustration project, but it is deeply satisfying in a way that buying furniture rarely is.
The first thing most people notice is how physical the process feels. Pipe fittings are heavier than they look. Long boards suddenly become awkward the moment you try to carry them through a hallway without dinging a wall. And the second you begin laying out parts on the floor, the project stops being a cute online inspiration image and becomes a real build with real measurements and very real consequences for being “close enough.”
Then there is the surprisingly emotional relationship with the wall itself. Before this project, the wall was just there, minding its own business. Once you start building, it becomes a personality. Maybe it is not level. Maybe the studs are not where you hoped. Maybe an outlet lands exactly where your clean symmetrical layout wanted a vertical support. Suddenly you are negotiating with drywall like it owes you money.
But then the good part kicks in. You stain the boards, and the grain comes alive. You clean the pipe, tighten the fittings, and the structure starts to feel intentional. The first mounted section goes up, and the room changes immediately. Even before the styling, even before the books and baskets and framed prints, the project begins to create architecture. It gives the wall purpose.
One of the best experiences in this kind of build is watching something rough become refined. On day one, it is a pile of metal, lumber, screws, and uncertainty. By the end, it looks like a custom built-in with attitude. It has texture, scale, and presence. It feels substantial. Not delicate. Not temporary. Substantial. That matters.
There is also a practical thrill to using something you made every single day. You put a book on the shelf and know exactly what is behind it. You set down a planter and trust the support because you installed it yourself. You notice little details no one else sees, like the board you had to recut, the pipe fitting that took twelve years to thread correctly, or the shelf spacing you adjusted at the last minute that ended up making the whole wall look better.
And yes, there are classic DIY moments. The trip back to the hardware store because one fitting is somehow the wrong size. The level that reveals a problem after you were emotionally ready to declare victory. The debate over whether the stain is “rich walnut” or “slightly dramatic toast.” Those moments are part of the charm. They are mildly annoying in real time and strangely funny afterward.
What surprises a lot of people is how much a full wall shelving build affects the feel of a room. It does not just add storage. It creates rhythm, verticality, and intention. It makes the room feel designed. Even casual clutter looks better when it has a proper home. That stack of books becomes a collection. Those baskets become organization. That random ceramic object you bought because it “spoke to you” suddenly looks curated instead of confusing.
In the end, DIY full wall industrial piping shelves deliver more than storage. They give you a project with a visible payoff, a room with stronger identity, and the kind of low-key bragging rights every DIYer enjoys. Not the loud kind. Just the quiet, deeply satisfying kind that says, “Oh, those shelves? Yeah, I built them.”
Final Thoughts
DIY full wall industrial piping shelves are one of the best projects for homeowners and renters who want custom-looking storage with personality. They blend raw materials with smart planning, and when done well, they feel like a built-in feature rather than an afterthought. The key is simple: respect the wall, plan the weight, finish the wood properly, clean the metal, and keep the design consistent.
Do that, and you will end up with a shelf wall that looks stylish, works hard, and makes every room feel more intentional. Also, as a bonus, you get to tell people you built it yourself, which is basically free decor.




